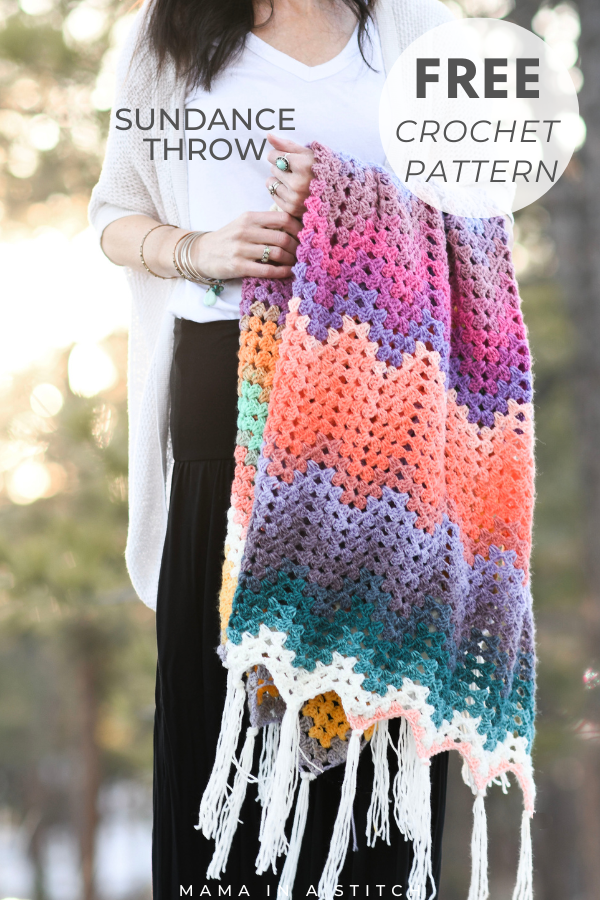
Sundance Granny Ripple Stitch Blanket
This “Sundance Throw” is FULL of gorgeous, happy color! It is such an easy stitch repeat, and there are no color changes. Yay! Read on…
See the full free crochet pattern below, or you may choose to purchase the ad-free printable from my Etsy shop HERE or the kit from Lion Brand Yarn HERE.
If you follow me, you know that I like simple, but I also get bored easily. There’s no getting bored with this pattern because it keeps you waiting for the next color change yet it’s easy enough to make while you’re watching for fave show.
I’d say it’s simple enough for adventurous beginners as long as you check out the stitch tutorial below. Also, look at a few granny ripple stitch videos on Youtube. It’s a no-no for brand new baby beginners, but easy enough if you’ve done a few crochet projects. 🙂
LOOK at all this color…..
There were questions about what colorway was used in some of my sneak peeks on social media, and as you now know, it’s not just one. The trick is to use the three that go together to get a lot of color. 🙂
The granny ripple stitch used in this pattern is cool because it has a vintage yet modern feel to it, and it’s a good lightweight option for warmer months or climates.
All these granny stitches have come roaring back into style which is awesome, right? You might remember the Nora Granny Square Blanket, Magnolia Tote Bag, Endless Eyelets Cardigan, all featuring fun colors and a variation of granny stitch.
I feel like this one definitely has a boho vibe with the fringe and the festive colors. Between the colors and the stitches, it’s just a fun little blanket.
I’ve shared how to crochet the granny ripple stitch below with a little picture tutorial, so definitely check that out (scroll on down to the end of the pattern). Check out my suggestions in the “Notes” section of the pattern about crocheting a practice swatch first so you can iron out any issues before you start on your big blanket!
OH! And you can easily make this blanket any size you like! I’ve included notes on how to adjust the stitch count so you can customize the width. Then you simply crochet for as long as you want it to be!
What Yarn do I Use For This Granny Ripple Stitch Blanket?
Here’s the fun part. You can use any worsted weight or lightweight yarn that you like! I used three separate colorways of Lion Brand Mandala so that there is a TON of color. It’s so nice because you just work through each skein of yarn. No color changes, no weaving in ends, and lots of fun stripes. Have fun and get creative when you’re choosing your colors!
What Stitch Do I Use For This Crocheted Blanket?
The stitch used is the Granny Ripple Stitch, and you can see a picture tutorial on how to crochet it by scrolling down.
Okay, are we ready for the free pattern?
Remember, you can grab the printable version from the Etsy shop here too (includes the picture tutorial as well)
Sundance Throw Granny Ripple Stitch Blanket Crochet Pattern
Description:
Bring color and happy vibes into your space with this gorgeous Sundance Throw! While it’s the perfect project to welcome spring and summer, this cheerful throw will be a comfort year round. There are no color changes, and it’s an easy pattern to make and memorize. Completely customizable, choose bright colors for a boho vibe, or more subdued tones for a
cool, classic look. Have fun!
Materials:
2 Lion Brand Mandala in Pixie light #3 yarn 590 yds 150 g/skein Convenient kit and yarns HERE
1 Lion Brand Mandala in Pegasus light #3 yarn 590 yds 150 g/skein
1 Lion Brand Mandala in Wood Nymph light #3 yarn 590 yds 150 g/skein
Pattern uses approximately 500 g
US Size H 5.0 crochet hook
Scissors
Tapestry needle to weave in ends
Size (approximate):
40” X 48”
Gauge:
Approximately 18 dc sts and 6 rows in 4” X 4”
Pattern Notes:
There is no need to change colors in this pattern. Simply work through each skein of yarn that you’ve chosen until the blanket is your desired length. ☺ This pattern uses the Granny Ripple Stitch. There are many video tutorials that you can find online for this stitch by conducting a simple search.
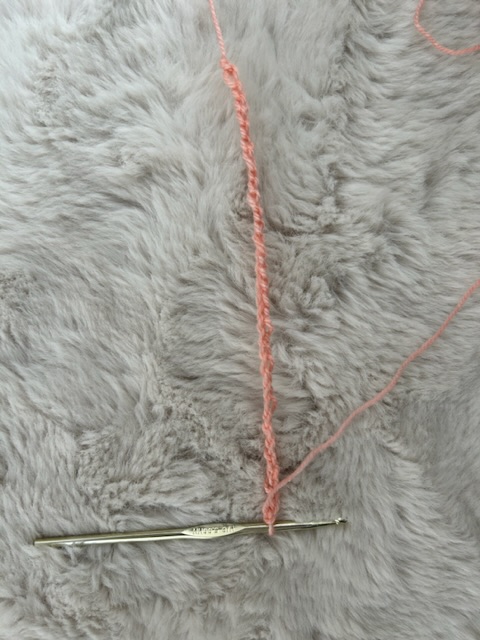
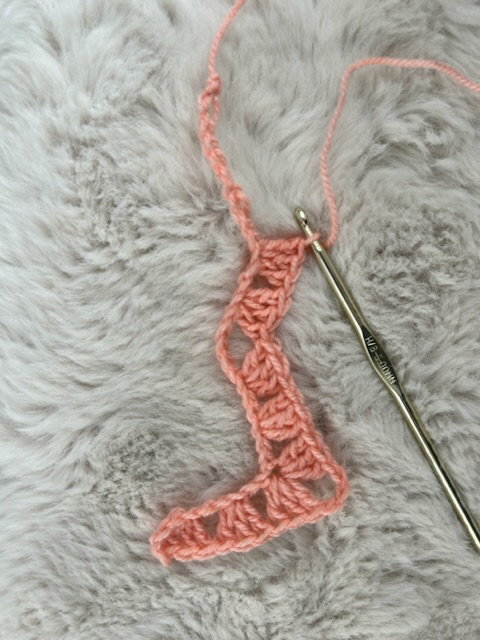
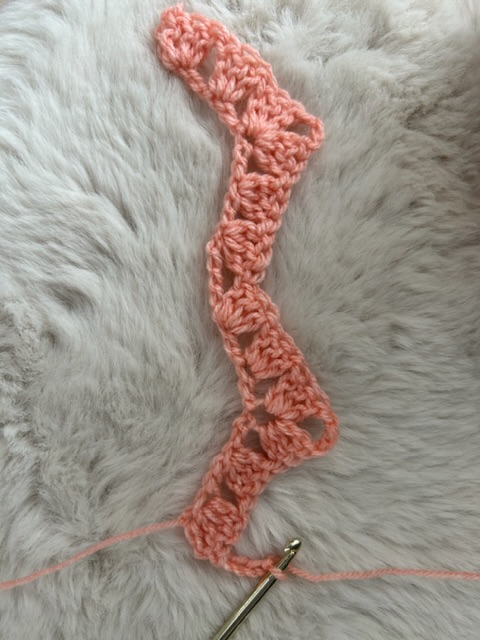
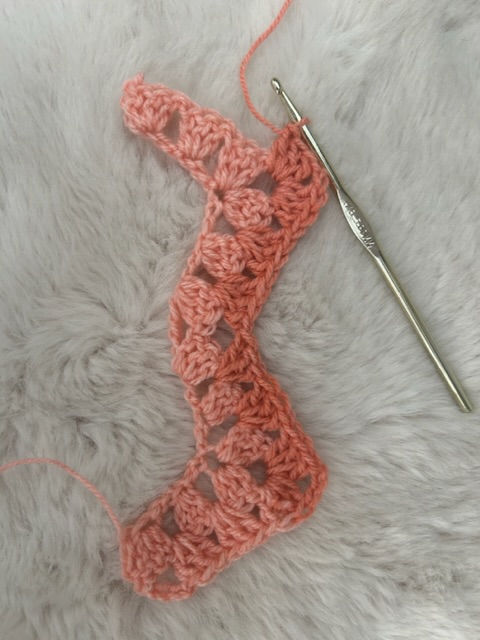
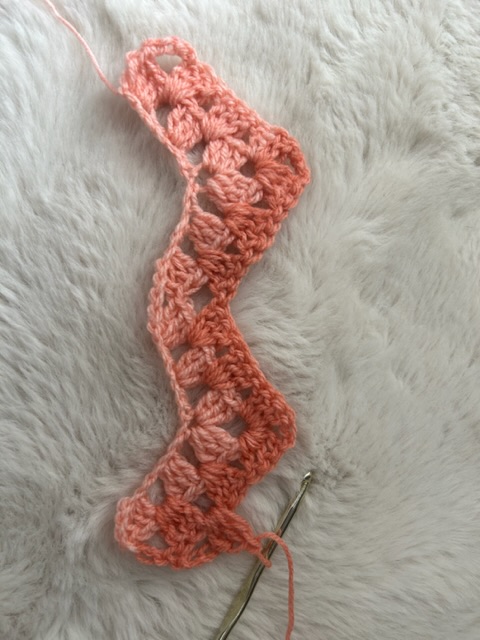
**You may choose to practice the pattern on a small swatch before beginning the full blanket. Simply chain 36 and work the pattern as written. See pictures of a practice swatch at end of pattern.
To adjust the width of the blanket, simply start with a chain in a multiple of 18. To make the
blanket longer or shorter, simply crochet for more or fewer rows.
Have fun!
Abbreviations (US) & Skills:
ch – chain
dc – double crochet
st – stitch
sl st – slip stitch
sk – skip
*If you’ve chosen to use the colors in the pictured blanket, begin with the color Pixie, followed by Wood Nymph, and lastly Pegasus (or make it your own by putting the colors in any order you like!)
You may add additional length by using another skein of Pixie after Pegasus (saving yarn as
desired for tassels, fringe, or poms)
*Work through each skein of yarn you’ve chosen until the blanket reaches your desired length
Chain 180
Row 1 3dc in 5th ch from hook, sk 2 ch sts, 3dc in next ch, sk next 2 chs, * (3 dc, ch 3, 3 dc) in next ch, sk next 2 chains, 3 dc in next ch, sk 2 chs, 3 dc in next ch, ** skip next 5 chains, 3 dc in next ch st, skip next 2 ch sts, 3 dc in next ch, skip next 2 chs, repeat from *, then ending at **, 1 dc in last ch.
Row 2 Ch 4, turn, {3dc in sp between 2 groups of 3 dc sts} twice. *(3dc, ch 3, 3dc) in next ch 3 sp, {3 dc in sp between two 3dc groups} twice, sk the next space between next two 3dc groups, {3 dc in sp between two 3dc groups} twice. Repeat from *, ending at **, sk next 3 dc, dc in top of turning ch.
Repeat row 2 until blanket reaches your desired length.
Tie off and weave in ends.
That’s it!
Optional: Use additional yarn to add length to your blanket, or make tassels or poms to add to your blanket! The pictured blanket used the white yarn out of the 2nd skein of “Pixie” skein to make small fringe along the edges. You may use any colors or color that you like.
Granny Ripple Stitch Picture Tutorial
Here you can see how I to crochet your practice swatch!
I sure hope you love this stitch and blanket as much as I do! It’s been so much fun to use more color over the last year.
Have fun my friends!
XO
Jessica
More Granny Stitch Patterns To Try:
How To Crochet The Granny Stitch
Yellowbrick Road Blanket Crochet Pattern
Nora Granny Square Throw Blanket Crochet Pattern
Lastly, you can check out even more blankets here:
Alpenhaus Throw Ripple Moss Stitch Blanket Crochet Pattern
Rolling Hills Throw Ripple Stitch Blanket Crochet Pattern
30 Easy and Beautiful Crochet Blanket Patterns
Mandala Yarn Crochet Blanket Pattern – Folklore Throw
Sunny Blooms Flowers & Daisies Blanket Pattern
This post sponsored by Lion Brand Yarn. All opinions are my own.

Jessica,
I have a question. I love to crochet the Granny Stitch, but generally knit things, because in crochet, I have a terrible time keeping my edges straight. Do you have a video lesson on that perhaps?
Thanks.
I really do like your items and am doing the ‘Billowy Quilted Throw Blanket” right now. I like the pattern, but made the mistake of using a varigated/ombre color yarn which doesn’t allow the ‘pattern’ to show so clearly. It’s still pretty.