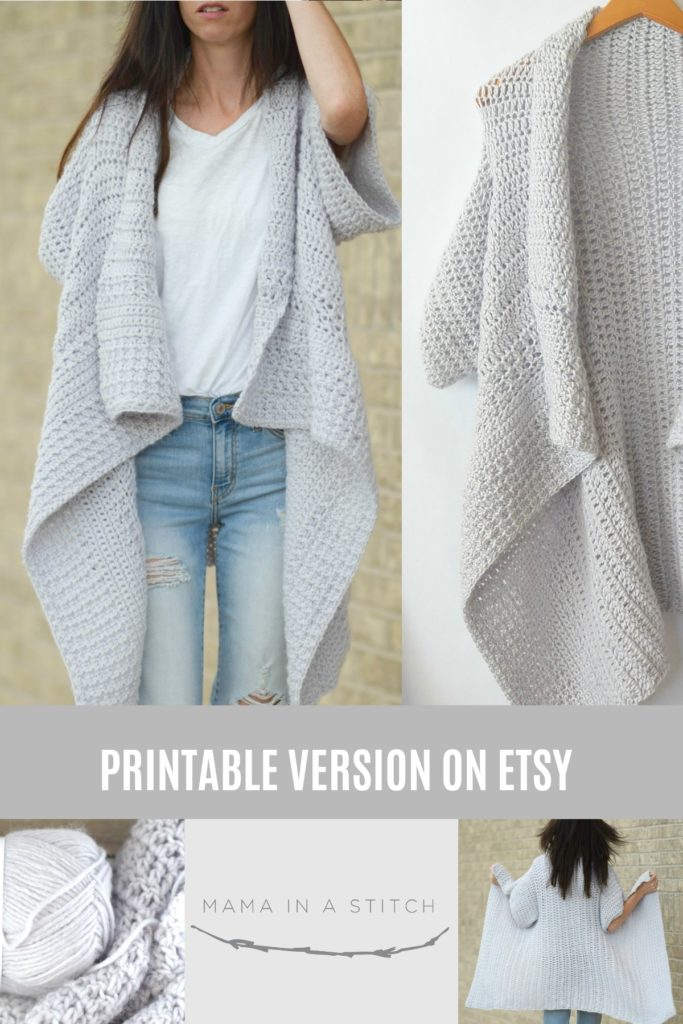
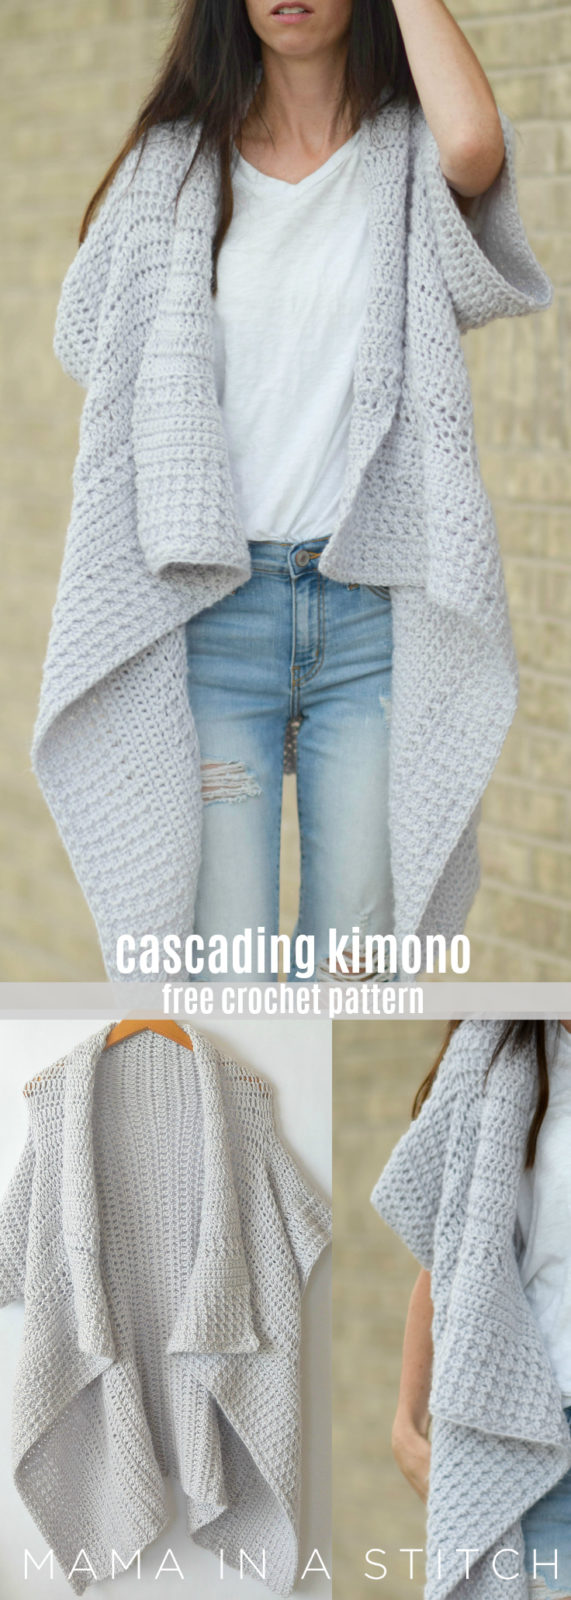
Cascading Kimono Cardigan Crochet Pattern
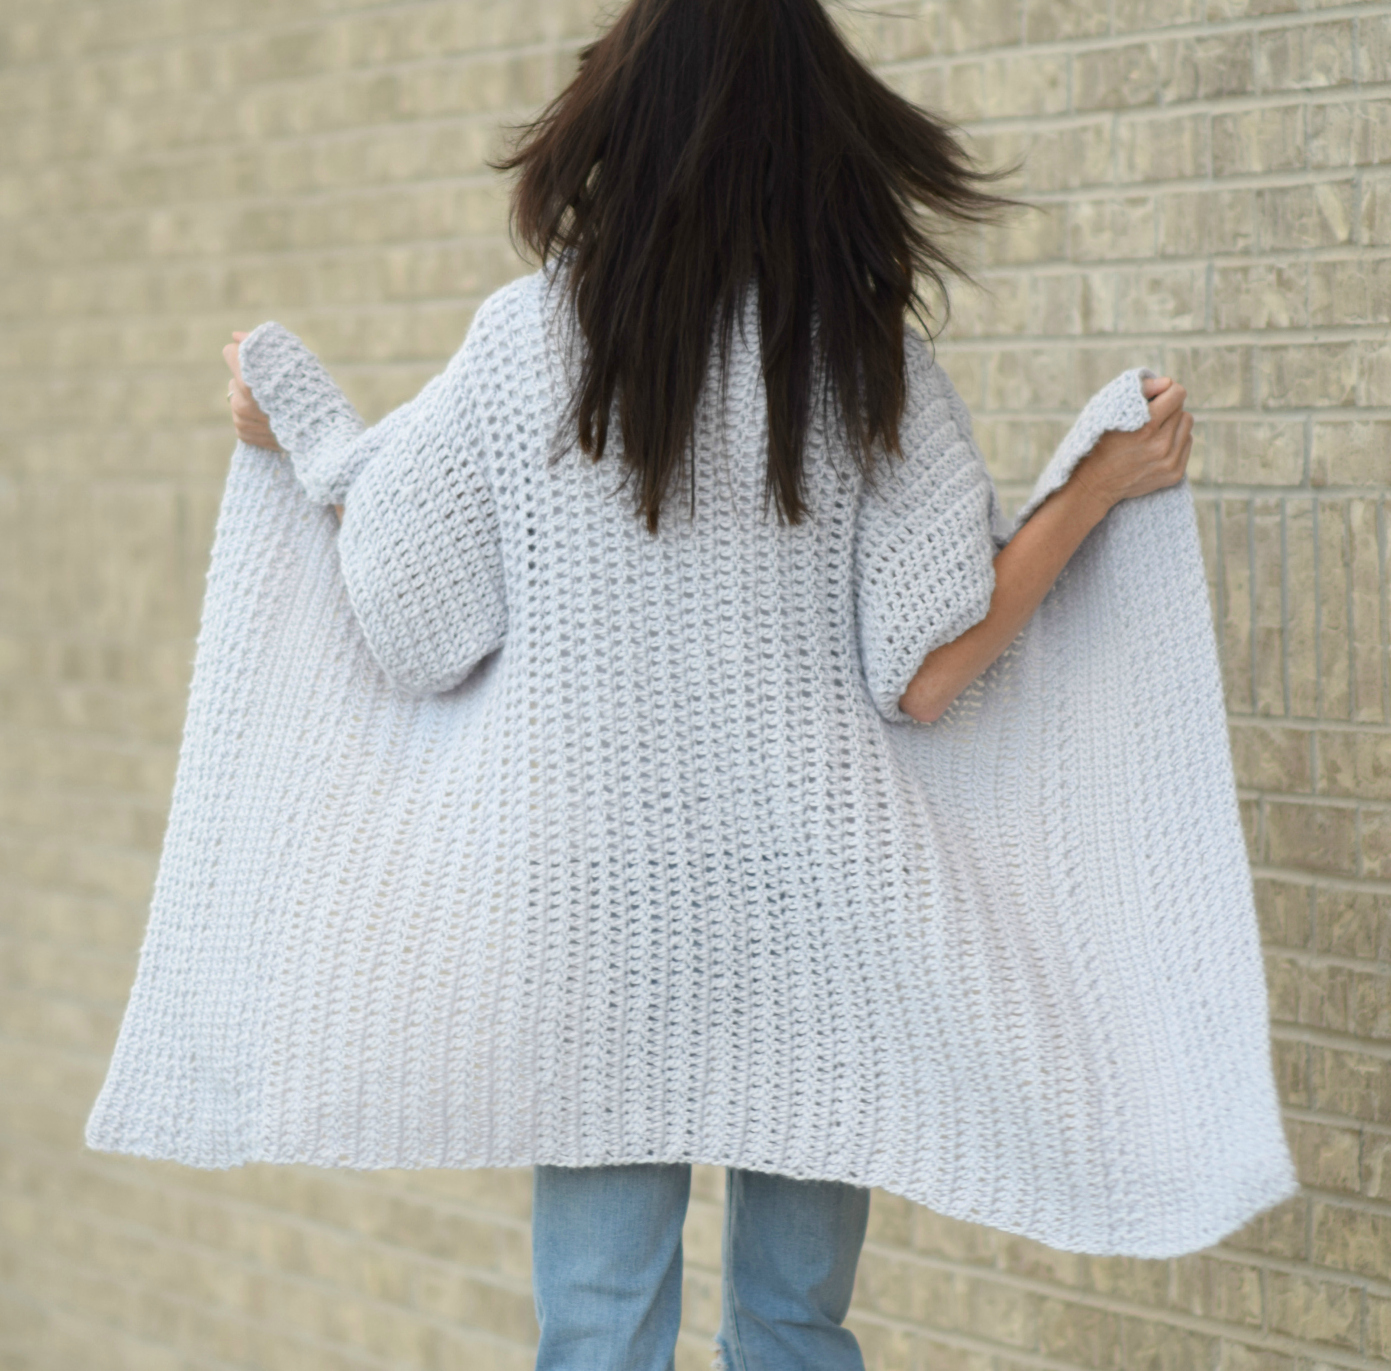
Some of you may have seen that Lion Brand recently created a full crochet kit for this Cascading Kimono Cardigan Crochet Pattern and I’m happy to now share the pattern for free here on the blog as well! I LOVE how this crocheted kimono turned out. It’s easy, breezy, flowy (is that a word?) and a lot of fun to crochet. As with most of my projects and patterns, this has a super simple construction but the look is flattering and relaxed. If you follow my blog, you know I’ve made a trillion blanket sweaters by now (hehe), so it was fun to change things up and make something a little different and with a little more shape to it. But don’t be scared of the word “shape” – there’s no difficult shaping or crazy stitches here. And like I said, this particular cardigan crochet pattern is super easy. Be sure to scroll all the way down to see the picture tutorial on how simple this thang is put together! 🙂
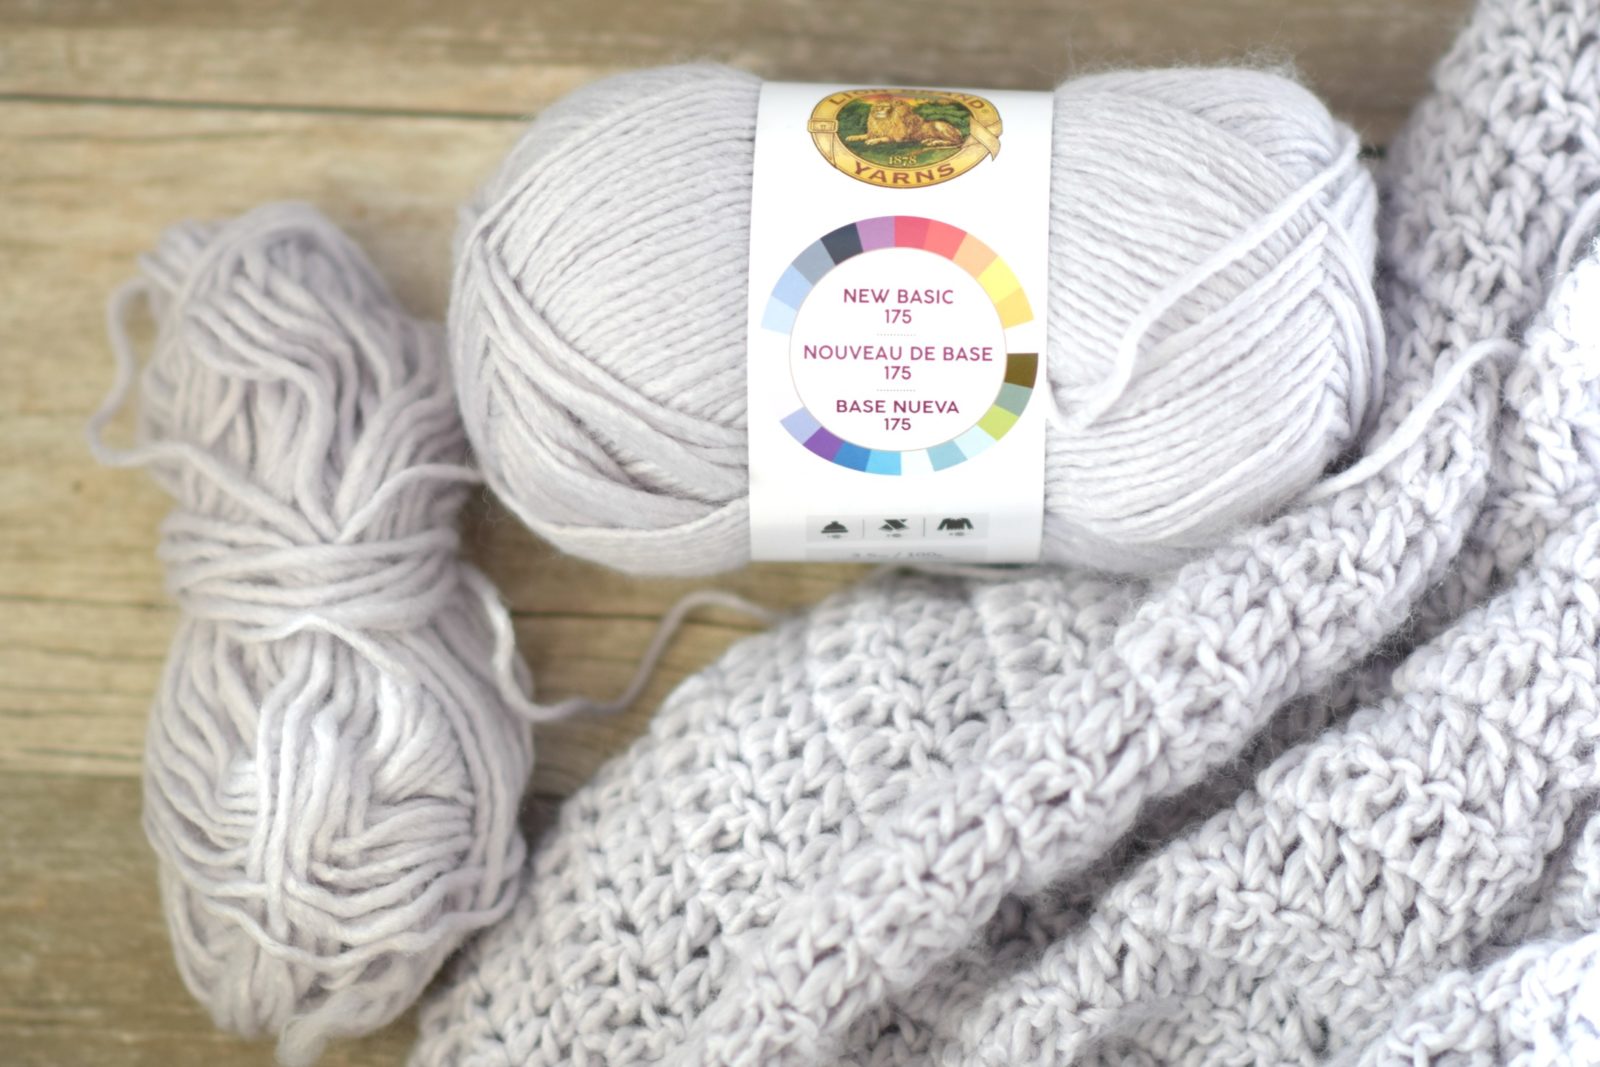
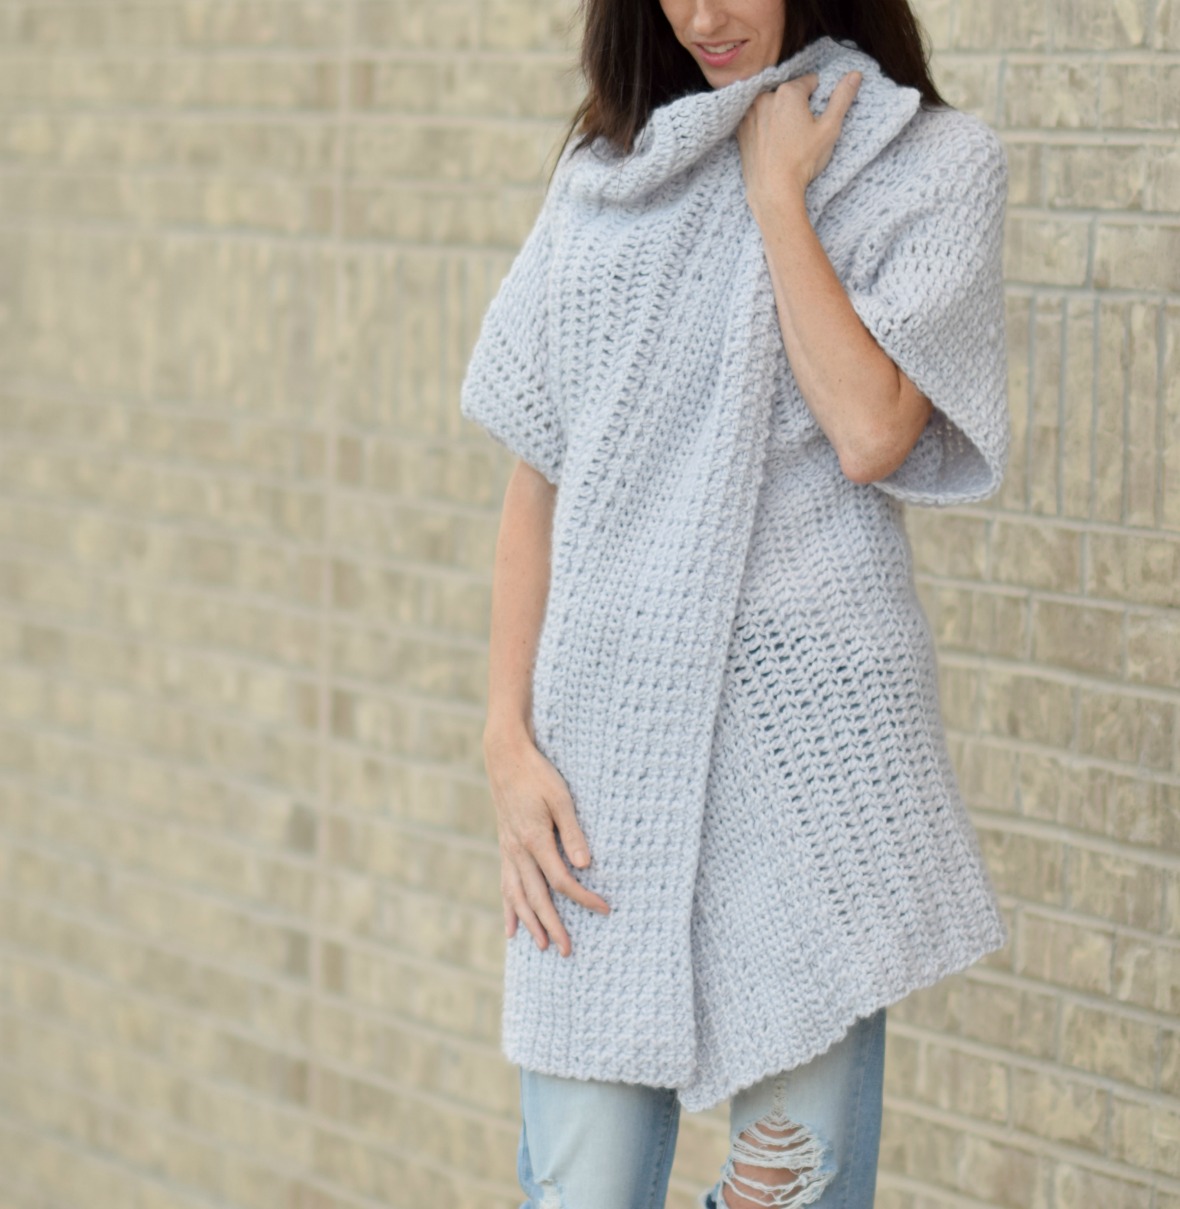
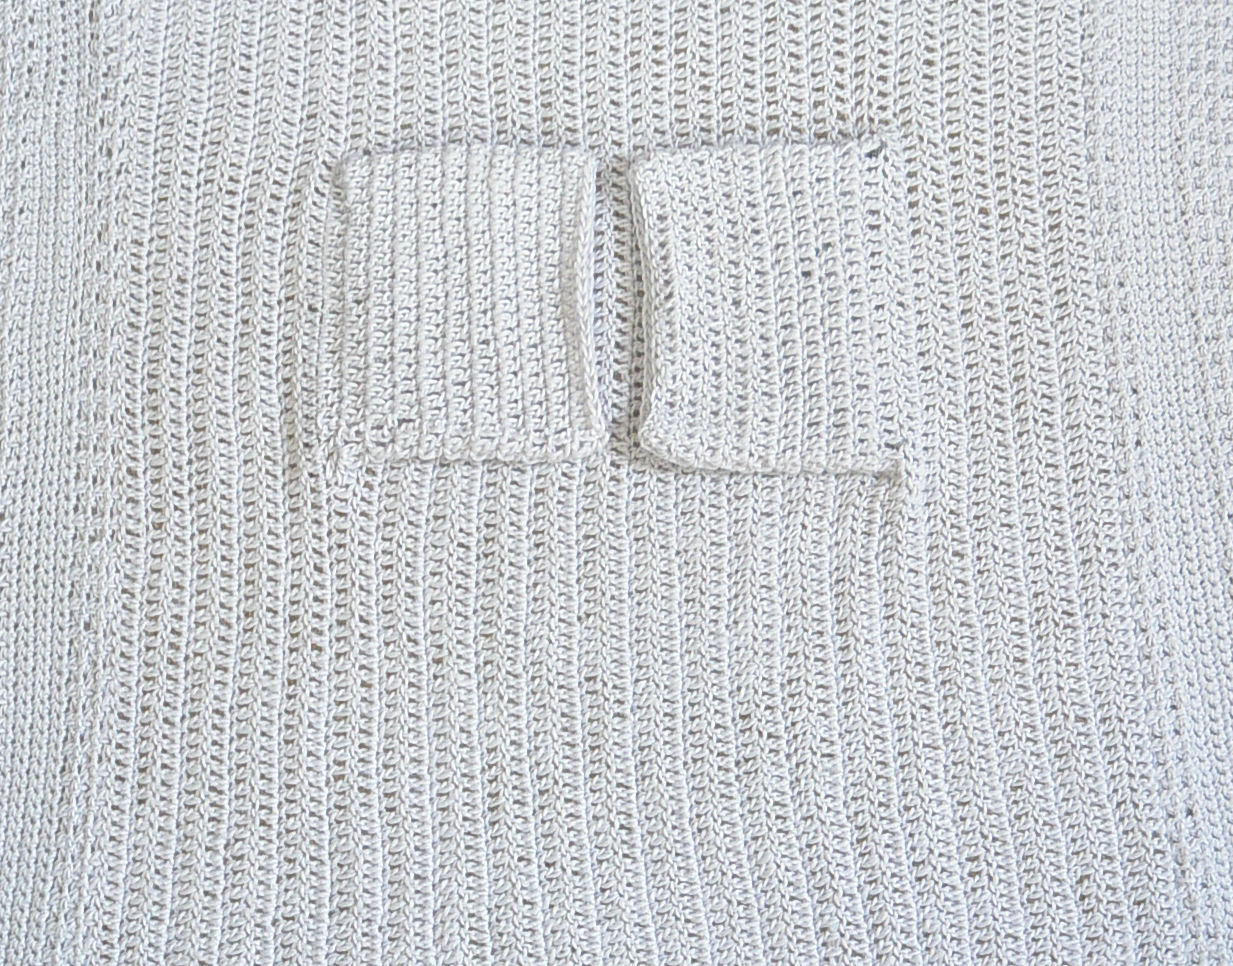
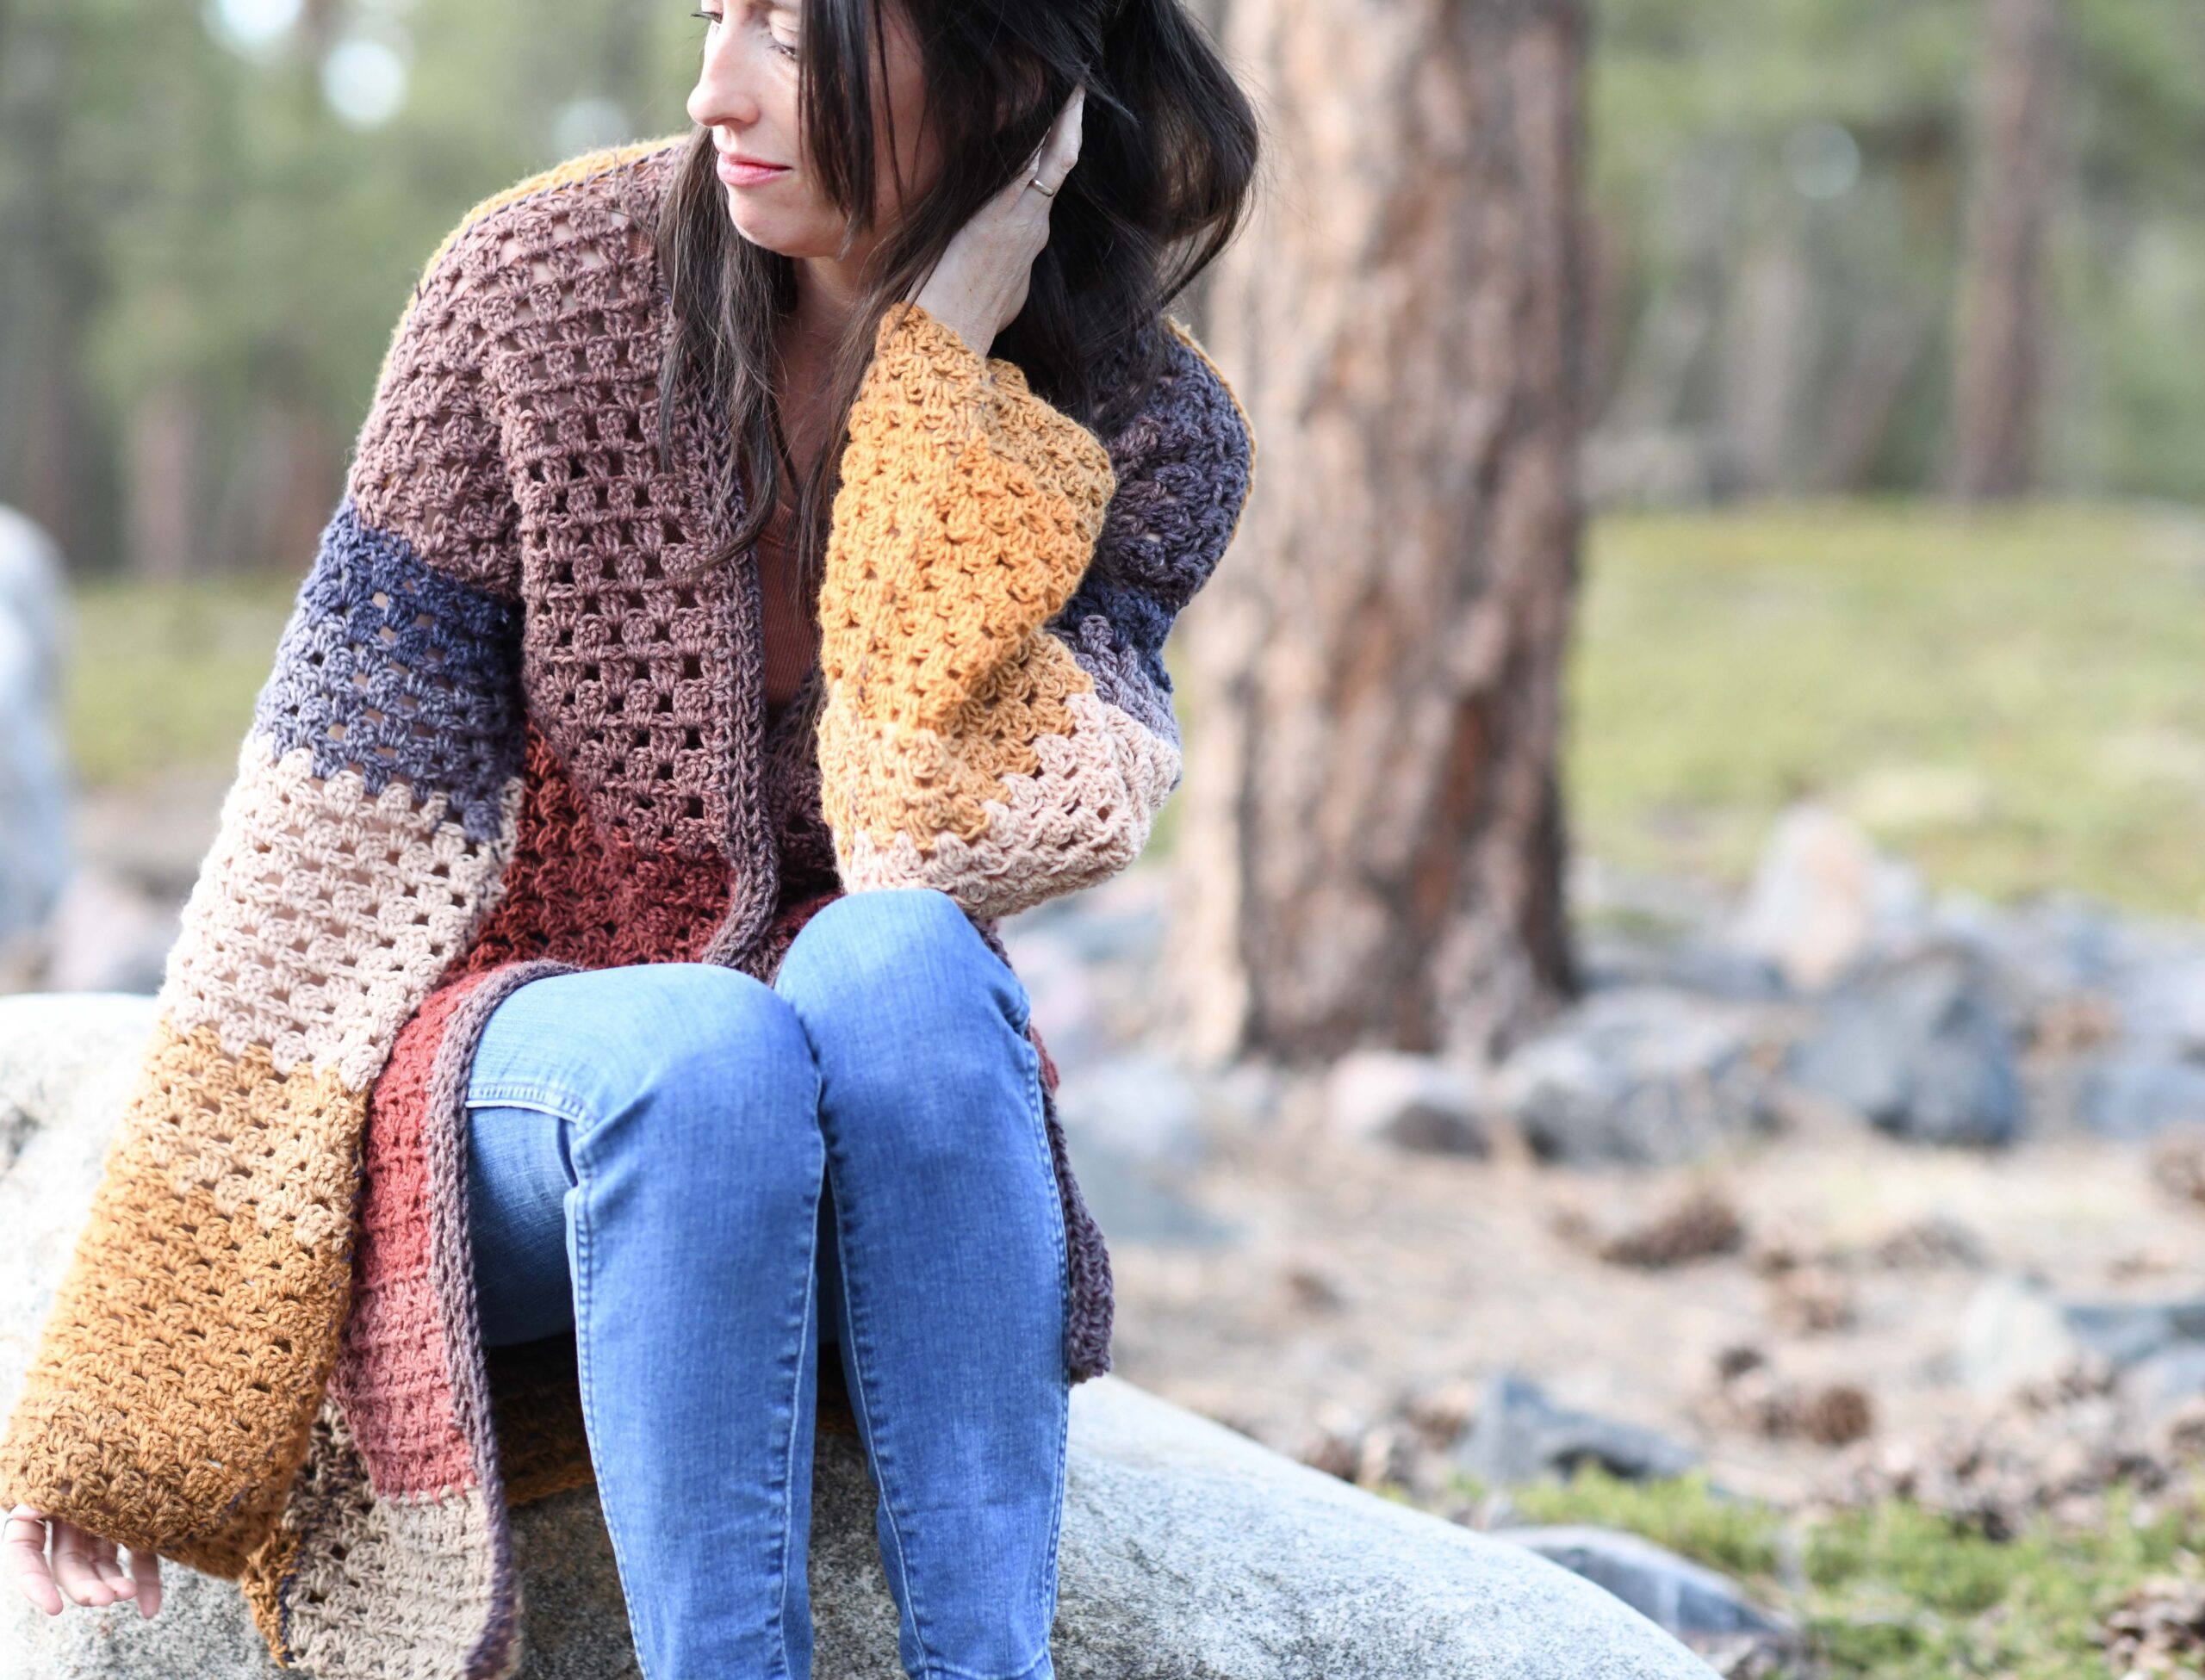
It was a ton of fun to play around with different stitches as well in order to make the oversized collar really pop. I’m pleased with how the texture turned out and don’t you love this color?! Lion Brand’s New Basic yarn comes in a variety of beautiful shades, and this one in particular is called “Whisper”. It’s a pale silver – grey color, with almost a hint of lavender it seems if the light hits it just right. The yarn appears to be homespun too which gives it a lofty texture and I think it really made the stitchwork on the collar “pop”. What do you think of this kimono cardigan?
Scroll down to find the free pattern below, or you may choose to purchase the ad-free, printable PDF version of this kimono cardigan crochet pattern from my Etsy Shop here. The printable version includes all of the picture tutorial photos that you will find below as well. 🙂
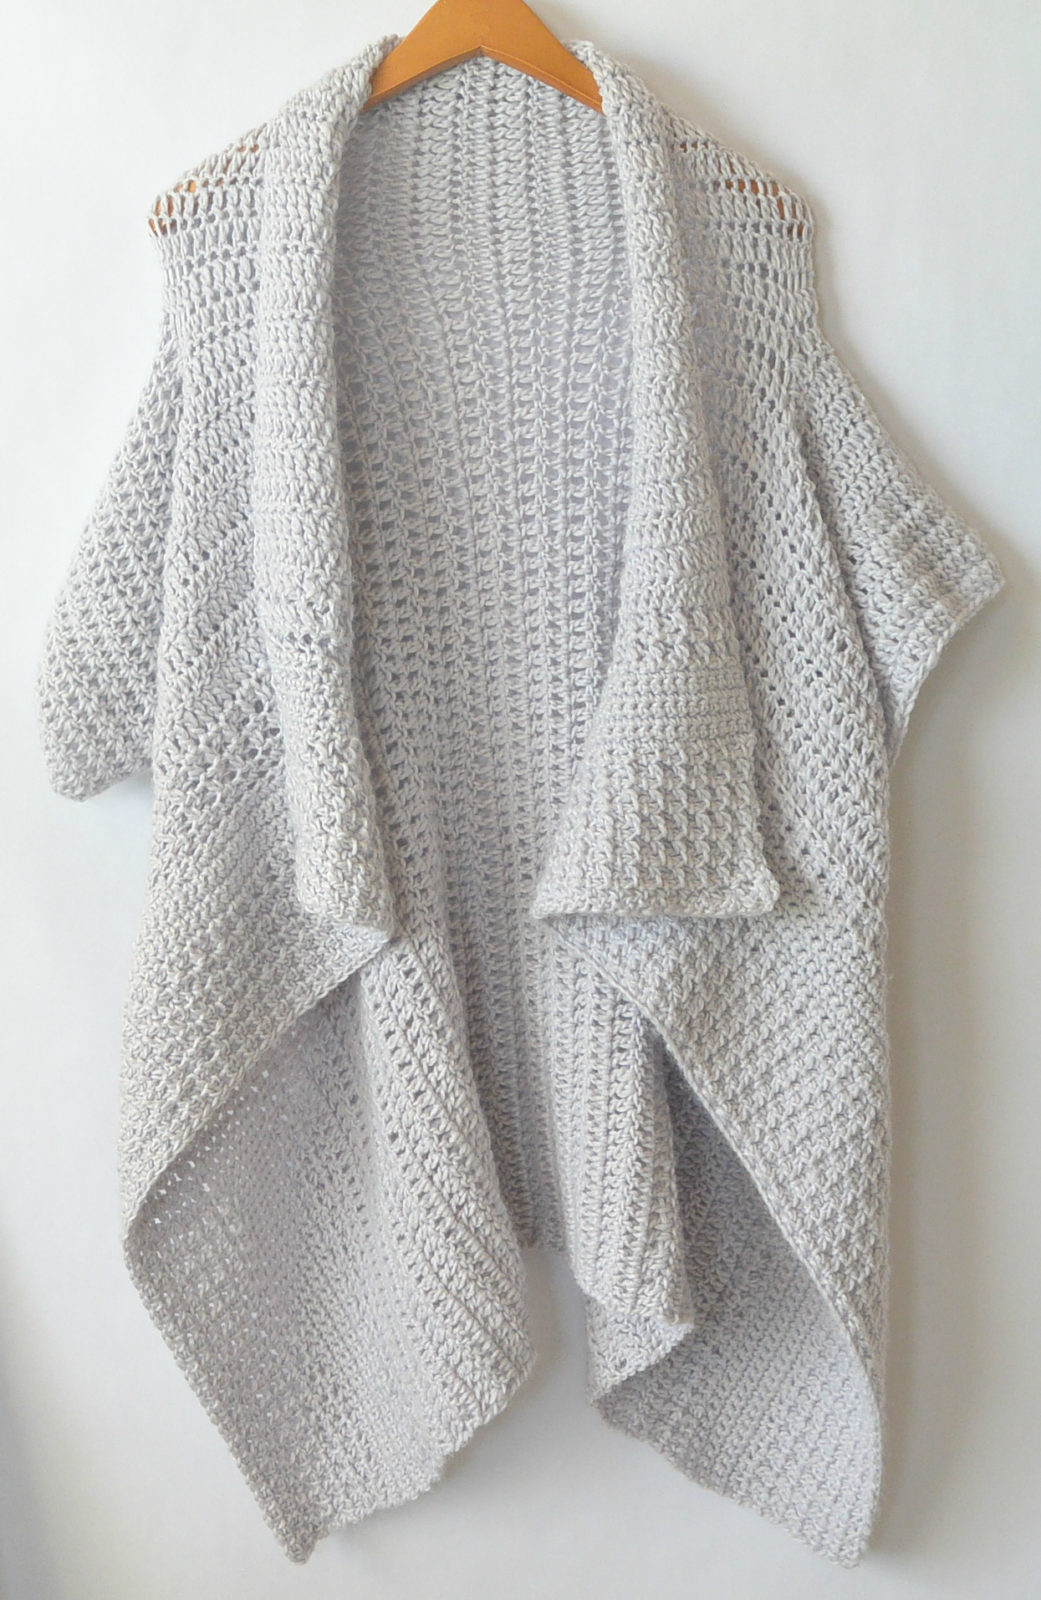
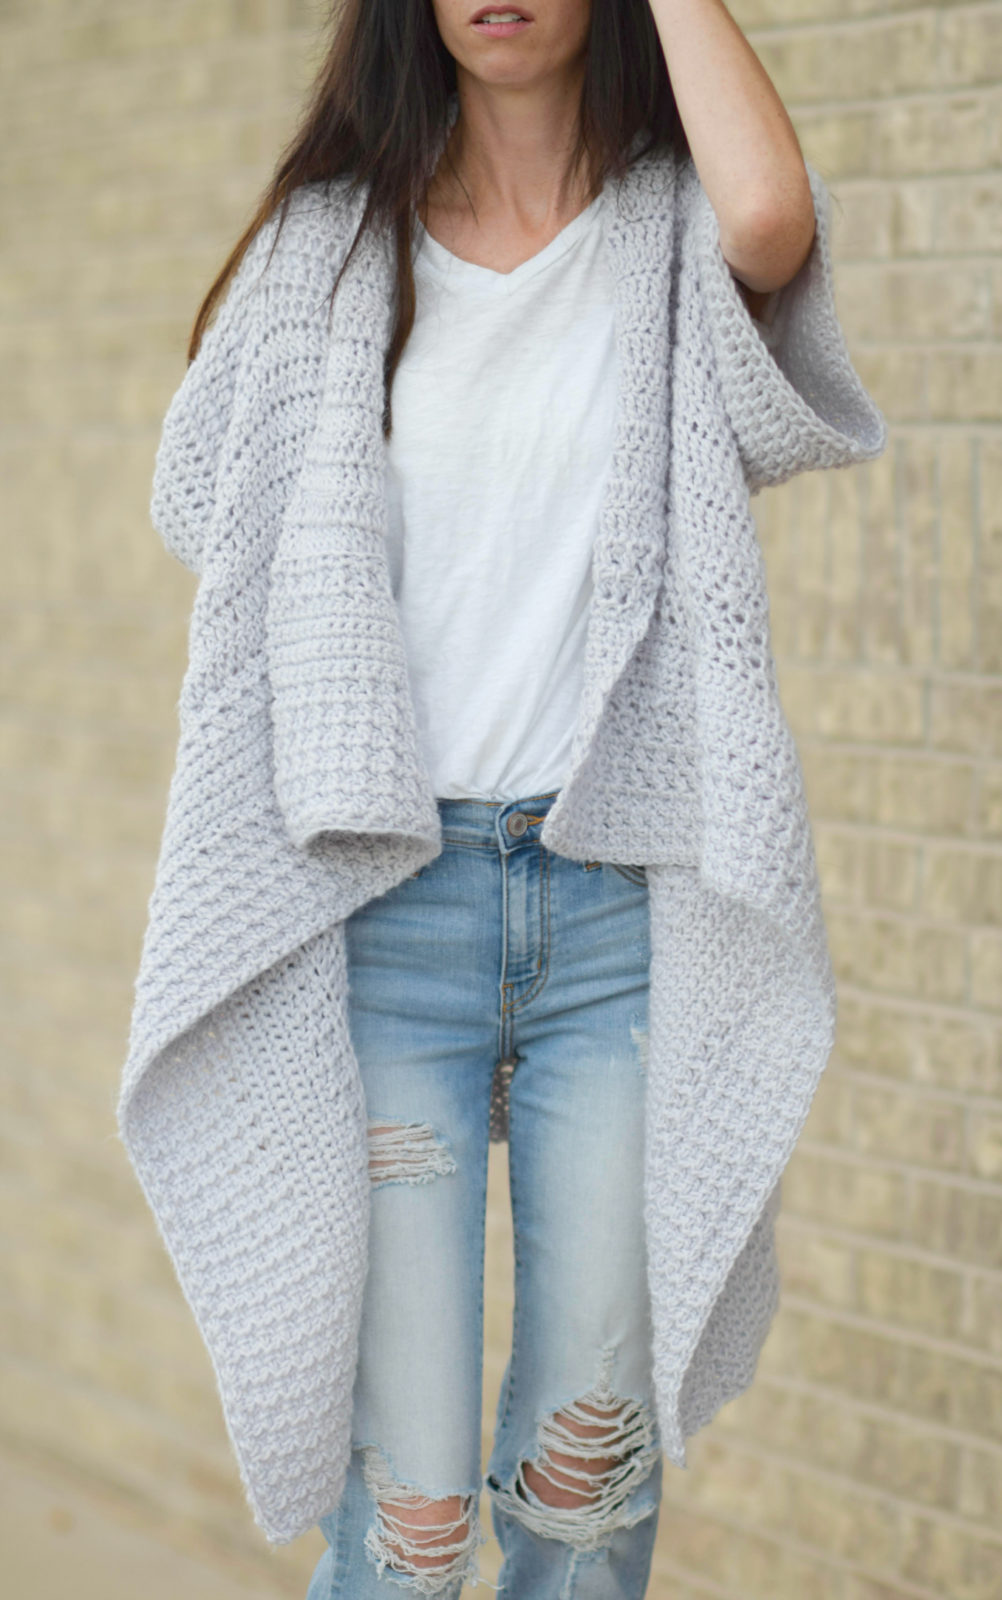
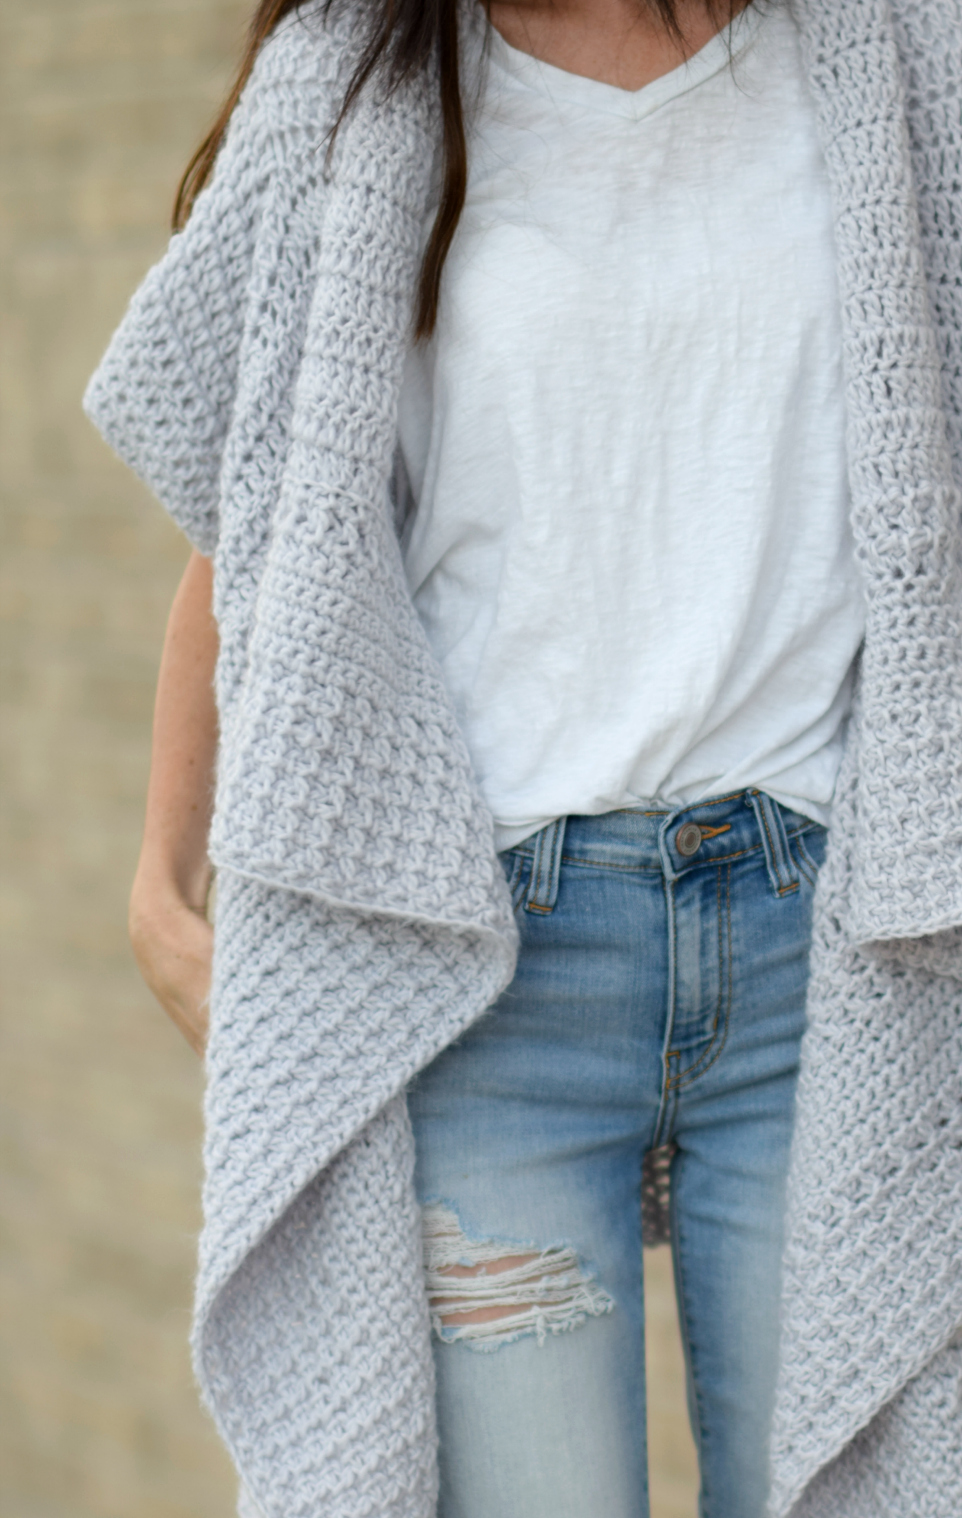
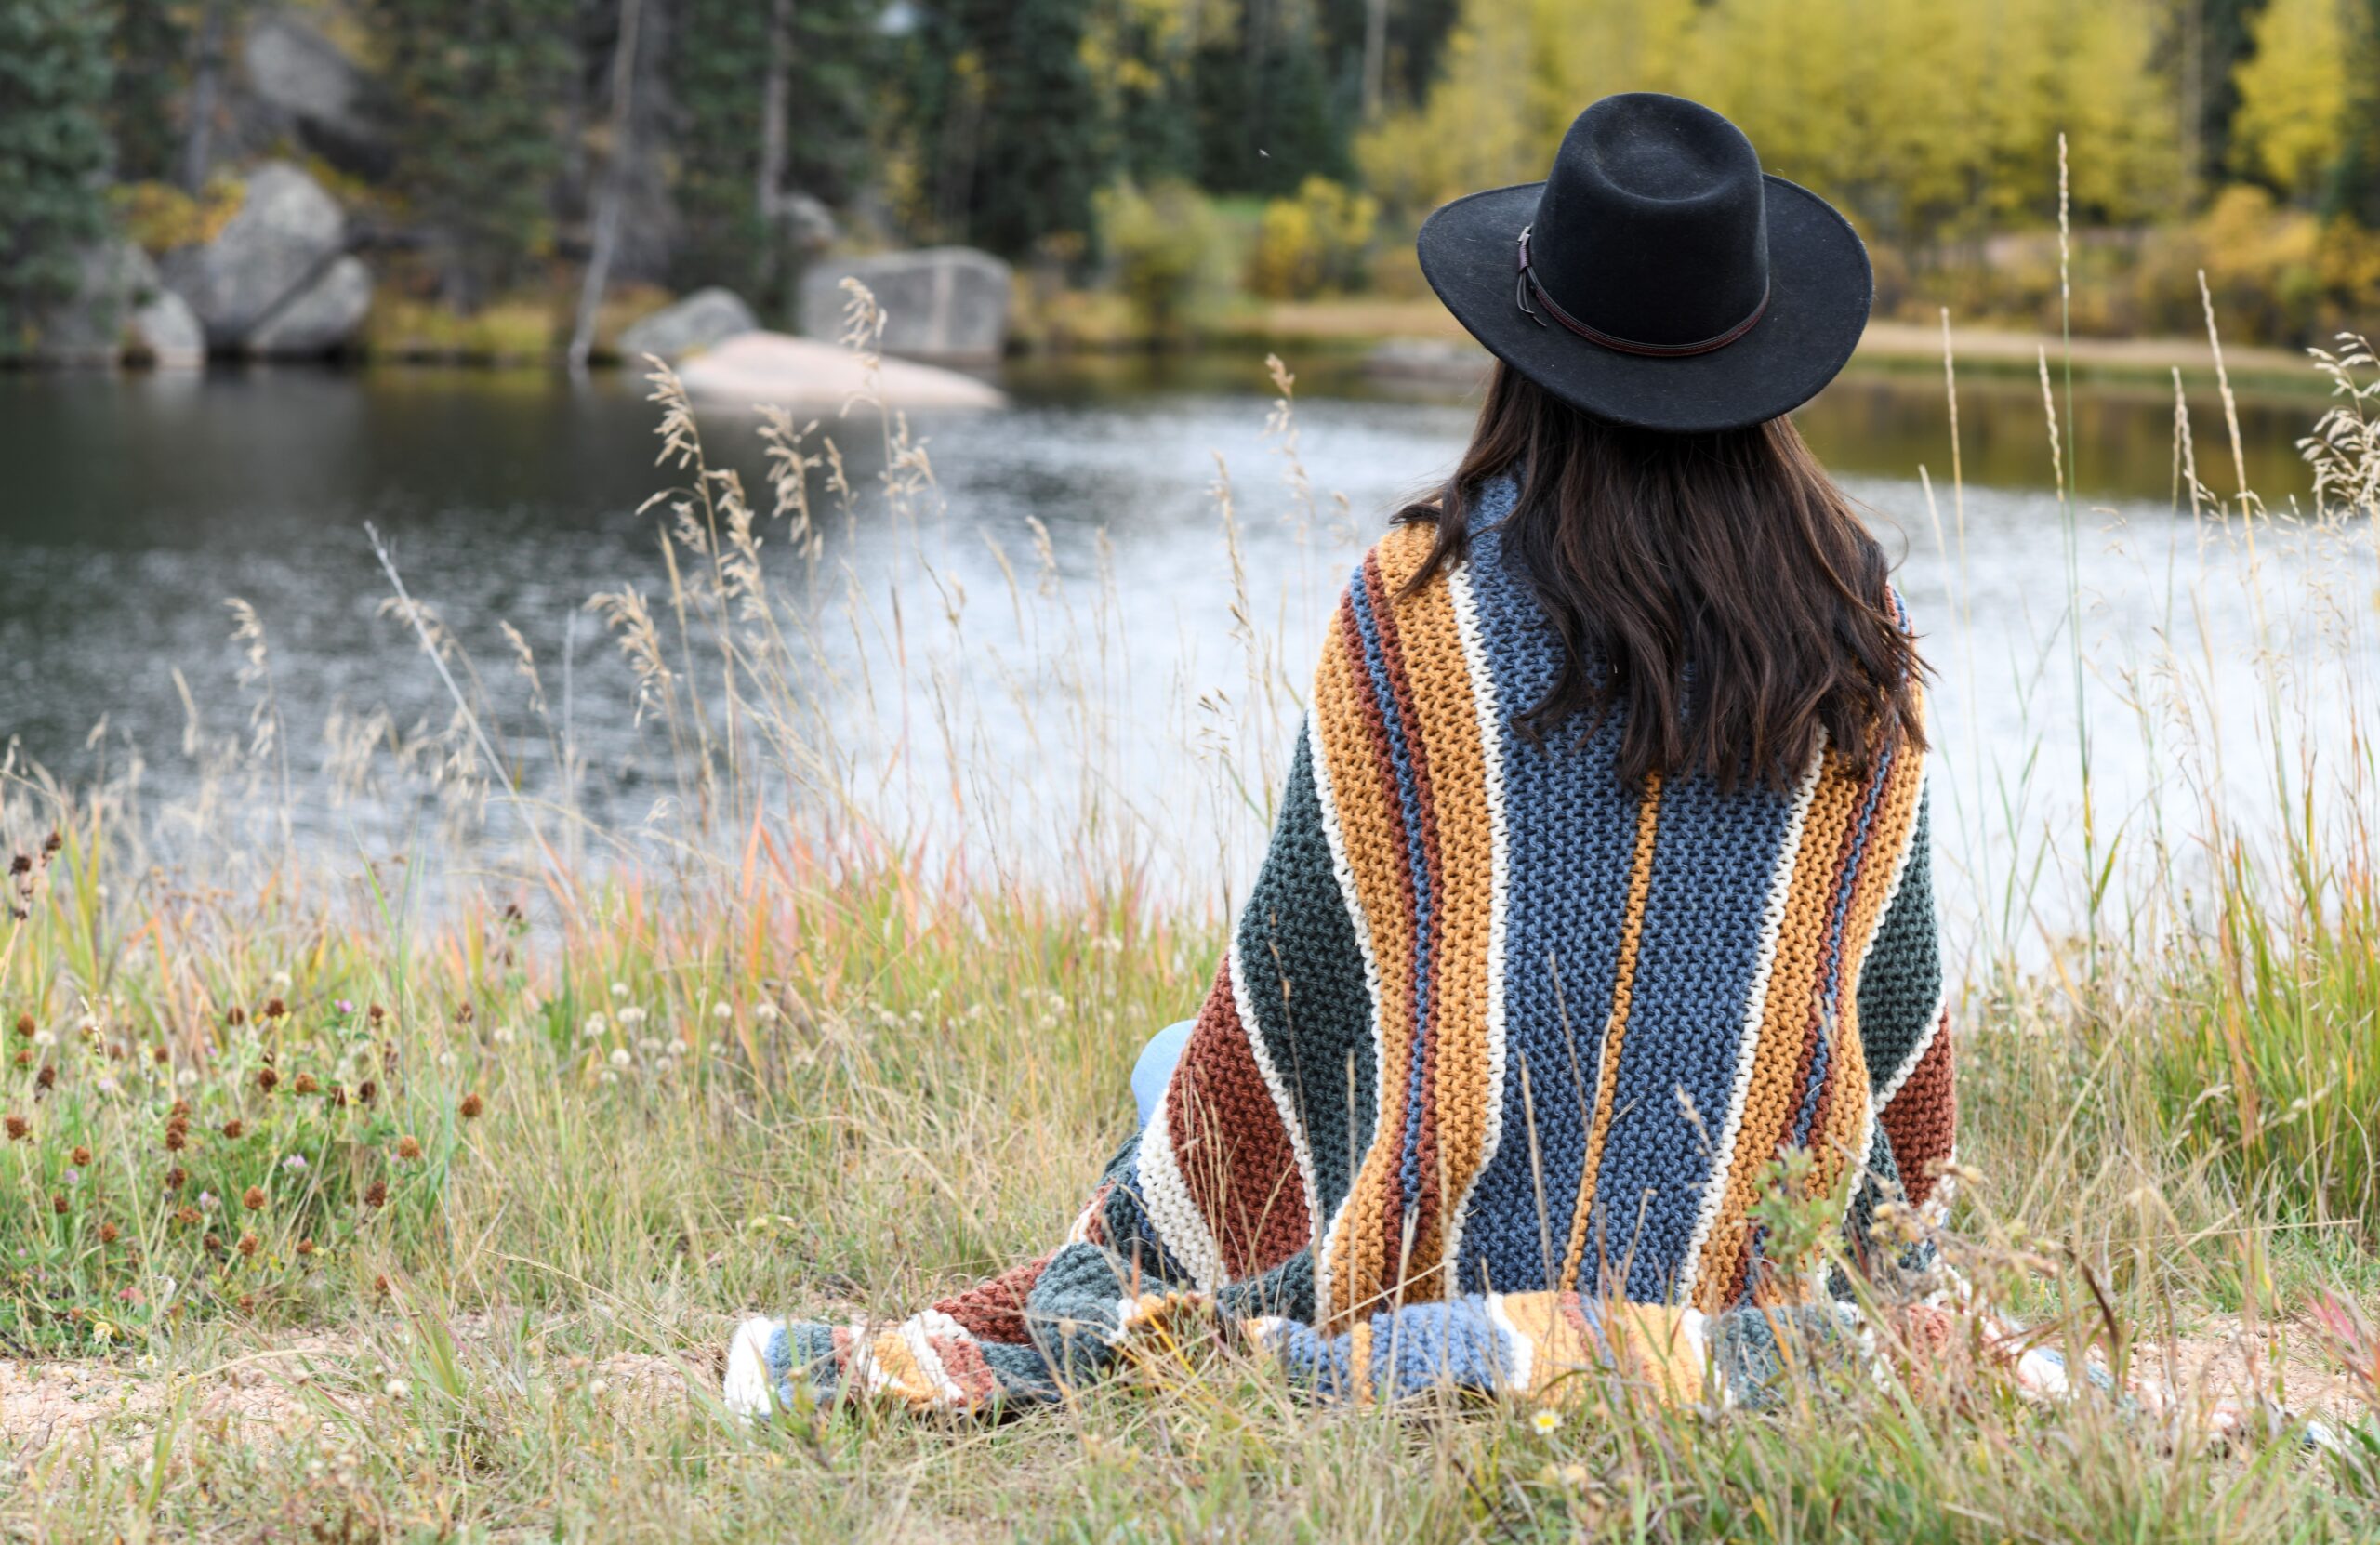
Explanation: A beautiful, comfortable kimono cardigan with a generous sized collar that’s perfect to throw on during cool days. The various textures created with simple crochet stitches make a cozy and practical sweater. Pair it with jeans or leggings for a fun relaxed look. Please enjoy this easy, breezy kimono cardigan crochet pattern!
Level: Easy +
Sizes
Follow Key Throughout Pattern
(S/M, L)
You will need:
Size K 6.5mm Crochet Hook
Lion Brand New Basic 175 Medium Weight Yarn in Whisper (6,7) (Kit for purchase here from Lion Brand)(NOTE If you are substituting yarns, this is a “chunky like” worsted weight. As you know, not all yarns are equal – you may find that your size turns out different if the yarn you choose is thinner or chunkier)
Pattern uses approximately 600 grams (S/M) or 661 grams (L)
Scissors
Tapestry Needle to weave in ends
Measurements:
S/M
Cross Back Measurement is approximately 14” across
Finished Chest is approximately 39.5” inches
Length is approximately 31”
L
Cross Back Measurement is approximately 17” across
Finished Chest is approximately 42.5” inches
Length is approximately 31”
See “Notes” section below for suggestions on making this in a larger size
Abbreviations and Skills needed:
sc2tog – insert hook, draw up a loop, insert hook in next stitch, draw up a loop, yarn over, draw through all three loops on hook
sc- single crochet
dc – double crochet
st – stitch
ch – chain
Gauge:
Approximate – just over 3 stitches per inch
Notes:
This piece is worked as a large rectangle, with the arm openings created as you crochet (see photos below). You will find a few different stitch pattern sections as you work across the rectangle. Sleeves are then added at the end.
It might be helpful to practice the Textured Section stitch pattern (below) on a small swatch before beginning the cardigan. Simply chain an even number of stitches and work the pattern. It’s imperative to make the chain stitch between each sc2tog, or your piece will begin to shrink as you crochet.
Pattern for both sizes is worked the same until you reach the first arm opening portion.
If you’re experienced: To make this kimono larger than the sizes indicated throughout the pattern, simply start with a slightly longer chain (couple of inches), with an even number of stitches. Follow the stitch patterns as indicated, however, make the arm openings larger by placing stitch markers further apart and add more rows of double crochet in the portion between the arm openings to make the back wider.
I am a loose crocheter! Please check your measurements as you work to ensure your sizing will be correct! If you crochet tighter than I do, it will turn out small. Here is the size that it should be: S/M rectangle measures approximately 39.5” X 31” and L measures approximately 42.5” X 31
Cascading Kimono Cardigan Crochet Pattern
Ch 98 (both sizes)
Textured Section
Row 1 Sc2tog in 2nd and 3rd ch from hook, *ch 1, sc2tog over next 2 chains; repeat from * to last ch, ch1, sc in last ch. (97 stitches)
Row 2 Ch 1, turn, sc2tog over 1st st and ch-1 sp, *ch1, sc2tog over next st and ch-1 sp; repeat from * to last st, ch 1, sc in last st.
Repeat row 2 until entire piece measures approximately 4” inches.
UPDATE: I’ve now shared a tutorial and video on how to do this stitch! Check it out HERE:
Single Crochet Section
Row 1 Ch 1, turn, sc in each st across row (97)
Repeat row 1 for approximately 2”
(note: entire piece should measure approximately 6” at this point)
Textured Section II
Repeat row 2 from Textured Section above for approximately 1”
(entire piece measures approximately 7”)
Double Crochet Section
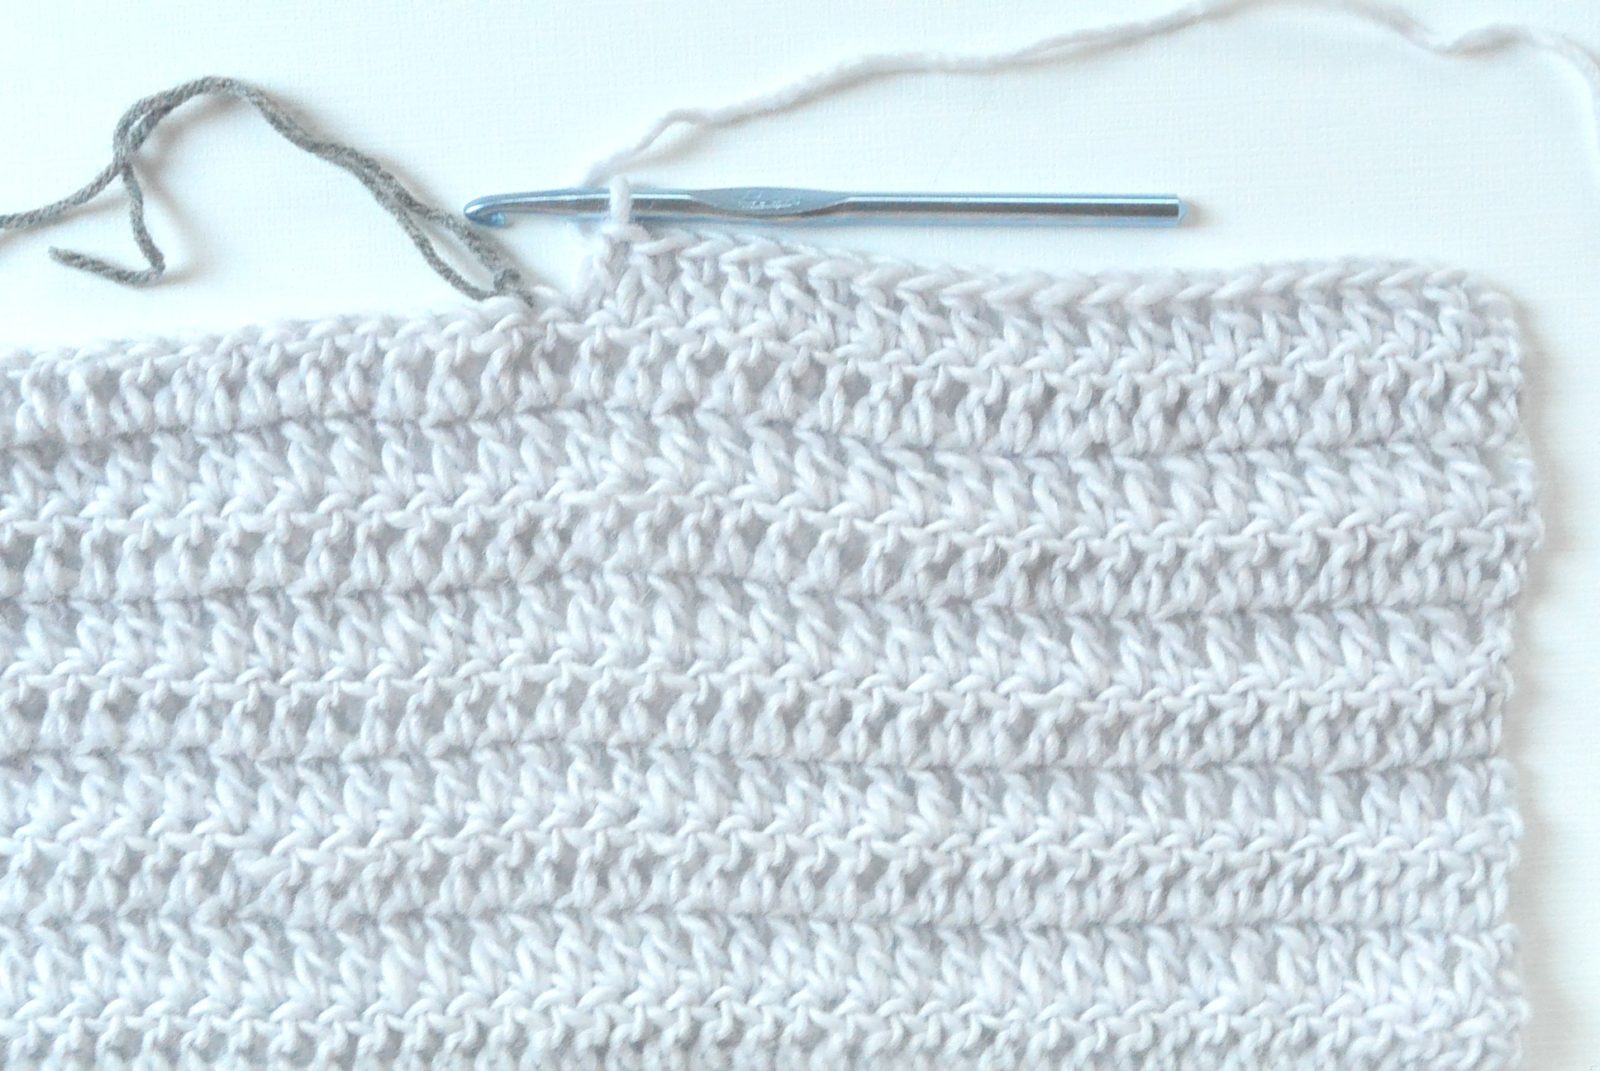
Row 1 Ch 3 (counts as 1st dc), turn, dc in 2nd st of row and each stitch across (97 stitches)
Rows 2 – 9 Repeat row 1 Note that final dc of rows will be worked into top of turning ch 3
1st Arm Opening
Row 10 Place stitch markers at 22nd and 43rd stitch from end of piece- this end will also now be referred to as the top of your piece. Ch 3, turn, dc in 2nd st of row and in each stitch across to stitch marker. Next, loosely ch 22 stitches, then dc into 44th stitch from beginning and dc in each stitch across to end of row. (97 stitches) See photo tutorial below for extra help
Row 11 Ch3, turn, dc in 2nd st of row and in each stitch across row to end (including into each ch stitch made at arm opening) (97 stitches)
Next repeat row 1, making dc stitches across each row until piece measures approximately (14”, 17”) from arm opening
2nd Arm Opening
Next
Place stitch markers at 22nd and 43rd stitch from the top of your piece. The arm openings should line up evenly. (see photos) Work dc stitches across to stitch marker, ch 22 stitches loosely, attach to stitch following stitch marker with a dc stitch. Dc in each stitch across to end of row. (97 stitches)
Repeat row 1 for 9 rows
Next
Repeat Textured Section II
Next
Repeat Single Crochet Section
Next
Repeat row 2 of Textured Section for approximately 4”
Tie off and weave in ends.
Sleeves
Attach yarn to sleeve opening
Round 1 Ch 3, counts as dc stitch, dc evenly around sleeve opening, sl st to join at end of round.
Repeat round one for nine more rounds or until sleeve is as long or short as you like. Tie off and weave in ends.
Extra Help
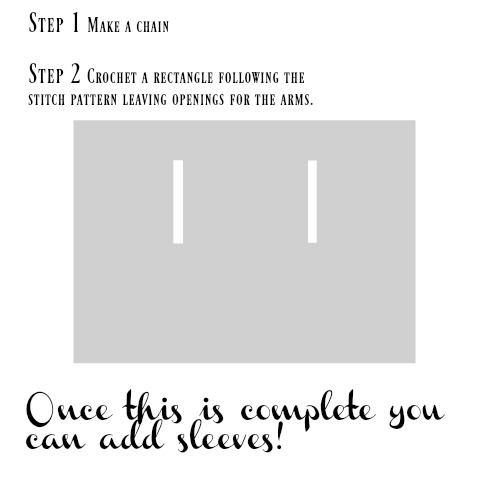
Above – diagram of cardigan, your beginning chain is one of the short edges. S/M rectangle measures approximately 39.5” X 31” and L measures approximately 42.5” X 31
Arm Opening Photo Tutorial
Double crochet across to stitch marker
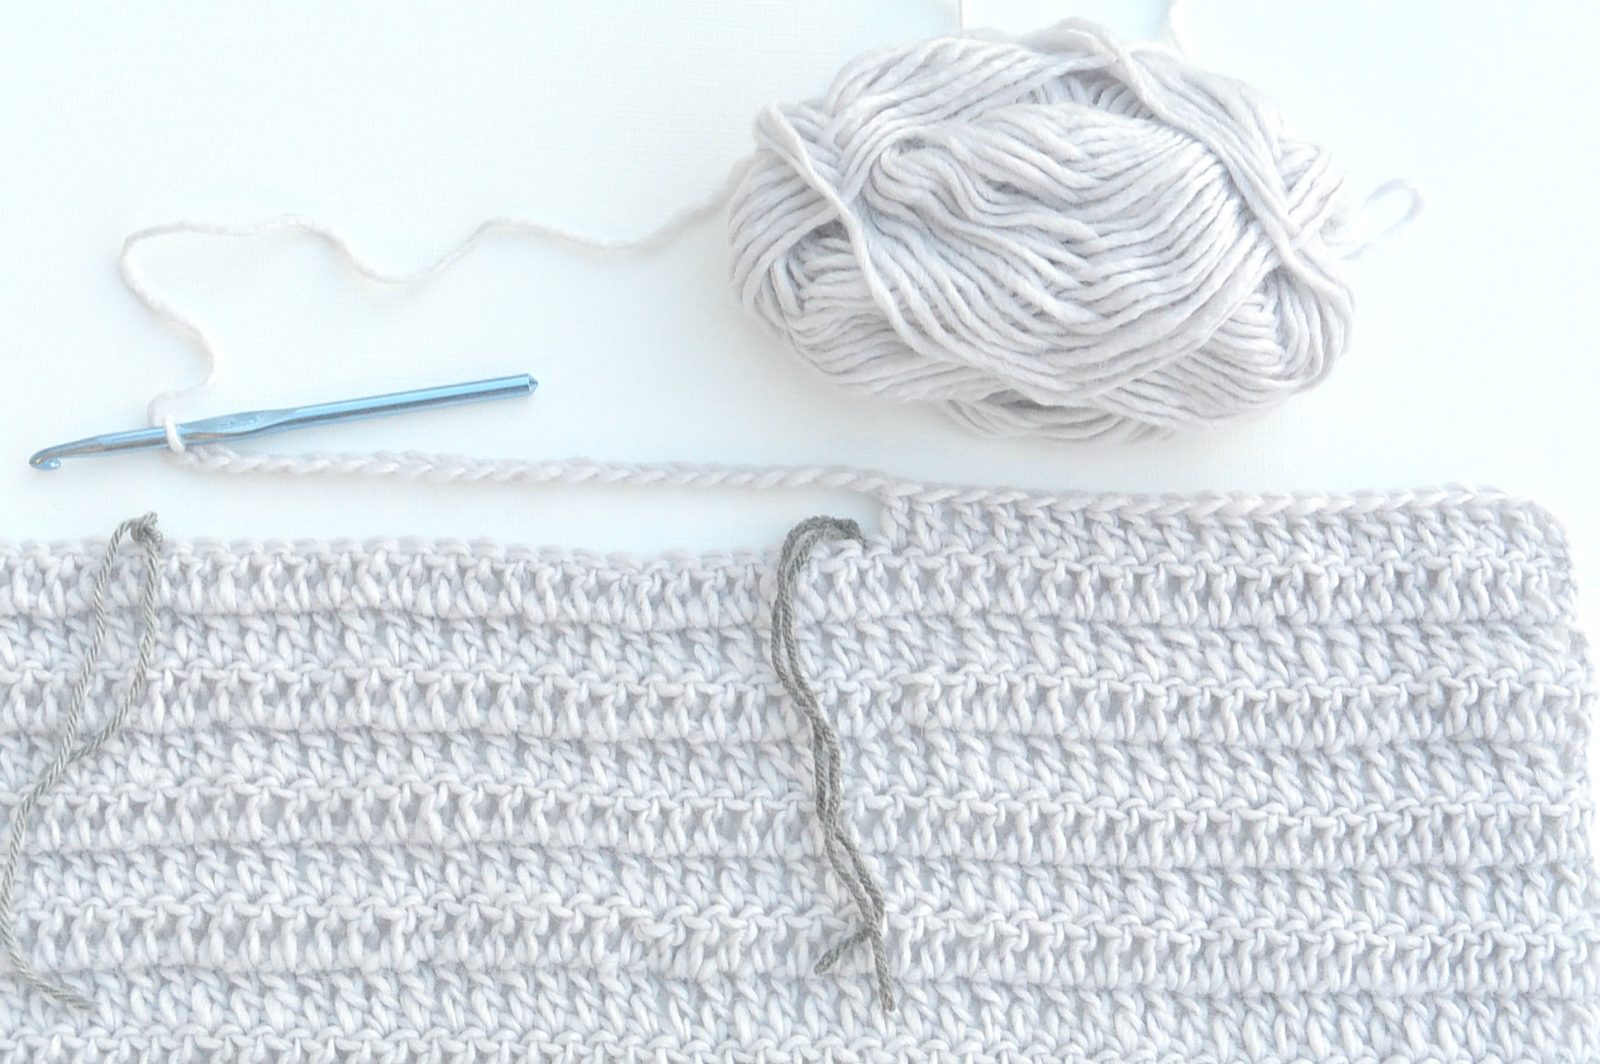
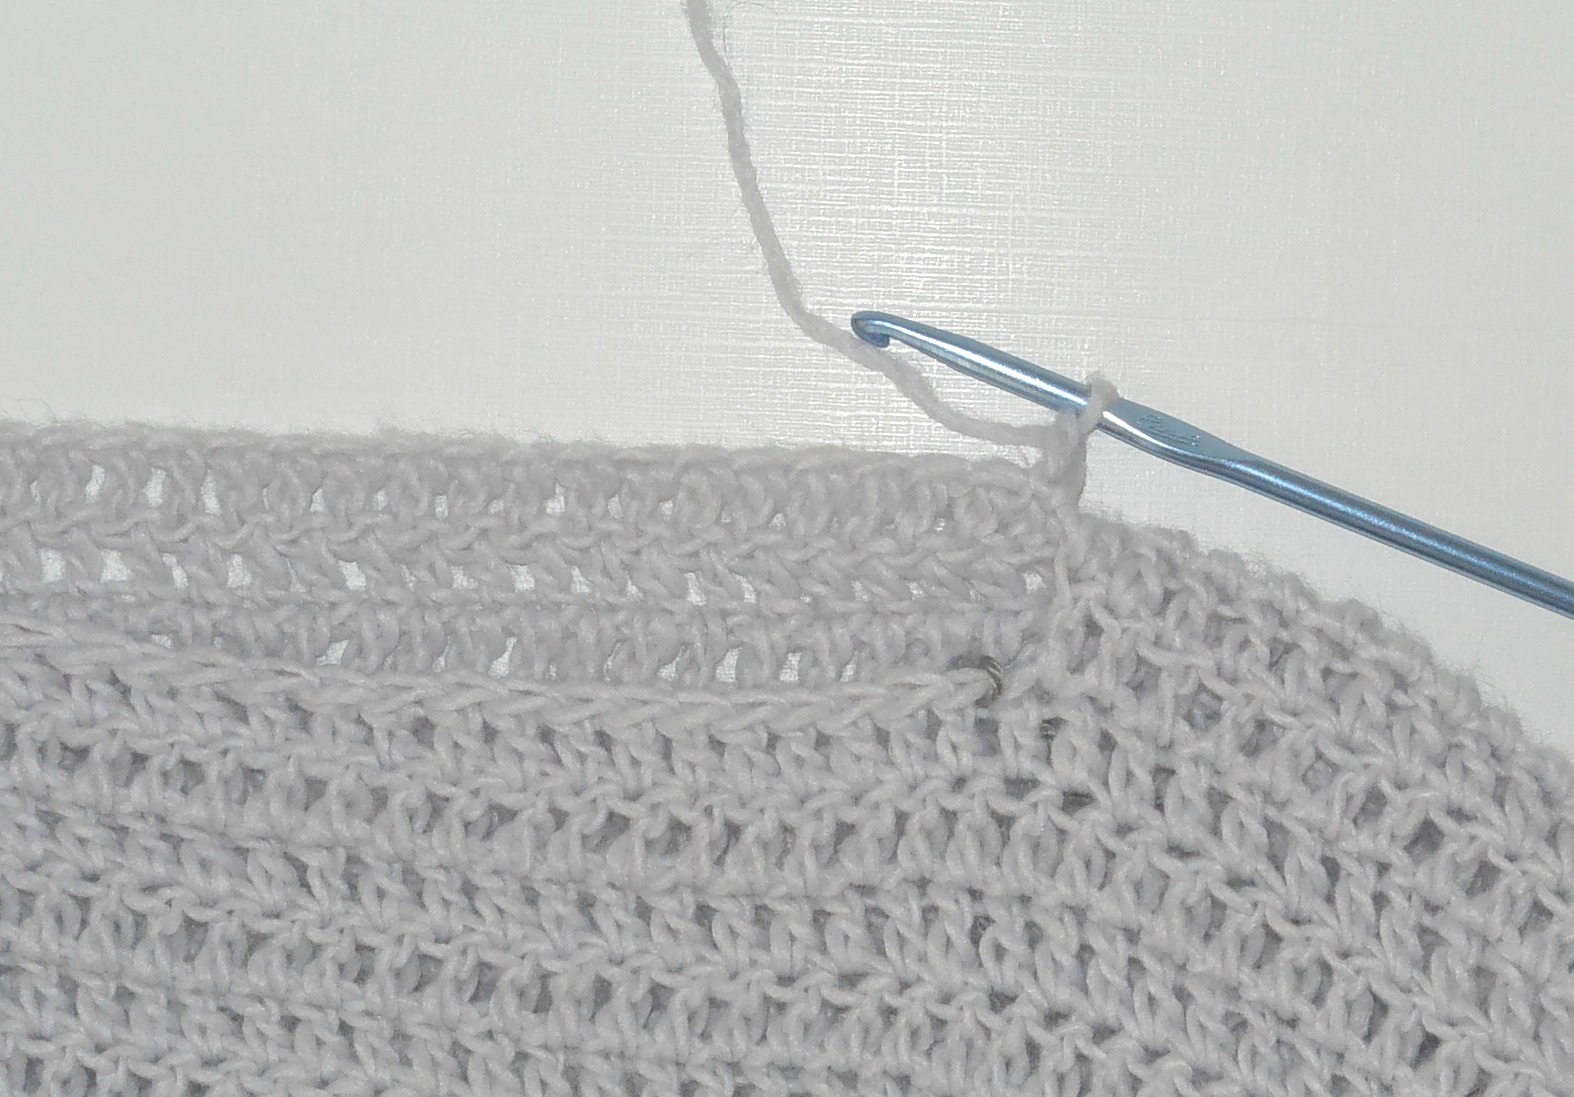
Loosely chain
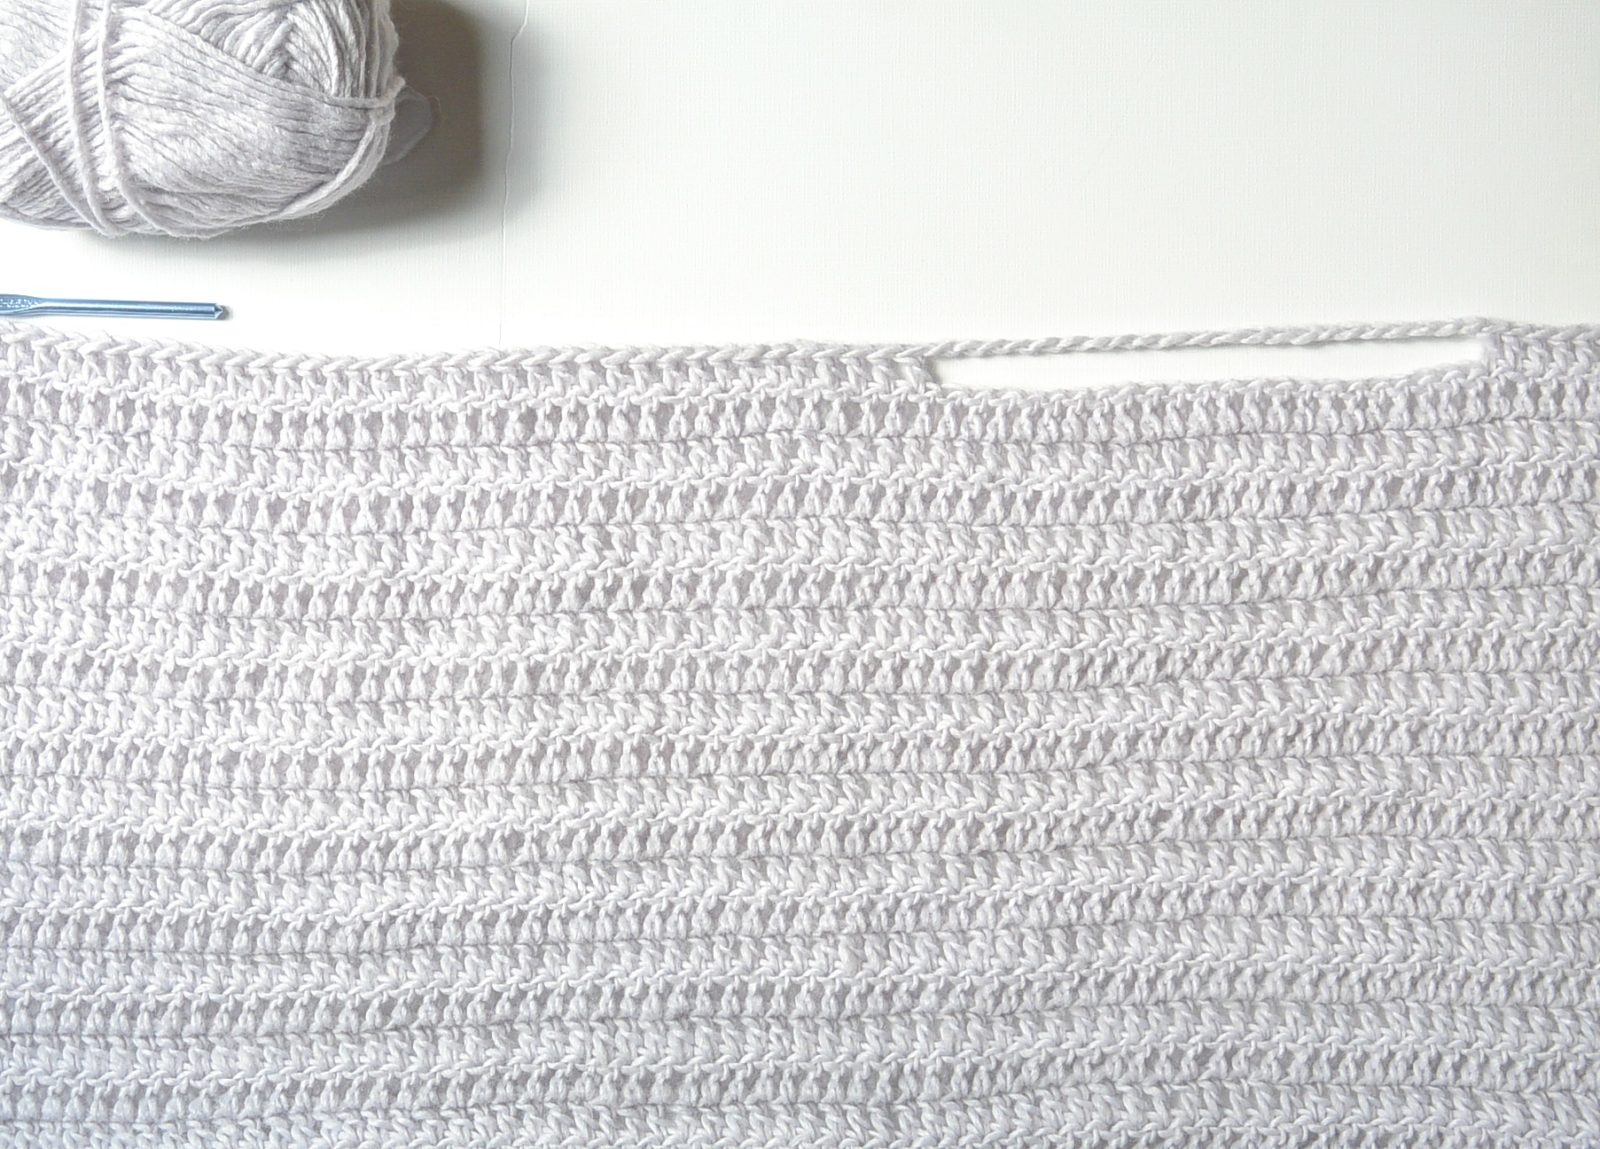
Attach and dc across, then you will dc across each row until you make the next opening
After the rectangle is complete, sleeves are attached to the arm openings
I hope you love your new, cascading kimono!
-Jessica
I am so grateful to have the opportunity to collaborate with Lion Brand on projects. This blog post was sponsored by Lion Brand. All opinions are 100% my own.
Please make his larger, for plus sizes.
Why don’t you do a utube showing every one how you do your patterns, you would get so many subscribers on utube
Need p,us size patterns or add on …… pleaee
I second that, please! Love this pattern!
This kimono is the reason I signed up for your emails! Beautiful
Love it! Can’t wait it. Thank you so much.
You’re welcome! Hope you enjoy making it!
Hi Louise! Thanks for signing up and also for your kind words!
Aww thanks! I wish I only had the time. I actually thought of doing a video for this one though. I still might do one to at least show the stitches.
Yes!!! Please video. I really want to make this. I love your patterns.
My first thought was that it is such a pretty sweater pattern that would look so much nicer if the model could afford to buy a pair of jeans without so many holes in the legs.
HI Jessica ,
I just love this kimono and the colour really works well with this pattern . I just wish I knew how to crochet better . I am a knitter not much of a crocheter . It really would be fantastic if you could show us how the stitches work for this pattern . I would love to make this for me and my 2 daughters . Thanks for the lovely free patterns , very much appreciated .
This is beautiful
This is gorgeous and I’ve bookmarked it for my next project. Thanks for sharing!
Do have a question. If I were use a more lightweight yarn, can I just increase the no of stitches to get the same length? TIA!
Yes, you certainly could!
As always, your creations are magnificent. This one is not exception. Absolutely beautiful. So glad I signed up for your emails.
If you’re experienced: To make this kimono larger than the sizes indicated throughout the pattern, simply start with a slightly longer chain (couple of inches), with an even number of stitches. Follow the stitch patterns as indicated, however, make the arm openings larger by placing stitch markers further apart and add more rows of double crochet in the portion between the arm openings to make the back wider.
This is a great pattern and is perfect for our Colorado fall. Would love it for plus size too.
How sweet. Thanks Terri.
I am also wondering how many chains I would have to add on to make this a bigger size.
Also wondering, if I wanted to make the sleeves longer, any particular tips or tricks I should know?
Thanks
Thank you for sharing this pattern.
I love this kimono, I love crochet but not really good at reading patterns!
I hope one day this kimono will have video!
Thank you so much!
ANOTHER gorgeous pattern! I am always inspired by your creations and your directions with pictures are so helpful. Can’t wait to try this! Thanks for sharing!
Oh WOW wouldja look at that!!! What a thing of beauty! Just when I think you can’t come up with anything to beat your latest creation, you do. I need 6 hands to keep up with you.
I found that by cutting a piece of fabric and draping it on my dress for I could adapt this pattern to the length and arm home size that fit me well. I started with a large rectangle and cut off inch by inch on the length and width, and then marked where my arm hit in the dress form. If you don’t have a form, you could do the same by pinning fabric to your shirt shoulders to see how it drapes.
Jessica: You have once again out done yourself…Amazing. Hip and so simple and affordable. Dont ever stop! Im making mine long sleeved, living in Florida this is really all you need for winter “coat”
Would love a video!!!
I LOVE it!!! I’ve been wanting to do the Driftwood poncho ! Im wondering if I can do it with this pattern and just make to rectangles, etc..add the hood?? I just love the textures in the Kimono but love the looseness of the poncho..
You never cease to amaze me! you’re so incredibly talented.
It’s out of this world love it hope I get it right
So I’m not that great with measurements (I know I know! but I just can’t seem to catch on) 🙁
Can you tell me in a number what size large would fit? 14? 16? 🙂 Thank you for the help! It’s beautiful!!
Absolutely gorgeous! Wish there was a specific plus size pattern. I’m not adept enough to “wing” it.
I did 108 chains for an extra large. Add 2 inch to each as is listed if it says 4 inches, then you go to 6 inches.
Next section would be 8 inches
Before getting to the Dc rows
I Have 9 inches.. hope that helps those who xl and xxl
Hi, in the decrease pattern rows in has abbreviations of sp can you clarify that for me? Thanks. Also what’s a comparable yarn that can be used? All I have on hand is red heart and bernat super savers.
It’s hard to think of a specific yarn recommendation, but you can try it with any worsted weight yarn you’d like. However, I’d choose one on the chunkier side (as you know, not all yarns are created equal even when listed as weight “4”) Just make sure to measure as you go and check your gauge. Adjust as necessary if you need to. Also, sp means “space”
You’d never believe that the jeans were purchased new like this….hehe! It’s not everyone’s style, but I’m enjoying the look and laid back trend of worn jeans these days. 🙂
Hi Jessica,
The 24/7 yarn is not available in Canada. Would you know how it compares to the Heartland which is also a category 4 weight?
Hey Marnie! Heartland has more drape but the thickness is very, very similar!
Hi Jessica, I just found Your blog through my Facebook group. Love Your work, follow You on Instagram too. I just started my blog as well. Please come by, would love to hear Your thoughts.
Love your patterns and have made a few of them.Really hope you utube how to do the stitches that really helps us that are beginners. I would love to make this for myself. Thank you .
Thank you so much Penny!
I love your patterns. I find them easy to follow and I just adore your style. Thank you so much for sharing! I am super excited to pick out the yarn and get started on this beautiful kimono.
Hi Jessica,
Love your simple, beautiful and practical patterns!
Could you please write down the rectangle measurements for size 2X/3X and 4X/5X, the distance to the armholes from beginning, and their size? I’m sure this information will benefit more crocheters, who would like to make this flattering kimono.
Thank you!
Hi Laura!
That makes me so happy to hear! Thanks for your sweet words too. Let me know if you have questions as you make it!
Love your patterns! I signed up for your emails. You are very creative!
I am visual learner and teach art so a video of creating the pattern or a video of creating the stitches would help us visual learners greatly. Please consider videos. Thanks!
Hi Amy! There’s definitely been a lot of requests for more videos so I better get my video gear ready to go again sooner than later. Thanks so much for following along! I love that you teach art. It was always my favorite class all the way through high school.
I meant the New Basic yarn, but I think you go my drift 🙂
I love the drape of the Heartland, so I think I might give it a try.
Thank you!
Marnie
I am making it to fit an extra large to a 2 x..it is working up great so far..need to add my sleeves..
Very welcome mine is working out great
Hi Maya!
Thanks so much for stopping by! I always love to hear from a fellow blogger and yours is beautiful! Which Facebook group is yours?
Hey Marnie! So if you’re talking the New Basic, Heartland is quite a bit different, but I love the drape with Heartland. You will just have to be careful with measurements as it’s thinner than the New Basic. 🙂
Thanks for the input Debbi! There are a lot of requests for larger sizes on this one. I will definitely keep it in mind for the future! It’s always a balancing act for me as these patterns are very time consuming and each size requires recalculating yarn amounts, stitch amounts, and more. Some patterns I have made multiple sizes, but there have been times when in an attempt to balance my family life I have chosen to do enough sizes for most people and include basic instructions on how to make it larger for any size. I hope the basics that I include above will help many and I will keep larger sizes in mind for the future as time permits. Thanks for your understanding!
I love your new creation! I can’t wait to try it. TFS
I absolutely love this pattern. I am working on it now but I crochet tightly. Can you tell me what the measurement is of the 22 stitches for the arm hole? I want to make sure I made it big enough.
Gorgeous pattern! Thank you so much for making it available to us. Just wondering what size the cardigan is in the pictures. Is it the S/M or is it the L?
To make XL/2X – Chain 108. This adds 2 inches. Textured section, crochet 6″ instead of 4″.
Armhole – I put stitch markers at 22 & 53. Chained 32.
Double crochet section – 20″.
Love it…
Awesome! Thanks so much for sharing!
Hi Jessica! Thanks! This is the S/M in the photo and I am a small person. 5’6″ and always wear a small or xs.
Thanks MJ! So glad you like it. You’re welcome of course. 🙂
Sure! It’s right around 9 3/4″ or so.
Check out the comments above….one kind reader has written out how to do it for larger sizes. 🙂
You’re welcome! Your patterns are GORGEOUS!!
Thanks Jessica! There have been a couple of lovely ladies who have shared some great plus size information on this thread. I will definitely be trying this pattern using their info…thanks for considering plus sizes in the future!
Yes Jessica please!!!! or at least the textured stitch. I’m not sure i’m doing it correctly and would hate to get far into it, then have to pull it out. Please, please please!!!! 🙂
My question is how can all 4 sizes start off with the same number of chains and but end in different lengths? Shouldn’t s/m start at 98 and m/l start at say 108 chains?
I crochet some what tight and going to have to add chains just to meet s/m gauge. Love the pattern, will be experimenting. Thank you for the cute pattern. Debbie
I ordered the kimono kit from Lion. Love this! But I am feeling so discouraged, i can not figure out the textured stitch! I am a visual learner and I am making this for my niece for Christmas and cant figure that section out. Please Help
I’m hoping to do a tutorial for it soon!
Hi, I’m one of your members from Over The Pond living quite close to Stonehenge in Wiltshire. Will be making this draped kimono for my daughter in London but as she’s allergic to real wool will have to use acrylic so hope it drapes nicely like yours. Thank you for the pattern.xx
I recently made your cascading kimono, I used a different yarn that made it turn out a little smaller. but I love it and can’t wait to make another one
Hi Mary! I’m so happy to hear that you like how it turned out!! Thanks so much for sharing!
I hope it drapes well for you too Teresa! I think that it should be fine. 🙂 Thanks for following along here. It’s lovely to hear from you across the pond!
What a great idea, thanks!
Hi Jess,
I can’t seem to crochet the textured part. I made the chain and sc2tog with a chain in between but one I started row 2 my sc2tog into the chia in is SO tight I’m hardly able to do it. Any ideas or suggestions?
Maybe if you see how I do it? Here’s my latest blog post with a video about it:
https://www.mamainastitch.com/crochet-textured-stitch-hostess-washcloth/
Hello have you a diagramm for the fantasy rows
No diagram, but I recently did a tutorial here:
https://www.mamainastitch.com/crochet-textured-stitch-hostess-washcloth/
Hello! I want to ask about the “Single Crochet Section”. When you say that work “across row”. Does it mean that we gonna do the single crochet to the end of the row (and it has 97 stiches), and then we are going to do the next 97 stiches that continue after that until we come back to the st we start first, or we gonna reserve and do like the textured section?
P/s: Sorry for my bad English!
Hi! Really enjoy your patterns! Any chance you could show how to knit this? Idon’t crochet. Thanks so much!!!
Yes a video for this!!
That color is unavailable on most websites I’ve looked at. Do you have another kind of yarn that you recommend that has a similar color?
Thanks for the heads up on that! This color is so rare in my opinion. But I do love the New Basic in Cafe Au Lait and think it would work up beautifully as well! Last I checked that color was available on Lion Brand’s website.
Hi! I love this pattern and I am trying to make it for my mom for Christmas. I crochet very tightly, so I’m a little bit worried about going off of stitches instead of measurement.
Could you please let me know how many inches the double crochet section (nine rows) before the arm opening is? Also, how many inches between the top of the work and the opening of the armhole(on the 22nd stitch)?
Thanks so much for your help!
Love it!!!
One question. How can I make the sleeves longer? If I put on more rows than the are to “big”.
I hope you can help me.
Greetings Tamara
Hi Tamara,
You can make them longer, but you’ll want to do some simple decreasing to make the sleeve slimmer as it reaches the wrist. Make sure to match what you did on one sleeve with the other sleeve.
Hi Lisa!
The armhole itself is about 9 3/4 inches wide and the arm hole starts about 8″ from the top when I just did a rough measurement. The collar measures about 13″ before you start the row which includes the armhole.
Hope this helps!
It does! Thank you!
Hi. I’m making the Casading Kimona. Please check the instructions after the 2nd arm opening. It says 9 rows of row 1. Row 1 is the set up for the textured section. Should it be 9 rows rows of the double crochet section and then repeat textured section II
Hi Pat! I’m happy to help. It is referring to the “row 1” in the section you’re in, not the beginning section.
Hi !
Thank you for this pattern! Could this beauty be turned into a poncho style closed front? My coworker would adore this and I would surprise her for Christmas!
Thanks again!
Eric
Hi – does this require blocking once finished
I am making this and I added some chains and rows for a bigger size, but I still do not think i am getting the same drape that your pictures have.
I wonder if I block and stretch it, it might open up a bit and be more flowy?
Hi Eric! I’m sure whatever you can imagine with a closed front can work! I’m not sure I totally understand what you’re saying about the poncho style, but feel free to make this into whatever you can dream up!
You’re welcome for the pattern – it’s so fun to share! Bet your co-worker would love you forever making her something like this!
Hi! You certainly CAN block it though I didn’t. However, depending on how tightly you crochet and the and yarn that you used, you can always block it to stretch it and create more flow. 🙂
Hi! Thank you for creating and sharing this pattern! I’m attempting to use it as a guide because I’m using a different yarn and I just had a few questions regarding some of the measurements.
In the comments section here, I saw you mention that the armhole slits are about 9 3/4” long and that they start about 8” from the top of the rectangle. Based on this information (totaling about 17.75”) and knowing that the total rectangle should be about 31” tall, I’m guessing the lower part of the rectangle, below the armholes, should be about 13.25”. Could you confirm this for me?
Also, would you be able to tell me how long your sleeves are?
Thanks so much for the help!
I think I understand the pattern however in one picture the sleeves look small but when it is on the model the sleeves are big and wide. What am I not getting?? Want to make this really bad… So cute.
Hi! I’m a small person so the sleeves may seem wide on the photo and to me they are wide. Hope you enjoy it if you make it!
First of all, this is a beautiful pattern! I’m having a little bit of trouble though, and I think I need to go a hook size down… when I switch from the textured segment to the single crochet segment, it kind of flares, and widens. Does this mean I need to go a size down in my hook? Or just crochet tighter when I do my single crochets? Or will it all even out again once I switch back to the textured segment? Or will it fix itself when I block it after it’s all completed???? Thank you!!!!
Hi Jessica,
I absolutely love this cardi & thought this would be the perfect Christmas gift for my daughter. However, I think I may have screwed up somewhere. Can you tell me how many inches are between the 2 armholes? This just doesn’t seem right to me. I’m not an experienced crocheter & read the pattern before I started & thought it was going smoothly, but it just might be me.
Thank You
PS..is this made in 1 or 2 pieces? After reading some of the comments, I’m really starting to second guess myself!
Well, just reread instructions and of course I found my mistake. Sorry for all the posts, but like I said..I always second guess myself. Looking forward to the finished piece!
No worries Colleen! These patterns can be a lot to take in sometimes!
Hi Abbey! Blocking should do the trick! It did help me to simply loosen my tension for the textured and sc sections. It does have some flair but blocking can fix that if you prefer!
Hi Eric, I’m actually trying myself on this pattern as well. Finished the main part yesterday, so just the sleeves missing. Don’t know if I put them on, as it looks pretty nice as a vest as well.
If you want to make a poncho out of this pattern, I would simply replace the armholes with a bigger one in the center of the rectangle and there you have a poncho.
Sunny greetings from Spain, Tanja
can u make a knitting version pls 🙂
Would love to make this pattern as a Baby Blanket using the first block on the sides and perhaps a small section of the middle back. What would you suggest as multiples?
I love this pattern. I’ve been looking for a drape type sweater pattern for quite some time. It works up really quickly and easily. I started it almost a week ago and am almost finished. I can’t wait to wear this. Thanks for sharing.
Hi Donna! That’s so awesome to hear. Congrats on making this! It’s not a small project.
Thank you for including measurements in this! It means I can use your design, making it larger for the yarn I want to use. I have some GORGEOUS cotton DK that will really look good with this pattern. Because you included measurements, and I’m experienced, I can modify. THANK YOU!
You’re welcome!
Jessica: I am so loving this site and am on my 2nd project. I’m making the Aspen Poncho for a dear friend who is a size 2X. I’ve figured out the width . . . . I wanted to know how tall you are. The poncho looks longer than 26.5 “. My friend is 5’6″ so how long would you suggest. The pictured length is perfect, but I need an approximate length for 5’6”.
I’m also 5’6″ Linda and quite thin – so if she has a large bust you might want to add a little length as it will appear shorter. So glad you’re loving this!! Thanks for reaching out Linda!
Hi Jessica!
I just finished my very first crochet article of clothing ever, this is after re taking up the craft to make my gifts over the holidays, I made your gorgeous kimono for mom in an extra large as a gift for her birthday coming up on the 28th. I just finalizing the details, I’m putting 6 * 6 ” pockets as she loves pockets!? I used Lion Brand Scarfie yarn; its so stunning! Thank you so much for your site and all your contribution, your creativity is inspiring 🙂
Oh I can imagine it’s stunning in Scarfie! So glad the pattern worked out so well for you! thanks for your kind words and you’re welcome of course. It’s so fun to blog about these projects. Have a great weekend Lorraine and I’m sure your mom will love the kimono. 🙂
Hi! A little late to the party on this pattern. What changes to the pattern should I make if I want to use an Aran weight yarn? Just make my foundation chain longer? Thanks!
What is the size of the Kimono and the height/size of the model pictured. I made a S/M, added stitches to get the right 31” measurement, and the longer side is even a bit longer than stated, but unfortunately it doesn’t have the roomy look at it is on the model (I’m 5’8” and thin).
I think it would be helpful to have the pictured Kimono and model size to help us make the correct size for us.
Thank you in advance! I hope to gift mine to my more petite best friend. Hoping it looks better on her.
Hi Marcia!
I try my best to convey the size in the pattern – I am 5’6″ and 100lbs so a size small. I will note this in the pattern above as well!
I’m a pretty tight crocheter, has anyone made this with a larger hook size? I feel like I’d be good with a s/m, but moved up a hook size. I was thinking about using my 8.0mm hook if that helps.
Also, Jess, I LOVE your jeans and you’re an amazing and GORGEOUS model <3 <3 <3
Ahh hi my friend! I think you won’t regret going up a hook size. Because I’m so small, some folks who are a bit larger have found it doesn’t appear as long on them when worn. Especially if you’re a tight crocheter. Thanks for the sweet words too girl! Let me know if you have any other questions!
hello jessica. i love your pattern. it is very well explained, but mine is a litle bit longer that it should. you should be tallee than me. i have to fit the pattern in the next turn. thanks.
Hi Helena! That’s too bad that it turned out longer. I have had some comments that it turned out shorter, so I think it’s hit or miss for some folks! I’m glad you thought it was well explained and I hope that next time it works out for you. I’m about 5’6″ if that helps.
Hi, I love this sweater but I wonder if you have a video tutorial. It says to see video click here but there is nothing to click on. Thanks
The video tutorial is just for the stitch that is used, not for the entire kimono. Thanks for asking!
Please don’t send to me anymore emails, I don’t do crochet and I don’t have time to try to learn that. I like your site before but not anymore now everything is crochet. So no more emails…
Hi Febe! I’m sorry to hear that! You can unsubscribe by clicking the unsubscribe button at the bottom of any of the email newsletters. I still share knitting patterns; sometimes more and sometimes less.
Love this pattern and it’s super easy but it fits nothing like the picture but I have the right measurements. Not sure what to do
Penny,can u help me with the proper stitch gauge for this project? I am enlarging to Extra large per your instructions. My textured stitch is 3 stitches per 2”. Does this sound about right?
Thank u
Beautiful! Do you have a similar pattern that’s for knitting rather than crochet? Thanks!
So sorry, I don’t have a knit version currently Pam.
Hi, would you consider doing a video on your cardigans and sweaters from beginning to end? They are all so lovely.
I’ll certainly keep it in mind!
Hello
If I am a tighter crocheter should I use a bigger hook?
Thank you for generously sharing. I love all your patterns! And I tell all my friends about your site.
Thank you
I found your Cascading Kimono pattern and immediately ordered the kit. I can’t wait to wear it! I got started yesterday and started wondering if I might need to shorten the length, since I’m 5 ft tall. Do you have any advice about if I should and how I would shorten the length? Thank you!!!
Hi Rachel! It might be a good idea to use a larger hook! Thanks so much and I’m so happy you like my patterns. 🙂 Means a lot that you tell your friends too. 🙂
Dianna……I am in the process of crocheting this beautiful kimono. I am also 5’ tall. Just wanted to let you know that i think it is a little long. Hangs down to my knees in the back. In retrospect, I wished I had made it a few inches shorter. It’s a matter of preference. Hope this helps.
Patti
the pattern says the chest is 41″ my chest is 48″ adding to the chain side doesn’t make sense to me. i could be crazy. the chain side is the front and collar section. shouldn’t i be adding more rows between sleeve at in the textured sections? have i totally missed the mark here?
Correct – adding to the chain will make it longer, not wider. You will add to the double crochet sections and or the textured section.
Thank you so much for this pattern! I bought it on Etsy and it’s my first project beyond beginning scarves and hats. It looks great was manageable, and your instructions were clear enough for a beginner like me. I’m curious to know, though, how did you block it when you were finished? Yours looks more flowy than mine, mine appears fluffier than yours, more blanket like, despite using the same yarn, needle size, and ending up with the dimension you stated. I’m wondering if you made a choice to kill the yarn to make it lay that way? Thanks so much.
Hi Elizabeth! I’m thrilled that you’re happy with it! I actually didn’t do anything at all to the yarn, but I did slightly block the textured section. I wonder why there is such a difference in appearance of the fluffiness? Hmmmmm…..
Thank you so much for this pattern! I adjusted the number of stitches from 98 to 104 to get the correct the length. Should I also adjust the placement of the stitch markers for the arm holes? If so, can you suggest alternative placement? Thank you!
Yes please!!! Love the cardigan
I just have to say: every time I see something on Pinterest that I love, it’s from this website! I love the different patterns you have!
Hehehe! Thanks so much Sammy! I love Pinterest!
Hello! I’m just getting back into crocheting. Could you please explain the 2nd row with the space (sp)? It says to ch1 sc2tog then ch1 sp then ch1 sc2tog ch 1 sp… am I confusing this? So is it really ch2? I guess I need clarification on the sp. any help is appreciated! Thanks!
Hi! I absolutely loooove this pattern. Im working on it right now. I’m typically an xs though so do you suggest that i start off w less chains in the beginning?
I am an XS, so stick with the pattern as written! You should be good to go!
Hello
I have wanted to crochet something for myself for several yrs. I give most things I make I give away. I finally made this cardigan for myself and I love it. You make the nicest patterns that are easy to understand. I want to thank you so much for making these available and the time you take to explain everything.I made this and get compliments. I am not an crochet expert. I plan on making more patterns you have for myself and others.
Hi! In the first section, what do you mean whith “sp”? I don’t understand that part, un the row 2. Thank you!!
I would love to see a video for this pattern! For us somewhat newer crocheter this would be such a great help! This is absolutely stunning! I agree, you most certainly will find many followers/subscribers on YouTube! Thanks for show in us this pattern!
I’ll keep this in mind, Cheryl! Thank you for the suggestion!
Hi!
I stumbled upon this post and it’s absolutely gorgeous! I’m a beginner so I was hoping you could help me out by telling me the overall measurements of the “rectangle” laid out with arm holes as you pictured above.
Thank you very much!
I absolutely adore you and the things you do. The pattern and the look is amazing!!! I have no idea how I didn’t come across it before! It goes to my to do list 😀
Thank you very much for sharing this!
Plus sizes please, love this pattern.
Hi! I just finished your homebody sweater and getting ready to start this pattern! I love your work! Also, what kind of jeans are those? I adore them!