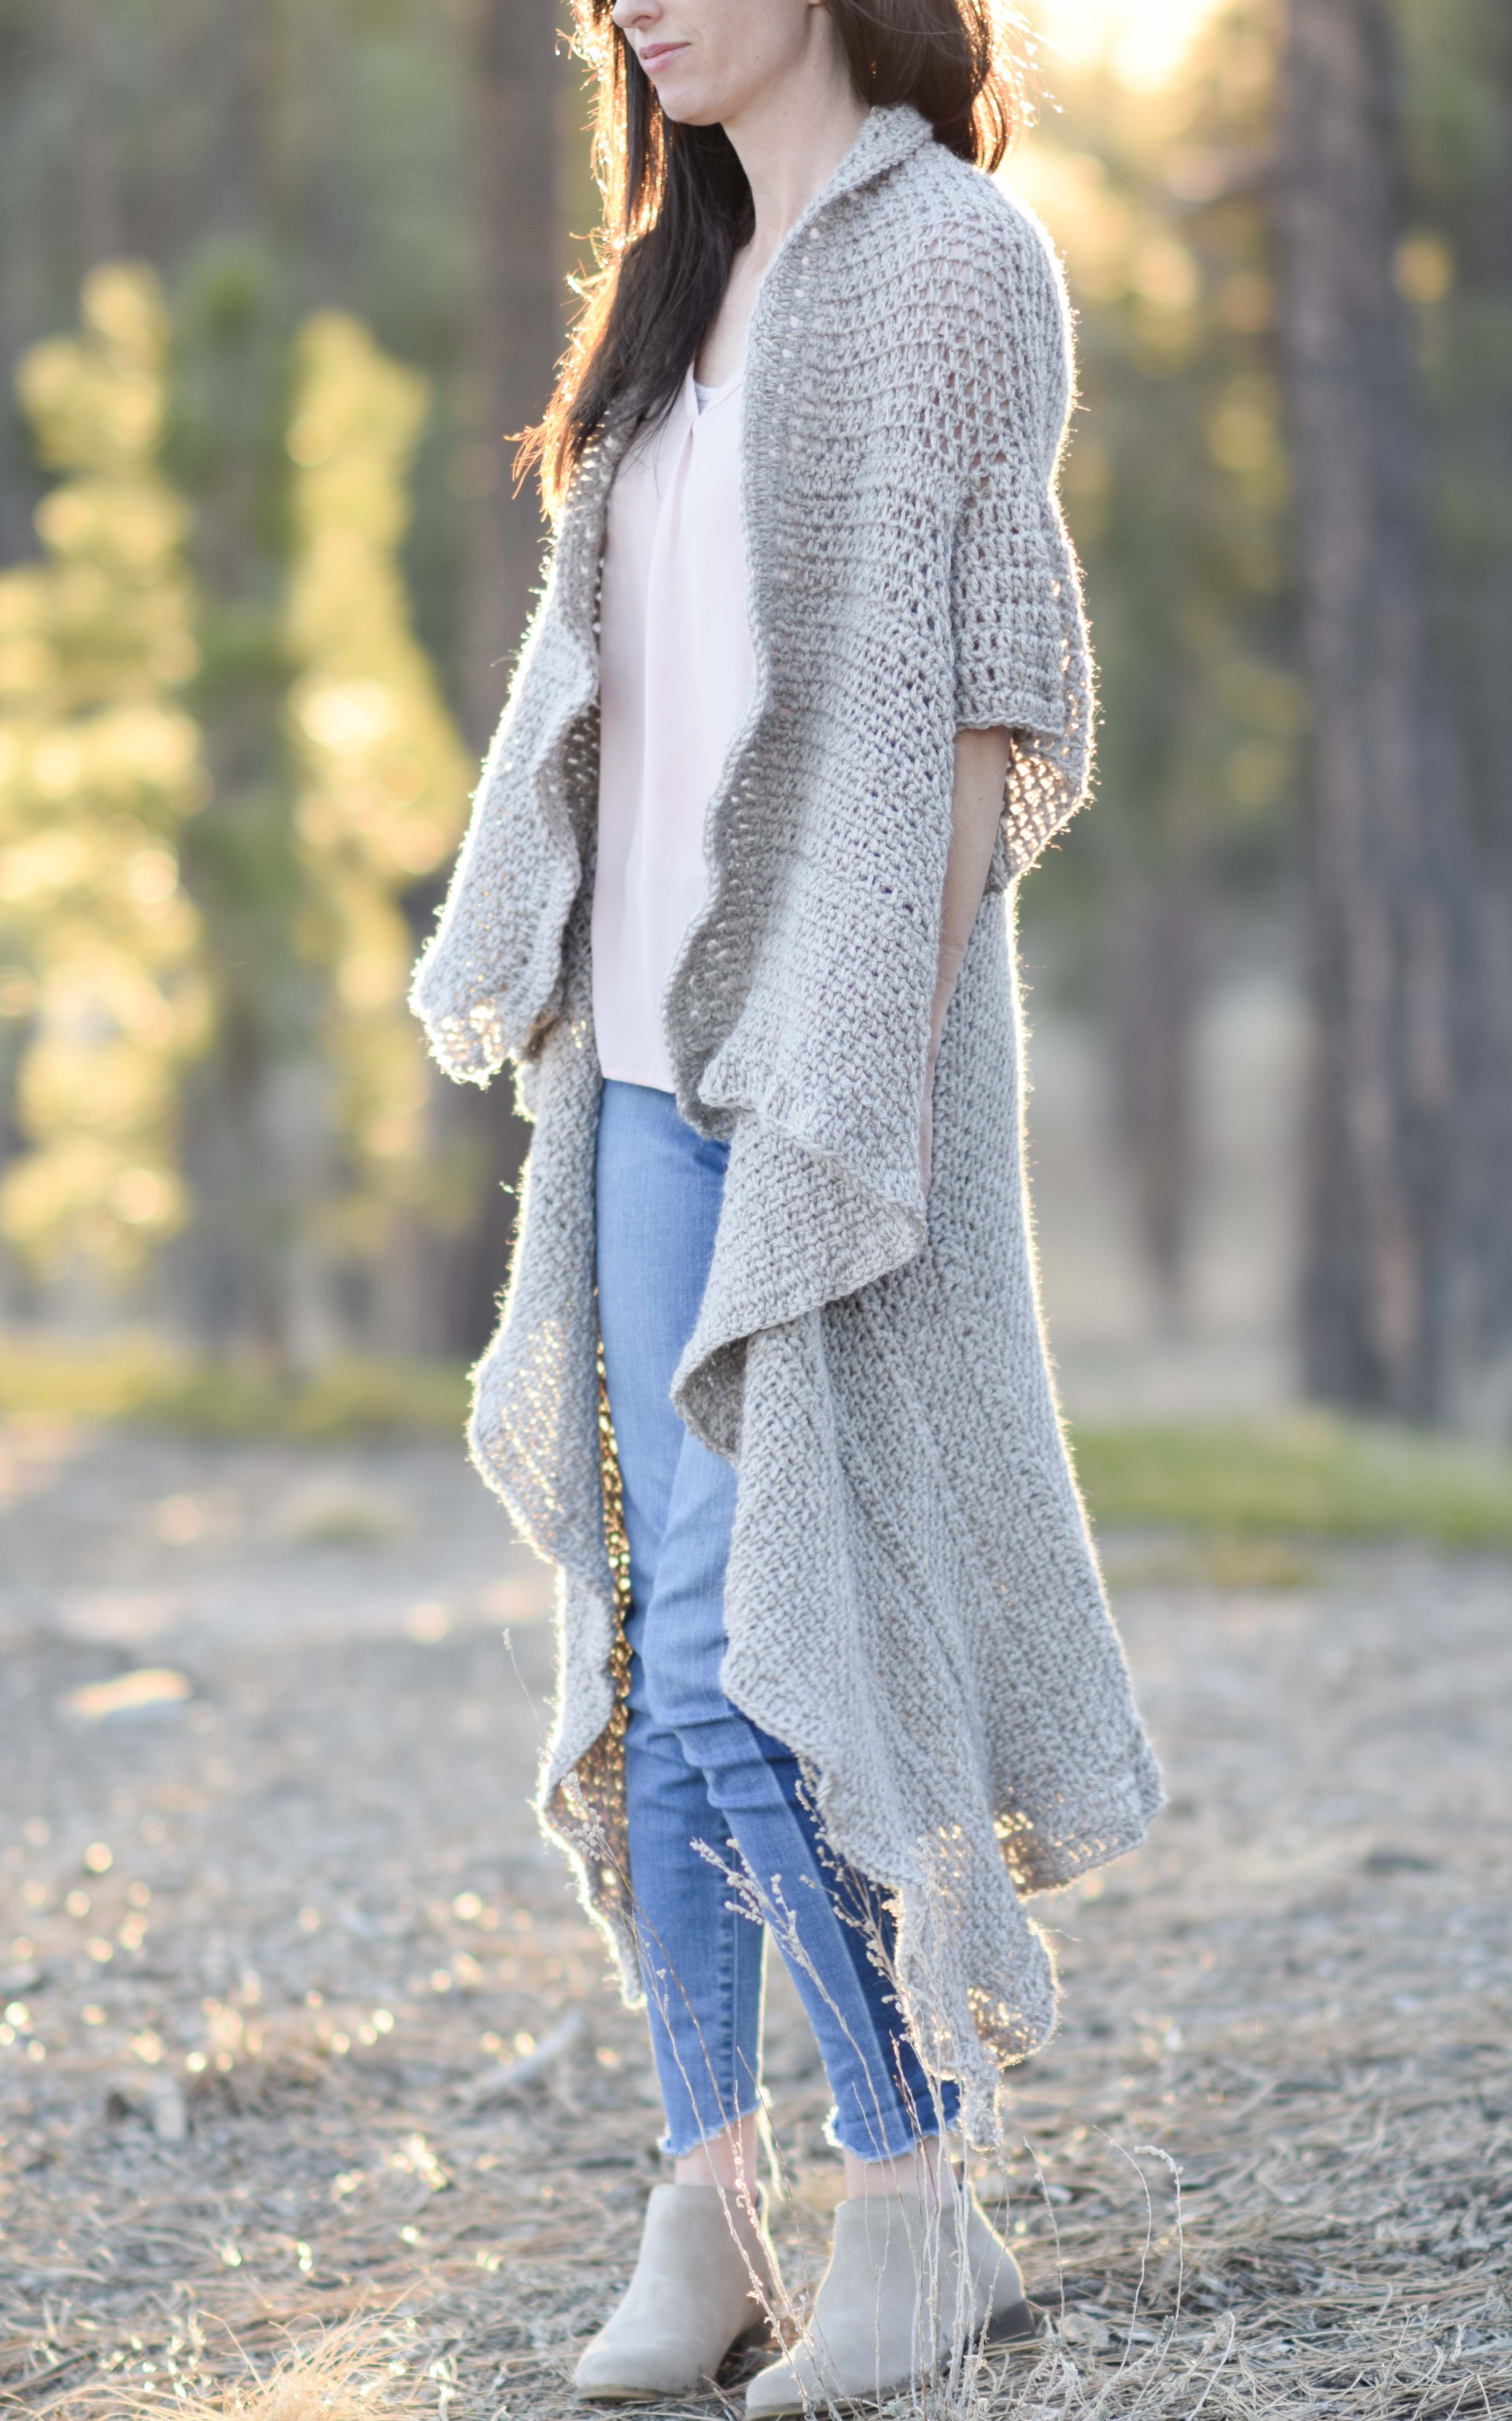
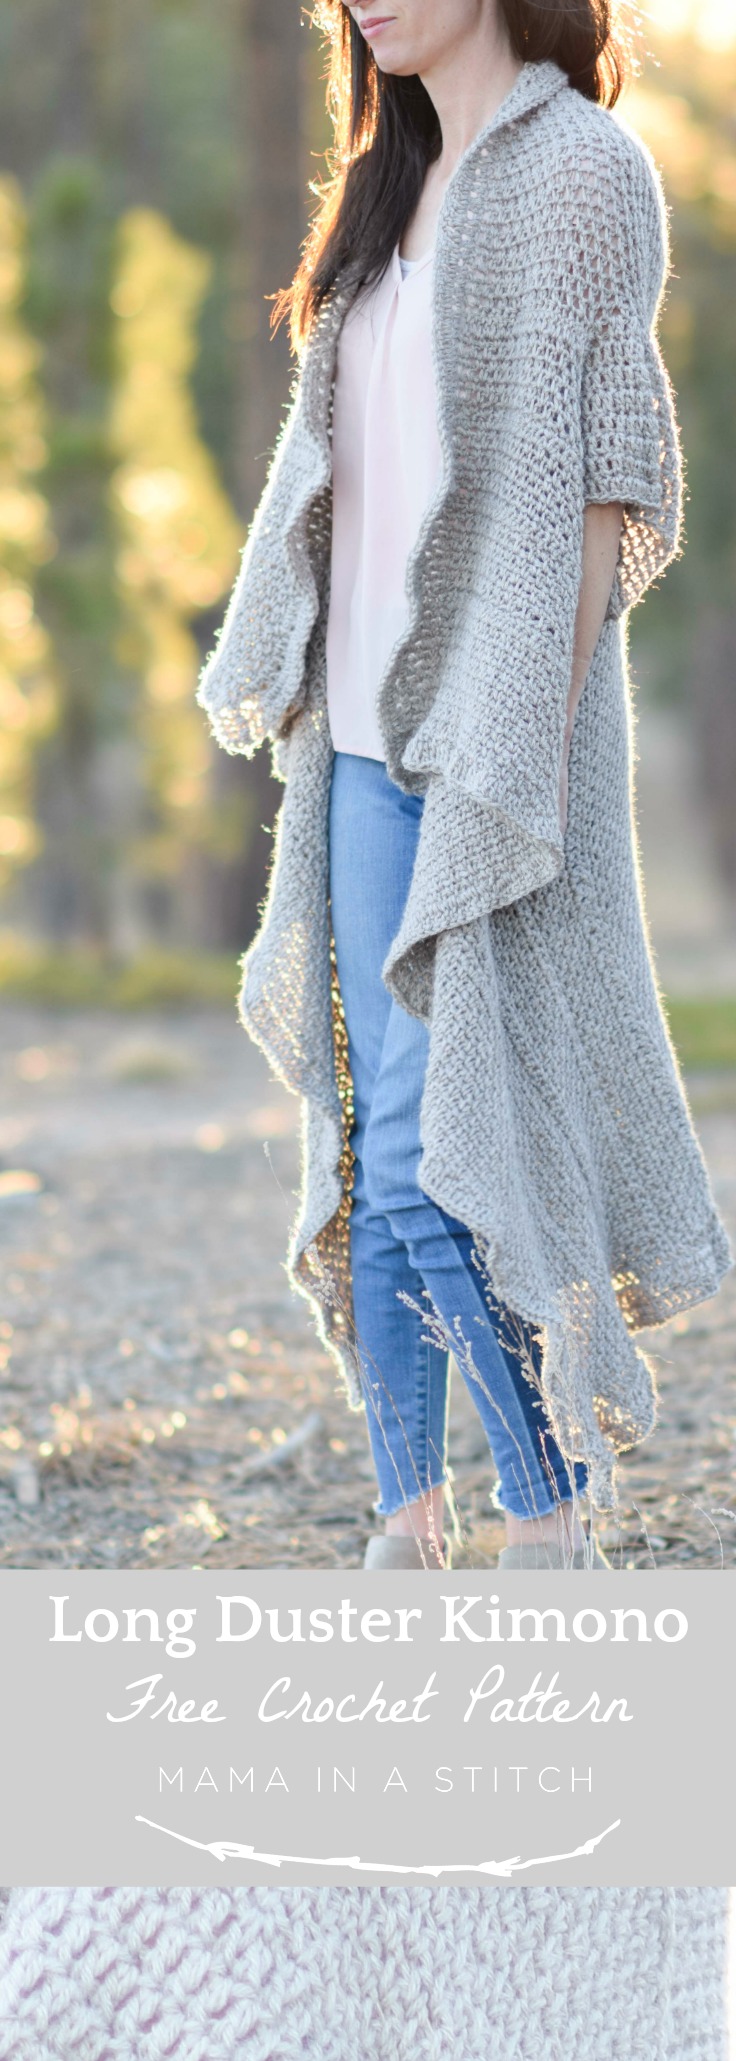
Endless Drape Kimono Duster Crochet Pattern
Ready for the looooongest kimono that you’ve seen on my blog? Hehe…
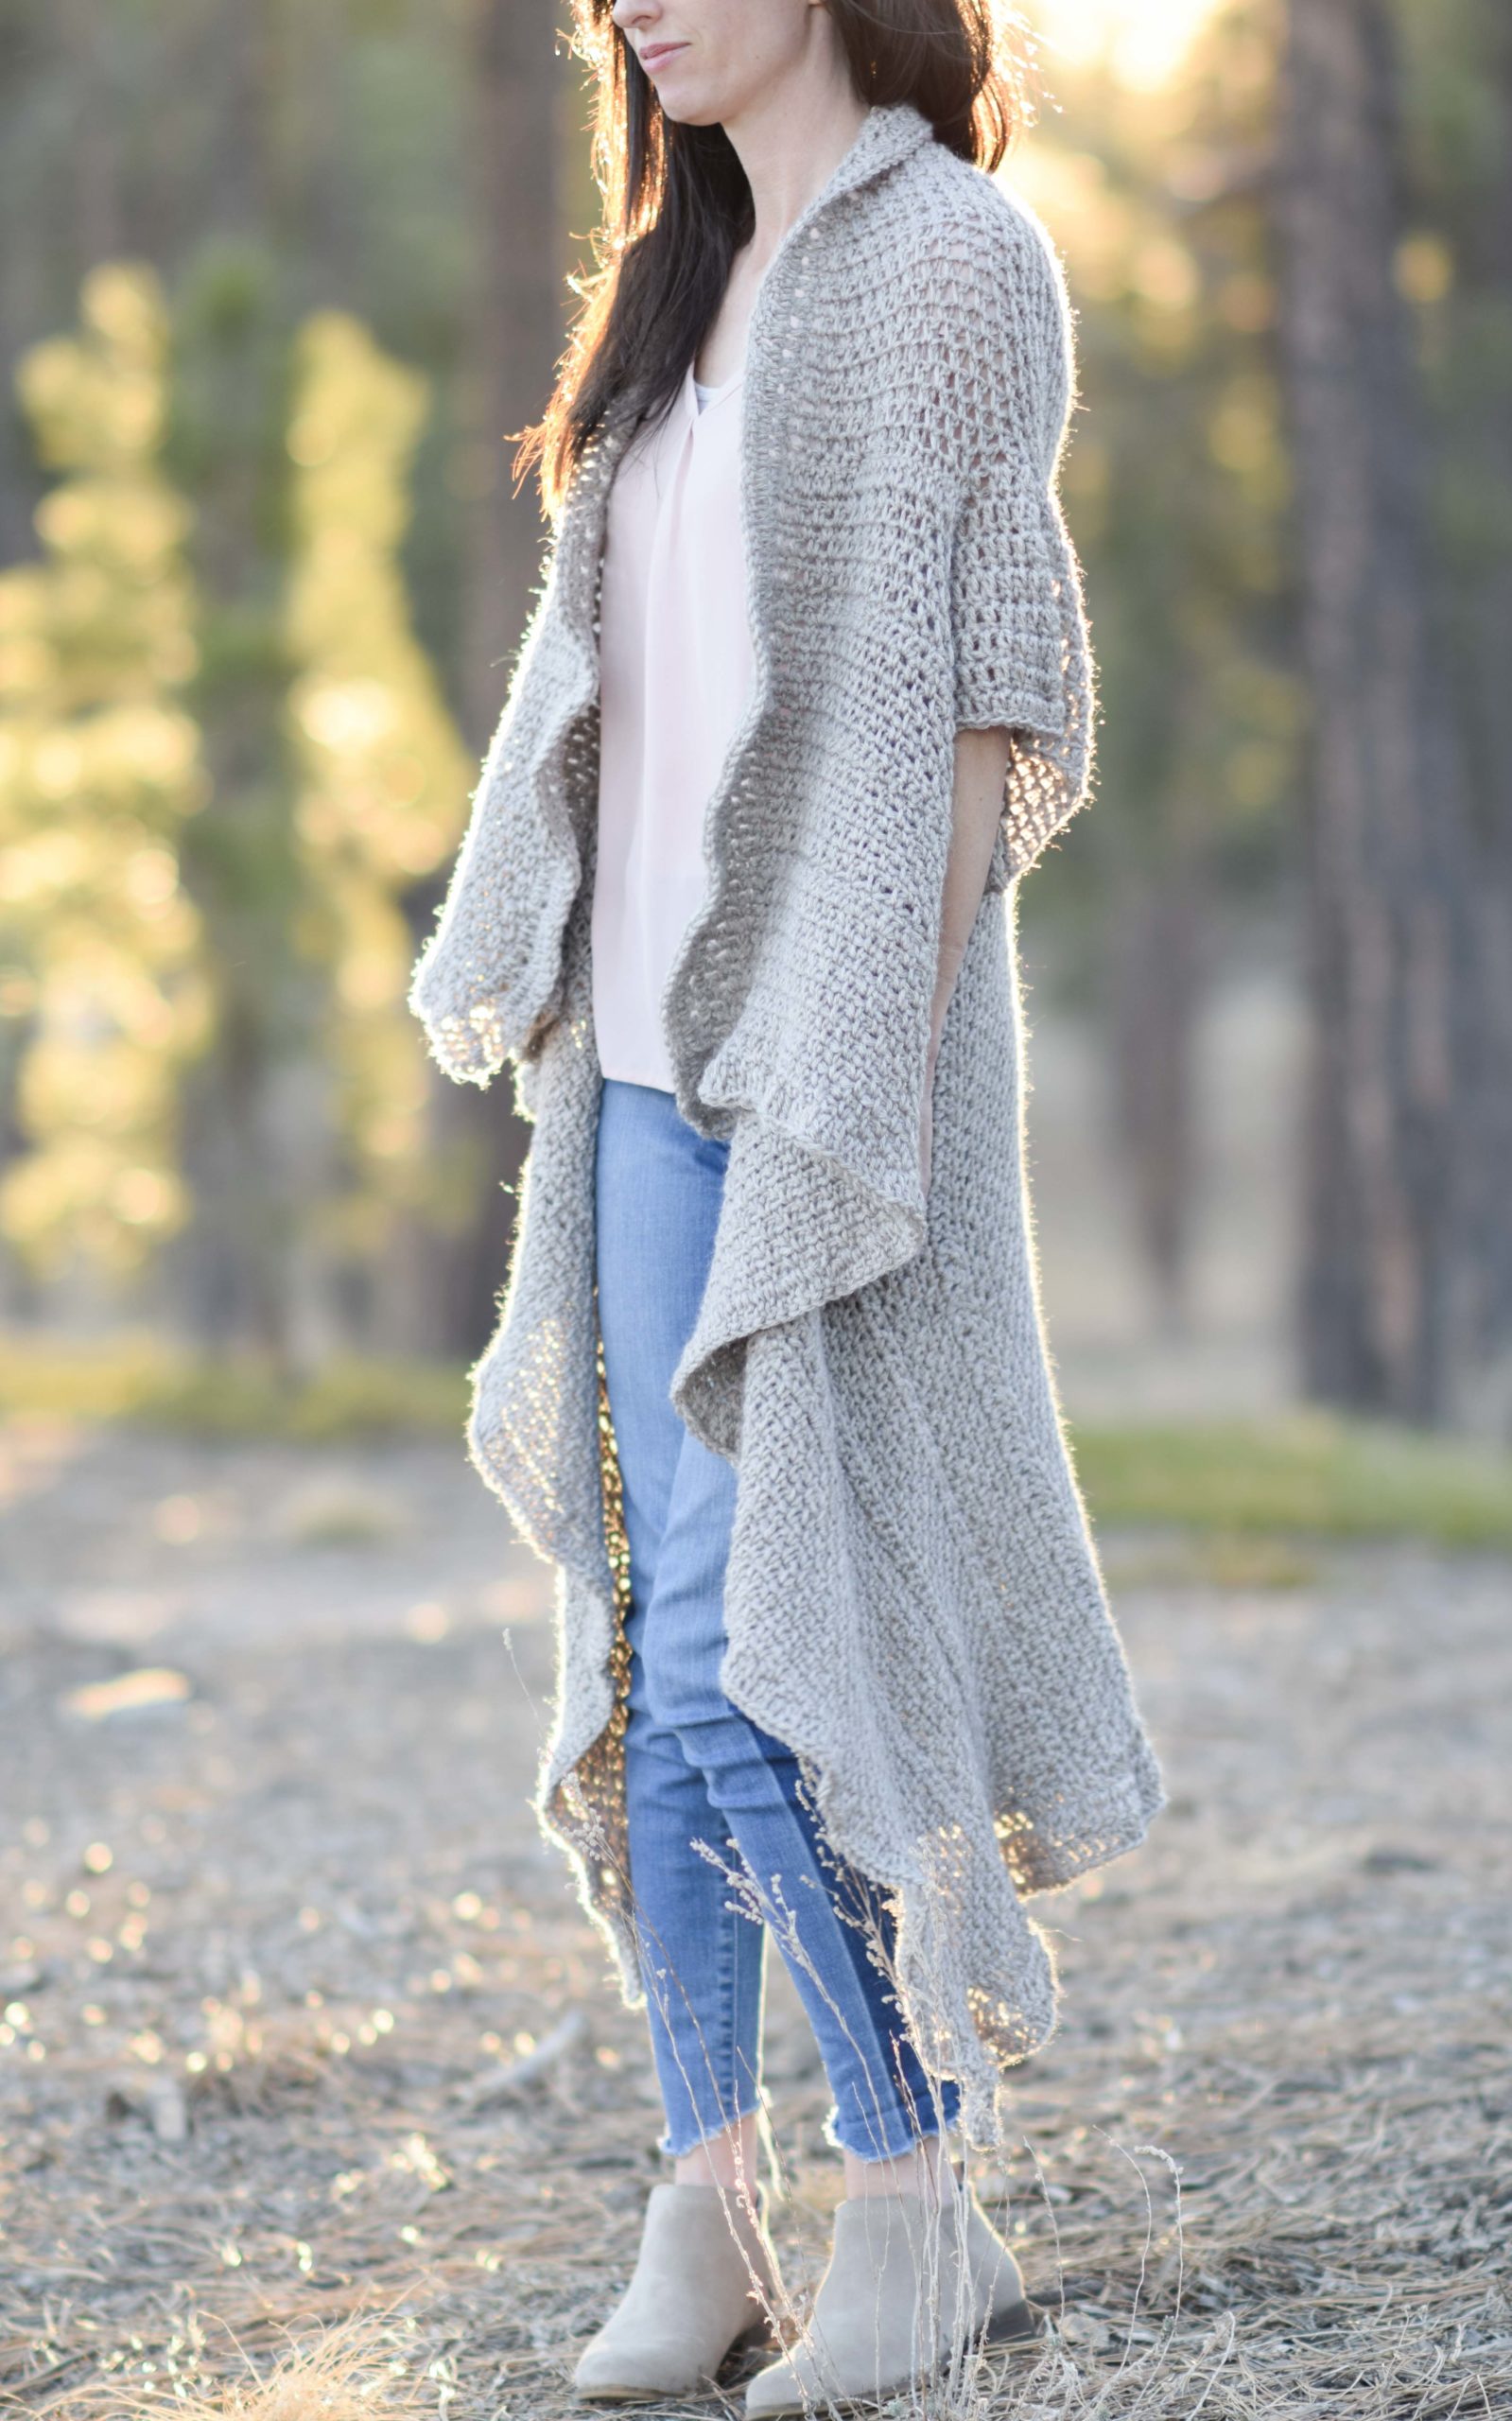
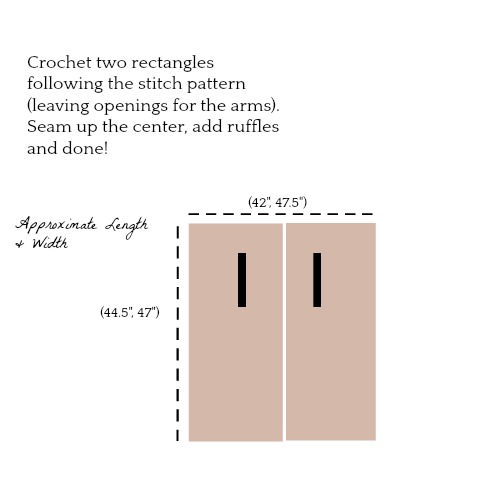
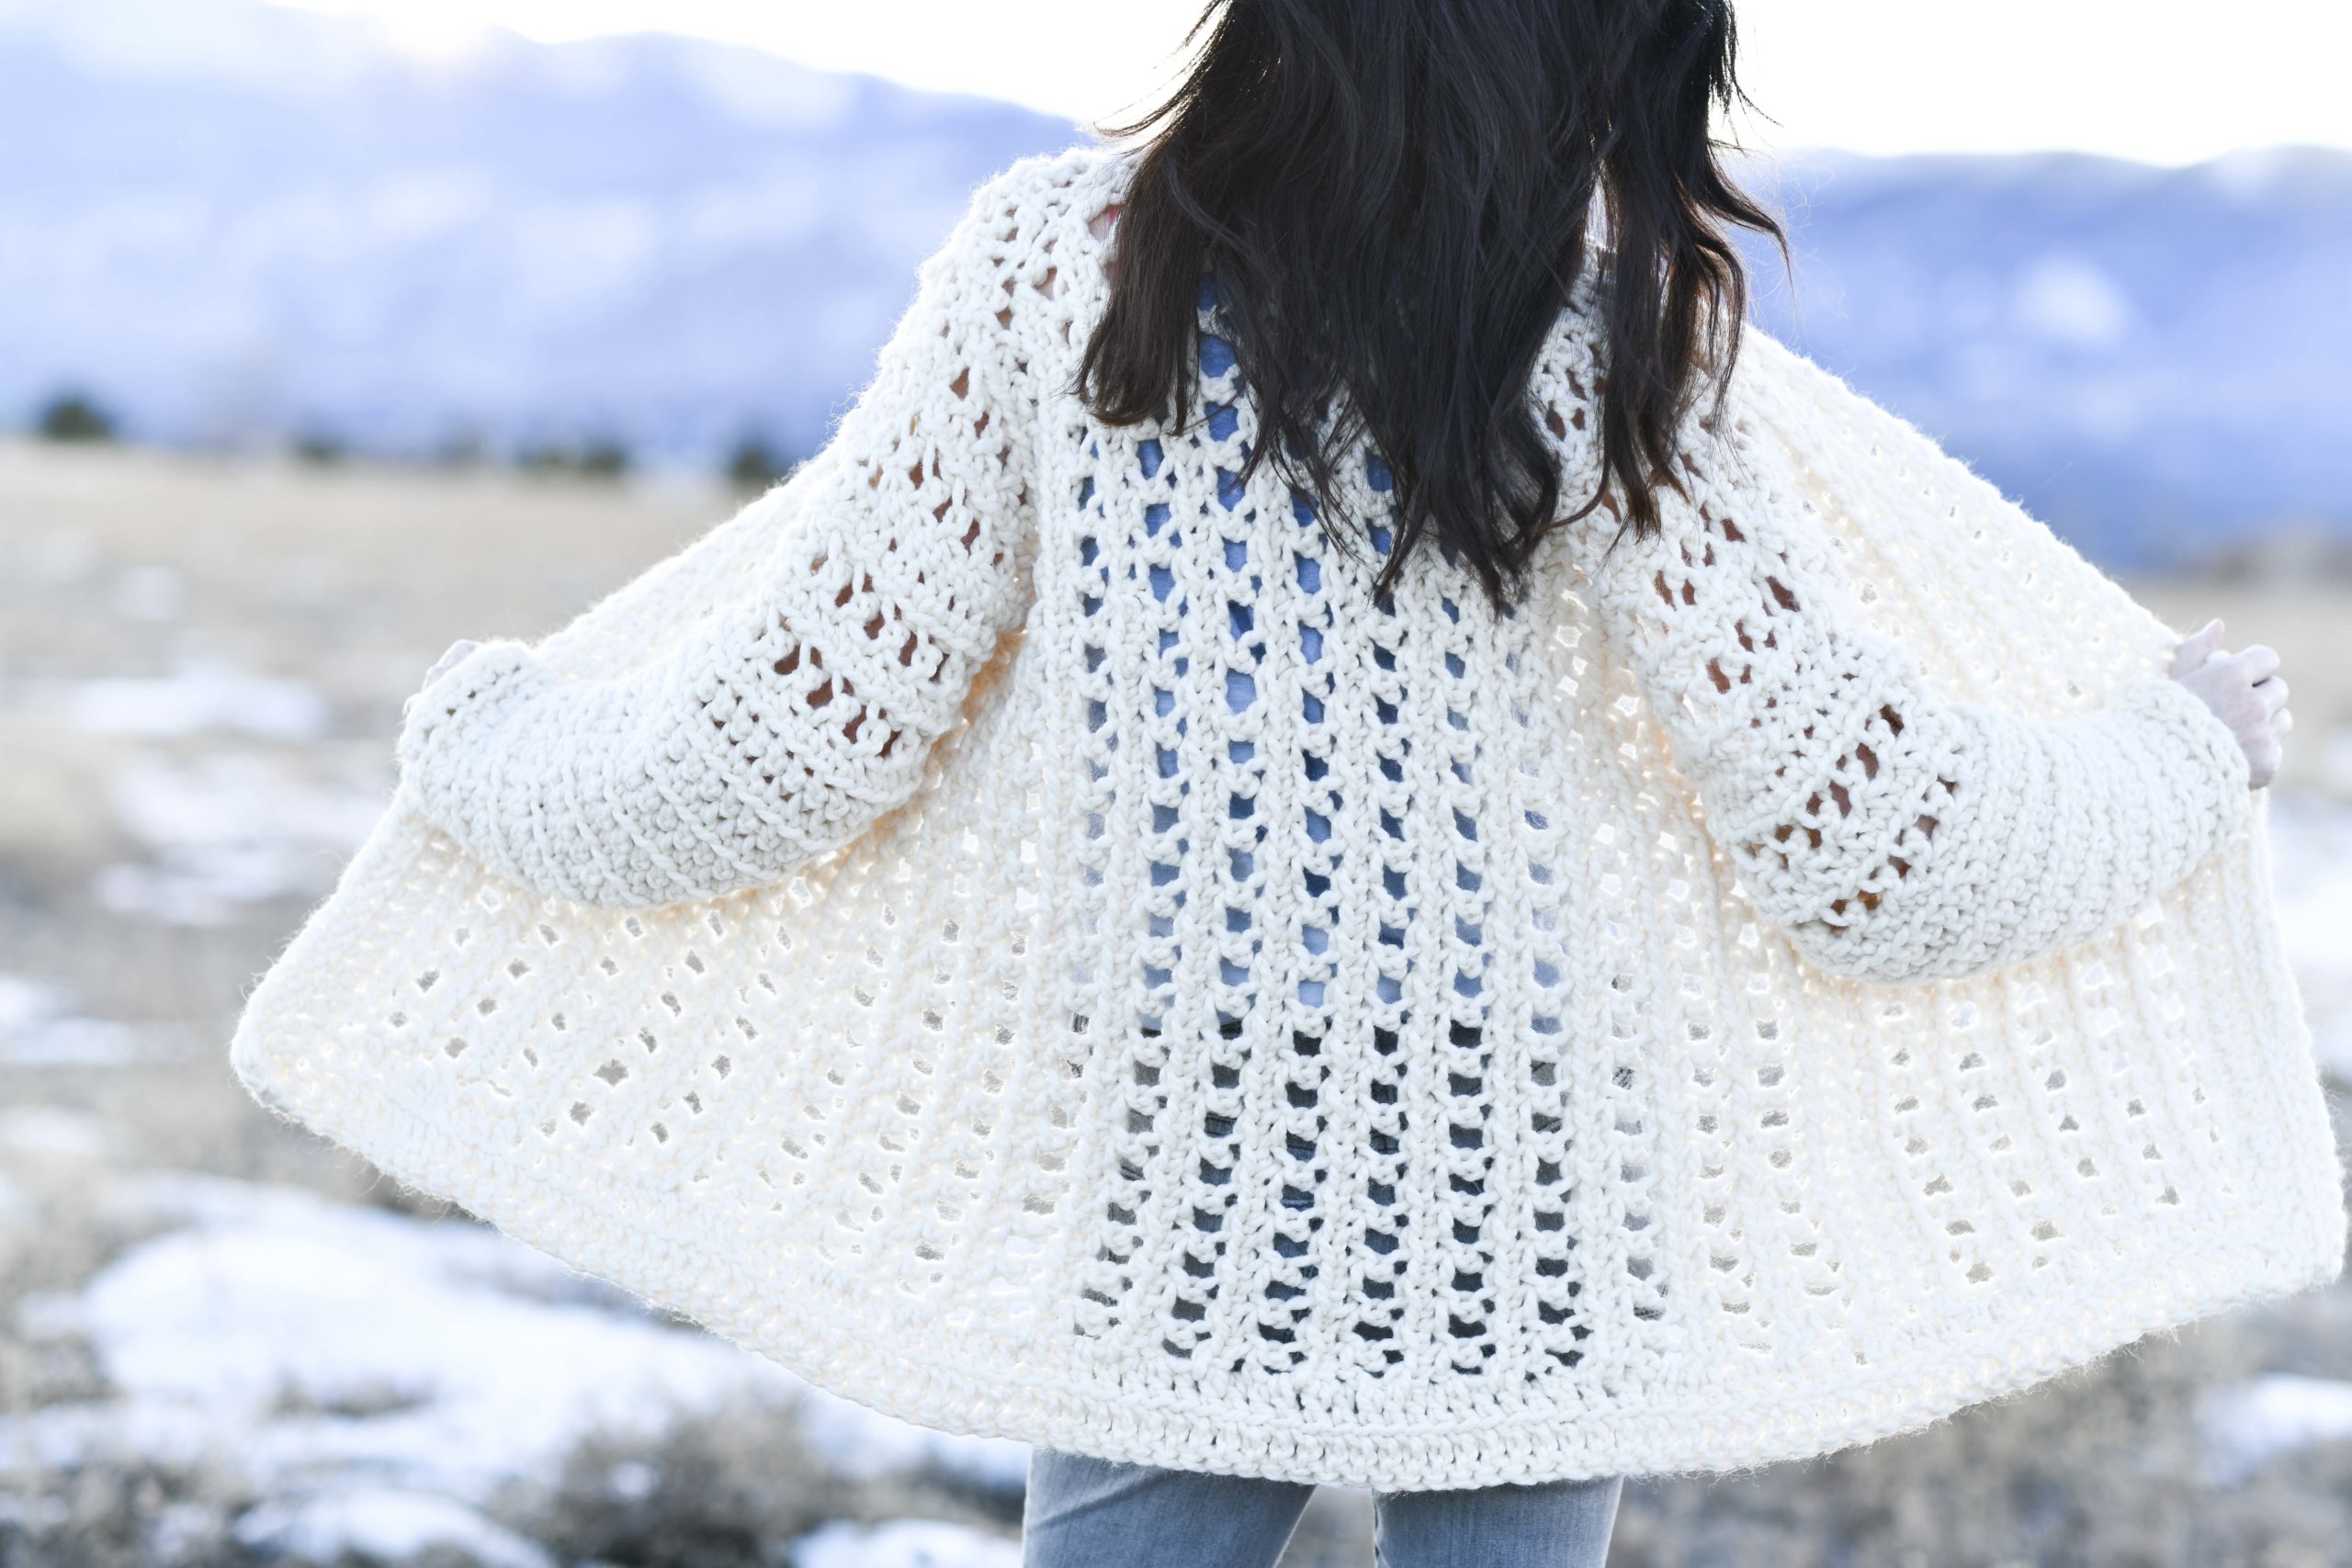
A while ago, one of my readers requested a “duster” pattern and I’ve kept it in mind for months as I thought it would make a super special project. When coming up with the design, one of the main things I was hoping to accomplish was to create something that could be worn in spring or winter. Kimono styles are great in my opinion because of the versatility to comfortably wear them over long sleeves or tank tops. This duster is a blend of a long, traditional duster and a comfortable, flowing kimono with understated ruffling details. As is the norm with my patterns, it’s easy to make as there is no shaping involved. You will basically crochet two rectangles with openings for arms and seam them together. 🙂
You can also see some similarities to my Cascading Kimono pattern as the large collar is created in the same manner, however this is longer and features the granite stitch as well as modest ruffling. The taupe color goes with just about anything and the Lion Brand Touch of Alpaca yarn has become a favorite of mine. It’s affordable and has a high end look and feel which I love. As usual, you can scroll down to see the free pattern below, or you can find the full kit available from Lion Brand here (in Taupe, Grey or Navy), or the printable ad-free PDF pattern for purchase from Etsy here. So many options..hehe
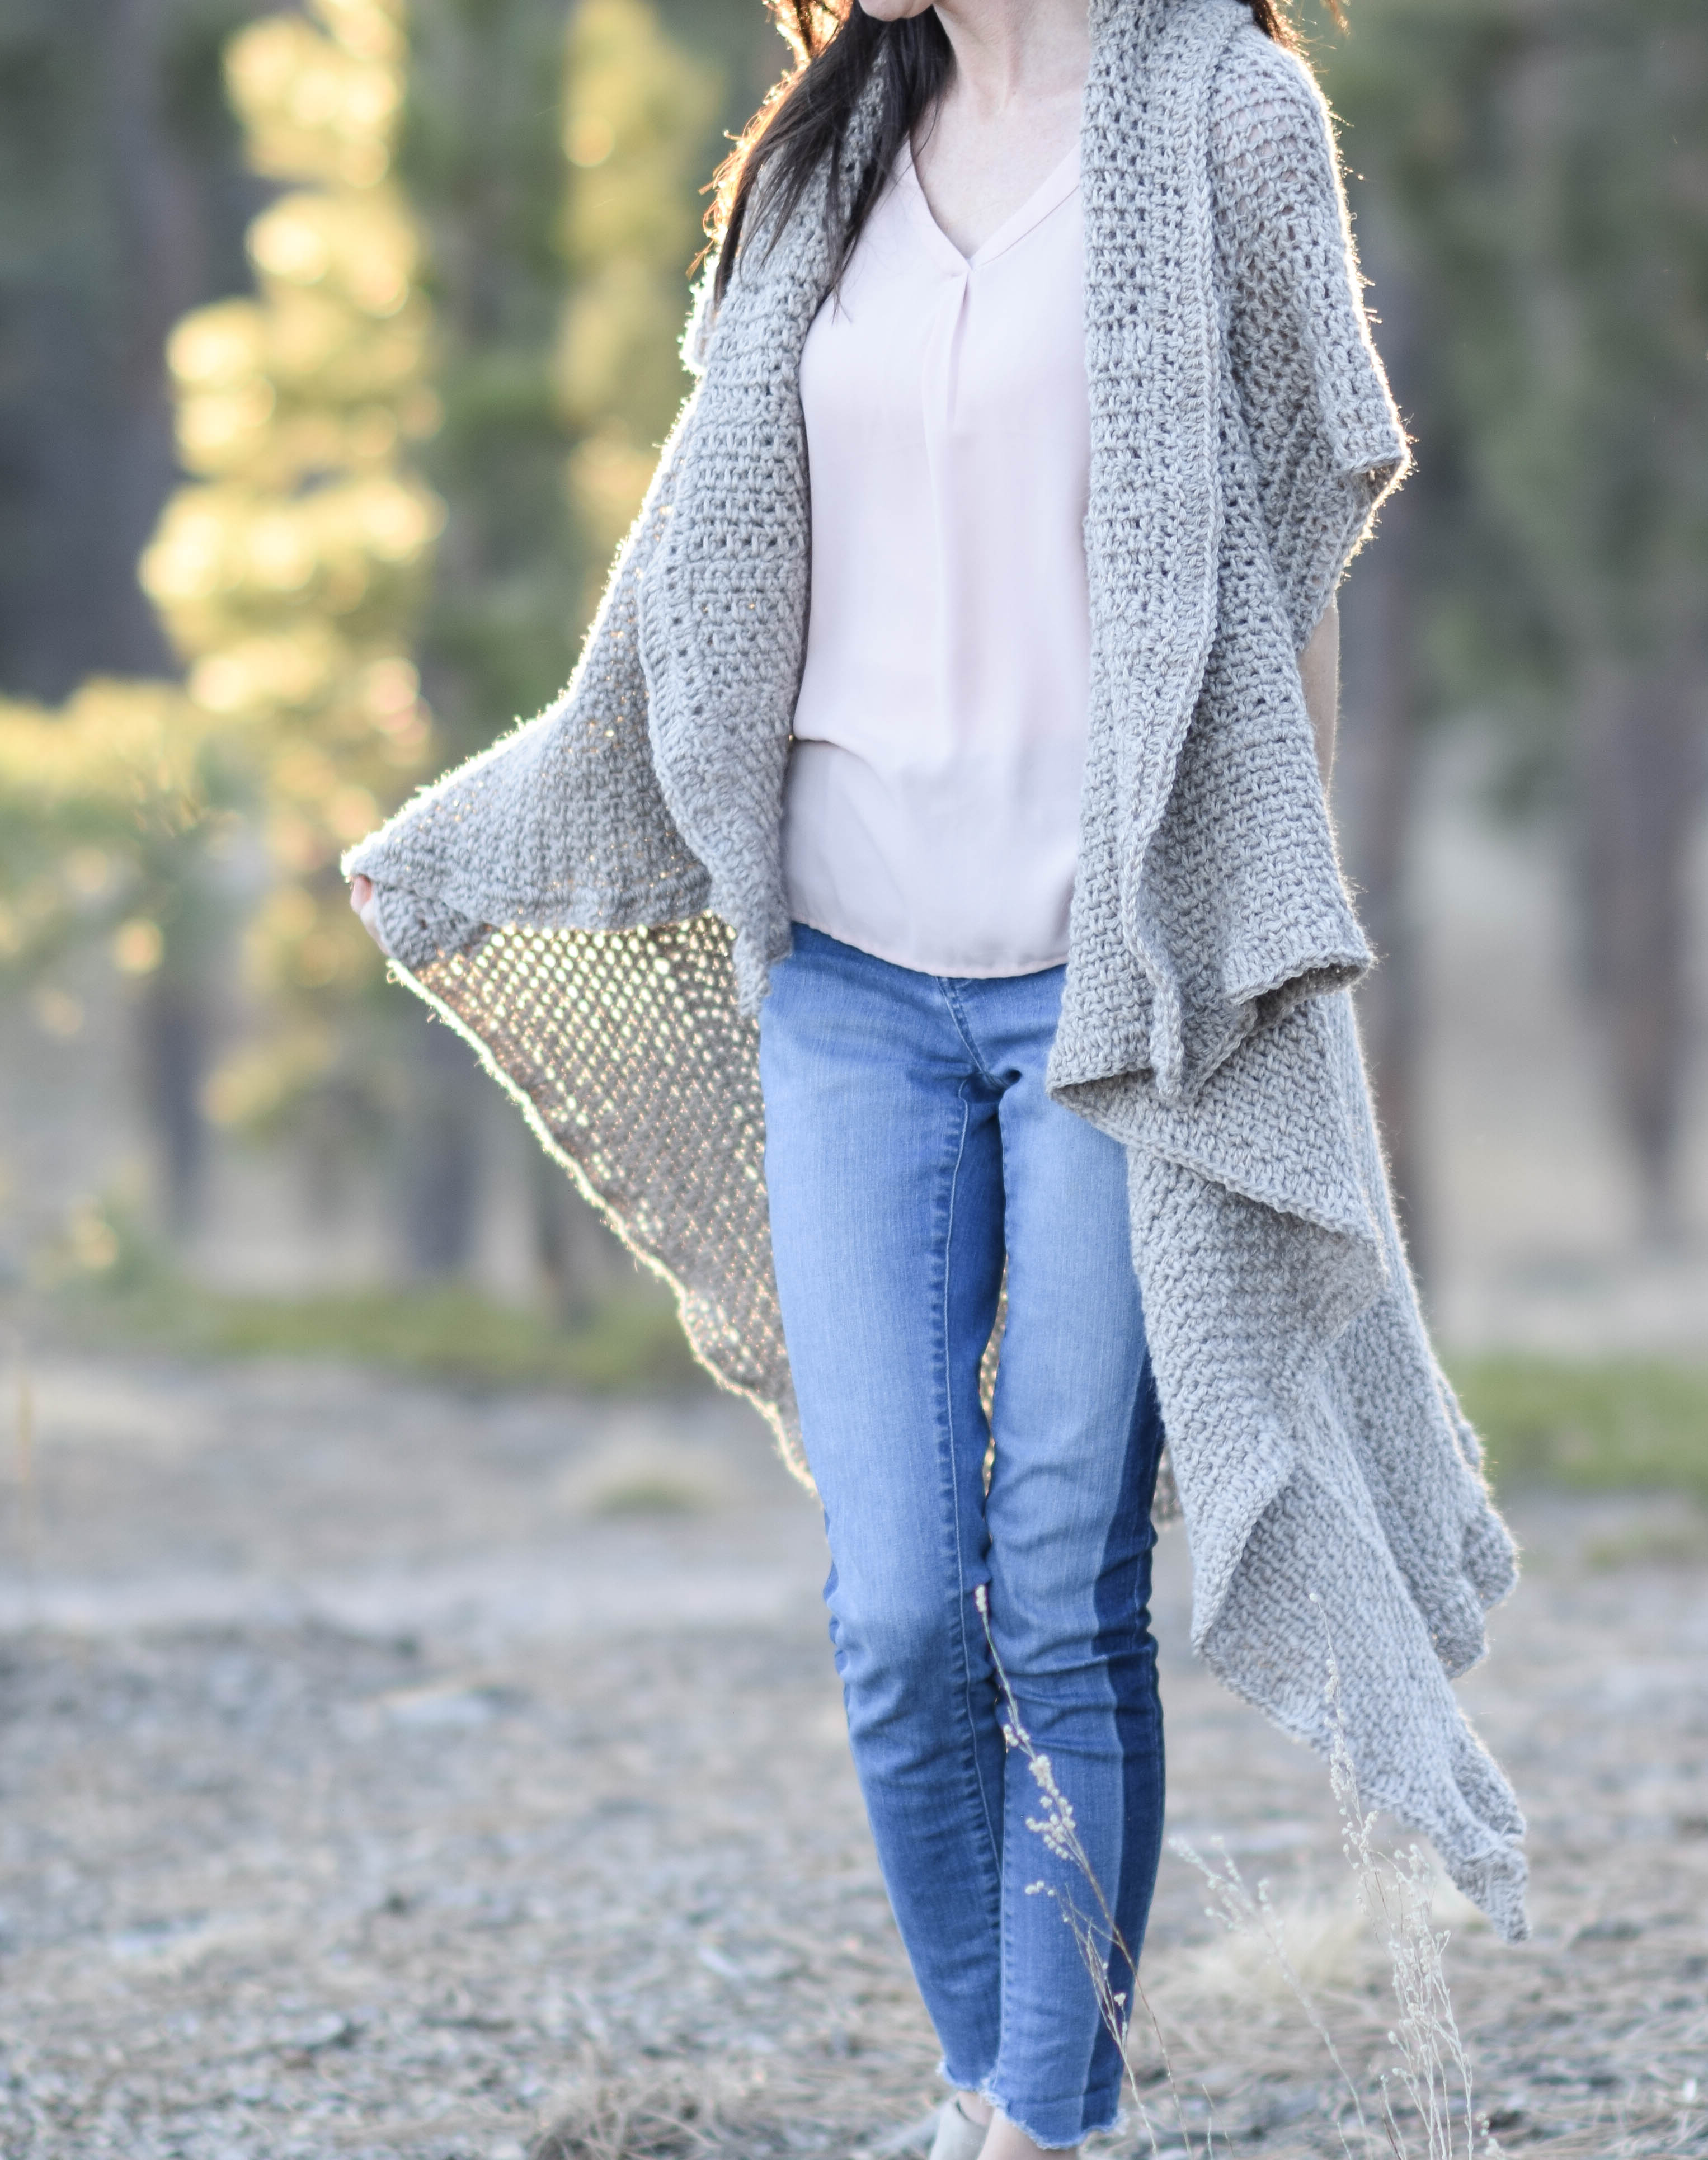
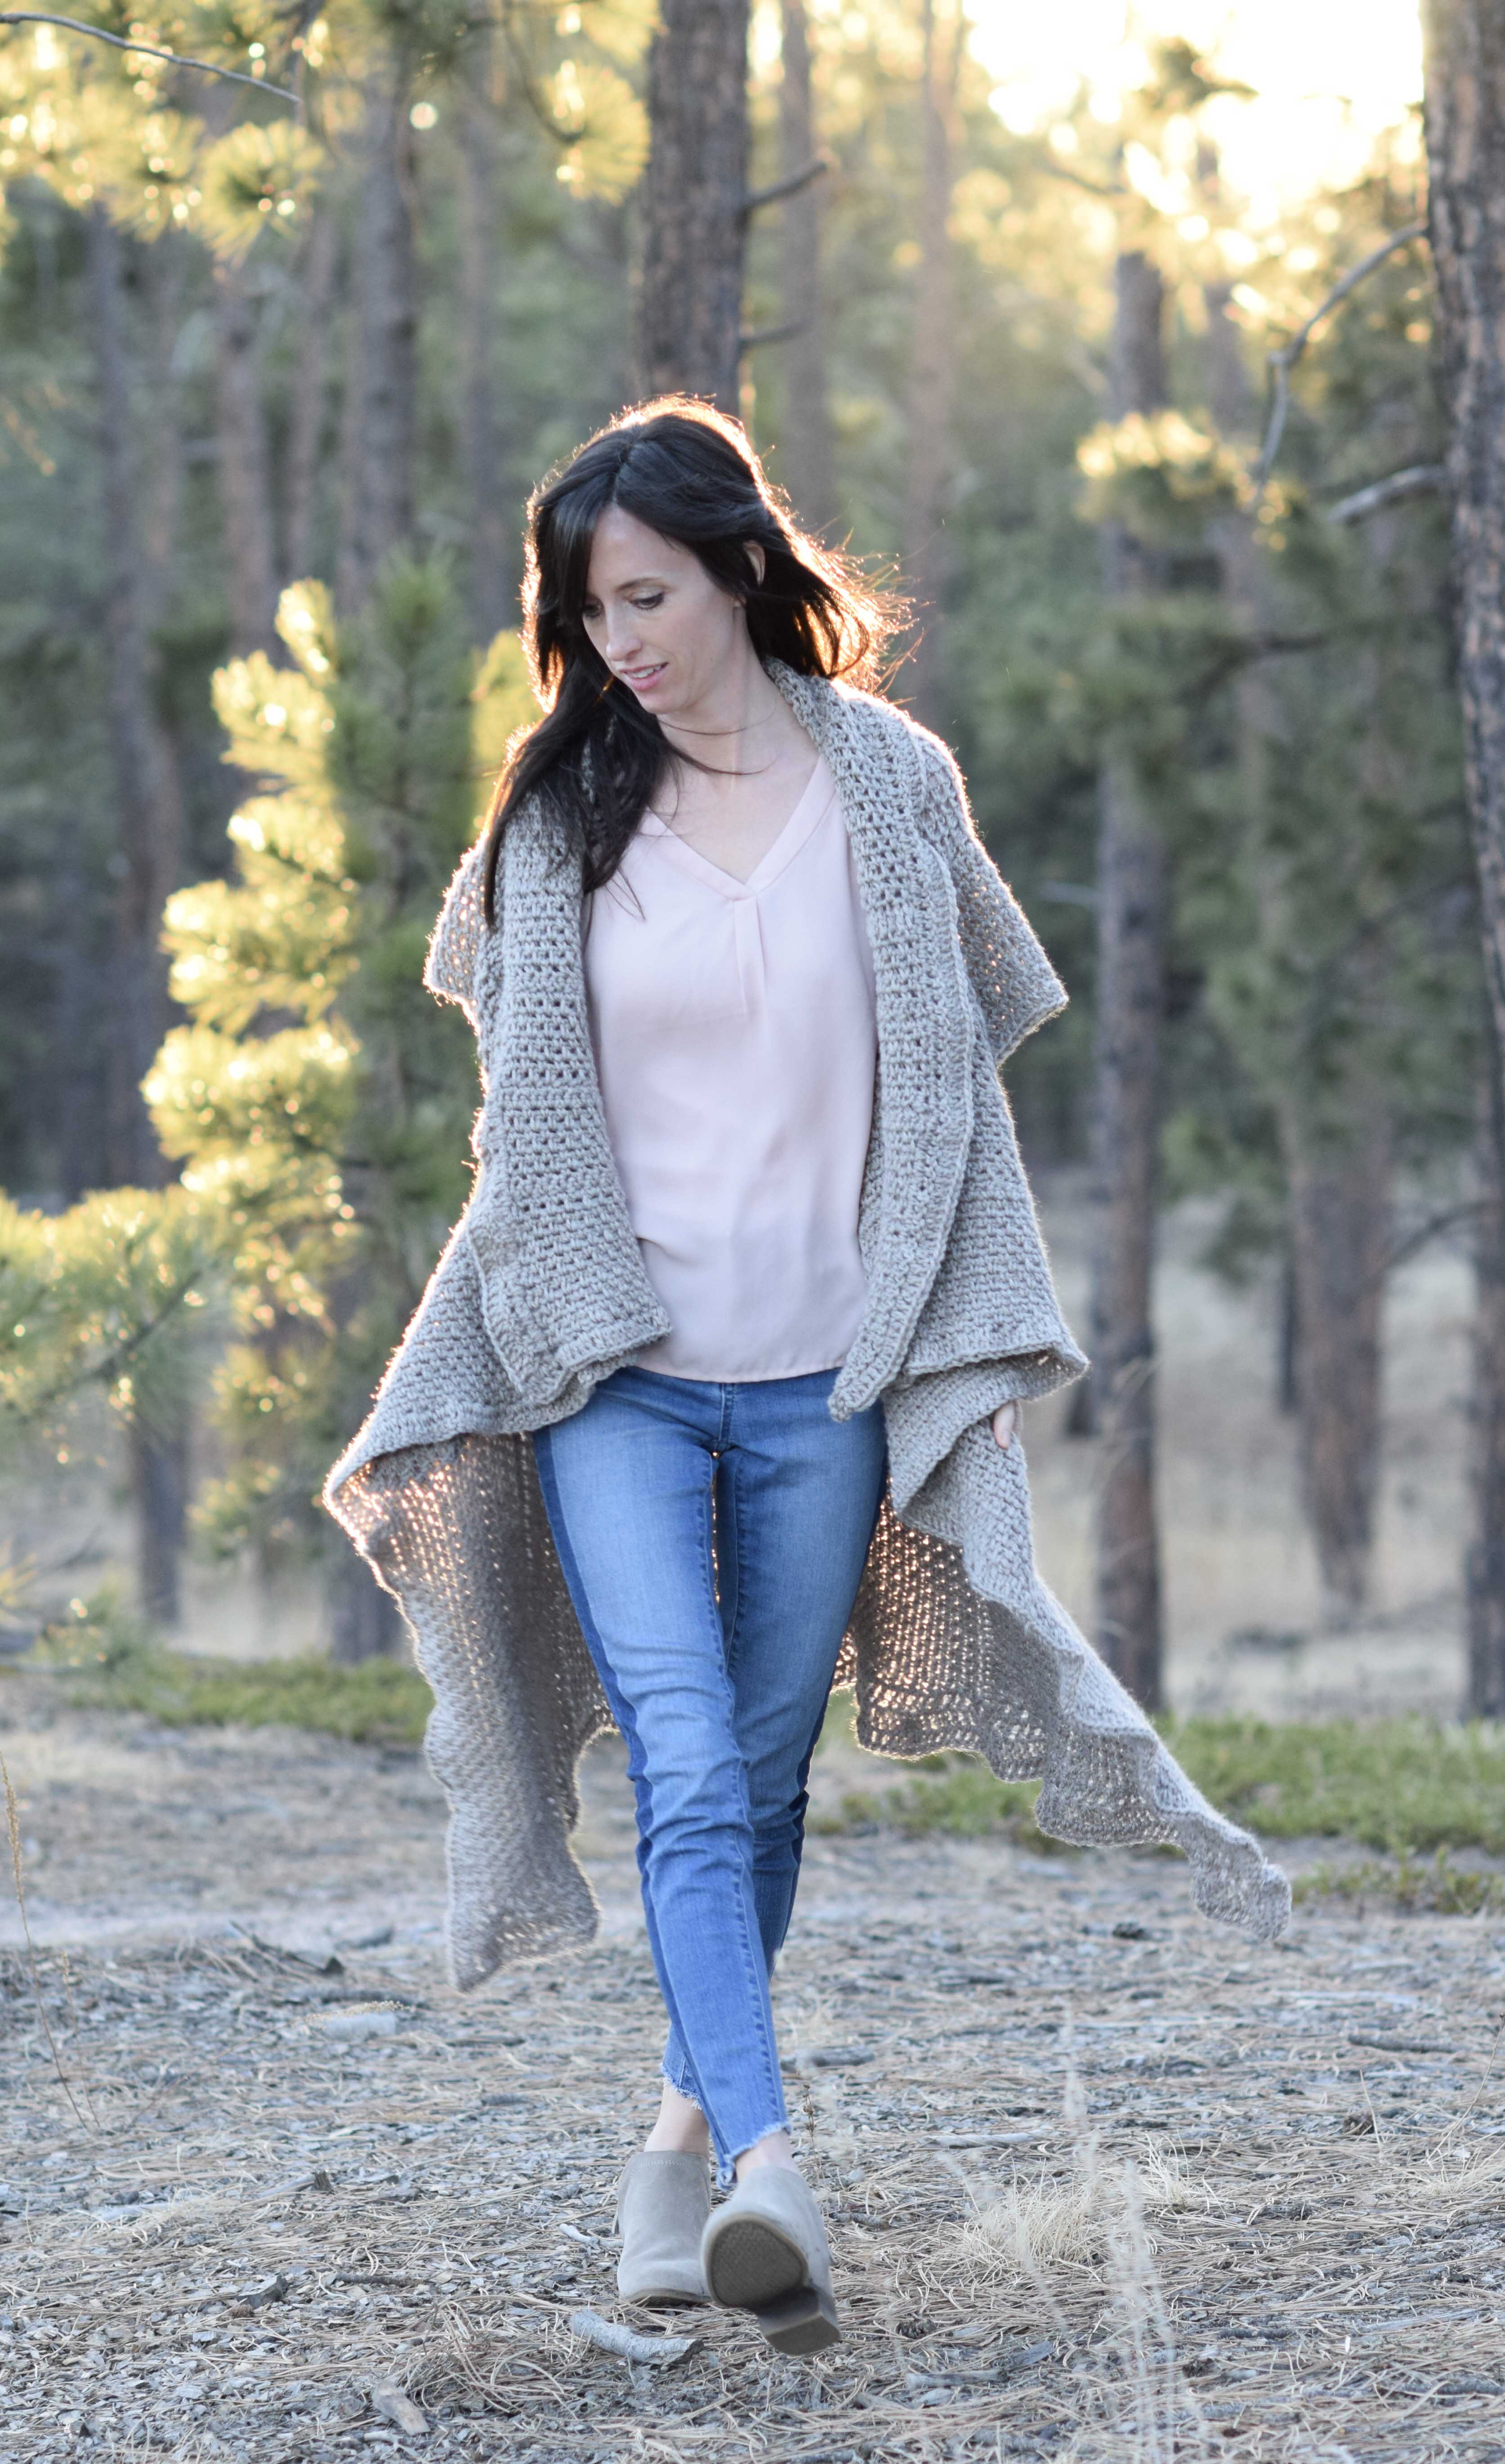
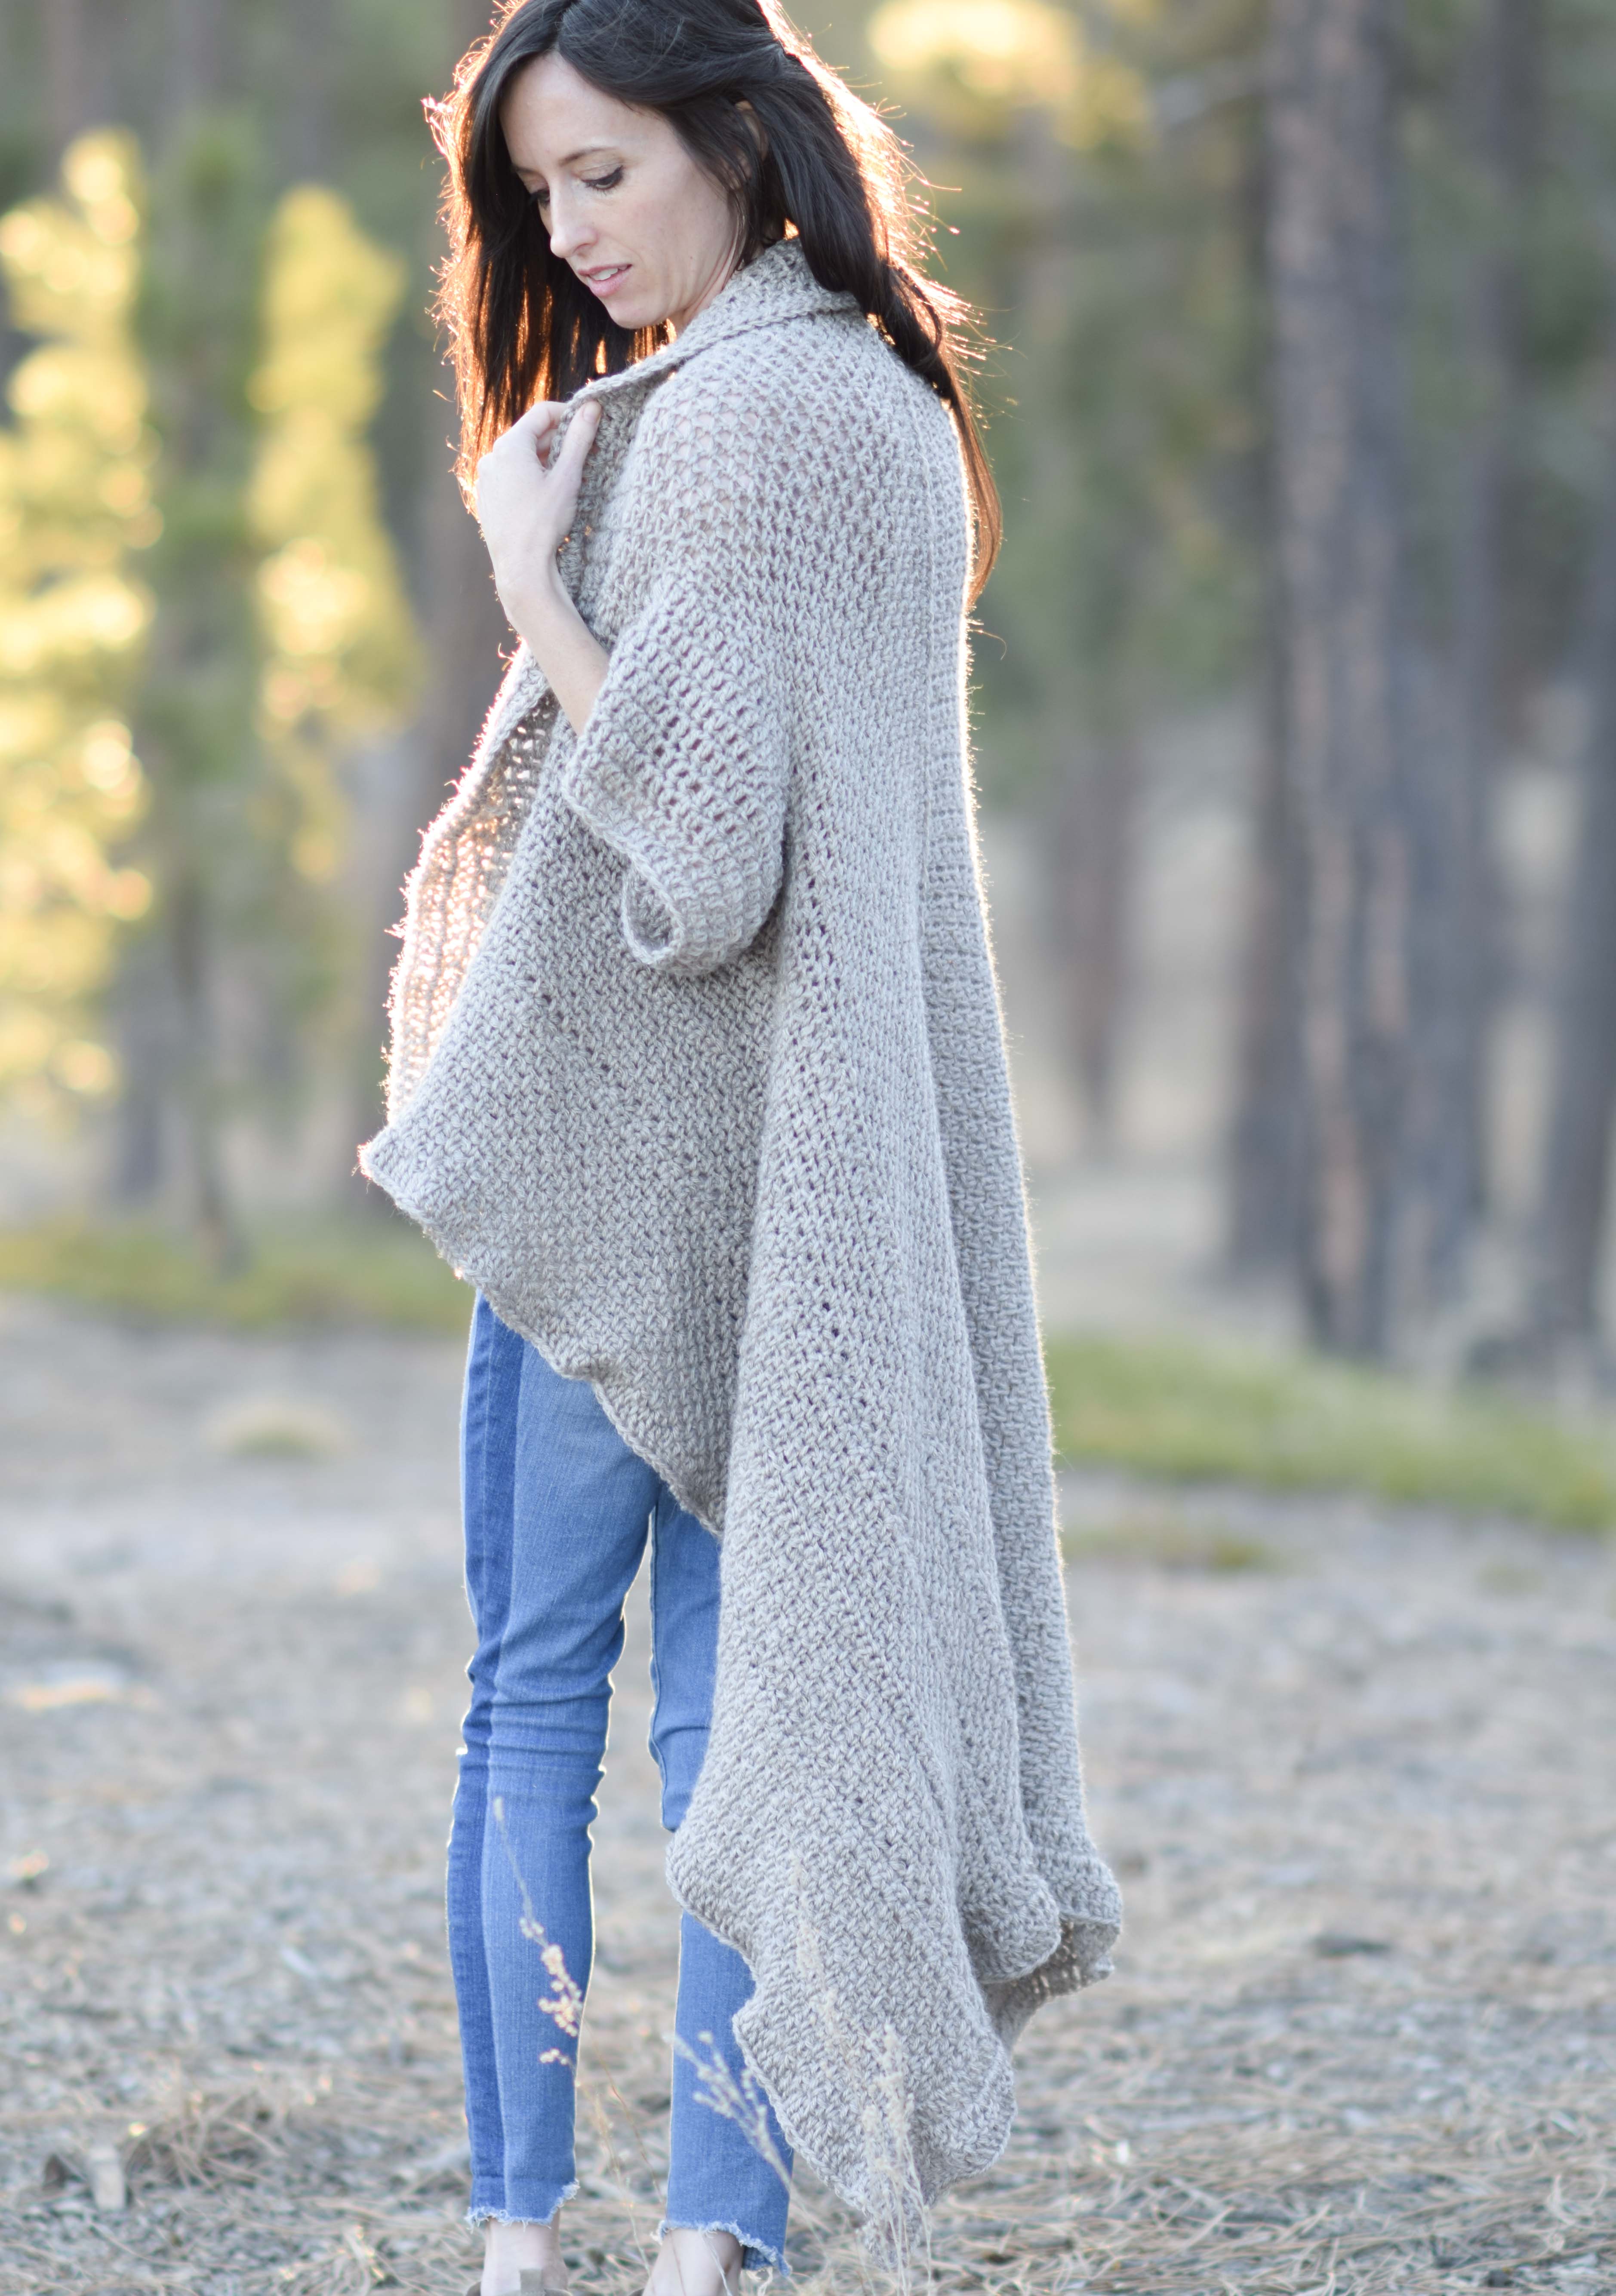

This is definitely not one of my “done in a day” projects, but sometimes those are the most special, right? While I tend to use a lot of big, bulky yarns and crochet hooks, those just wouldn’t fly for a flowing, light duster. This kimono is made up of mostly the simple granite stitch (see a tutorial here) but there are details that include single crochet stitches as well as double crochet. As mentioned earlier, the entire piece is made with a very basic construction as it’s just two rectangles seamed together at the back (with sleeves of course).
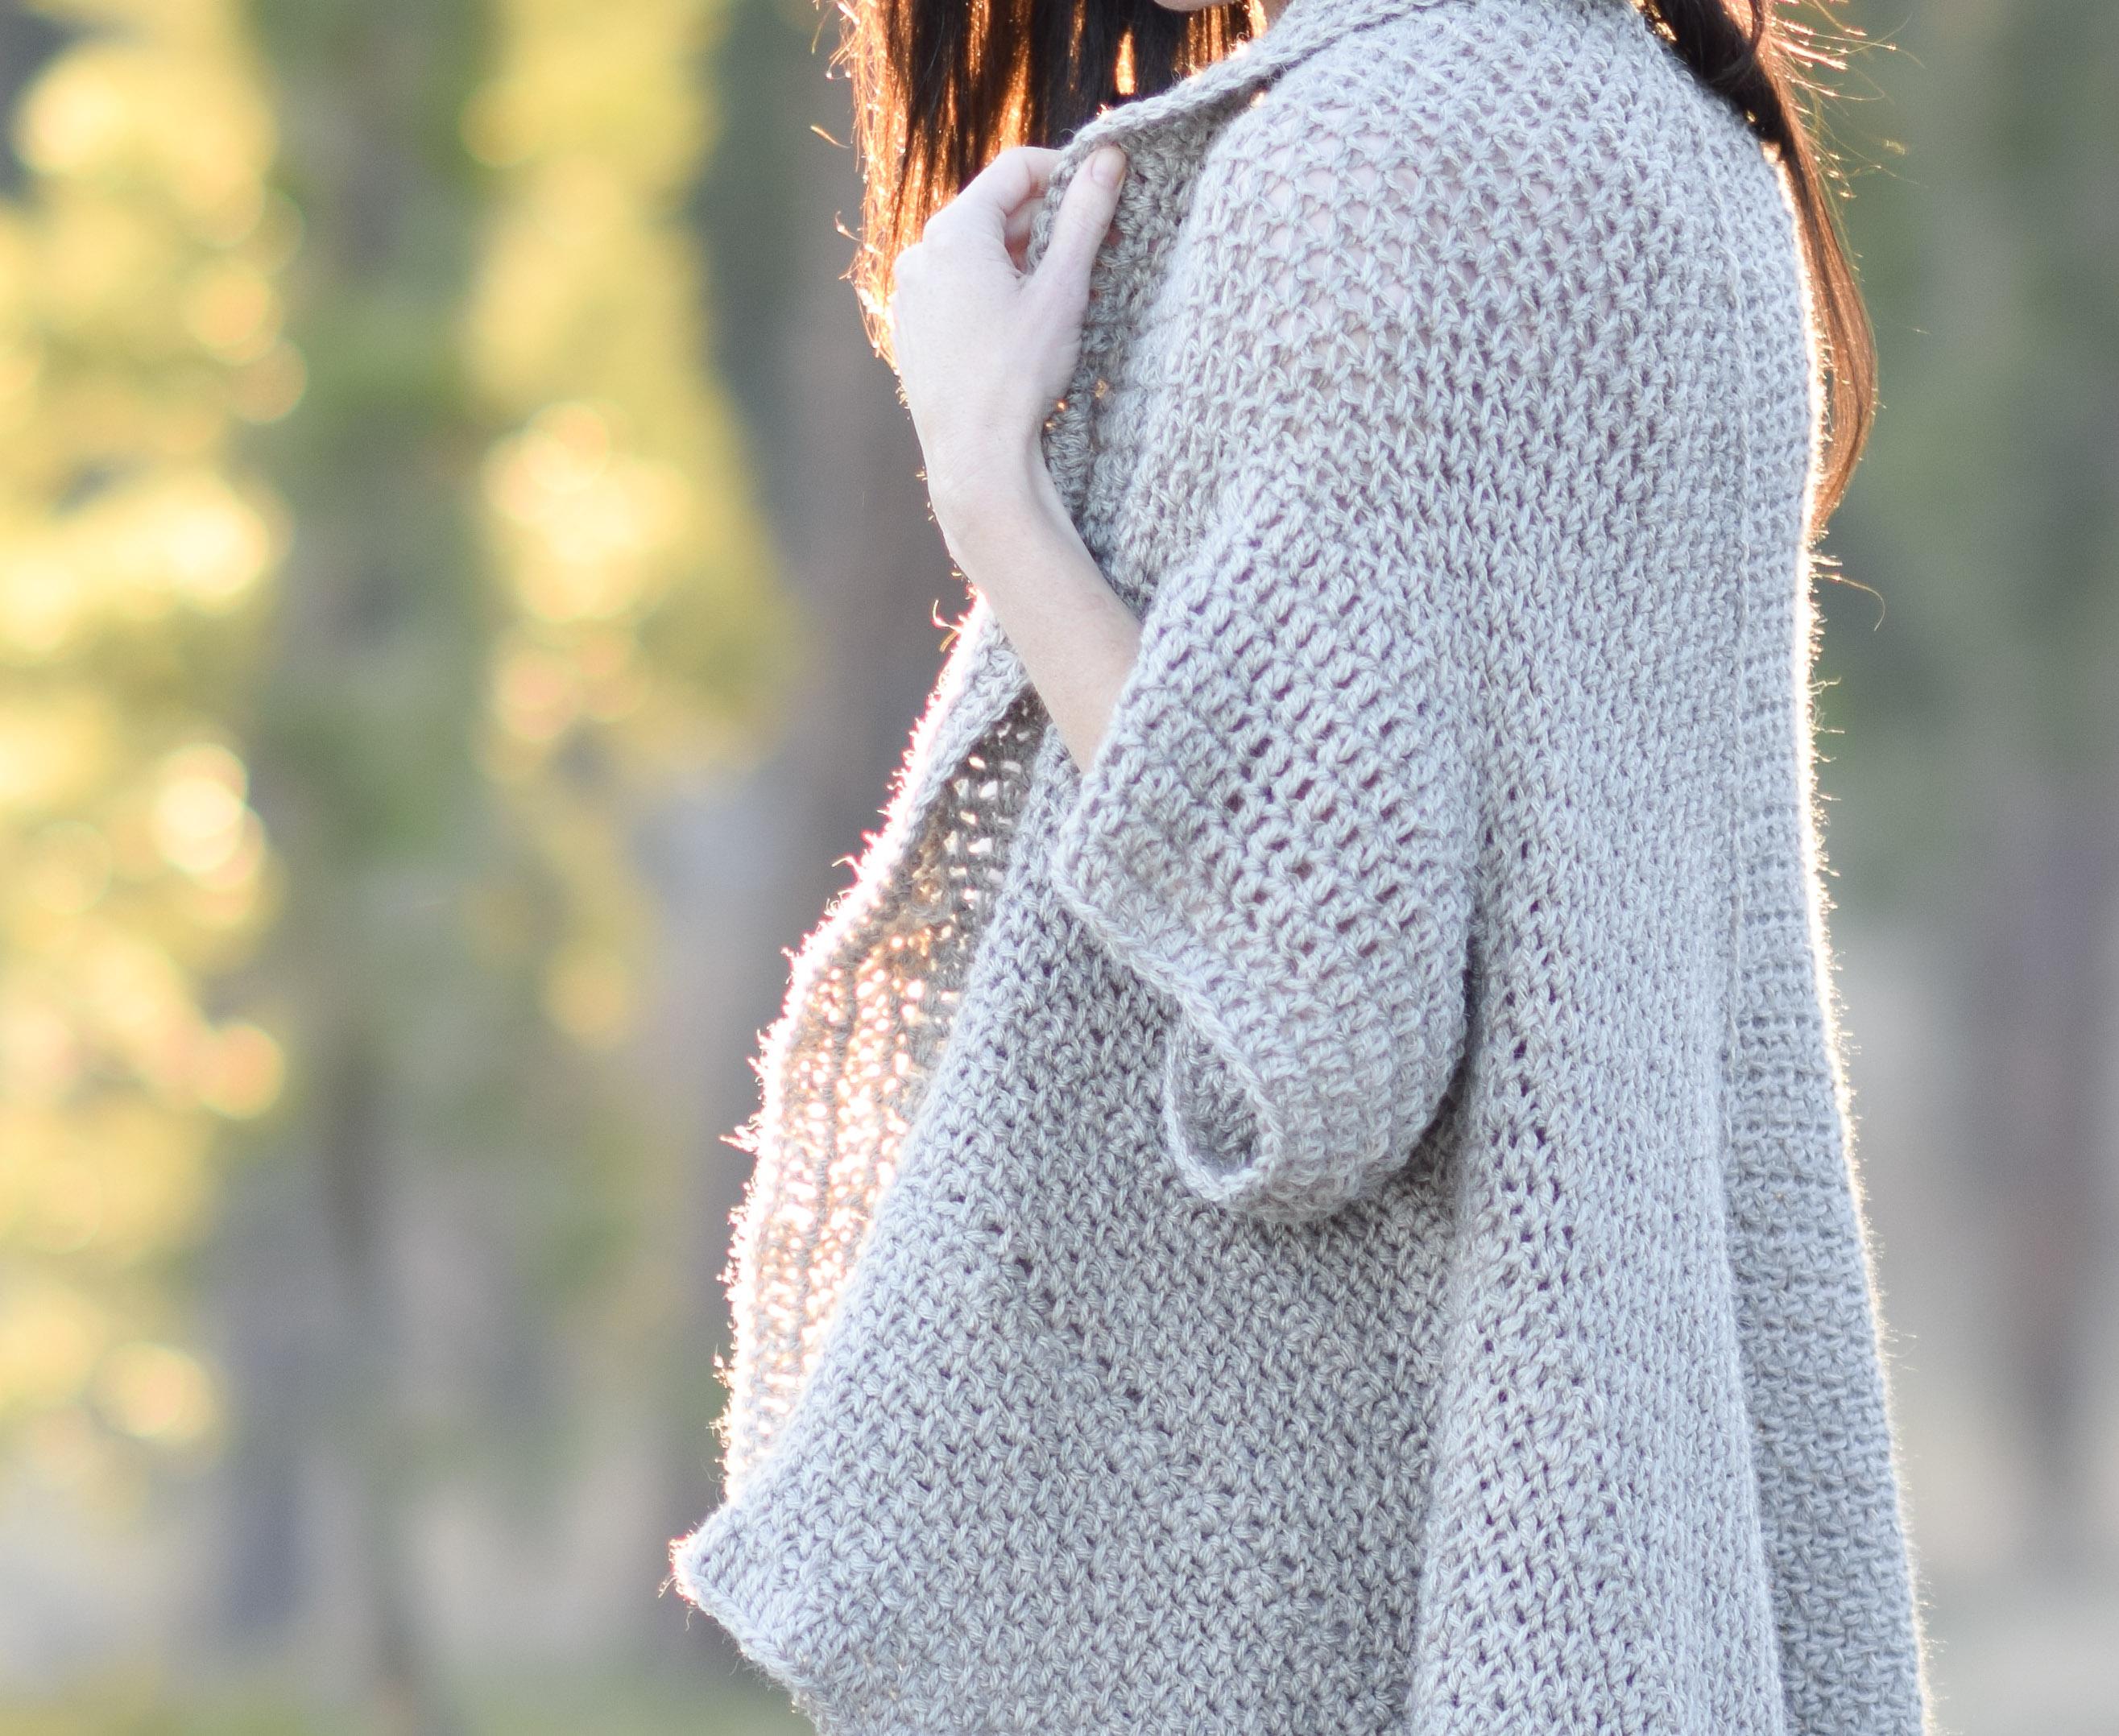
Above: You can really see the texture of the granite stitch. It almost appears knit or woven! This stitch has remained one of my all time favorite stitches ever since using it on this super basic slouch hat a couple of years ago. You can also see the alpaca fuzzies in the yarn which gives it that high end look I was talking about earlier. The best part is that the fuzzies stay put! I was worried there would be a lot of shedding but there wasn’t at all.
If you think you’ve seen this yarn before on the blog, you’re right! It was used in the Light Alpaca Poncho pattern too. 🙂
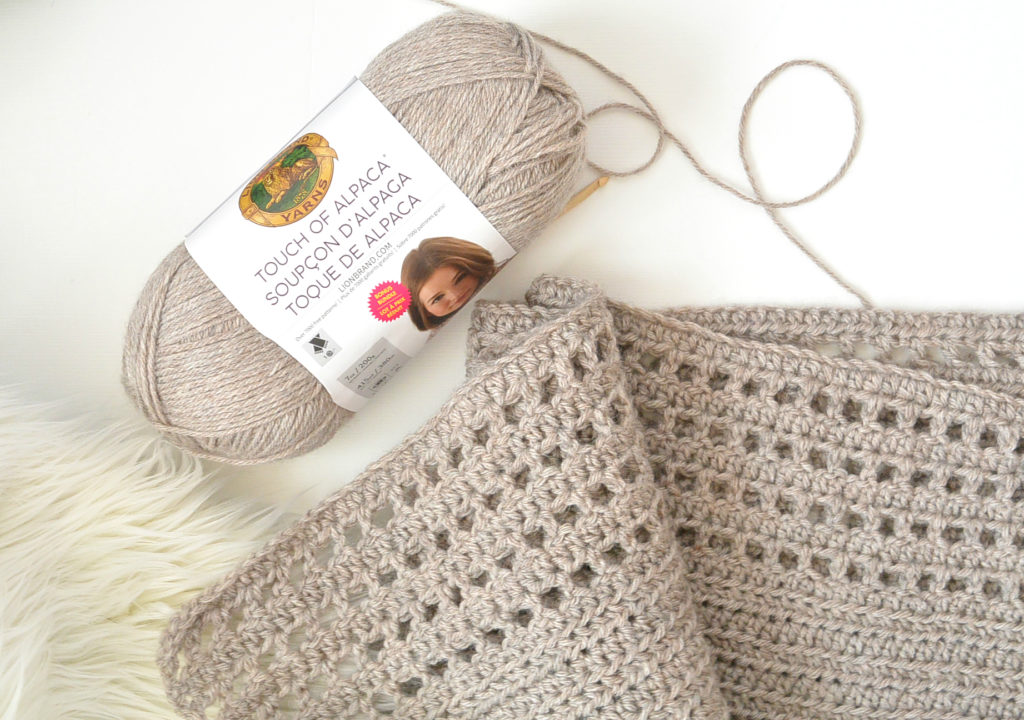
Above: Touch of Alpaca Yarn (you can check out all of the colors available on the Lion Brand site here)
See the free pattern below, or you can also purchase the ad-free printable here!
Shall we begin?!
Pattern Description: A long, flowing duster kimono featuring waves of texture and an oversized collar.
Skill Level: Easy +
Materials:
US Size L 8.0 mm crochet hook
(8,10) Lion Brand Yarn Touch of Alpaca in Taupe (100 g/skein) or (4,5) Touch of Alpaca Bonus Bundles – Pattern uses approximately (771g, 921g) grams of yarn (find the kit here)
Scissors
Tapestry Needle to weave in ends
Gauge: Approximately 13 stitches & 13 rows per 4”
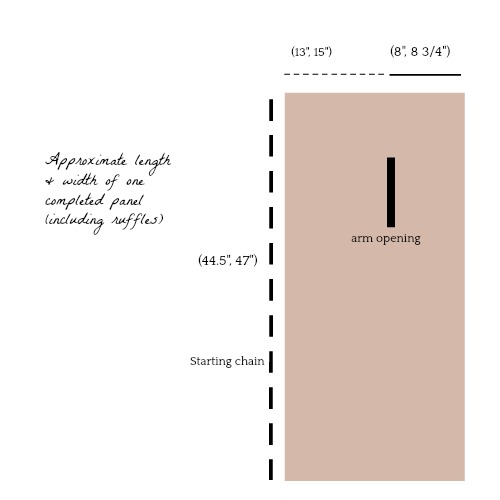
Dimensions (approximate):
Bust Circumference:
S/M: 42”
L/XL: 47.5”
Length:
S/M: 37”
L/XL: 39.5”
(Length indicated above is from natural neck to bottom of piece as worn; diagrams below include the collar in total length)
Cross Back Width:
S/M: 16”
L/XL 17.5”
Abbreviations:
ch – chain
ch sp – chain space
sc – single crochet
sk st – skip stitch
st – stitch
dc – double crochet
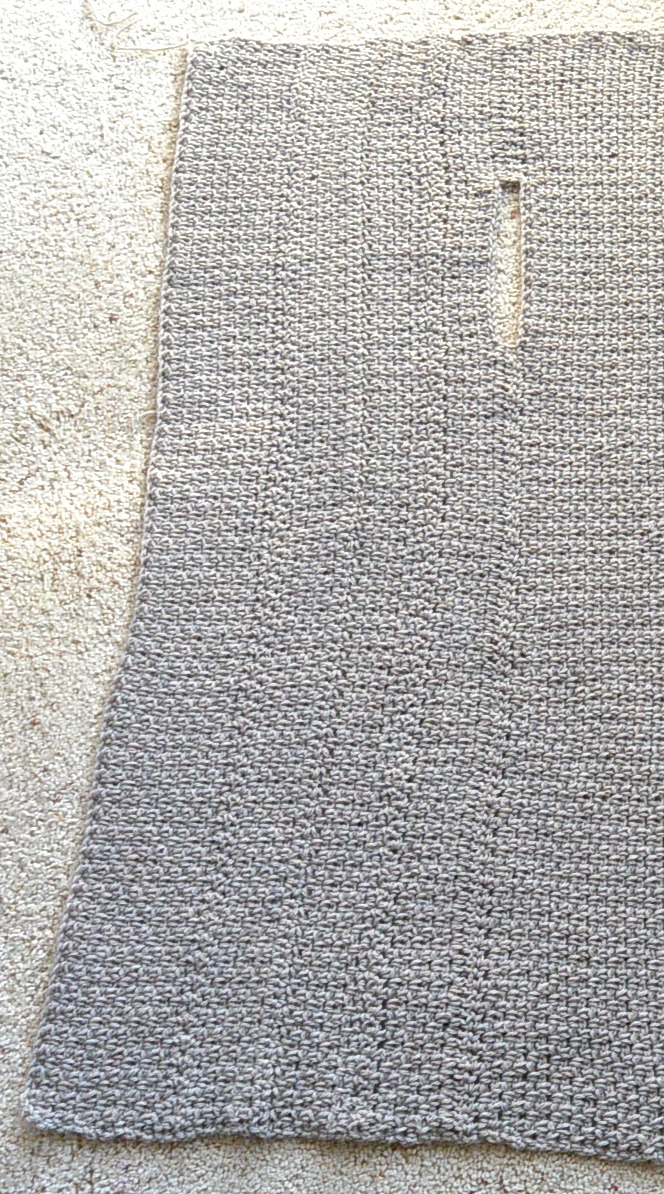
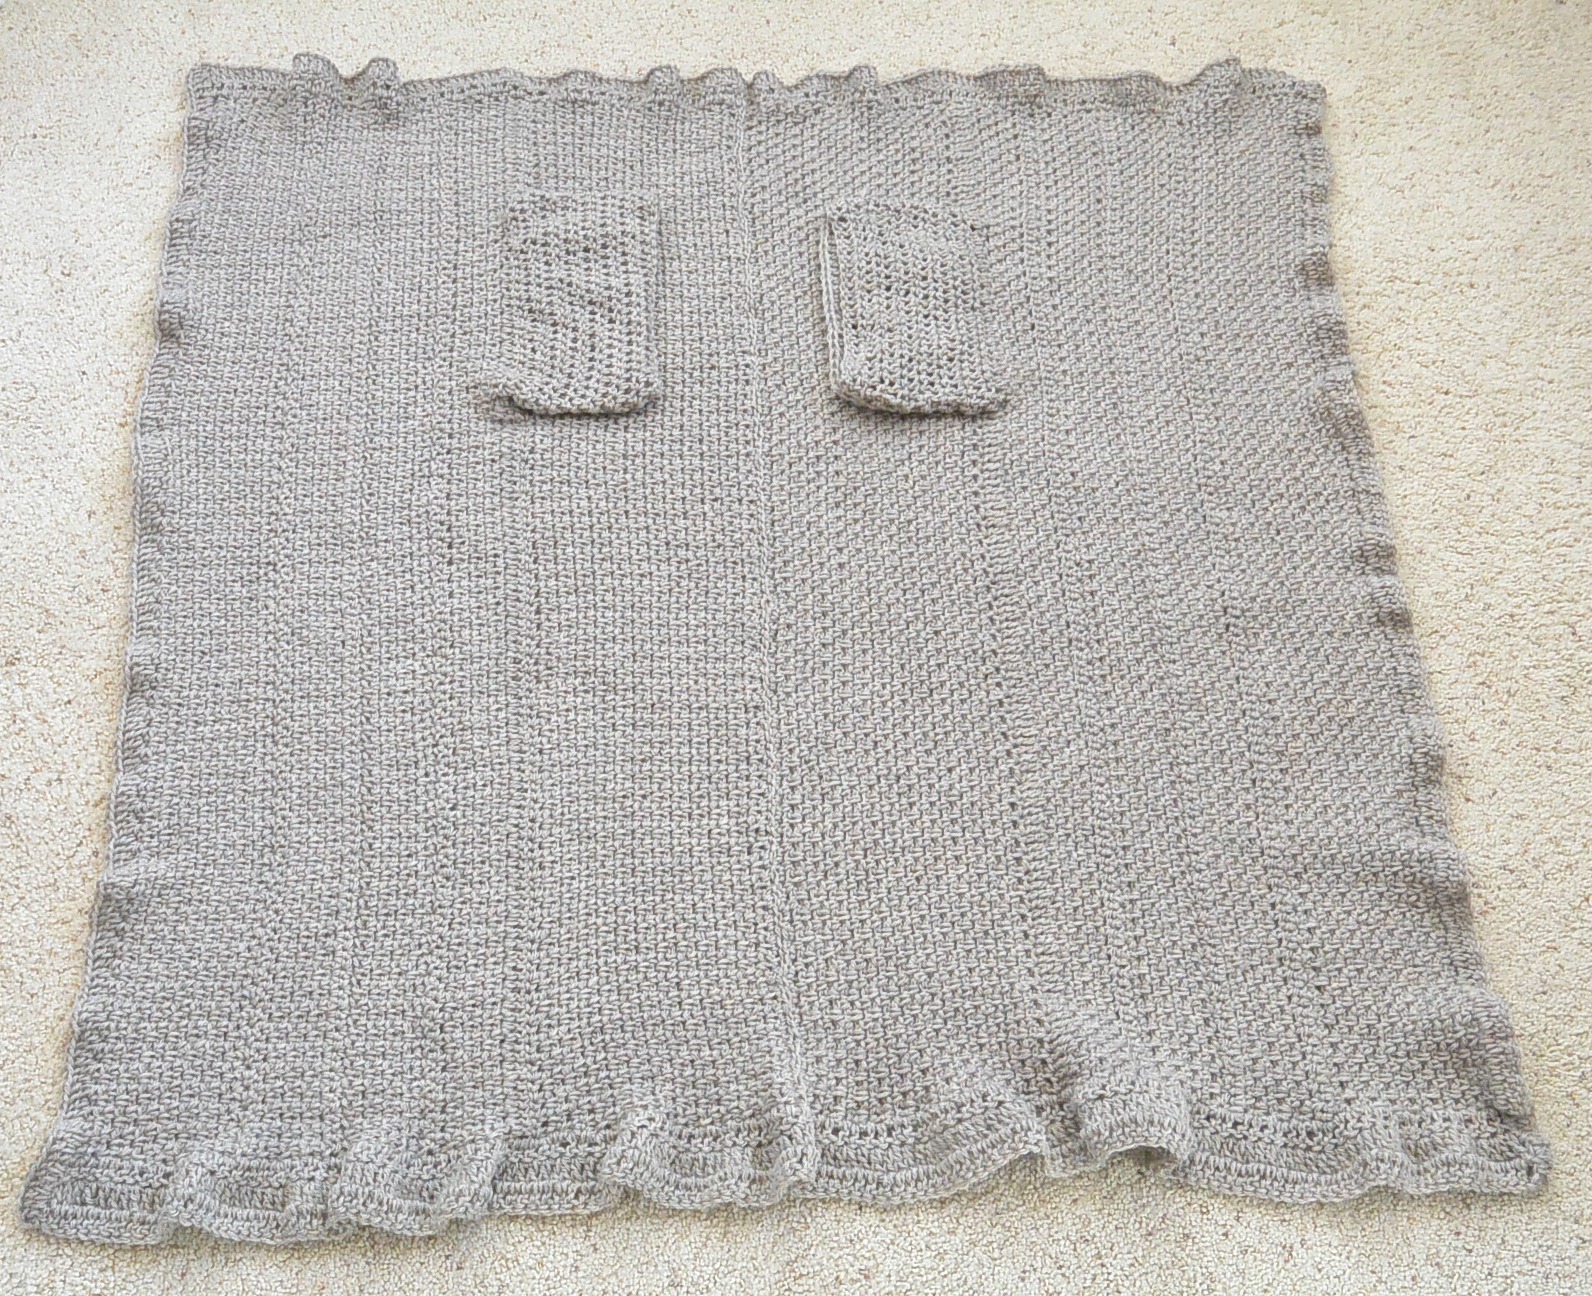
Notes: This duster is made by crocheting two rectangles lengthwise using the granite stitch (single crochet followed by a chain stitch), single crochet stitches and double crochet stitches. Arm openings are created on each panel. Once panels are finished, they are seamed together to join at the center back. Sleeves are added to the arm openings and ruffles are added along the edges.
Follow the key for your size throughout the pattern:
(S/M, L/XL)
Flexible fit allows for various sizes Note: (S/M is pictured above on 5’6”, size small model)
Endless Drape Duster Kimono Pattern Instructions
Main Panel
1st Granite Stitch Section
Ch (131, 139)
Row 1 Sc in 2nd ch from hook, *ch1, sk st, sc in next st. Repeat from * across, sc in last st, turn. (130, 138)
Row 2 Ch 1, sc in 2nd st from hook, *ch1, sk st, sc in next ch sp. Repeat from * across, sc in last st of row, turn. (130, 138)
Repeat row 2 for approximately (4”, 6”)
Next, you’ll create a stripe with the Single Crochet Striping Section below
Single Crochet Striping (this striping is optional. You may choose to continue with the granite stitch for the rest of the panel until you reach the width indicated in the pattern)
Next, you will make two rows of single crochet stitch work as follows
Row 1 Ch1, make 2sc in 2nd st from hook, *sk st, 2sc in next ch sp. Repeat from * across to last ch sp and sc stitch. Make 1sc in last ch sp and 1sc in final sc st, turn. (130, 138)
Row 2 Ch 1, make 2sc in 2nd st from hook, *sk st, 2sc in next st. Repeat from * across to last two stitches. Make 1 sc in each of last two stitches, turn. (130, 138 )
Granite Stitch Striping Section
Row 1 Ch 1, sc in 2nd st from hook, *ch 1, sk st, sc in next st. Repeat from * across row, sc in last st of row, turn. (130, 138)
Row 2 Ch 1, sc in 2nd st from hook, *ch1, sk st, sc in next ch sp. Repeat from * across, sc in last st of row, turn. (130, 138)
Repeat row 2 for approximately 2”
Next, repeat the pattern from the Single Crochet Striping Section
Next, repeat the pattern from the Granite Stitch Striping Section
Next, Repeat the pattern from the Single Crochet Striping Section
Next, Repeat the pattern from the Granite Stitch Striping Section
Next, you will work a row of double crochet stitches and create the arm opening.
Double Crochet Row & Arm Opening (in this section you will be crocheting across the row, then making a chain and attaching it with a double crochet stitch to create the arm opening)
Row 1 Ch 3 (counts as stitch), dc in each of next 22 stitches, ch (24, 28) (loosely), dc in (47,51) st of row, dc in each of the next stitches across to end of row, turn. (130, 138)
Final Granite Stitch Section
Row 1 Ch 1, sc in 2nd st from hook, *ch 1, sk st, sc in next st. Repeat from * across row, sc in last st of row. (130, 138)
Row 2 Ch 1, sc in 2nd st from hook, *ch1, sk st, sc in next ch sp. Repeat from * across, sc in last st. of row, turn. (130, 138)
Repeat row 2 for approximately (7.5”, 8.25”)
Final Single Crochet Row
Row 1 Ch1, make 2sc in 2nd st from hook, *sk st, 2sc in next ch1 sp. Repeat from * across to last ch1sp and sc st of row. Make 1sc in last ch1sp and 1sc in last sc st of row. (130, 138)
Tie off, weave in ends.
Repeat entire Main Panel pattern to create the second panel of the Duster.
Individual Panel Approximate Measurements (before adding ruffles & seaming)
S/M 20” X 40.5”
L/XL 22 3/4” X 43”
Assembly & Finishing
Place pieces side by side with “Final Single Crochet Row” edges together. Seam pieces together from the bottom up with preferred seaming method. (As pictured, seam completed using a length of yarn and a tapestry needle to create an invisible seam) Tie off and weave in ends. (Tip – to make the seam less obvious, you may want to single crochet your final row so that it matches the direction of crochet on the opposite panel when laying side by side for assembly.)
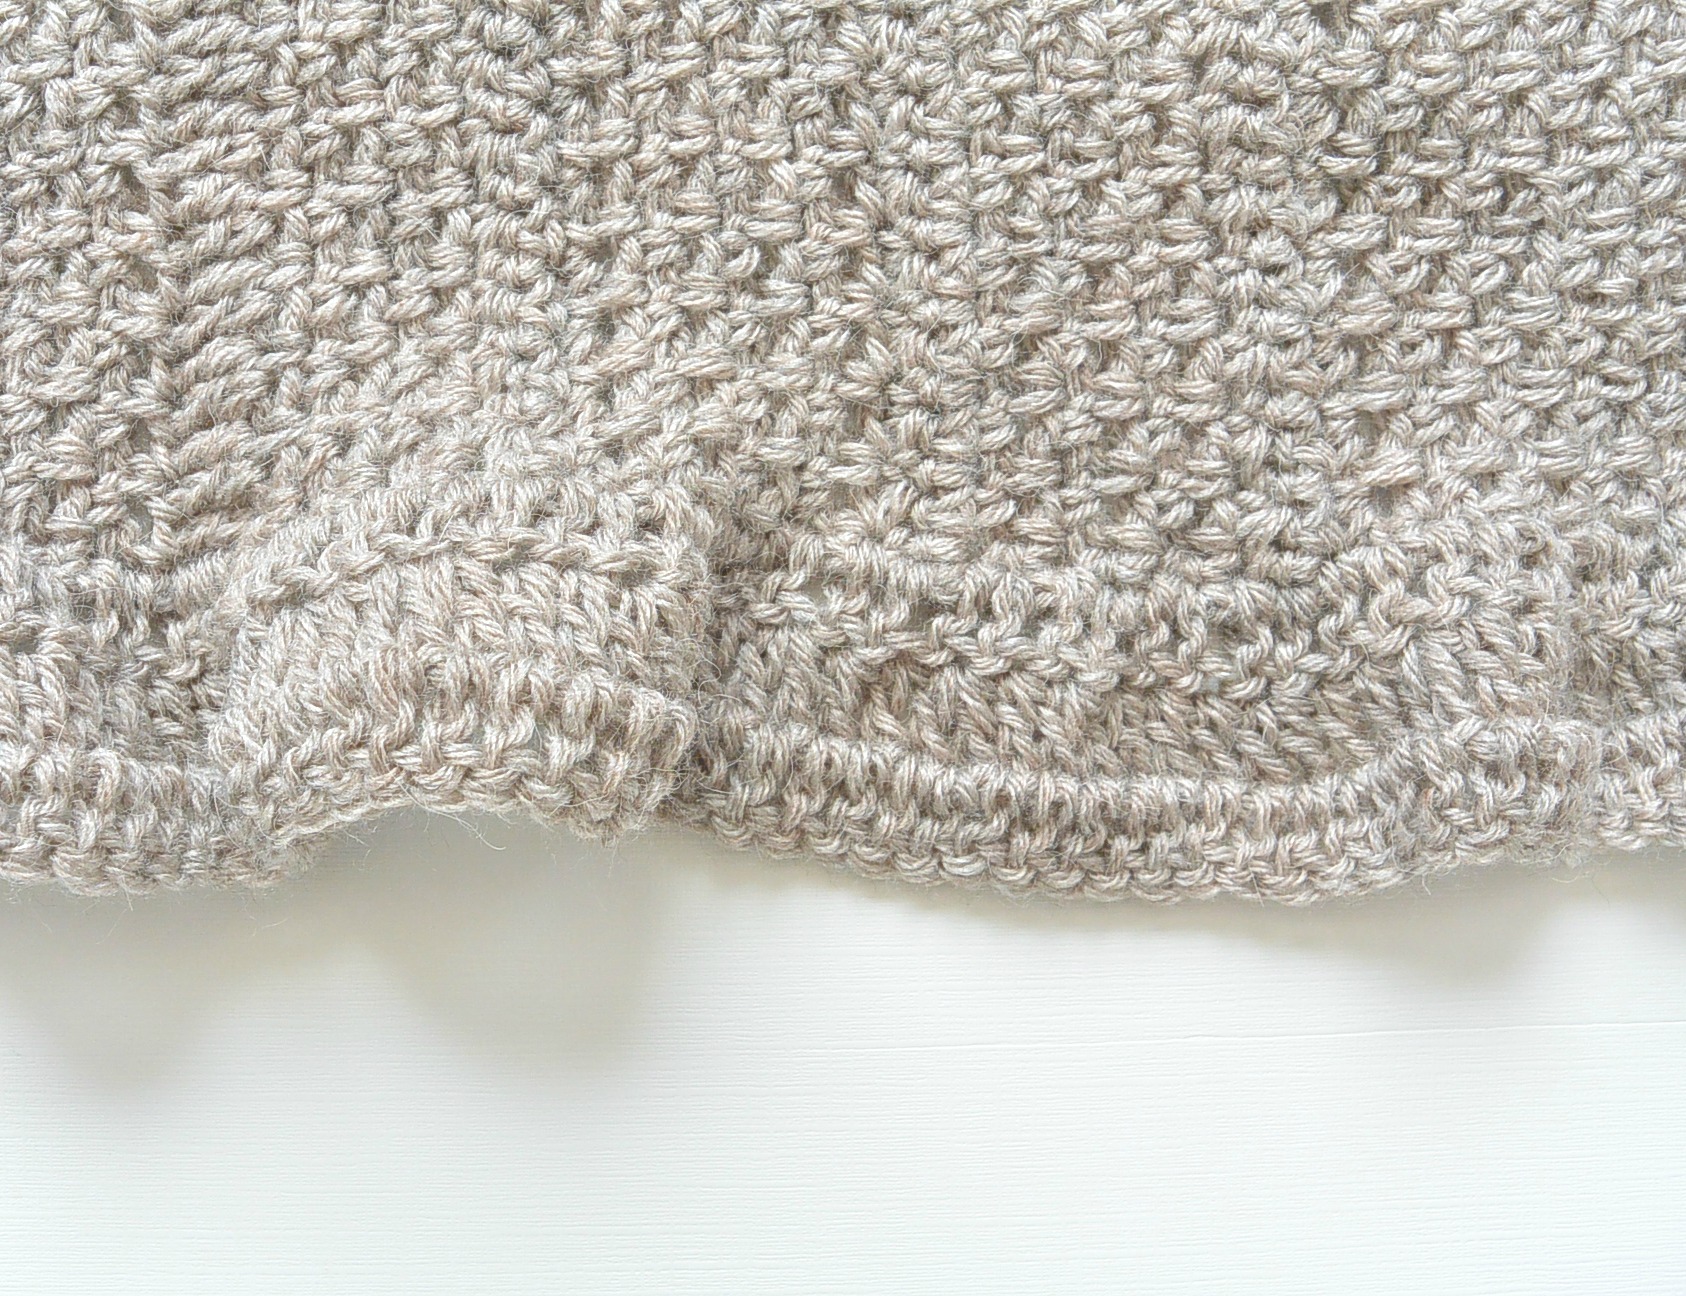
Adding Wavy Ruffle details
Note: Each edge is completed separately as the ruffle edging is not crocheted in the round.
Bottom:
Attach yarn to bottom corner of duster
Row 1 Ch 3, dc evenly across bottom to end of edge, turn.
Row 2, Ch 3, *1dc in each of next 2 stitches, 2dc (increase) in next st. Repeat from * across. Tie off and weave in ends.
Top:
Attach yarn to upper corner of piece.
Row 1 Ch 3, *1dc in each of next 2 stitches, 2dc (increase) in next st. Repeat from * across to end of edge. Tie off and weave in ends.
Sides:
Attach yarn to upper corner of piece and work down the side of the piece (this will be the inner collar when worn).
Row 1 Ch 3, *1dc in each of next 2 stitches, 2dc (increase) in next st. Repeat from * across to end of edge. Tie off and weave in ends.
Repeat this pattern for each of the two sides.
All of your edges should now have a lovely little wave!
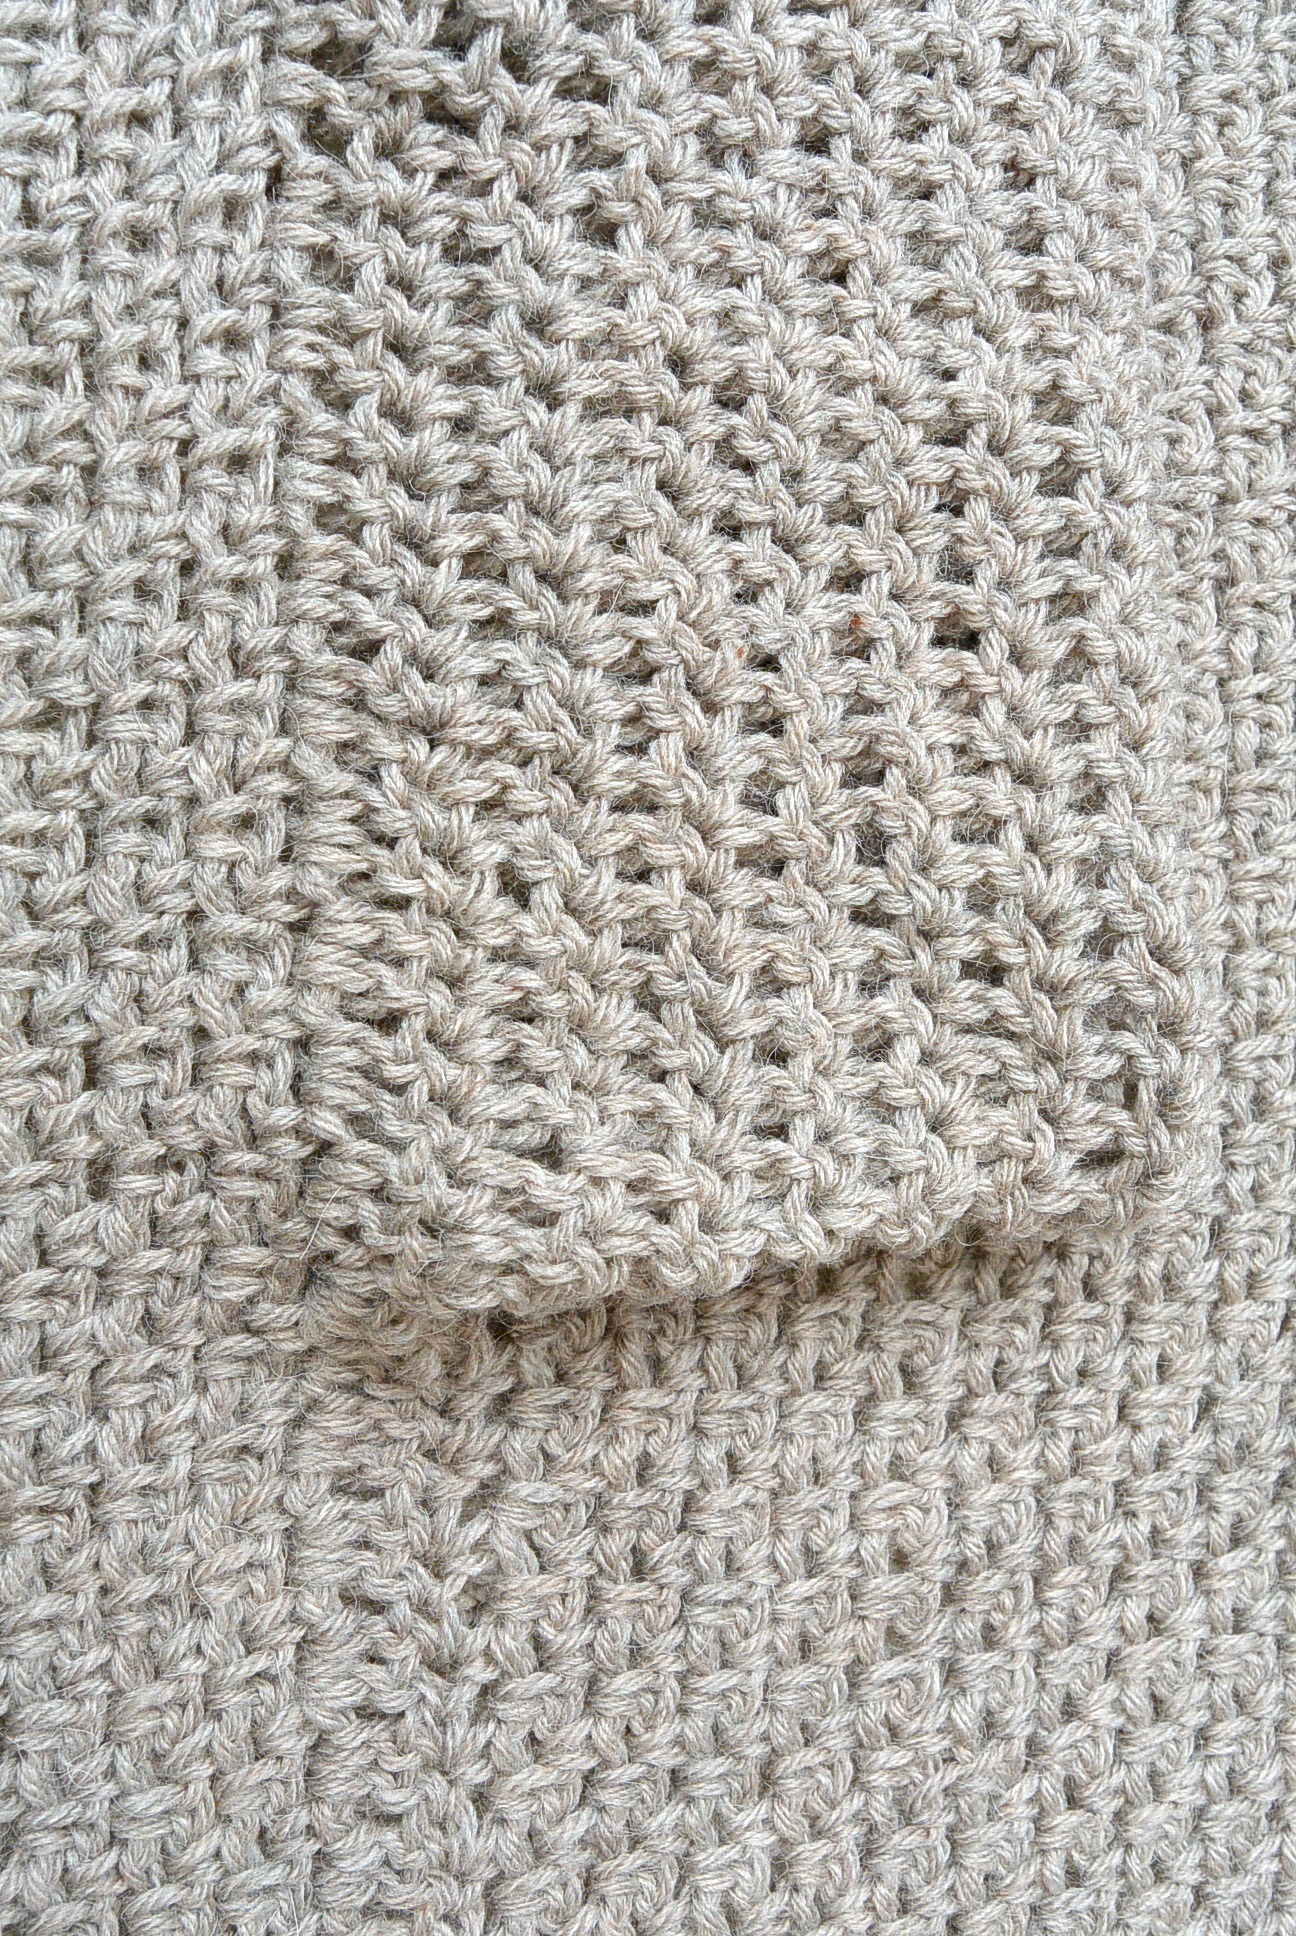
Sleeves
Attach yarn to bottom of arm opening.
Row 1 Ch 3, dc in each st around, join with sl st at end of row.
Row 2 – 8 Repeat row 1, working in the round.
Tie off and weave in ends.
(You may make your sleeves longer by crocheting more rows. Keep yarn needs in mind)
Repeat this pattern for both arm openings/sleeves.
Photos
Below: One panel done with arm opening
Below: Sleeve has been added
Below: Double crochet ruffle added
Below: The piece is complete as the two panels are seamed at the center, sleeves are added and ruffles are finished.
Pretty simple right? Now wear it and enjoy!
Hope you enjoyed this duster you guys! Happy crocheting. 🙂
XO,
Jessica
If you liked this, you might also like:
This post was sponsored by Lion Brand Yarn. All opinions are 100% my own.


So pretty and feminine! I love it. I just finished my very own, first ever, kimono using the drop stitch that I designed, thanks to your inspiring blog. Thank you!
I absolutely your patterns and now I’m going to have to make this pattern thank you for your patterns my fingers will be crossed trying to win your book giveaway ❤❤
Absolutely beautiful! I have yoyr kit foe the coloured serape you designed…its next on my *endless* list lol
If i wanted to make this kimono in a larger size but not longer (short and fluffy here) would i increase the starting chain x8 for each size up? Or is it worked from side to side?
Totally gorgeous. Definitely on my “To Make” list. Thank you so much.
I love this , my daughter wants me to make her one. Gonna make me one to. Thanks for sharing.
I’m also confused on that. She looks like she’s crocheting this piece from neck to ankle so the increase should merely make it a few inches longer. If it’s indeed worked top to bottom then I intend to add measured rows after each arm hole of each panel. Super easy to always increase front edge. There’s always a way.☺ My concern is will Alpaca yarn cause me to scratch like other wool. I read on the internet that its possible. I plan to make the traditional poncho also.
I love the simplicity of this pattern. It’s soft and flirty without being too feminine.
Looks pretty and if the yarn ever goes on sale, I will try it. But $70 is too rich for my budget.
This is sooo beautiful!! I definitely want to make this for myself from the same yarn but I’m 162 cm tall and I wonder if this would be too tall for me. May I ask your height please?
Thats a point Lyn…can add a few rows after the arm holes to cover the extra fluffeh tum area. Thanks for that!
I read somewhere that the designer/model is 5’6″. Hope that helps:)
Hi there, I’m going to begin this project next week! I’m excited for my first garment! For the gauge it says 13 stitches but which stitch would it be sc, dc or the granite stitch?