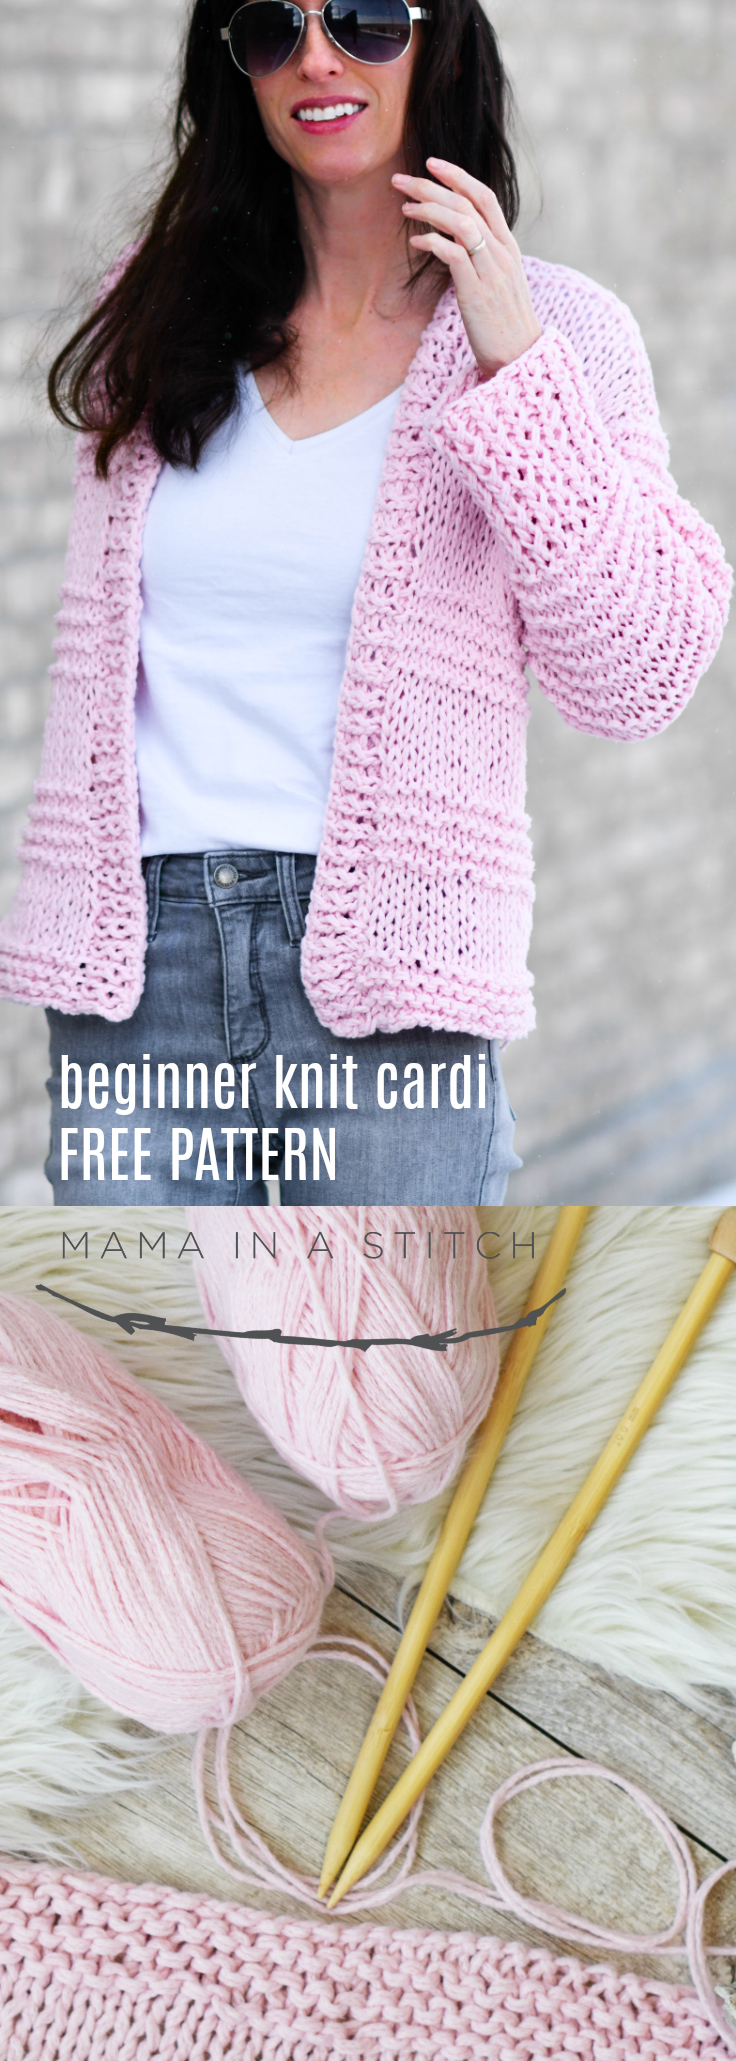
Cotton Candy Easy Knit Cardigan Pattern
Scroll down to see the free pattern below, or you may choose to purchase the printable PDF from my Etsy shop (here), featuring all necessary photos and large print, or you may purchase the kit from Lion Brand Yarn (here)
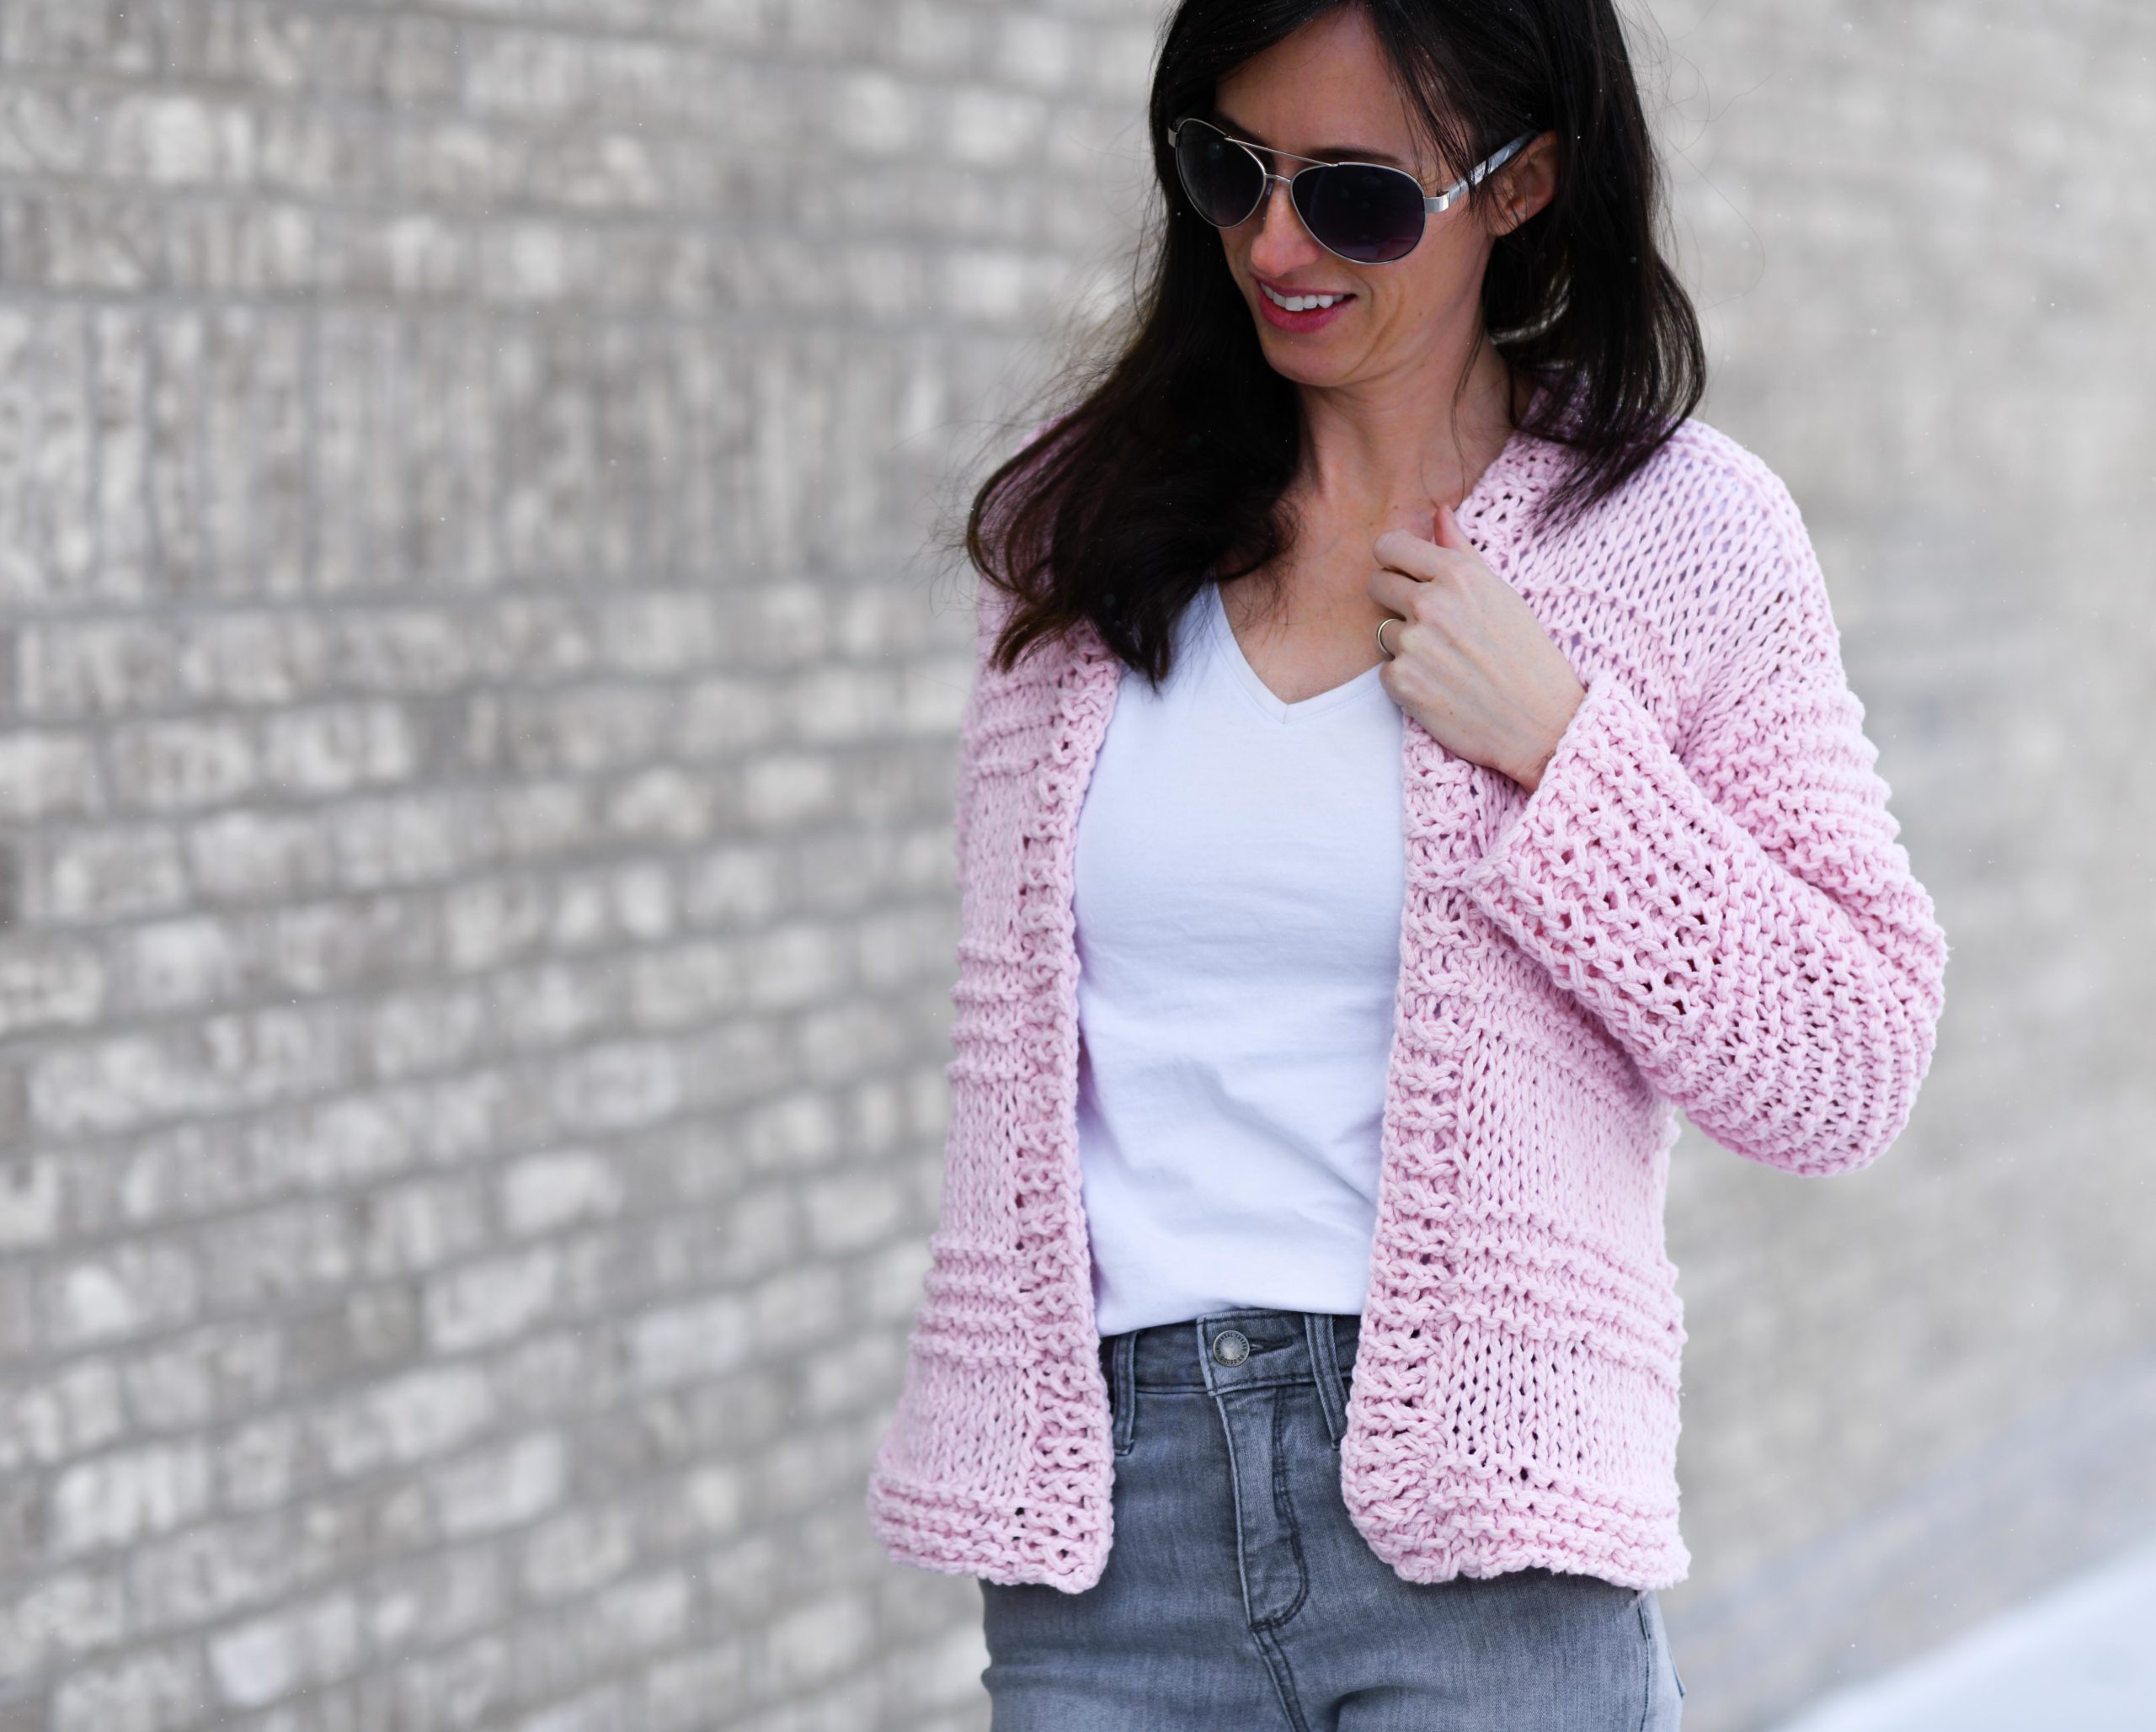
It’s been a while since I’ve knit any sort of sweater or cardigan, and it’s definitely been a while since I made one with pink (the Marled Knit Cardigan). That’s why today I’m thrilled to share this simple pattern that I’ve been putting together! It’s seriously the softest cardigan I’ve ever made (thanks to the buttery soft yarn). A soft, pink, fluffy sweater calls for the name “Cotton Candy” Easy Cardigan, right? While it’s fleecy and wonderful for winter, this sweater’s airy and light enough to take you into spring as well. 🙂 It’s a perfect project for those of you who want to make a sweater for the first time. The pattern is quick and easy, so you shouldn’t find yourself halfway through, feeling overwhelmed and unmotivated to finish.
And if you haven’t yet learned to knit, you can find my tutorial on how to knit HERE and how to purl HERE. These are the only stitches that you need to master before making this sweater. Simple, right?
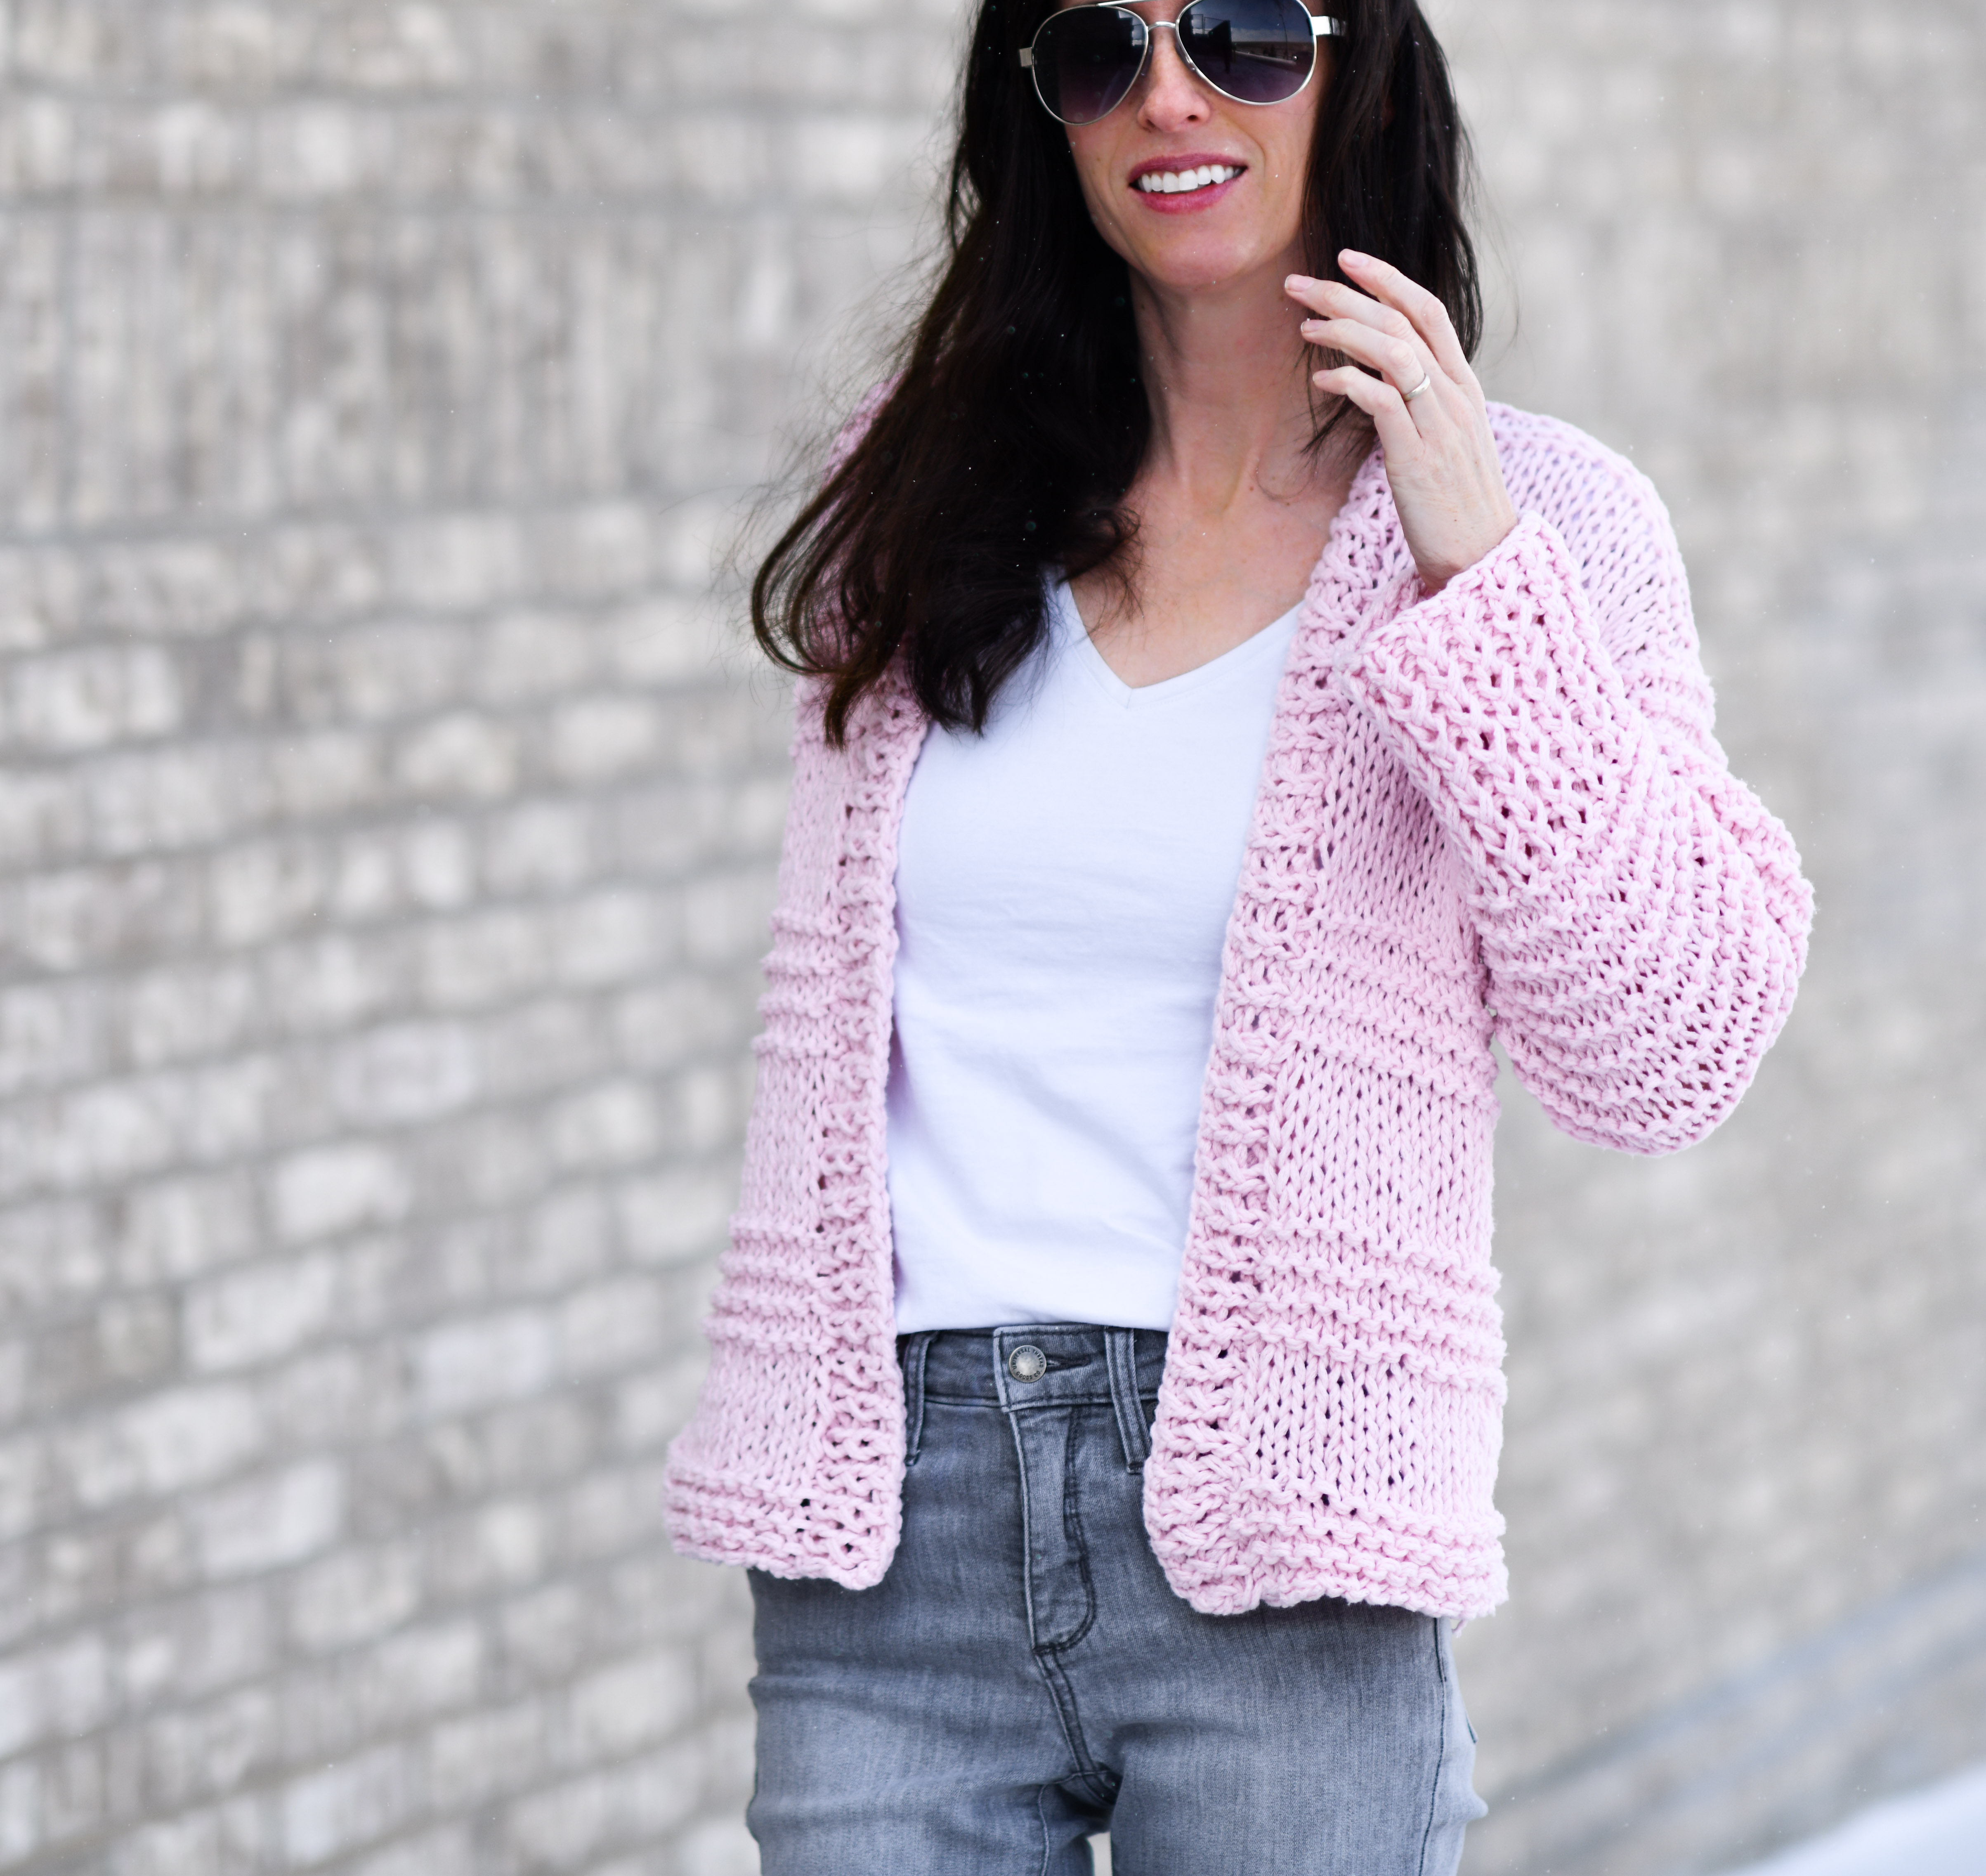
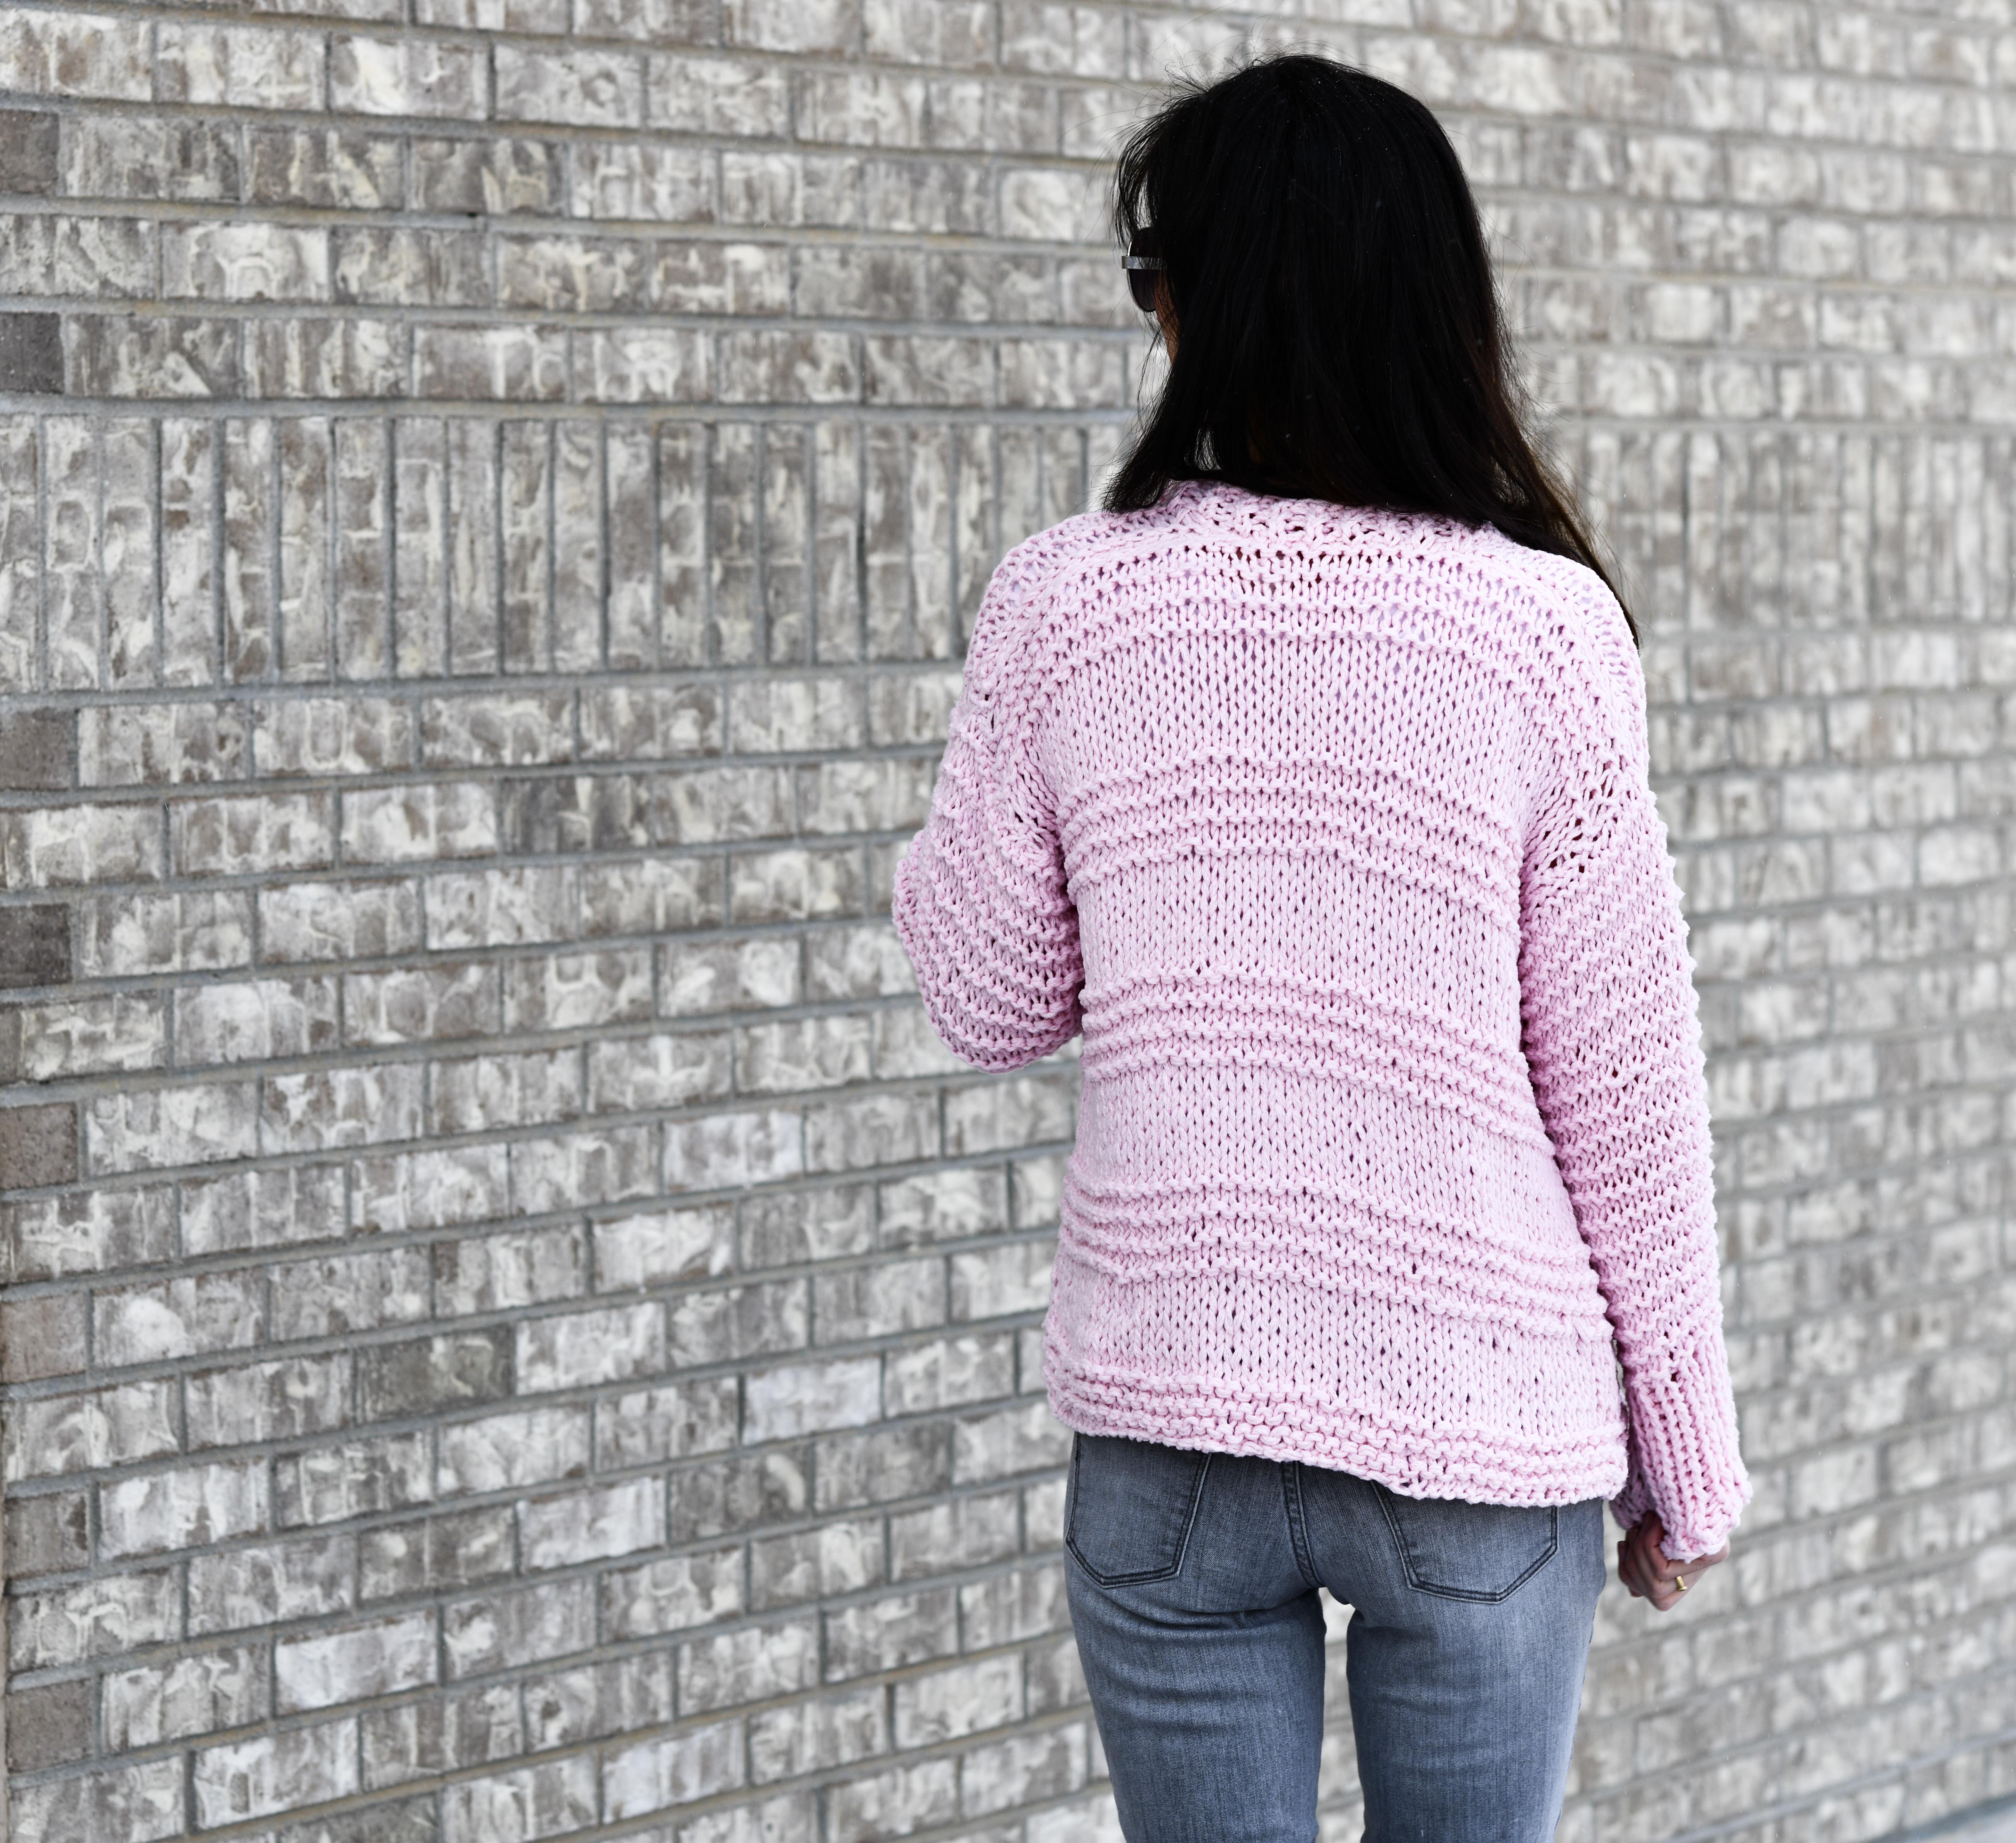
The stitch definition turned out so cool, don’t you think? Using the large needles with this yarn created a soft, drapey piece with that super trendy, big-stitch look. The ribbing on the sleeve cuffs is particularly fun in my opinion.
Let me jump right into why it’s so easy to knit:
- It uses only knit and purl stitches
- It works up quickly as you will use large needles and two strands of worsted weight yarn ( I love quick and easy! )
- Has minimal shaping (However, if even the slightest of shaping scares you, definitely stick to my Easy Knit Blanket Sweater Pattern to create your first sweater)
- Shaping is clear and easy to understand
- It’s knit flat
Above: I highly recommend this Feels Like Butta yarn (here) for anything that you want to be super, duper soft. Baby blankets, afghans and sweaters come to mind.
If you follow my blog, you know my family loves nature. I find a lot of inspiration from the outdoors and this pink is no exception! While it’s a step away from my comfort zone of “au natural” neutrals, I love the pinks that we find outside. The first thing that comes to mind are the gorgeous sunsets that you can catch from time to time. When visiting Arizona, I’m always stunned at the pink and gold sunsets. Occasionally, we have some fabulous sunrises with pink throughout the sky here in Colorado as well.

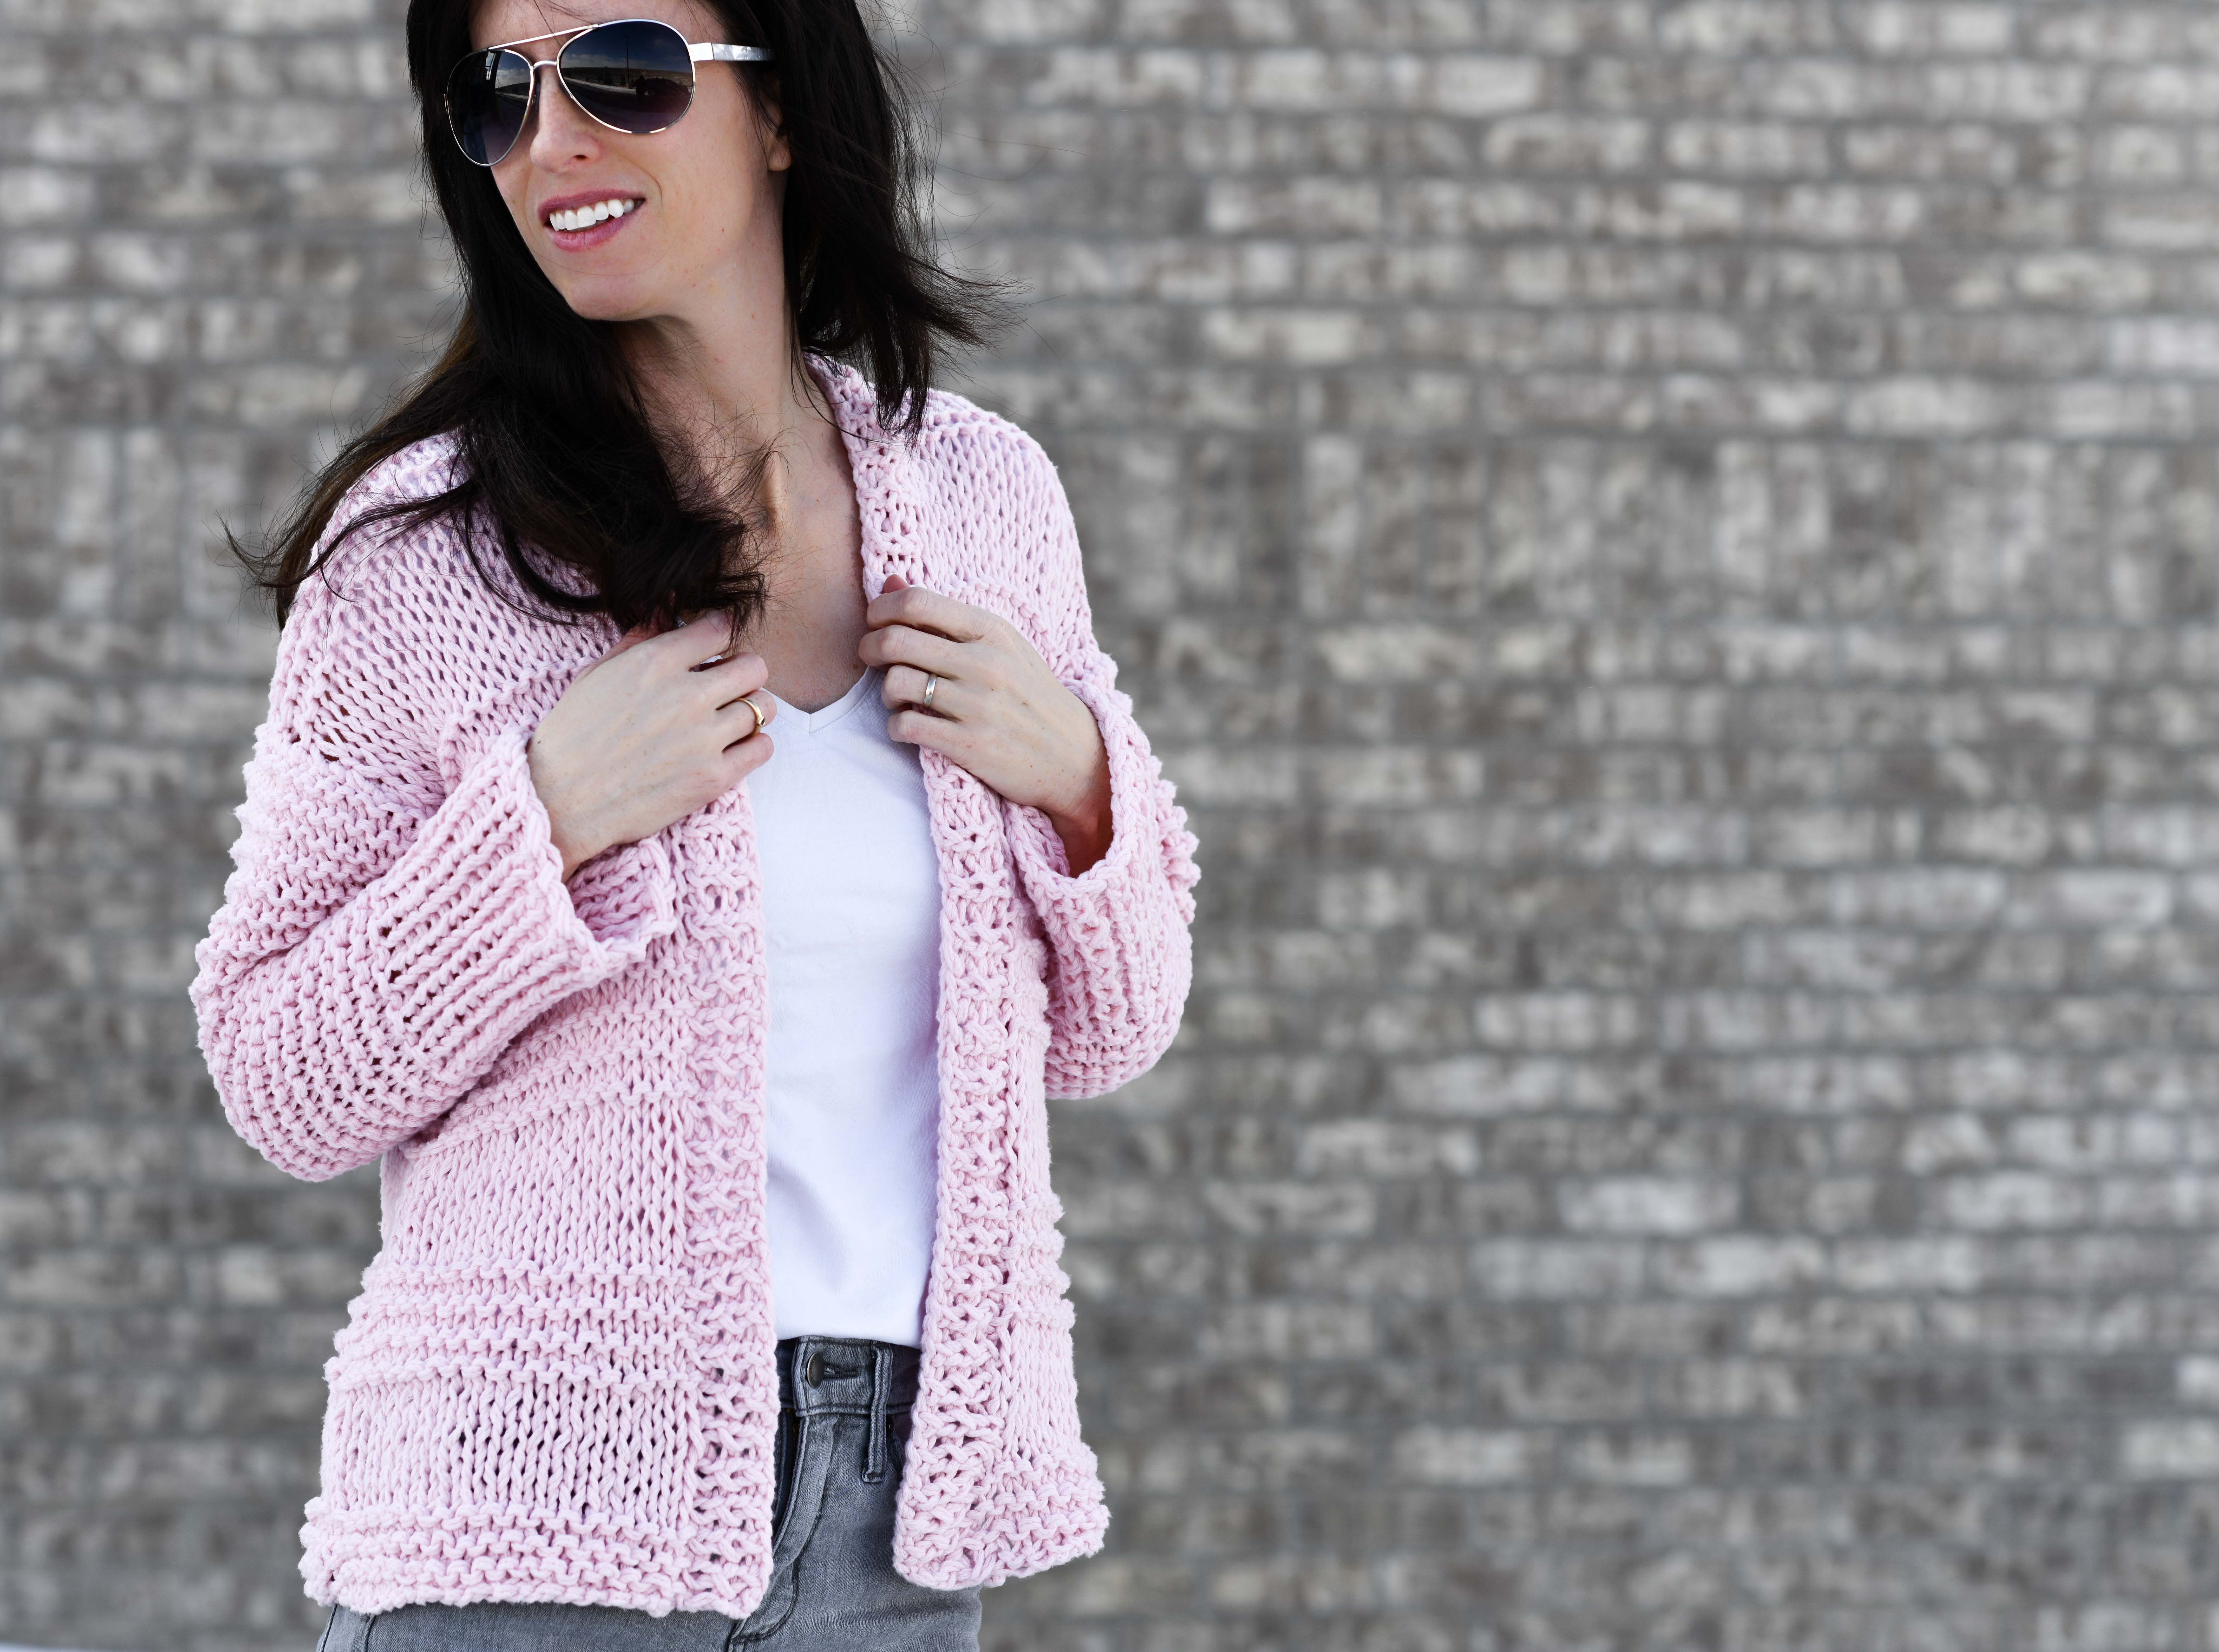
This is one of those times where I wish you could reach through the screen and touch THIS CARDIGAN! I’d describe the yarn used here as a super soft, fleecy wonder. The best part is that it doesn’t shed either, which I find to be rare with some of the soft yarns. When I’m wearing sweaters and cardigans, one of the most important things to me is comfort. I basically live in cardigans all winter as they are the perfect layering piece. Sweaters are a little more restrictive as I like the open front for breath-ability with cardigans.
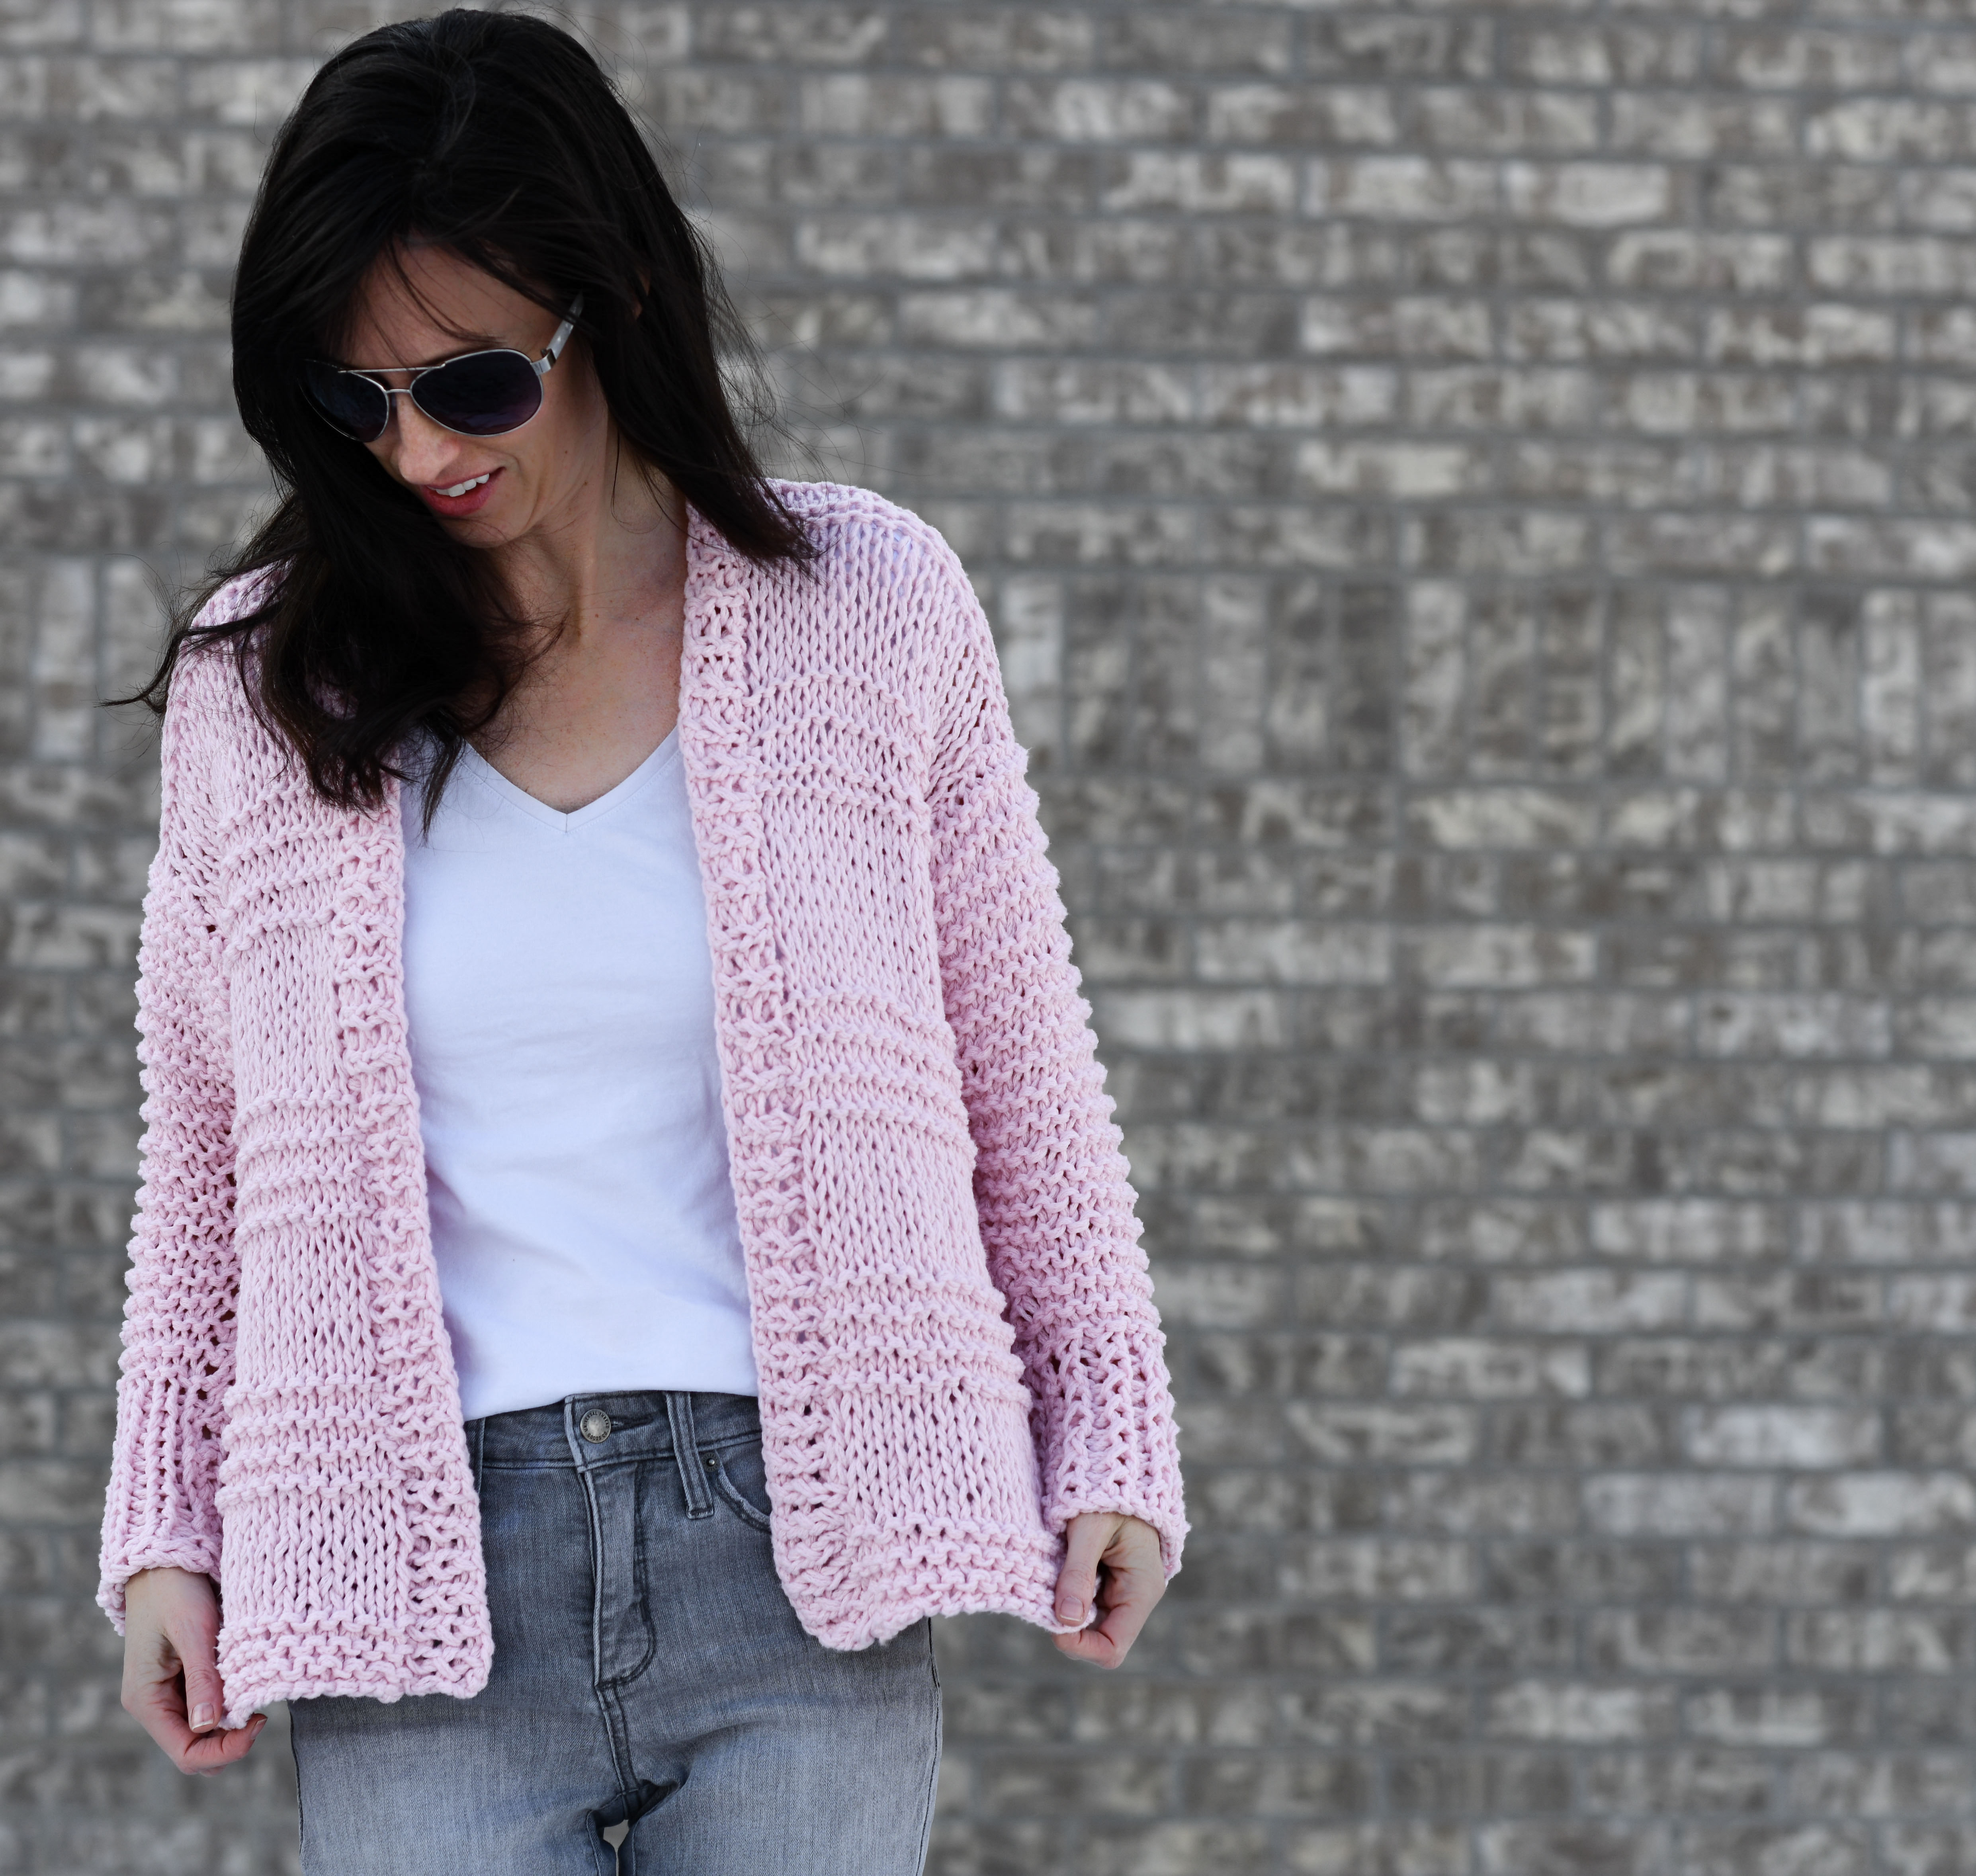
This Cotton Candy Cardigan is knit by creating a back panel and two front panels. You will also knit two sleeves (it’s not scary), and then pick up stitches to make the collar (also not scary). It’s also super easy to adjust the length of the cardigan by simply knitting more rows than indicated for each panel. As long as they all match, you’re good to go! This cardigan is fairly short as the pattern’s written, so definitely feel free to add length if you like a longer look. It’s certainly a unique yet basic cardigan and it can be dressed up or down.
Ready to start this fun cardi? Here we go!
Remember, you can see the free pattern below, or choose the ad-free, printable PDF featuring large print, in my Etsy shop HERE
Cotton Candy Cardigan Easy Knitting Pattern
Pattern Description:
The look and feel of this superbly soft, airy cardigan will remind you of cotton candy! It features a comfortable, loose knit fabric with simple stockinette and garter stitches. The stitch definition is gorgeous and it works up quickly with large knitting needles. Because it’s made with minimal shaping and only requires beginner knitting skills, this is the perfect project for first-time sweater makers.
Skill Level:
Beginner +
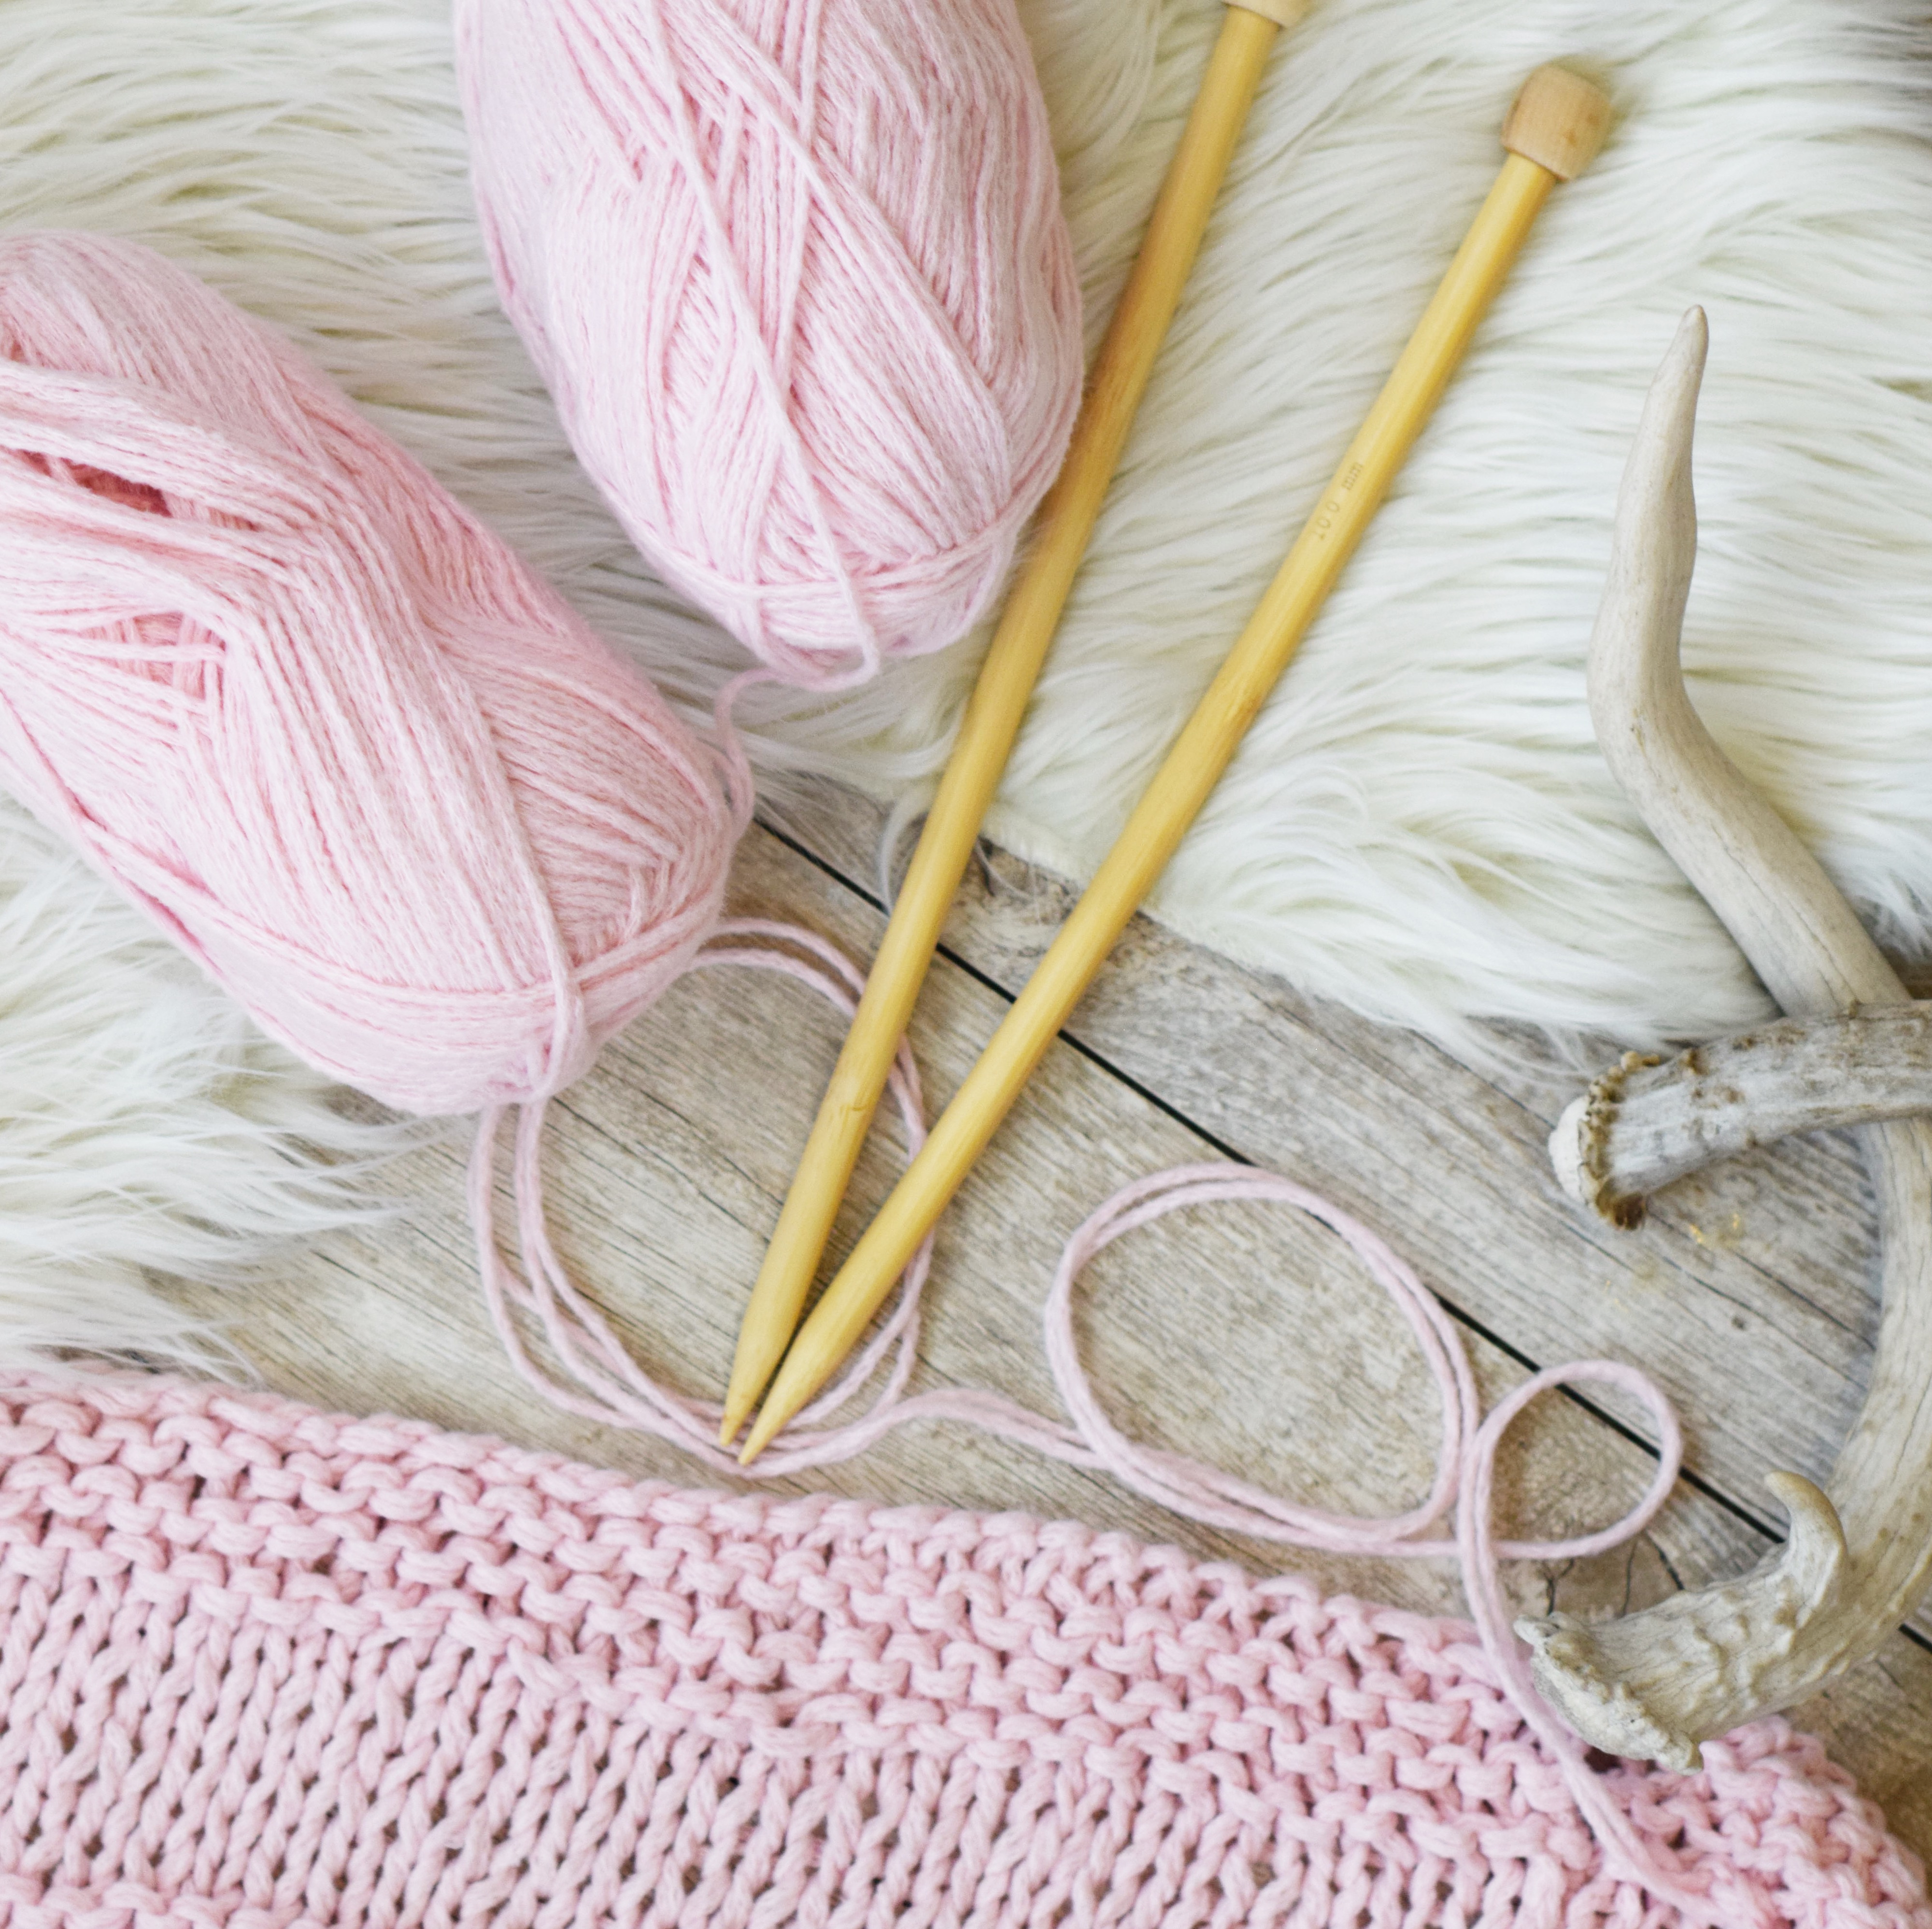
Materials:
US Size 17, 24” (or longer) circular knitting needles
6,6,8,8,10 skeins Lion Brand Yarn Feels Like Butta in Pink Rose (100 g / skein) Kit available HERE in 4 color options
Pattern uses approximately (465 g, 565 g, 673 g, 793 g, 856 g) total
Measuring Tape
Tapestry Needle
Scissors
Dimensions (approximate):
XS, Small, Medium, Large, XL
Please follow the key throughout the pattern according to the size you are crocheting:
(XS, S, M, L, XL)
Bust Circumference:
XS – 36”
S – 40”
M – 44”
L – 48”
XL – 52”
Length:
XS – 20”
S – 22”
M – 24”
L – 26”
XL – 26”
Cross Back:
XS – 14”
S – 15”
M – 16”
L – 17”
XL – 18”
Abbreviations & Skills:
k – knit
p – purl
st – stitch
k2tog – knit two together (decrease)
You should know how to work a 1 x 1 rib pattern. (For row 1, you will work a knit stitch, followed by a purl stitch, repeating this pattern across the row. For row 2, you will knit the knit stitches and purl the purl stitches)
Gauge:
Approximately 10 stitches in 4” x 4” swatch of stockinette stitch
Notes:
This cardigan is made while holding two strands of yarn together throughout the pattern. You will be knitting a back panel, two front panels and two sleeves. All pieces of the cardigan are knit flat. These are each sewed and seamed to finish. If you’re experienced and would like to knit the sleeves in the round to avoid sewing and seaming, you may do so. The collar is created by picking up stitches along the inside edges of the front panels and back neck area of back panel. Use the mattress stitch seam for stockinette sections, a simple whip stitch seam for garter stitch sections, or your preferred seaming method.
Pattern Instructions
Back Panel
While holding two strands of yarn together, cast on (47, 52, 57, 62, 67) stitch count remains the same throughout back panel pattern until you reach the arm opening shaping
Rows 1 – 8 Knit across each row
Row 9 Purl each st across the row
Row 10 Knit each st across the row
Row 11 Purl each st across the row
Row 12 Knit each st across the row
Row 13 Purl each st across the row
Row 14 Knit each st across the row
Repeat rows 1 – 14, in that order until piece measures approximately (12”, 14”, 14.5”, 15.5”, 15.5”) You do not need to finish the 1 – 14 repeat; simply end on any row of the pattern when you reach the indicated length
Next you will create the arm opening section, continuing from where you are in the pattern repeat from rows 1 – 14.
Arm Opening Shaping
Cast off first two stitches and last two stitches of the next row
Continue to follow the stitch pattern until piece measures approximately (20”, 22”, 24”, 26”, 26”) *Tip: If you’re a beginner, you might want your last rows to be worked in garter stitch as you may find it easier to seam at the shoulders. Simply work garter stitch for the last few rows no matter where you are in the stitch pattern. If you modify in this way, be sure to do the same to both of the front panels so they match.
Cast off and weave in ends.
Front Panel Pattern (make 2)
While holding two strands of yarn together, cast on (20, 22, 25, 27, 30) stitch count remains the same throughout back panel pattern until you reach the arm opening shaping
Rows 1 – 8 Knit across each row
Row 9 Purl each st across the row
Row 10 Knit each st across the row
Row 11 Purl each st across the row
Row 12 Knit each st across the row
Row 13 Purl each st across the row
Row 14 Knit each st across the row
Repeat rows 1 – 14, in that order until piece measures approximately (12”, 14”, 14.5”, 15.5”, 15.5”) Just as with the Back Panel, you do not need to finish the 1 – 14 repeat; simply end on any row of the pattern when you reach the indicated length, matching the back panel.
Next you will create the arm opening shaping section, continuing from where you are in the pattern repeat from rows 1 – 14.
Arm Opening Shaping
Cast off first two stitches of the next row for the first panel, and cast off the last two stitches of the next row for the second panel that you knit (This was corrected from the original version)
Continue to follow the stitch pattern until entire piece measures approximately (20”, 22”, 24”, 26”, 26”)
The length and stitch patterns should match the back panel.
Cast off and weave in ends.
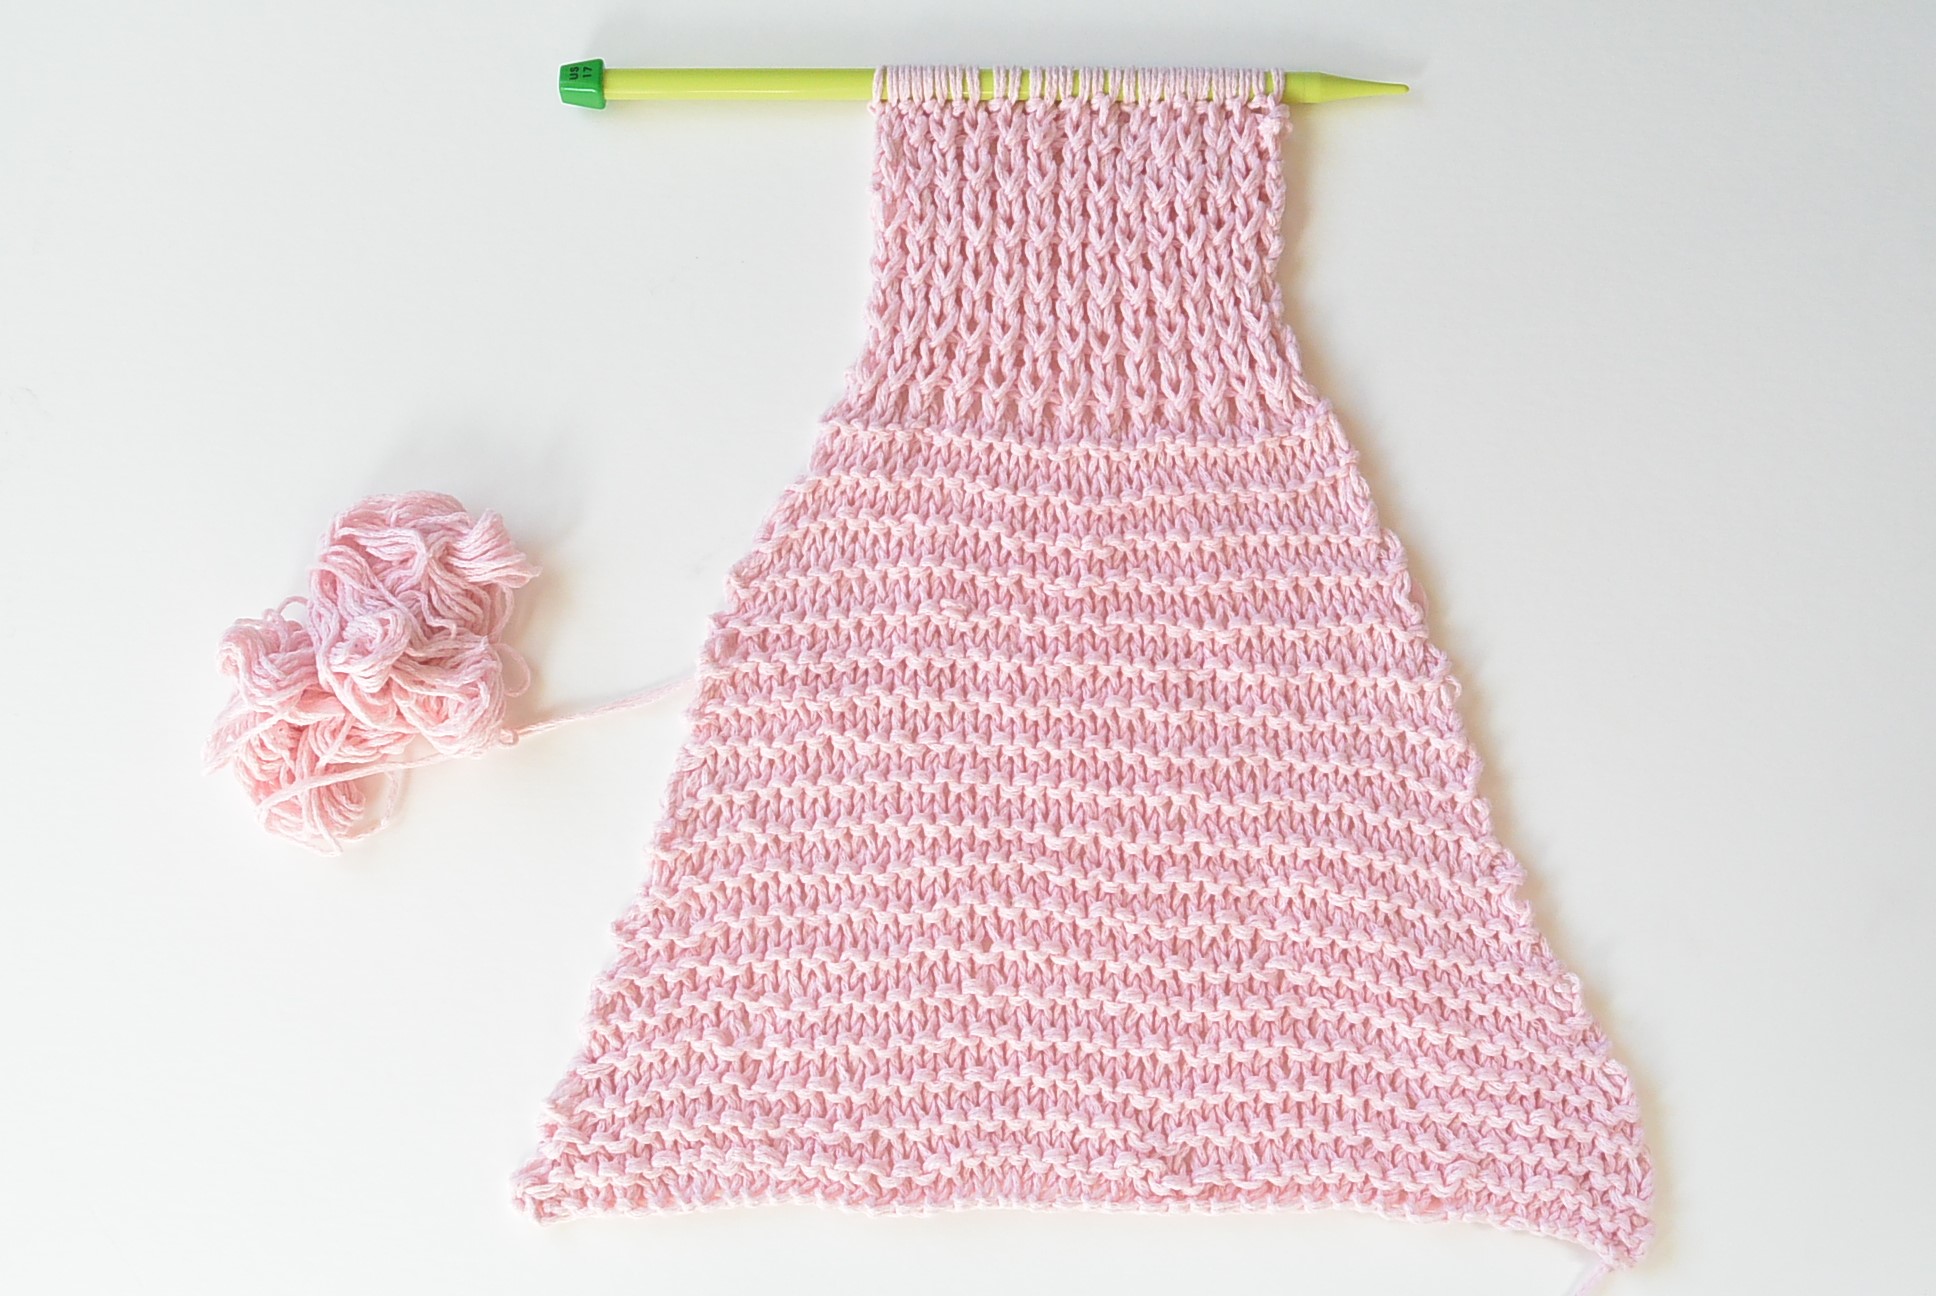
Sleeve Pattern (make 2)
While holding two strands of yarn together, cast on (40, 40, 46, 49, 49)
Row 1 Knit each st across the row
Decrease Section
Row 2 K2tog, knit across to end of row
Row 3 K2tog, knit across to end of row
Row 4 Knit each st across the row
Row 5 Knit each st across the row
Repeat rows 2 – 5, in that order, decreasing by following the pattern until piece measures approximately (8”, 8”, 8”, 9”, 10”) wide (if knitting in the round, sleeve should measure about half of indicated width in parenthesis for your size)
Next, work a 1 x 1 rib pattern until entire sleeve measures approximately (18”, 19”, 19”, 20”, 20”) long
Cast off and weave in ends
Below: This is what the sleeve looks like as you knit. (Before folding and seaming)
Assembly & Seaming
Using your tapestry needle and a length of yarn, sew front panels to back panels with mattress stitch seam on stockinette sections, a simple whip stitch seam or preferred method on garter stitch sections. Seam at the shoulders as well. Leave arm openings for the sleeves.
Fold and seam each sleeve, then sew sleeves to arm openings with preferred seaming method.
Collar
For the collar, you will pick up stitches evenly along entire length and knit a 1 x 1 rib pattern.
Pick up (60, 66, 72, 78, 84) along first front panel, pick up 12 (all sizes) along neck area on back panel, continue and pick up another (60, 66, 72, 78, 84) stitches along second front panel.
Row 1 K1, p1 across the row
Rows 2 – 5 Knit the knit stitches and purl the purl stitches to create the 1 x 1 rib knit pattern
You may continue and make the collar as wide as you’d like (keep yarn needs in mind)
Cast off and weave in ends.
Block to shape and size as desired.
That’s all there is to it, my friends!
I hope that if this is your first time tackling a cardigan pattern, that you really enjoy both making and wearing it (or gifting it!)
Have a wonderful day and I’d love to hear if you make one. Also, I’d love your feedback about me using this color. Would you like to see more color on the blog? I’m not making any promises as a neutral addict (hehe!), but I always value your thoughts and opinions. Thank you so much!
XO,
Jessica
If you like this, you might also like:
Thank you to Lion Brand Yarn for sponsoring this post. All opinions are 100% my own. 🙂

Thank you for sharing such a beautiful cardigan. I am loving the pink!
May I please ask what size you have pictured? Thank you again.
We are expecting a snow storm here in PA and I’m expecting to enjoy
it and knit!
Love all of your knit patterns, I just don’t know how to use circular needles. Would love some help with this.
Thank you,
Lynn Allard
Love that you are starting to use colors, Jessica.
I love this beauty. But I don’t knit at all, only crochet, and want to stay with the one hook in all its forms, i.e. ordinary crochet, tunisian, and … knooking, which I’m keen to learn. So my question is, can we knook this cardigan? I’m a total igno when it comes to knitting, but plan to get to grips with it through the knook, and this looks like a wonderful project to start on (after I have a few simple dishcloths & potholders under my belt). I’m solid mid-level Intermediate as a crocheter, so how realistic is this idea? Either way, thanks for the lovely pattern!
Hi Wendy! So cool to hear from you. I remember that you’ve always appreciated the colors when I use them (rarely!). Thanks so much for still stick’n with me all this time!
Hi Lynn! You use circulars in this case only because straights might not hold all of this stitches comfortably for you. However, they might if you’re making a small size! You should google knitting flat with circular needles – it’s really no different than knitting with straights. Hope this helps!
So glad you like the pink! I’m wearing the XS size and am 5’5” and 105 lbs. I’m also wearing a high waisted pant. Stay warm in PA and happy knitting!
Oooops, sorry – jumped the gun! Can you please delete the duplicate? Thanks –
Hi Harper! I’ve never knooked and am kind of embarrassed to say that I know nothing about it! So I’m not sure if you can do it with this cardigan.
What a pretty shade of pink! I made one of my daughters a cardigan out of this yarn for her birthday last year and it’s so soft! Another great pattern!
Lucky daughter of yours, Christina!
Is it possible that you will offer a video tutorial for this cute sweater?
I love all of your tutorials and have made all of them.
Thank you.
I absolutely love this! And the pink is absolutely perfect. Question: I am a 2x is there any suggestions as to how to make this a bit bigger?
The arm holes sound a little intimidating for a beginner.
I love this cardigan so much! My only question is, can the sleeves be knit so that the rows are vertical rather than horizontal for those of us who already feel self-conscious about our fat arms?
I love this pattern and the color! I’m adding this to my ever growing list of things to knit!
Rebecca
Ahhh. All you do is cast off a few stitches at the beginning of the row and a few at the end. It’s super easy!
I think the easiest would be that you could choose to modify and knit them in stockinette stitch instead. Follow the pattern but alternate a row of knit with a row of purl. Seam with the mattress stitch seam.
Lovely pattern.
Hi, I love this cardigan so much. Any suggestions for substitute yarn? I am pretty sure I won’t be able to find Feels Like Butta in Canada.
Thanks
We’re having the same problem here in Sweden. If you google “substituting yarns”, you’ll find sites offering info on substitute yarns. Hope this helps.
I’ve made several of Jessica’s patterns in other than LB yarns. I’m very pleased with the results. Of course I’d love to be able to buy the kits, but I’ve made finding a suitable yarn part of the fun.
Hi Jessica
I love how creative you are, and I really like this cardigan. I wonder, being a larger lady, would I be able to knit it, by adding at least 10 stitches? I would love this cardigan be large enough for plus size ladies..
Hermoso, Gracias por compartir!!
The pink cardigan is beautiful! I have been looking for a sweater this color and have not had any luck. Your pattern is lovely, and I appreciate your sharing it. The last cardigan I made was for my baby 40 something years ago but I have kept knitting shawls, scarves, etc. I think, this cardigan is my favorite of all of your designs that I have seen and loved. Hope I can find the pink color on line or here in Tennessee. Thank you so much for your generosity.
Hi Jessica! I ordered the kit from Lion Brand and I’m getting ready to start knitting! The pattern does not appear to say how many rows of 1 x 1 ribbing needs to be done. In looking at the photos it looks like I need to start with the ribbing and then move into the Rows 1 – 8 knit. My question is how many rows of 1 x 1 ribbing do I do?
Hi Jacque! So glad you liked it enough to buy the kit! The only ribbing is actually on the sleeves. You start with the garter stitch on all the panels. Hope this helps!
I absolutely love all of your patterns. I have made 3 of your kimono sweaters and they are so quick and easy to knit up. My daughter’s loved them. Here in Northwestern Ontario we are in a deep freeze, extreme cold warnings. Tonight we are expecting it to get down to -45 F with the find. I have a lot of wool on hand so I will be starting this sweater for sure.
Thank you for all of your beautiful patterns I love love love them.
Hi Jessica. I am a new subscriber to your newsletters. Thank you so much for your great patterns. I love your style.
I just cast on this cardigan and am on my second front panel. I am wondering if I should decrease at the end of the row this time instead of the beginning again. I think that will give me a right and left side.
Also is gauge right? I got 10 stitches for 4”. But I got 10 rows for 4”, not 5.5. I can easily adjust for length but I’m wondering if my knitting is really that tight!
Thank you again!
Oh wow! Stay warm! So happy you like my patterns and thank you so much Anne Marie!
Hey Brooke! Thanks so much for following along and subscribing. So happy you like my patterns! The panels should be reversible, so you’re good decreasing where ever you’d like as long as the panels match! You may just have to knit for more rows if your gauge doesn’t quite match mine. I am a super loose knitter typically, so it’s possible. Sorry for the delay here!
I made a “tester” cardigan out of the Lion Brand Pound of Love in a light gray.. I found out that I tend to loosen my gauge as I knit apparently so mine is huge! I’m going to figure out how to re-knit part of it (the arms!) but the Pound of Love was perfect because I made mine to be about mid-thigh length. Very affordable to try it out.
I bought the kit in Teal so now I know that I need to size down when I make that one! And Lion Brand has super customer service. I somehow ended up with the kit in Cranberry at first by accident and when I contacted them, they told me to keep the Cranberry kit for free and sent the Teal kit to me as well!
I am also enjoying the snowstorms in Newfoundland, PA, by knitting this in grey and purple.
Warm sun put a nice glaze on the ice and it’s funny/sad watching my dogs fall all over the place!
Hi Jessica! As always love everything you post and like everyone else I am so blessed by your beautiful patterns and pictures. I am not a huge cardi girl and was thinking of making this into a sweater. In my mind it’s totally doable but I’m a pretty new knitter and never knitted a sweater or cardi and was positive I never would. Thanks to you I don’t feel that way. My thoughts were making two back panels and having a go of knitting the sleeves in the round which I’m told is easy! I realize I’ll have to consider getting more yarn and where I live in Canada we just got in feels like butta at Michaels and it lives up to its name! It’s really hard to find yarn here where I live. We just moved and where I lived was the land flowing with much yarn at many sources. Now I’ve got Michaels and Wallmart. For you, my fellow Canadians I hear yarn Canada is a good place to shop online. Any suggestions Jessica would be great!
Hi Amanda! I love your idea of making this into a sweater! I hope it works out well for you! As far as places to shop for yarn in Canada – I really don’t know! Being from the states, I’m lucky to have a lot of places to shop. But I have no clue what’s available in Canada. I hope maybe some readers might have some insight for you! Do you ever order yarn online?
I want to order the kit. I like your color pink. Did you use the pink or the dusty pink? There is no pink rose Thanks
Hi: I love your cardigan. I chose color Ice. Love it. I may be overthinking this but I don’t understand the arm opening section. How do you cast off the last two stitches of this row? Would it be the first two of the next row?
Hi. I love your pattern. I chose color Ice. It’s beautiful and the yarn feels so soft. I have a question about the instructions. To cast off forming the sleeves on the back panel. When you are at the end of the row do you complete this row and cast off the two for that end when you start next row. Hope I explained that. I can’t figure out the cast off ending the row and have my yarn in correct place.
Do you have to hold 2 Strands of yarn together ? I am using Bernat Softee chunky and was just going to use 1 Strand . Please advise ?
I’m using two strands of worsted weight yarn held together. 🙂
Ok, so I am in the process of this . It seems my back ended up measuring 29. should I redo it ? It’s pretty wide or can I tuck in since its my first time and now I know what the measurement is do another one. Please help and tell me if I should take it apart . I really don’t want to but I think it will be too big. Any thoughts ? I wish I could show a picture.
Absolutely love this! Please consider making a pattern like this for a pullover sweater–it would be perfect for this coming winter!
Lovely cherry blossom pink color! Or lotus blossom pink! Nature does pink…
Julie in San Diego
I’ve made several of your patterns and love them all. My question . . . will this sweater look unfinished without the collar. I’m an experienced knitter but have never picked up stitches to make a collar. Can I leave it unfinished without it looking weird. Thanks, Jessica!
Help! Mine looks like a cardigan that should have buttons. The front does not go straight dow, but has a 45* angle at the collarbone. This is for my daughter’s christmas gift.
Love your patterns and made several
Hi as a beginner at knitting found your Cardigan really easy to knit ,with instructions easy to follow.
Just finished the collar band and want to ask how do you cast off in the 1*1rib .Thanks and look forward to more of your beginners knitting patterns .
Hi! I love all your patterns she gave been really enjoying this one! Have a question about the sleeves … it seems like you should knit for more than just one tie before starting the decrease to make the actual sleeve before making the cuff. I feel like I’m reading the pattern wrong but can’t figure it out. Can you help? Would really appreciate it!
Hi Jessica, I love your patterns and have made a few of them. I’m having a hard time with the sleeve instructions … I feel like I’m not quite understanding bc it seems that I should be knitting for many more rows before decreasing. Can you help?
I don’t know where the 12 stitches are along the neck area on the back panel
Hi! I recently finished this sweater but wish I had done a better job of measuring. . . . I was too excited and couldn’t wait to get started. Being 5/9″ and about 175 lbs figured it would be a safe size but it is def. a bit too big. It’s a great sweater to knit but this yarn wasn’t the easiest to seam together! After many attempts at seaming with the stitches you recommended (and many tears) I ended up literally chain stitching the seams together so it wouldn’t look so messy! Also recommend that the sleeves be knit in the round as the seam is dragging the sleeve down and making it feel even bigger. Overall it’s a lovely sweater to have in my collection and I’ve gotten so many compliments – especially on the color. Jessica, I wonder if there’s any way this pattern could be re-written with less seams. . . . hmmmmm. I’m not experienced enough to knit an entire cardy from the top down but if I try it, you’ll be the first to know.
I love all your patterns, this is my third one and I am also working on the summer sweater, as well. Yay for less seaming!! My nemesis for sure.
XOXO LYnn
I am very glad to have found your lovely patterns. About to embark on the cotton candy cardi, I would love it if you could possibly clear up some confusion I have in regards to the pattern. You state in the materials the only needles needed are the circular, however in the photo of the sleeve being knitted it is on a straight needle. Do I need to purchase number 17 in a straight needle as well? Many thanks Jessica.