Mandala Crocheted Blanket Bag Pattern
I created this blanket bag crochet pattern over the summer and can finally share it with you today! You know that I love to make wearables, but it’s awesome to change things up every now and then. This crocheted blanket doubles as a bag so it’s quite unique and handy. Rather than trying to shove my park blanket into a bag with my snacks for a day outside, now I can fill my blanket and cinch it closed. I’m thinking it makes a fun little beach bag too! What do you think?
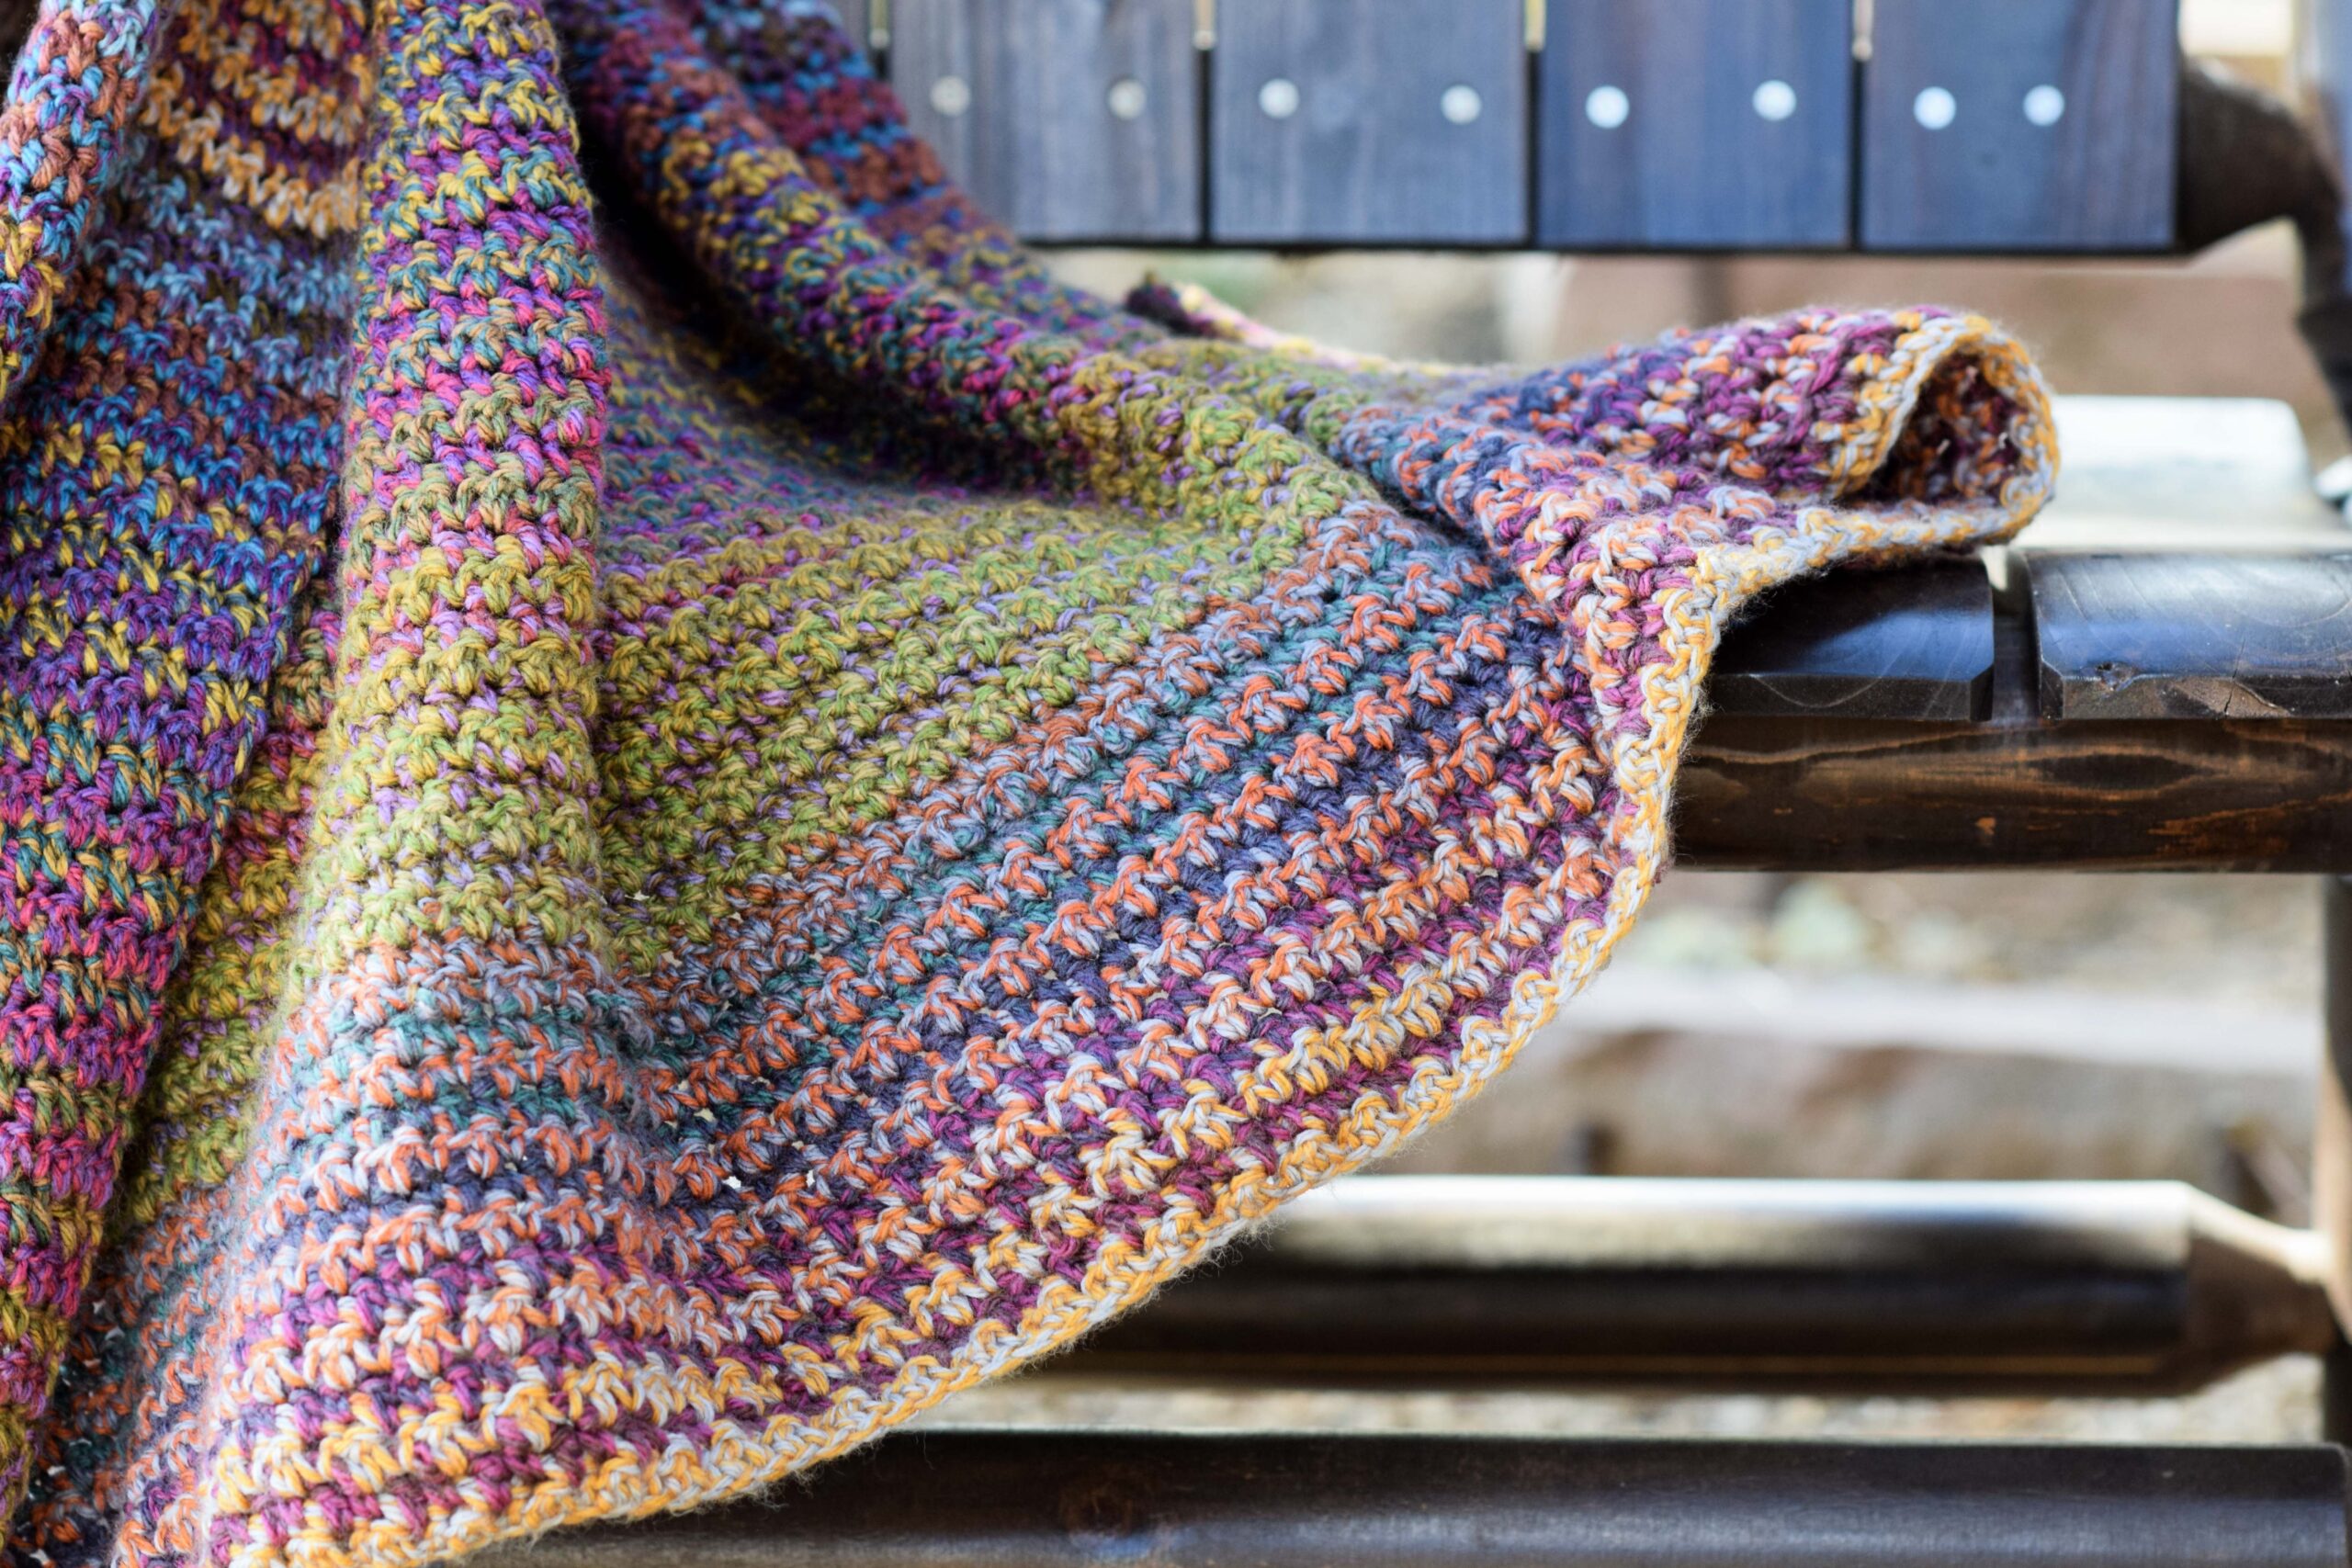
The pattern is simple and I’ve included a step by step tutorial below on how to get started below. If you can double crochet and crochet in the round, this project will be very easy. The Lion Brand Mandala yarn is available in amazing colors and I just love the variety of blues in the skeins used for this blanket bag. If you like the look of the blanket itself without turning it into a bag, it works really well to add a retro pop of color to a chair and it makes super cute toddler or baby blanket. As usual, you can find the free pattern below and Lion Brand has also made this into a kit which you may choose to purchase on their website!
![]()
Above: There you have your pretty, little crocheted blanket
Below: The blanket’s now become a bag – fun, fun!
![]()
This blanket bag is made mostly with double crochet stitches so it works up fairly quickly considering it’s size. It’s almost like Granny’s doily turned giant! Once you have your circular blanket finished, you will simply braid or chain some super bulky yarn to make the rope handle. There’s no need to make special holes in the pattern for the rope to slide through as it is worked right through the existing stitches. You will see how simple it is to put together in the picture tutorial and video below.
![]()
![]()
You guys, I am no video expert, but I made this little video last summer so you can see how this works! Haha! Kinda cheesy, but you get the idea right? Click to play it below!
![]()
As usual you can find the ad-free printable pattern in my Etsy shop HERE, or you can find the free pattern below!
![]()
It really is like you’re making a “Mandala” with this pattern. The color changes are beautiful as you work the rounds and there’s always a new and exciting color coming up next so I never got bored. I do tend get bored with large projects but not the case with this one. Have you tried the Mandala yarn yet? My daughter recently saw a rainbow color version at Wal-Mart so I have a scarf in the works for her. It’s super soft and while I don’t often do color, I really enjoy how the yarn works up.
Crocheted Mandala Blanket Bag Pattern
You know those certain projects that you’re especially excited about? This is one of those for me. EEEK! I think because it’s so unique – the blanket turns bag, turns play-mat, turns toy carrier, turns carry-all after all. It’s also completely useful and pretty. One pull of the drawstrings and your blanket turns into a generous sized bag. And because of the amazing self striping Lion Brand Mandala yarn, the pattern is as simple as can be since there are no color changes. The yarn did all that work which is a plus for me. I like easy. 🙂
You will need:
Size H, 5.0 mm crochet hook
2 skeins of Lion Brand Mandala “Spirit” Worsted Weight Yarn 591 yards or you can purchase the kit from Lion Brand Yarn HERE
150 g/skein (uses approximately 277 g)
1 skein of Hometown USA Super Bulky Yarn 142 g/skein in New York white or preferred color (uses approximately 23 g)
Scissors
Tapestry Needle to weave in ends
Skill Level:
Easy +
Abbreviations/Skills needed:
dc – double crochet
ch – chain
sk – skip
st – stitch
sl st – slip stitch
rnd – round
*You should be familiar with crocheting in the round
Gauge:
Not important for this pattern, however please note that I am a LOOSE CROCHTER! This means that my blanket may have turned out larger than yours if you crochet tightly.
Size:
Approximately 41” inches in diameter
Notes:
This pattern uses the basic method of slip stitching to join rounds and the first chain of each row counts as a stitch. You may use another method of joining rounds if you prefer. The pattern begins by creating a granny circle and later turns into basic double crochet stitch-work in the round.
Counting stitches in each round is a helpful way to ensure your blanket will turn out correctly.
Mandala Blanket Bag Pattern
Granny Circle Center
With your Mandala worsted weight yarn, chain 5 (below), slip stitch to join in order to form a ring
![]()
Rnd 1 Ch 3 (this counts as your first dc), make 11 dc into the ring. Sl st to join into first ch. (12 stitches)
![]()
Rnd 2 Ch 3 (counts as 1st dc), make second dc in same space. Make 2 dc in each space around and sl st to join at end of round (24 stitches)
![]()
Rnd 3 Ch 3, make 2 dc in same space. Continue to make 3 dc stitches in the space between each group of 2 dc from last round, sl st to join at end of round. (36 stitches)
Rnd 4 Ch 3, make 3 dc in same space. Make 4 dc in space between each group of 3 dc from last round, sl st to join at end of round. (48 stitches)
Rnd 5 Ch 3, make 4 dc in same space. Make 5 dc in space between each group of 4 dc from last round, sl st to join at end of round. (60 stitches)
Rnd 6 Ch 3, make 5 dc in same space. Make 6 dc in space between each group of 5 dc from last round, sl st to join at end of round (72 stitches)
Rnd 7 Ch 3, make 6 dc in same space. Make 7 dc between each group of 6 dc from last round, sl st to join at end of round. (84 stitches)
Double Crochet Rounds Section
Rnd 8 Ch 3 (counts as first dc), make dc into same space, *dc in next 6 stitches, 2 dc in next space between group of 7 dc stitches. Repeat from * around. Sl st to join. (96 stitches)
Important: For each of the next rounds, end with a single dc stitch rather than the 2 dc stitch group. If you make a 2 dc stitch at the end of a round, you will have too many stitches. Counting stitches will also help to ensure your circle blanket turns out correctly.
Rnd 9 Ch 3, dc in same stitch, * dc in next 7 stitches around, 2 dc in next st. Repeat from * around. Sl st to join. (108 stitches) Remember to end your round with a single dc stitch rather than a 2dc group
Rnd 10 Ch 3, dc in same stitch, * dc in next 8 stitches around, 2 dc in next st. Repeat from * around. Sl st to join. (120 stitches)
Rnd 11 Ch 3, dc in same stitch, * dc in next 9 stitches around, 2 dc in next st. Repeat from * around. Sl st to join. (132 stitches)
Rnd 12 Ch 3, dc in same stitch, * dc in next 10 stitches around, 2 dc in next st. Repeat from * around. Sl st to join. (144 stitches)
Rnd 13 Ch 3, dc in same stitch, * dc in next 11 stitches around, 2 dc in next st. Repeat from * around. Sl st to join. (156 stitches)
Rnd 14 Ch 3, dc in same stitch, * dc in next 12 stitches around, 2 dc in next st. Repeat from * around. Sl st to join. (168 stitches)
Rnd 15 Ch 3, dc in same stitch, * dc in next 13 stitches around, 2 dc in next st. Repeat from * around. Sl st to join. (180 stitches)
Rnd 16 Ch 3, dc in same stitch, * dc in next 14 stitches around, 2 dc in next st. Repeat from * around. Sl st to join. (192 stitches)
Rnd 17 Ch 3, dc in same stitch, * dc in next 15 stitches around, 2 dc in next st. Repeat from * around. Sl st to join. (204 stitches)
Rnd 18 Ch 3, dc in same stitch, * dc in next 16 stitches around, 2 dc in next st. Repeat from * around. Sl st to join. (216 stitches)
Rnd 19 Ch 3, dc in same stitch, * dc in next 17 stitches around, 2 dc in next st. Repeat from * around. Sl st to join. (228 stitches)
Rnd 20 Ch 3, dc in same stitch, * dc in next 18 stitches around, 2 dc in next st. Repeat from * around. Sl st to join. (240 stitches)
Rnd 21 Ch 3, dc in same stitch, * dc in next 19 stitches around, 2 dc in next st. Repeat from * around. Sl st to join. (252 stitches)
Rnd 22 Ch 3, dc in same stitch, * dc in next 20 stitches around, 2 dc in next st. Repeat from * around. Sl st to join. (264 stitches)
Rnd 23 Ch 3, dc in same stitch, * dc in next 21 stitches around, 2 dc in next st. Repeat from * around. Sl st to join. (276 stitches)
Rnd 24 Ch 3, dc in same stitch, * dc in next 22 stitches around, 2 dc in next st. Repeat from * around. Sl st to join. (288 stitches)
Rnd 25 Ch 3, dc in same stitch, * dc in next 23 stitches around, 2 dc in next st. Repeat from * around. Sl st to join. (300 stitches)
Rnd 26 Ch 3, dc in same stitch, * dc in next 24 stitches around, 2 dc in next st. Repeat from * around. Sl st to join. (312 stitches)
Rnd 27 Ch 3, dc in same stitch, * dc in next 25 stitches around, 2 dc in next st. Repeat from * around. Sl st to join. (324 stitches)
Rnd 28 Ch 3, dc in same stitch, * dc in next 26 stitches around, 2 dc in next st. Repeat from * around. Sl st to join. (336 stitches)
Rnd 29 Ch 3, dc in same stitch, * dc in next 27 stitches around, 2 dc in next st. Repeat from * around. Sl st to join. (348 stitches)
Rnd 30 Ch 3, dc in same stitch, * dc in next 28 stitches around, 2 dc in next st. Repeat from * around. Sl st to join. (360 stitches)
Rnd 31 Ch 3, dc in same stitch, * dc in next 29 stitches around, 2 dc in next st. Repeat from * around. Sl st to join. (372 stitches)
Rnd 32 Ch 3, dc in same stitch, * dc in next 30 stitches around, 2 dc in next st. Repeat from * around. Sl st to join. (384 stitches)
Rnd 33 Ch 3, dc in same stitch, * dc in next 31 stitches around, 2 dc in next st. Repeat from * around. Sl st to join. (396 stitches)
Rnd 34 Ch 3, dc in same stitch, * dc in next 32 stitches around, 2 dc in next st. Repeat from * around. Sl st to join. (408 stitches)
Rnd 35 Ch 3, dc in same stitch, * dc in next 33 stitches around, 2 dc in next st. Repeat from * around. Sl st to join. (420 stitches)
![]()
Tie off and weave in ends, or continue pattern, increasing by one single dc stitch between 2 dc increases for each round until blanket is approximately 41” inches wide.
![]()
Above: The Blanket Bag measures approximately 41” inches across.
Drawstring Rope – Handle Instructions
Cut three lengths of Hometown USA yarn approximately 166” inches (or just over 4.5 yards) long each.
NOTE: Below I show you how to braid the Hometown USA to make a rope, however, you can also simply make a crocheted chain and have the same effect with a lot less work!!
Tie ends together with an overhand knot and secure with tape or preferred method to a sturdy table or structure. Braid the three lengths of yarn together loosely. Take care not braid tightly or your drawstring may end up shorter than needed. To make braiding easier you may wind each strand of yarn into a ball and release as you braid, or keep each strand in a neat grouping while you braid as pictured below. Tie off with an overhand knot when you’ve reached the end. Trim ends neatly. After braiding and trimming, final rope measurement should be approximately 4 yards 10 inches long. Note: If you’ve made a smaller or larger blanket than the pattern indicates, adjust the length of your rope accordingly.
You may also choose to use a large crochet hook and make a chain approximately 4 yards and 10 inches long!
![]()
Above: Braiding the drawstring rope with three strands of yarn
Attaching Drawstring Rope Handle to Blanket Bag
With one end of your “rope”, insert it into a space in the third row from the outside of the blanket (see photo). Weave the rope in and out of the blanket, working it through approximately every 10 stitches around. Pull through so that the drawstring is even on each side.
![]()
Above: Thread the rope through your blanket as pictured. You will then attach the rectangle tab that you see pictured in our next step.
![]()
Above: Note the drawstrings span the entire circumference of the blanket and come out to meet on one end.
Handle Attachment Tab
With your worsted weight yarn, ch 8.
Row 1 Sc across row (7 stitches)
Repeat row 1 until piece measures approximately 3.5” long.
Make single crochet border around piece, tie off and weave in ends.
Place the tab on the bottom of the blanket, on the opposite side from where the drawstrings exit. (See photos) With a length of yarn and a tapestry needle, attach tab to blanket, 4 rounds from outside of blanket with a whip stitch on the top and bottom, leaving the sides open.
![]()
![]()
Above: Whip stitch the bottom and top, leaving the sides open for the rope handle to tie through.
![]()
Above: The tab has been attached on the outside of the blanket, opposite end side from where the drawstring pull is located.
Tassels (optional)
Make as many or as few tassels as you’d like for your new blanket bag! Using your worsted weight yarn, cut approximately 17 strands of yarn 11” inches long. Holding the strands of yarn together, fold them in half and tie together as pictured. Cut another length of yarn and tie around top of yarn. Trim ends to make them straight and even. Attach tassel near ends of drawstrings.
![]()
Instructions for use of Blanket Bag:
After fully assembling your blanket bag, you can easily convert your bag to a blanket at any time. When your blanket is laying flat on the ground, simply pull both ends of the drawstrings upward. Attach the rope to the tab on the opposite end with a slip knot, making it any length that you want. Enjoy!
![]()
Above – drawstrings have been pulled to close blanket bag
![]()
Above – Pull both drawstrings together through the tab on opposite end
![]()
Finish your slip knot
![]()
That’s it – now carry it wherever you’d like!
![]()
It was a lot of fun to make this unique project. I hope that you enjoy your new blanket bag and let me know if you have any questions!
XO,
Jessica
If you love crocheted blankets, you might also like:
![]()
Above: Hearthside Blanket Pattern
![]()
Above: Simple Crocheted Go-To Blanket Pattern
![]()
![]()
Thank you to Lion Brand Yarn for sponsoring this post! All opinions are 100% my own.
I love this fun creation and what a great present it would make! Just getting to know knitting needles (the Telluride Knit Kimono for my daughter is coming right along BTW), but I will someday learn to crochet and make this blanket bag–that is, unless it shows up as a knitting pattern first! 😉 Thanks for your great ideas and inspiration!
Hi Laura! Thanks so much for your sweet words and congrats on beginning to knit! I’m honored to hear you’re making the Telluride Knit Kimono for your daughter. I hope she loves it! Thanks so much for taking the time to let me know you like this idea. Have a lovely day!
How Clever!! I was looking at round afghans earlier today and I love this one!! Thanks for your great pattern of a blanket-bag! I love it!
What a super idea! It’s one of those wow why didn’t I think of that ideas that seems so obvious once someone does it but is so hard to actually achieve. Does that make sense? In other words I’m so impressed and awestruck that you thought of it. Great job.
What a fun idea! I can’t wait to try it :))
Super cute idea! Would be great for springtime. I have yet to try Mandella yarn. I may have to know!
Lovely photos too. Do you take them ourself or have a professional take them. Theyre really nice!
Hi Shelly! So glad you like it and I think you’ll enjoy Mandala. I do all the photos myself or my husband takes them if I’m in the shot. We’ve been trying to improve our photos so I’m so happy you like them!
Thanks so much Bita!
Haha! Totally Tracy – such a simple concept right?! Thanks for your kind words.
You’re welcome Tonia!
What a clever design–and the yarn is so pretty! I always look forward to your emails and seeing/hearing what you’ve been up to.
Hey Susan! I’m so happy to hear from you as I know you’ve been a support for a very long time! You’re words mean a lot as you are so creative yourself.
What a great idea! I’m going to make it as a play mat for our newborn. I love the idea of quickly cinching up his toys (when he’s a tad older!) and having them ready again for tummy time/play time. Thank you!
I’ve been debating about returning some yarn that I wasn’t really in love with
but after seeing this it is definitely going back to the store! Just one question about
the Mandala yarn though. I just tried another brand of the self striping yarn and
it had two places where it had been tied together…..aarrrghhh! Did you find this
happening a lot in this yarn?
Loving this pattern.
Laurie Mowat
Hi Laurie,
Since I made this over the summer I really can’t remember if there are spots that are tied together. I haven’t noticed any with my daughter’s scarf but haven’t gotten too far into the skein.
So I started this awesome blanket pattern. Then the rounds look funny and I don’t think I was connecting them correctly plus the blank it was very Waving as I was crocheting. Can u please tell me with a photo in connecting with a slip stitch on this one?
Hello! I’ve used the Mandala yarn for a number of cowls. It’s my favorite of the self striping. I haven’t noticed any knots, except maybe in this last one. It was so small. I also had problems when I pulled the yarn out of the middle in the beginning. It came out in a small ball and I had to spend some time unraveling it. This is the first time I’ve had to do that, though. I really have enjoyed working with it other than that.
Hi Jessica! Love your designs. I have the crochet kimono kit ready and waiting to go, but I’m a little new to crocheting, so I’m saving it for when I’m a little more experienced. I have a question about this bag. Have you thought about adding some sort of lining? Not sure if it’s possible, but was curious if that’s an option.
A lining would be AMAZING Natasha! It would make the bag even more useful as you could have little pieces that wouldn’t fall through the holes. As is, it’s more like a market bag. Great thinking!
Hi Jodi,
If it is turning out really wavy, you might be adding stitches and increasing each round. Even though it’s tedious, you might want to count your stitches on each round to ensure you’re not adding stitches for some reason. See if that helps!
Mandala isn’t a worsted weight yarn. It’s a DK, size 3, yarn. A bit thinner. Love the pattern anyway.
I Wish there was a knitting pattern for this! It’s beautiful, great job.p
Thanks Kate!
This is absolutely genius! I’m definitely making one for this summer !
Hi Jody, I was having the same problem and realized that I made the first six rounds too loose. I started it over and kept the rounds tight and that seems to have solved the problem. I also put a marker in each 2 dc in the dc rows and find that it helps me keep the stitch count straight. Hope this helps.
I love this pattern and plan to make at least 2 more! I did count my stitches every now and again but found that if the increase is placed in the second dc of the previous row’s increase then it worked out perfectly and I really didn’t need to count at all.
Thank you so much for this pattern! I love to crochet and have developed a serious mandala yarn addiction. I am always on the lookout for gift items that are not blankets, scarves or shawls. With a little creativity this can be a gift for so many different occasions that lets me play with my fav yarn.
Hi Julie! It’s a great yarn for sure. So glad you like this pattern.
Hi Jessica! What a beautiful pattern and idea! Can you please go into further detail on where the slip stitch is supposed to go? Im on round 10 and seem to have only 6 stitches available for that last stretch. The previous round is on point, so I’m thinking I’m messing up with the placement of the Sl St.
I’m excited to finish this project! Thank you for sharing!
Okay, first I love this pattern. I’m pretty new at crocheting. My problem is that I’m unsure if the 2 dc in between the whatever row I’m on are supposed to line up? I count like a crazy person . I have no idea what I’m doing wrong
Hi. I’m loving this pattern and it is working up great. And I’m now a big fan of the Mandala yarn now. Two inquiries: First, I am getting a wavy in the blanket. I’m on row 17. I’ve been counting stitches and everything is adding up correctly. Is this okay? Second, do you block this? (Something I have never done before)? Would blocking (wet or steam?) help with the wavy issue?
Thanks for your help
I just finished making this blanket as a new baby gift, I’m a beginner sewer but it was easy enough to make, so thank you for sharing.
Oh no! Sometimes it could have a little wave but that’s usually when there are extra stitches. You can block it and it might help – I didn’t block mine.
I purchased the exact (brand, color) as what you showed here, however, it is not worsted weight, rather it is #3 (DK). I am newish to crochet so I am not sure if this difference is why mine is turning out wavy. I am only 9 rounds in and I have counted each round. I did go up one hook size as I normally crochet very tightly. Suggestions?
Thx,
Angela
Hi Jess
Are the DC American DC = TR (UK) Trebble UK.
Thanks.
I have bought the PDF & Just made this lovely blanket bag.. but used UK Double Crochet (UK DC) = US Single (US SC)
Doooh.. I’m now quessing that’s wrong?
Hehe! I bet it looks cool with that stitch pattern! All my patterns are written in US terms Vonna, so this would be the UK trebble.
Hi Jess. I have made another using TR UK Treble (DC US) and it lays so much better.. will undo the other and start again it doesn’t lay flat and is too wide. Novice mistake! Shame as I’d used 2 whole cakes if yarn!
Love the one made correctly to the pattern, LOVE this bag – will be my Yoga / Gym bag.
Already have requests from family to make at least 4 more! Top design! I’ll have it perfected by then 😉
Hi I saw this and made one for my two granddaughters for their friend’s they bring for sleep overs.Giving to them for Easter with their gifts in them.
I just finished making the mandala blanket bag for my niece who lives in Florida. I want her to be able to use it at the beach, so I lined it with a cute whale design fabric. I mad a simple “compass” with a fabric marker and piece of string measured to the size I needed to fit the wrong side of the bag. I used it to draw out a circle on the fabric, cut two matching pieces which I then sewed together so that even when the fabric peeked through on the right sid of the bag you still see whales. After machine stitching the liner pieces, I hand stitched the liner into to wrong side of the blanket. Be sure to leave enough crochet edge exposed to run your drawstring through!