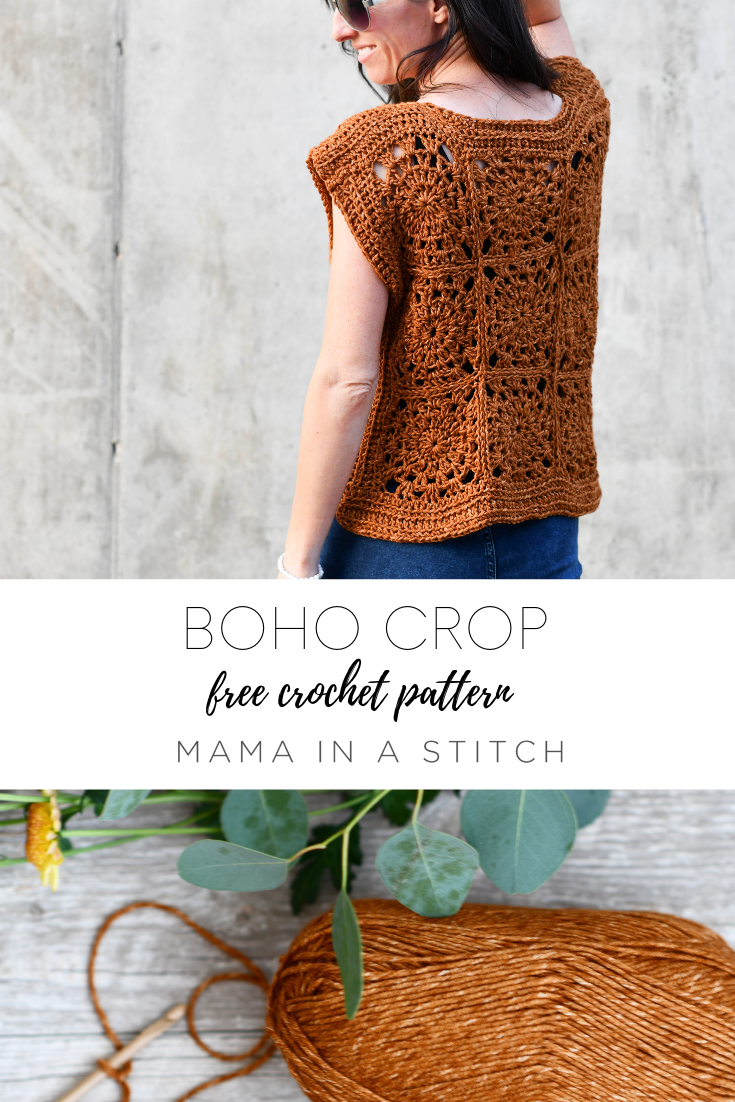
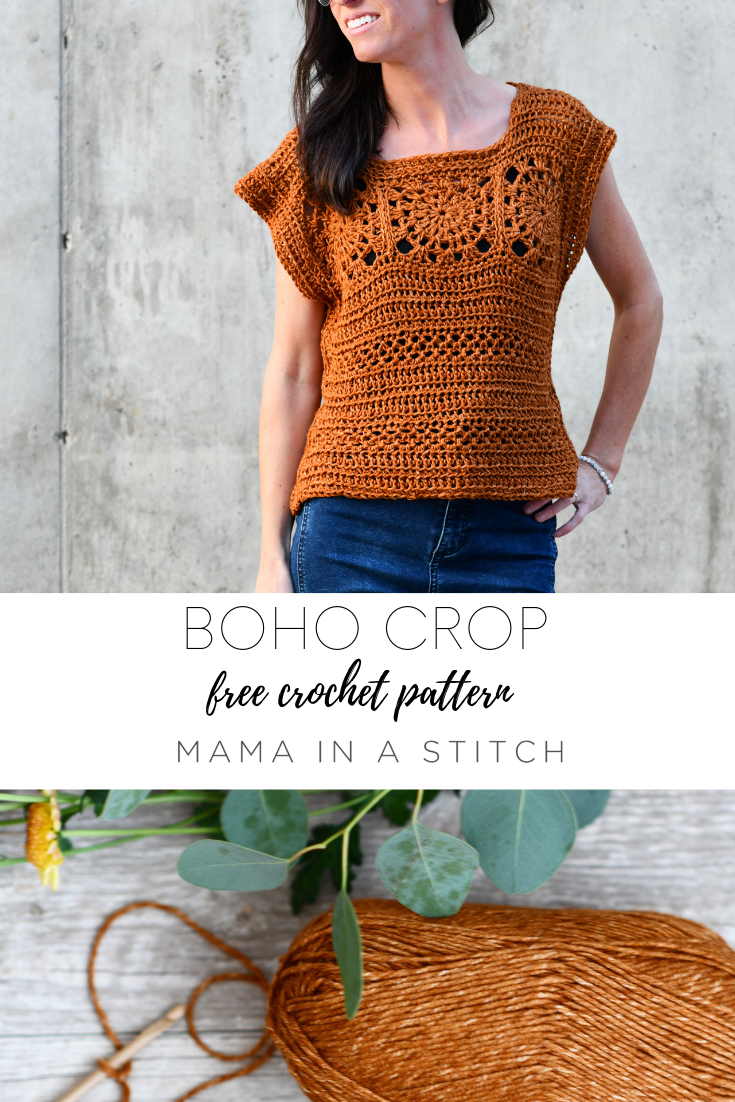
How To Crochet A Summer Boho Top – Free Pattern
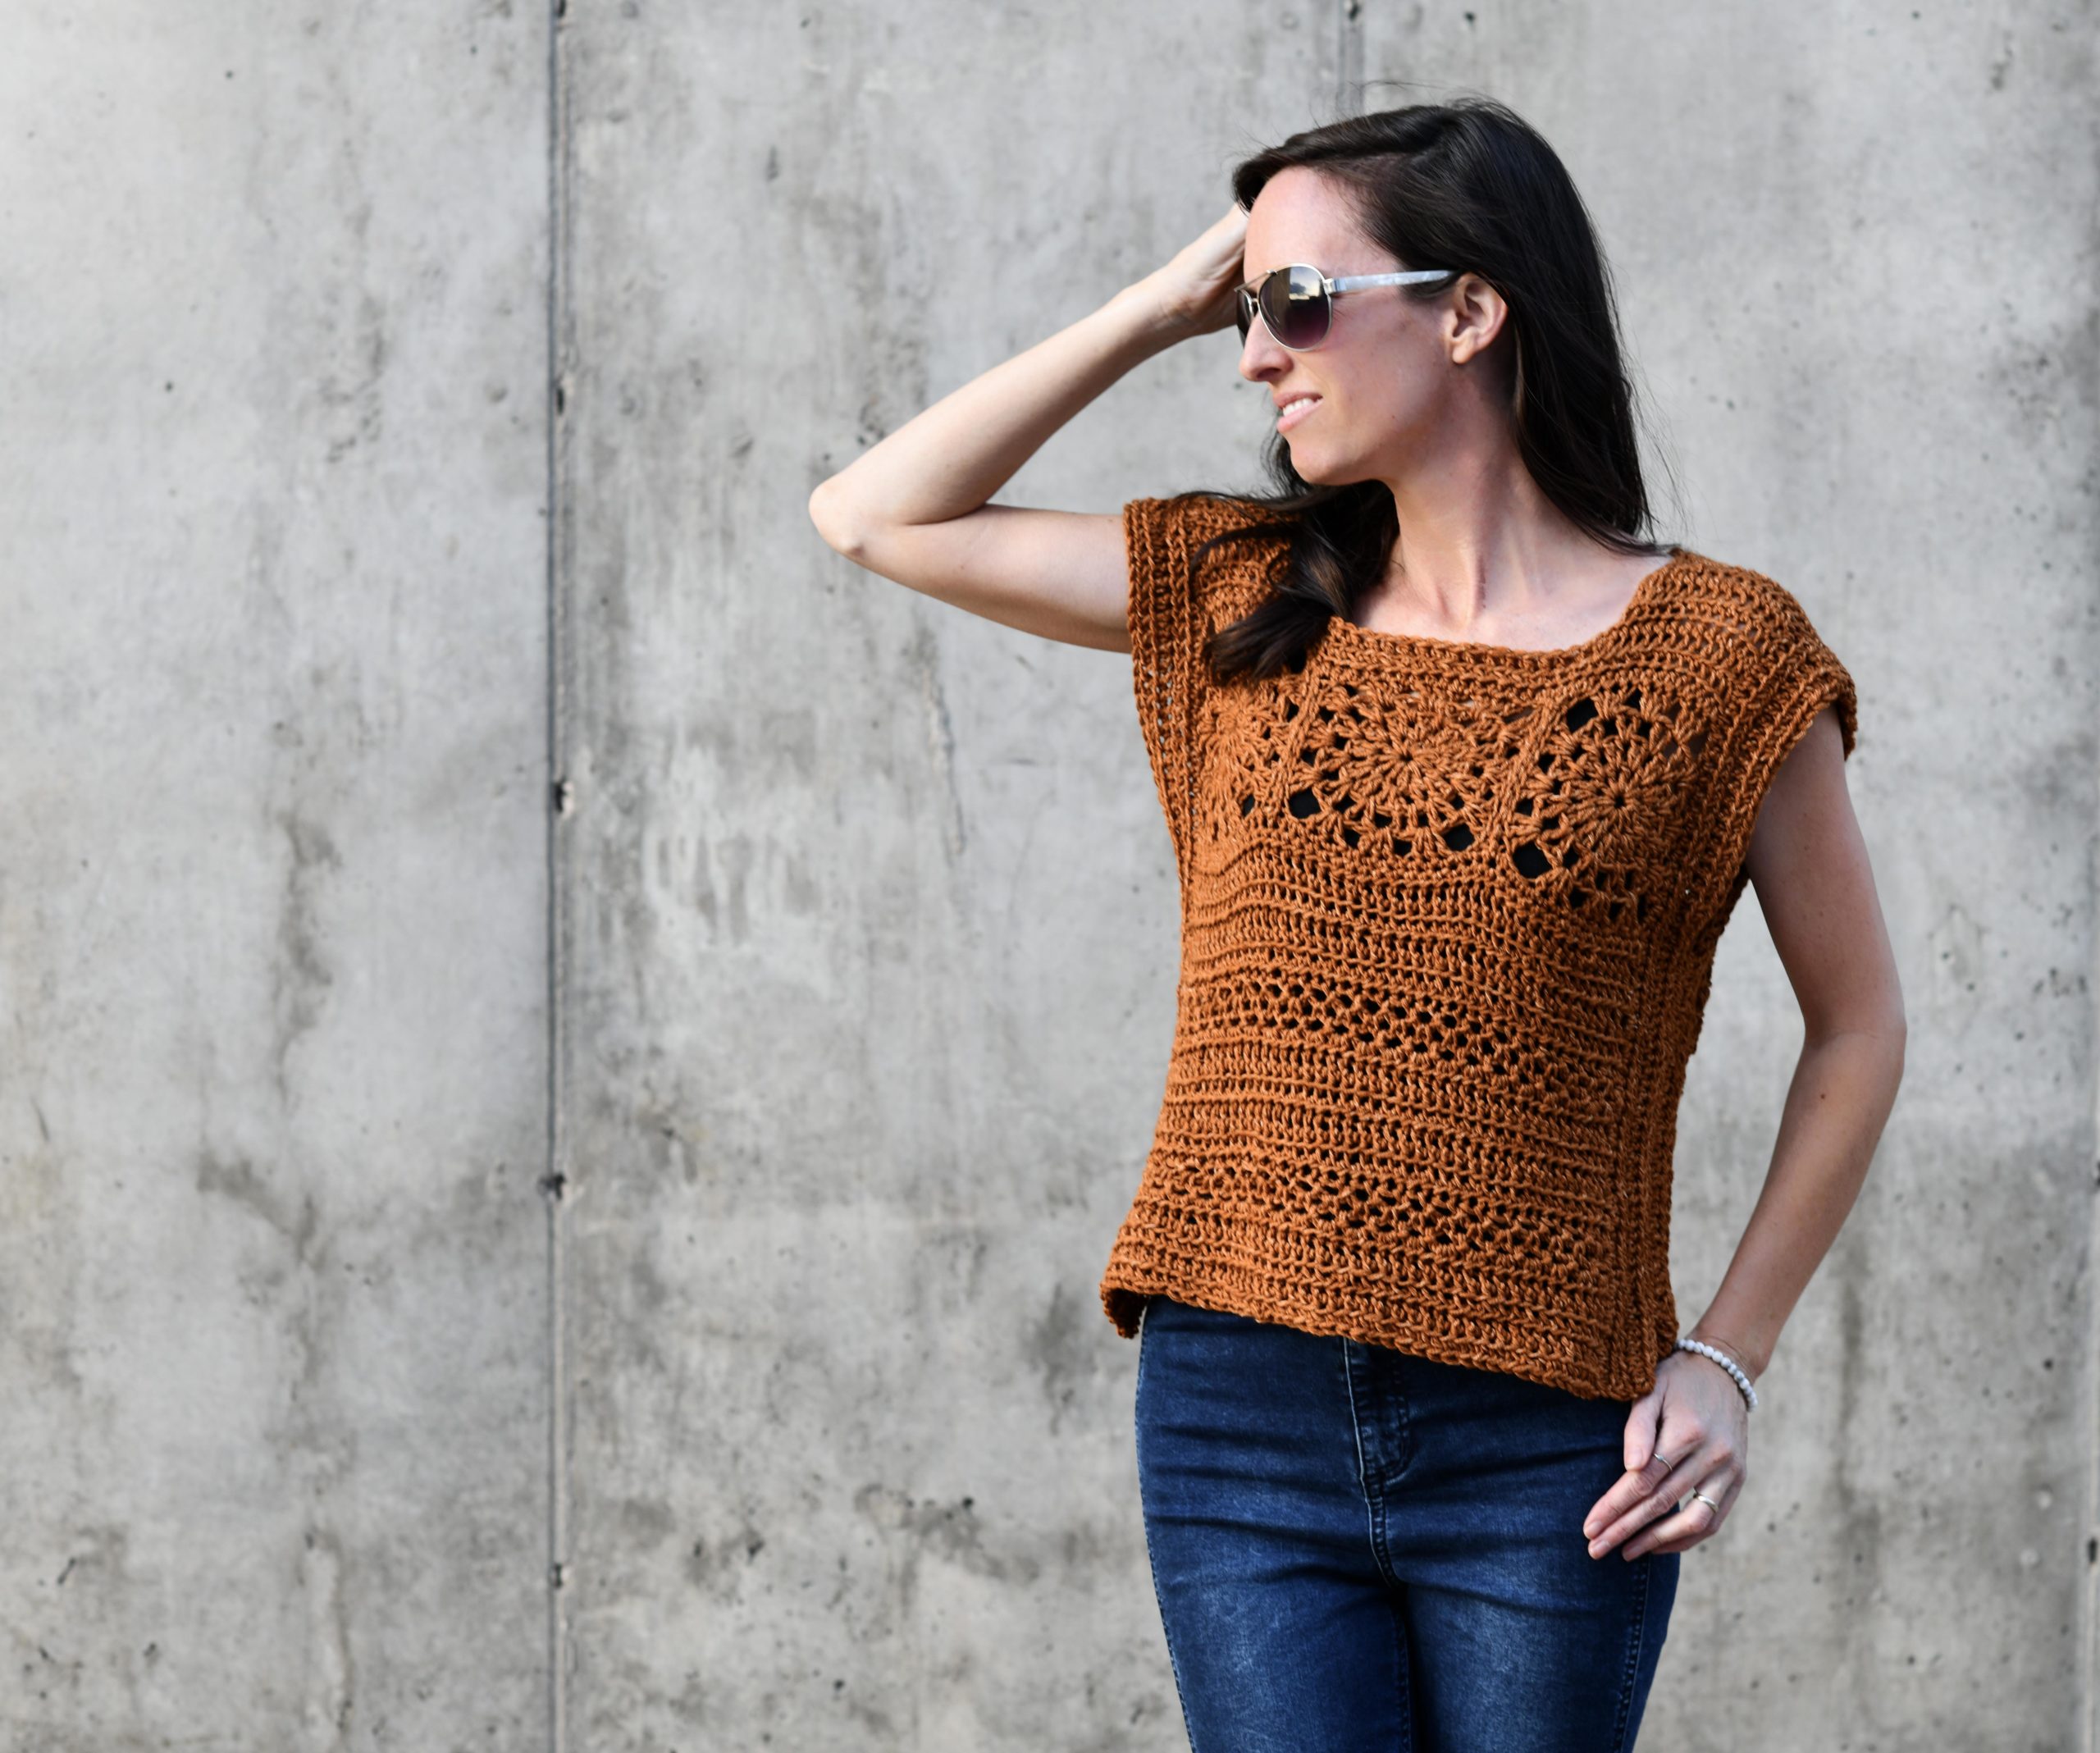
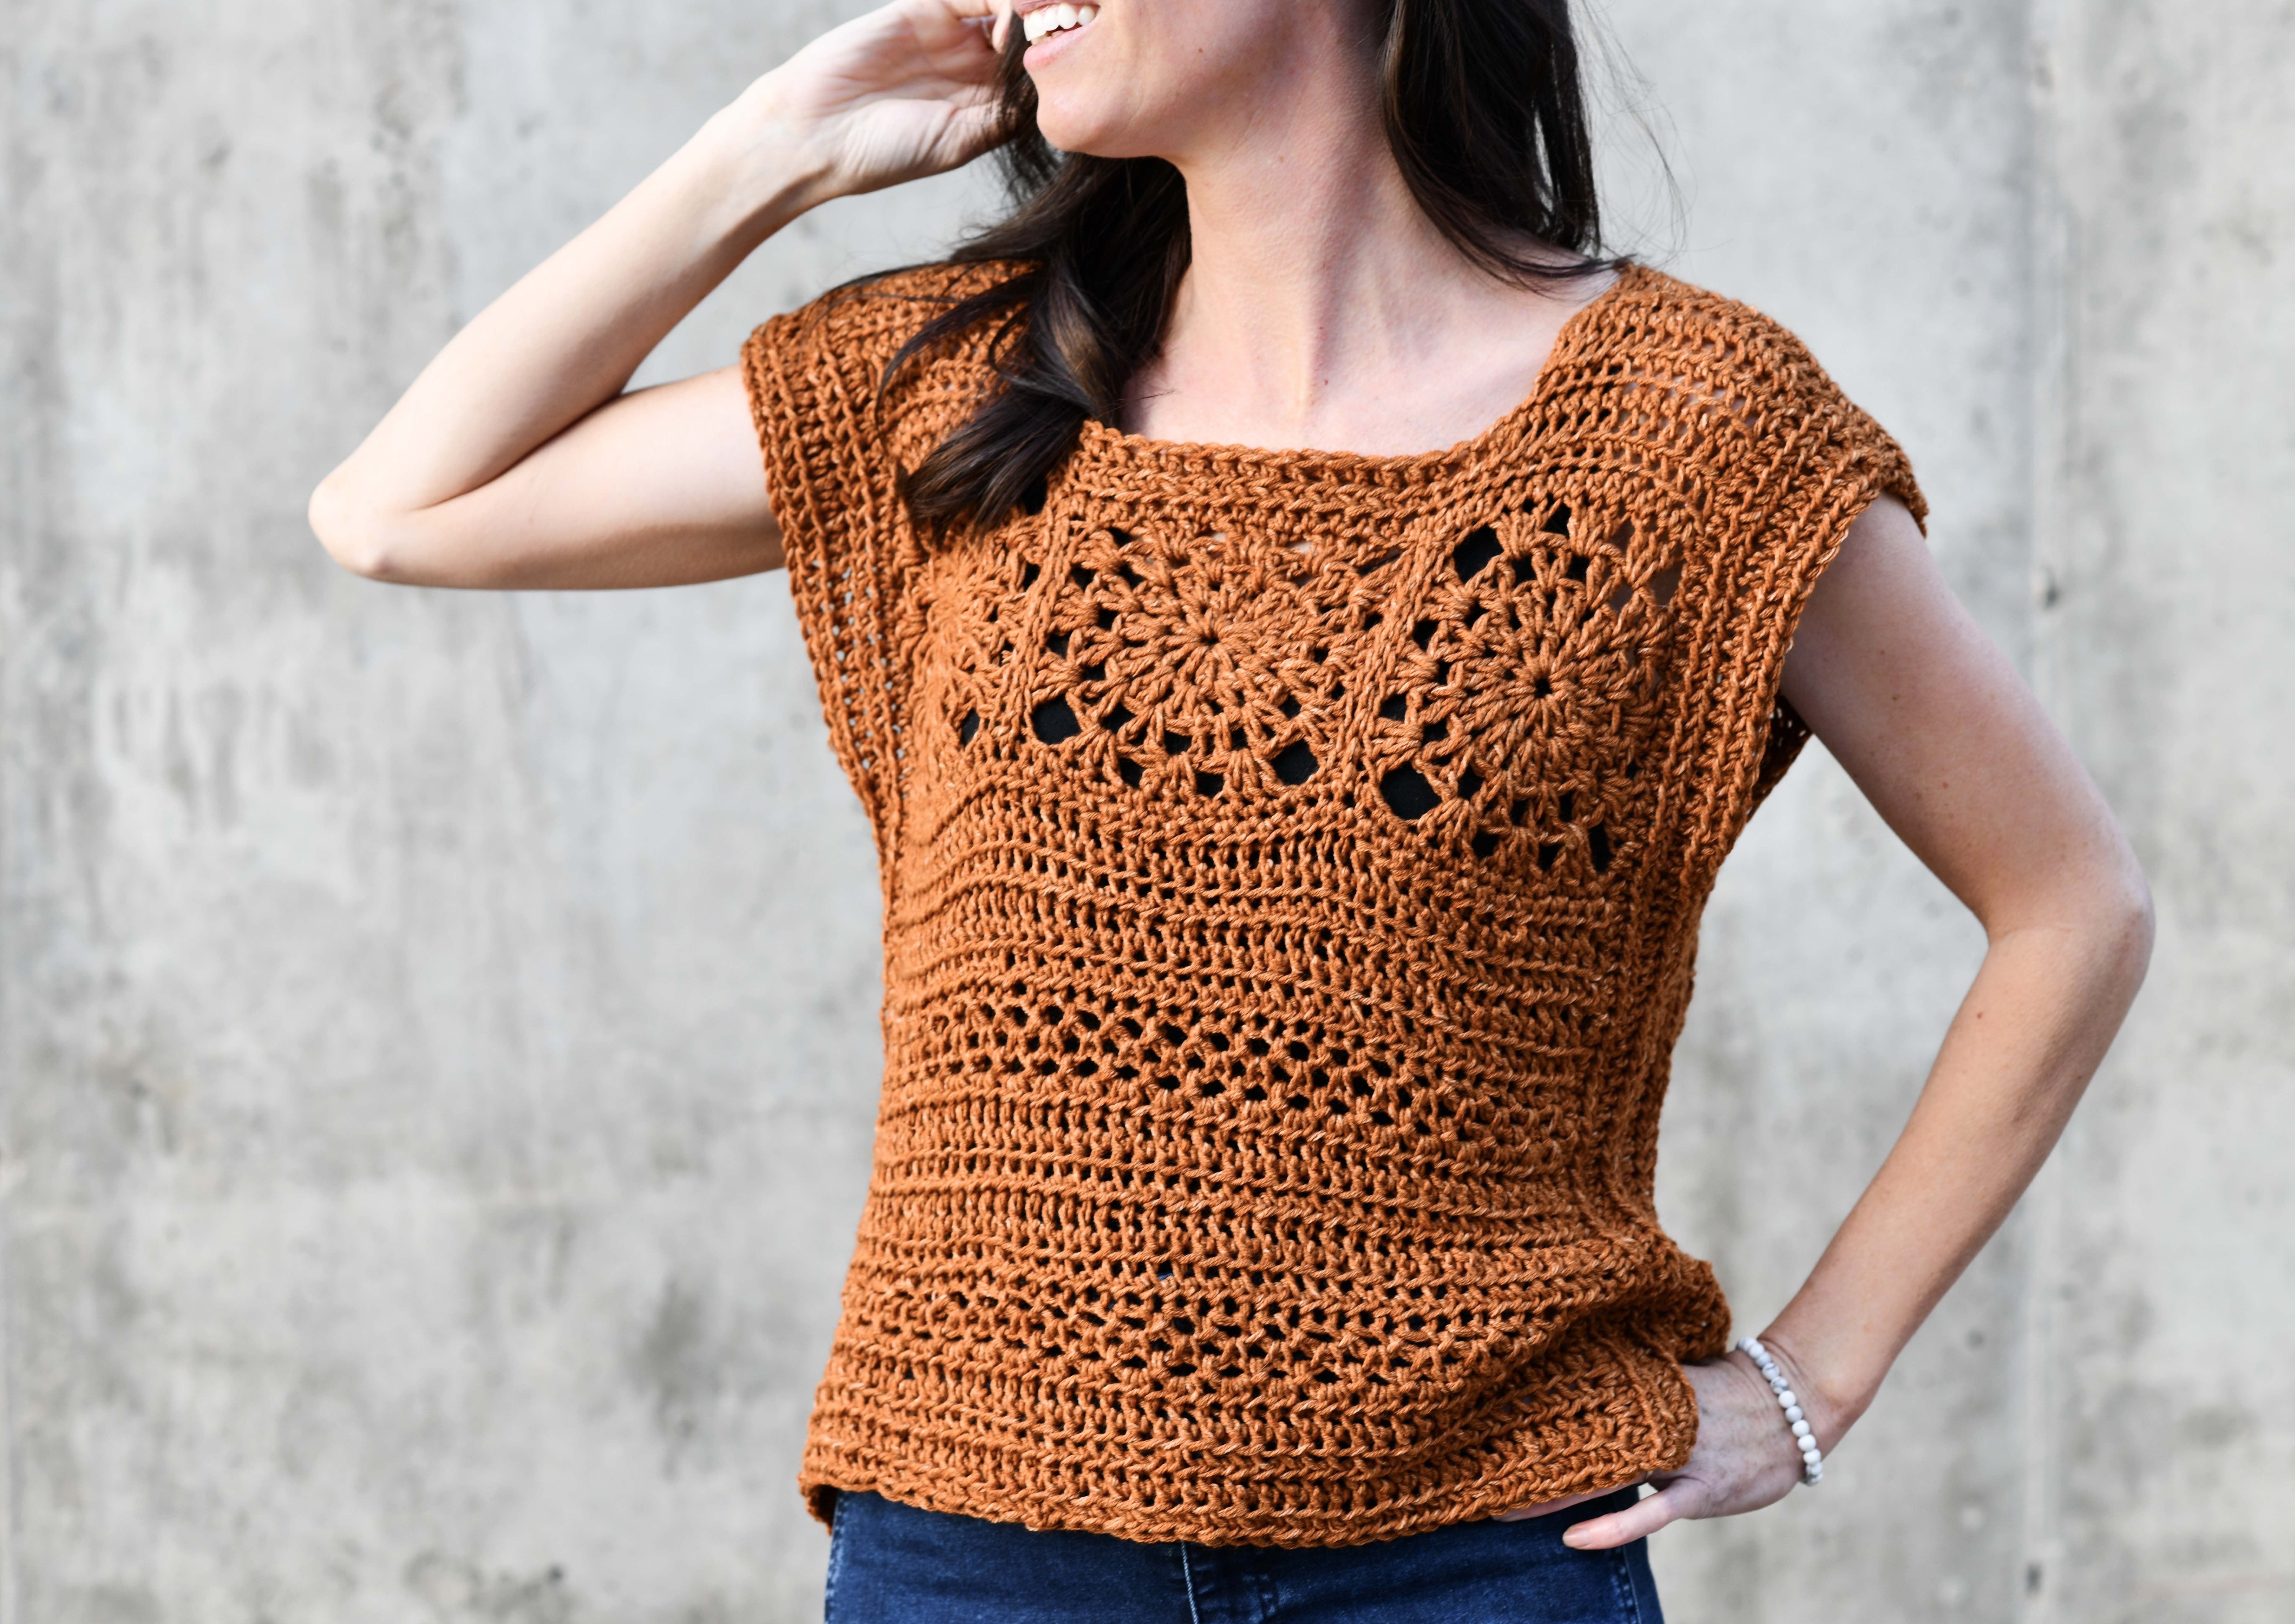
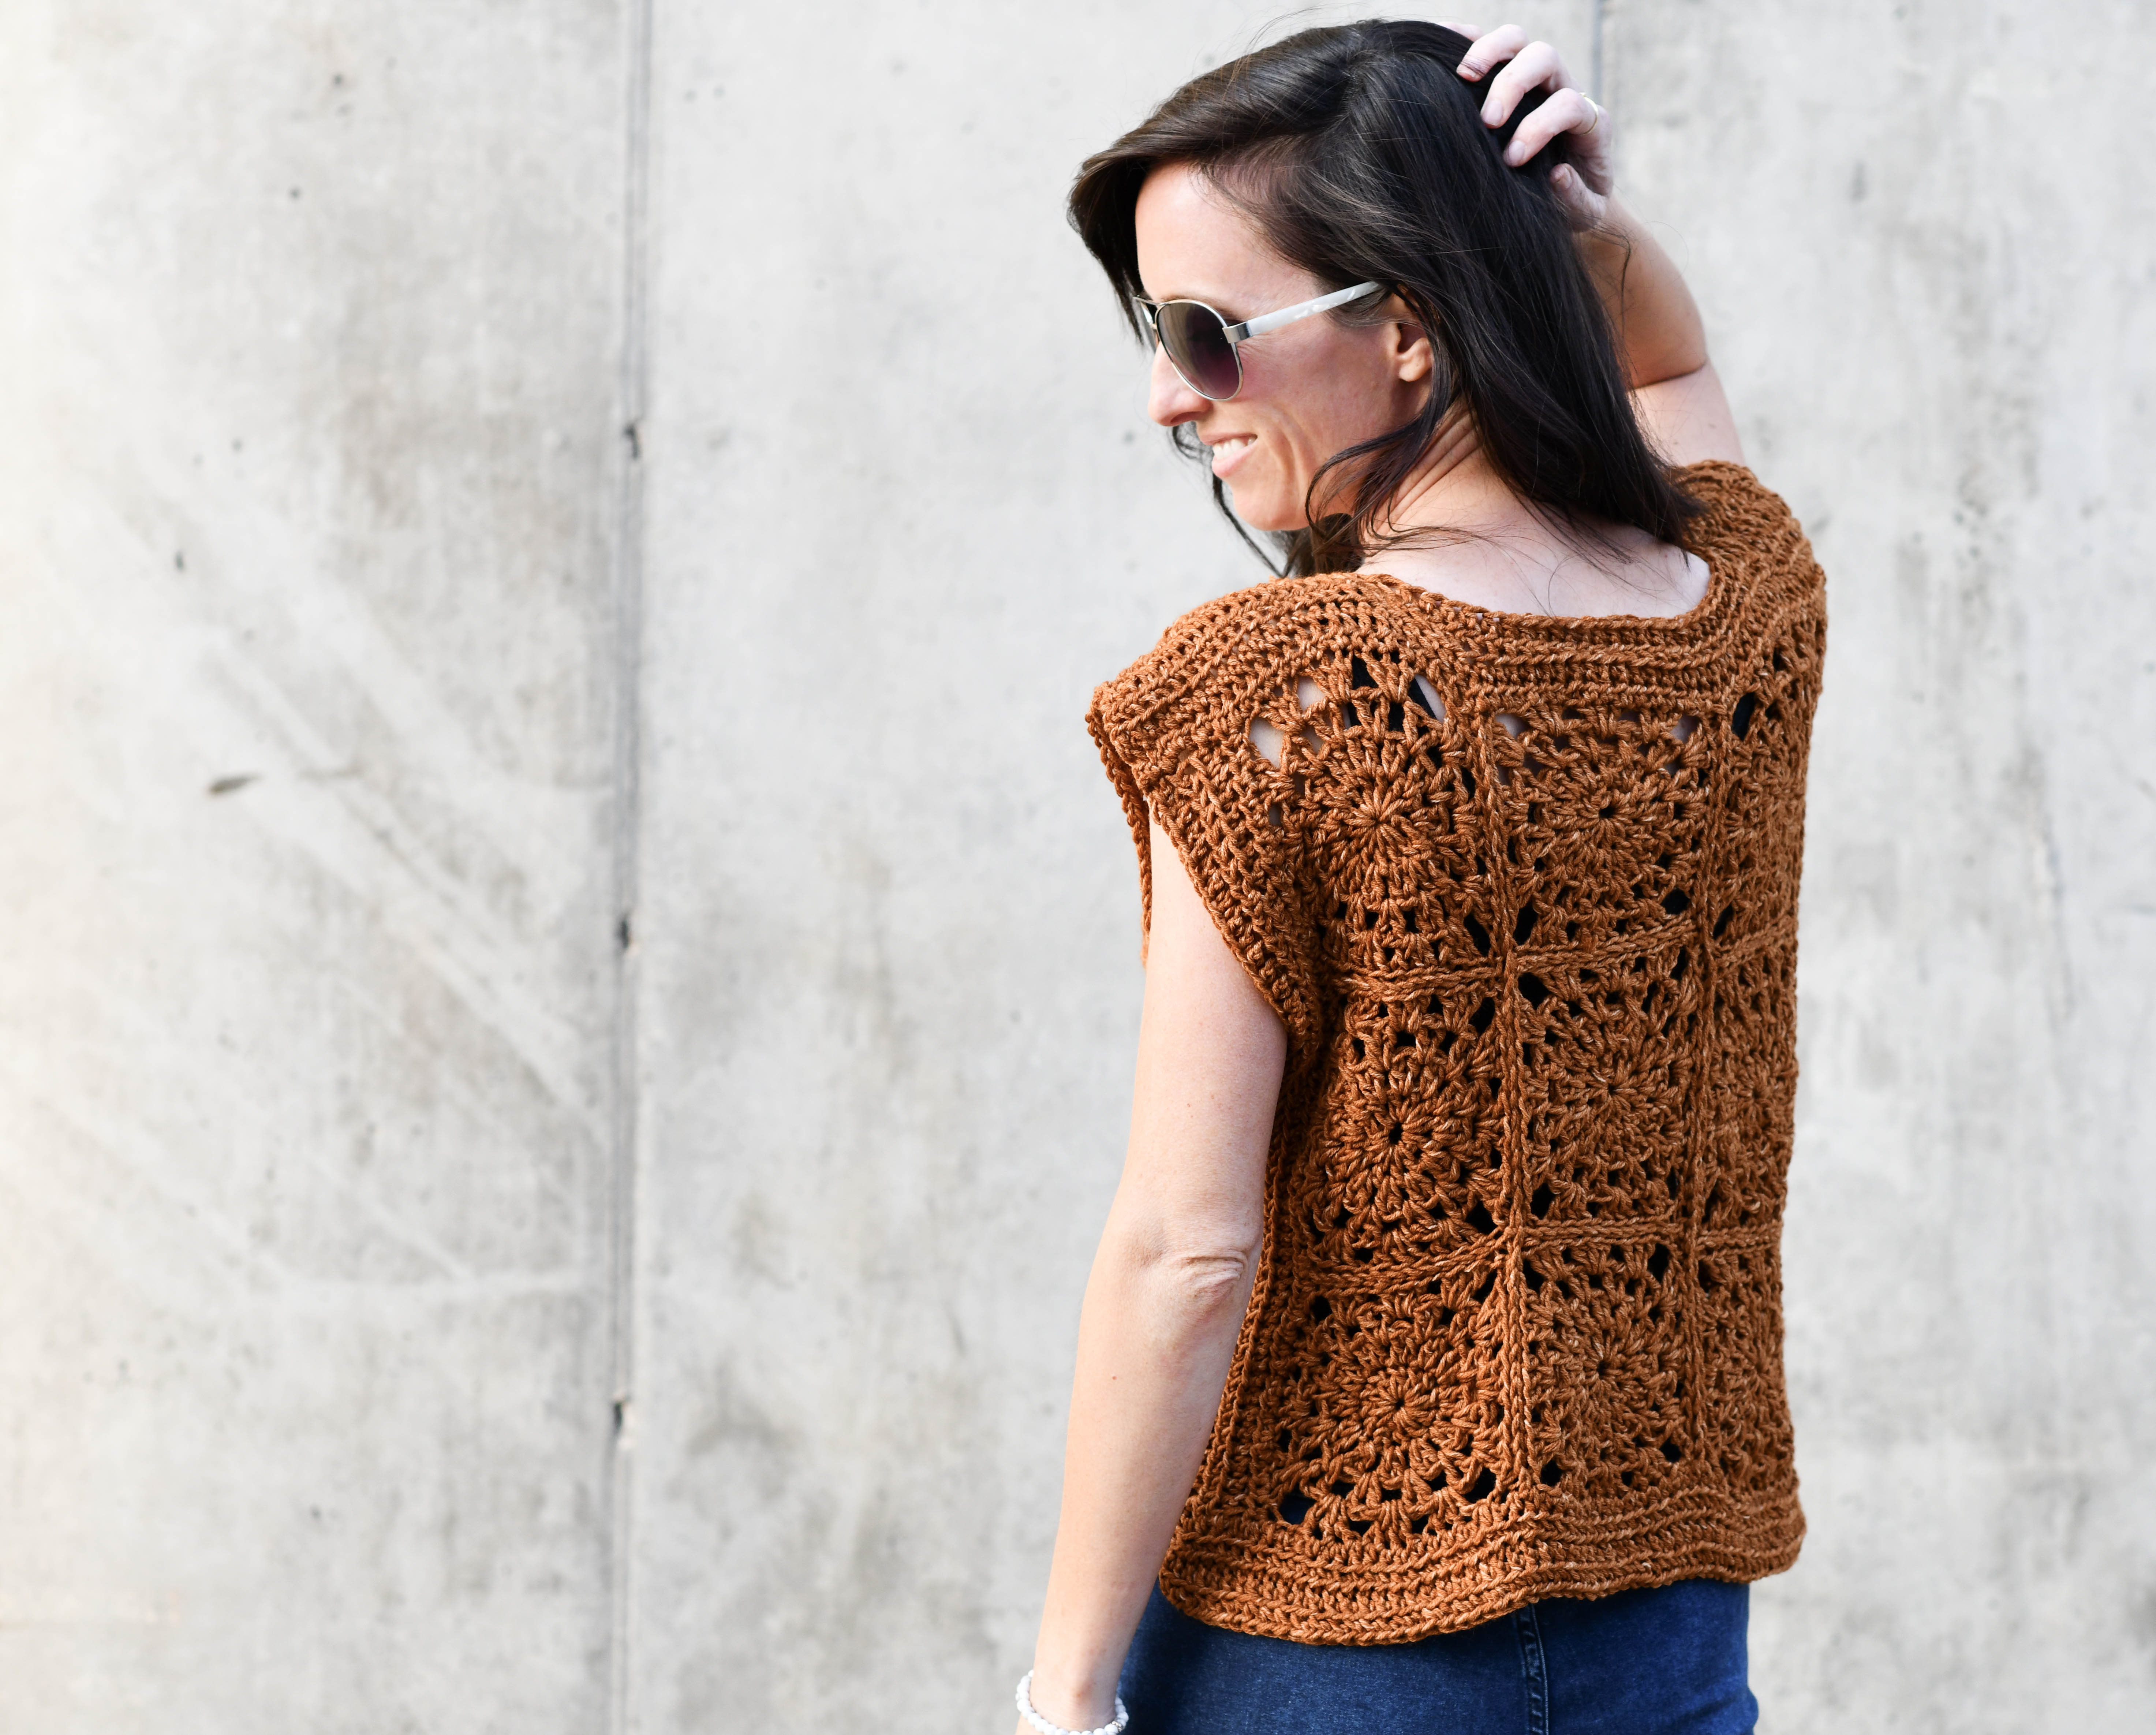
The boho trend is still going strong and this “Sunburst Crop” is crocheted by integrating several granny squares into the top. It uses a simple construction method and has minimal shaping – yay! This isn’t the first time you’ve seen granny squares on the blog ( Remember Yellow Brick Road Granny Blanket and Arlo Granny Cardigan? Who doesn’t love a good granny square? Hehe!). Below, you’ll find pictures to show you how to crochet these lacy squares. After you make the squares, you’ll seam them together and crochet to add more detail to the front, sides and neckline. I’ll do my best to walk you through how to make this “Sunburst Crop”, just in time for summer. 🙂
You’ll of course find the free pattern below, the printable version in my Etsy shop HERE, or you can find the kit from Lion Brand Yarn HERE!
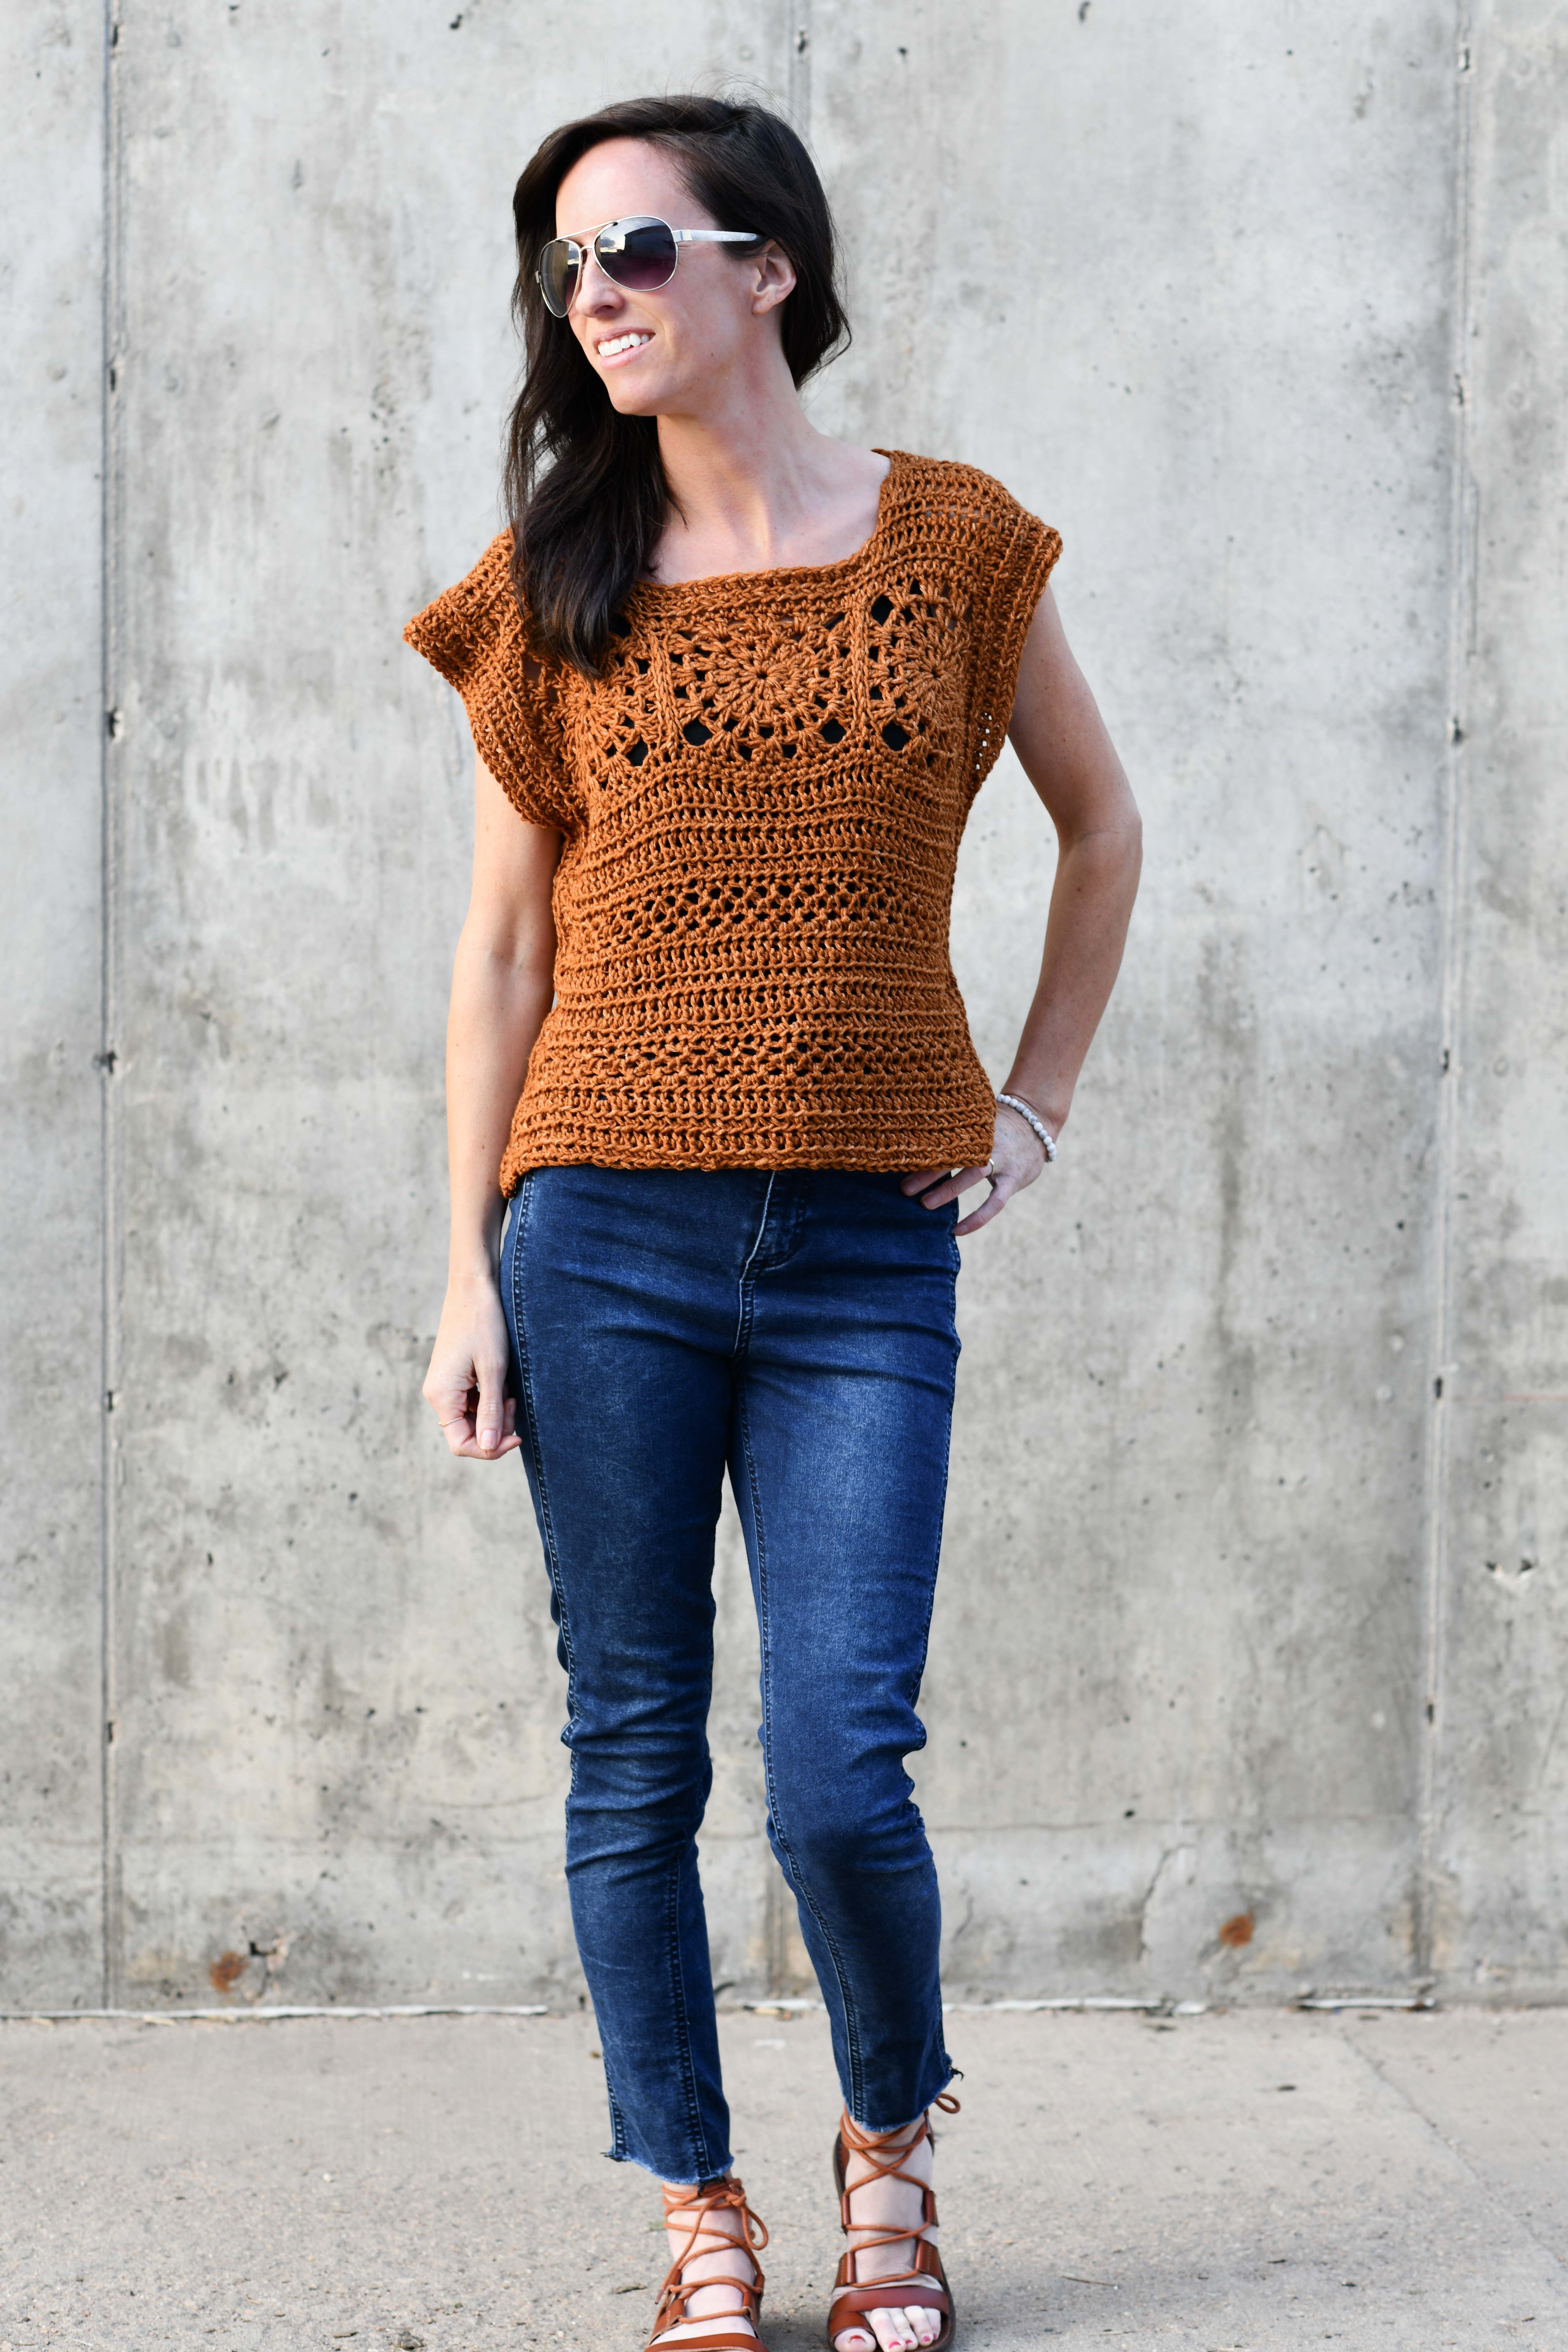
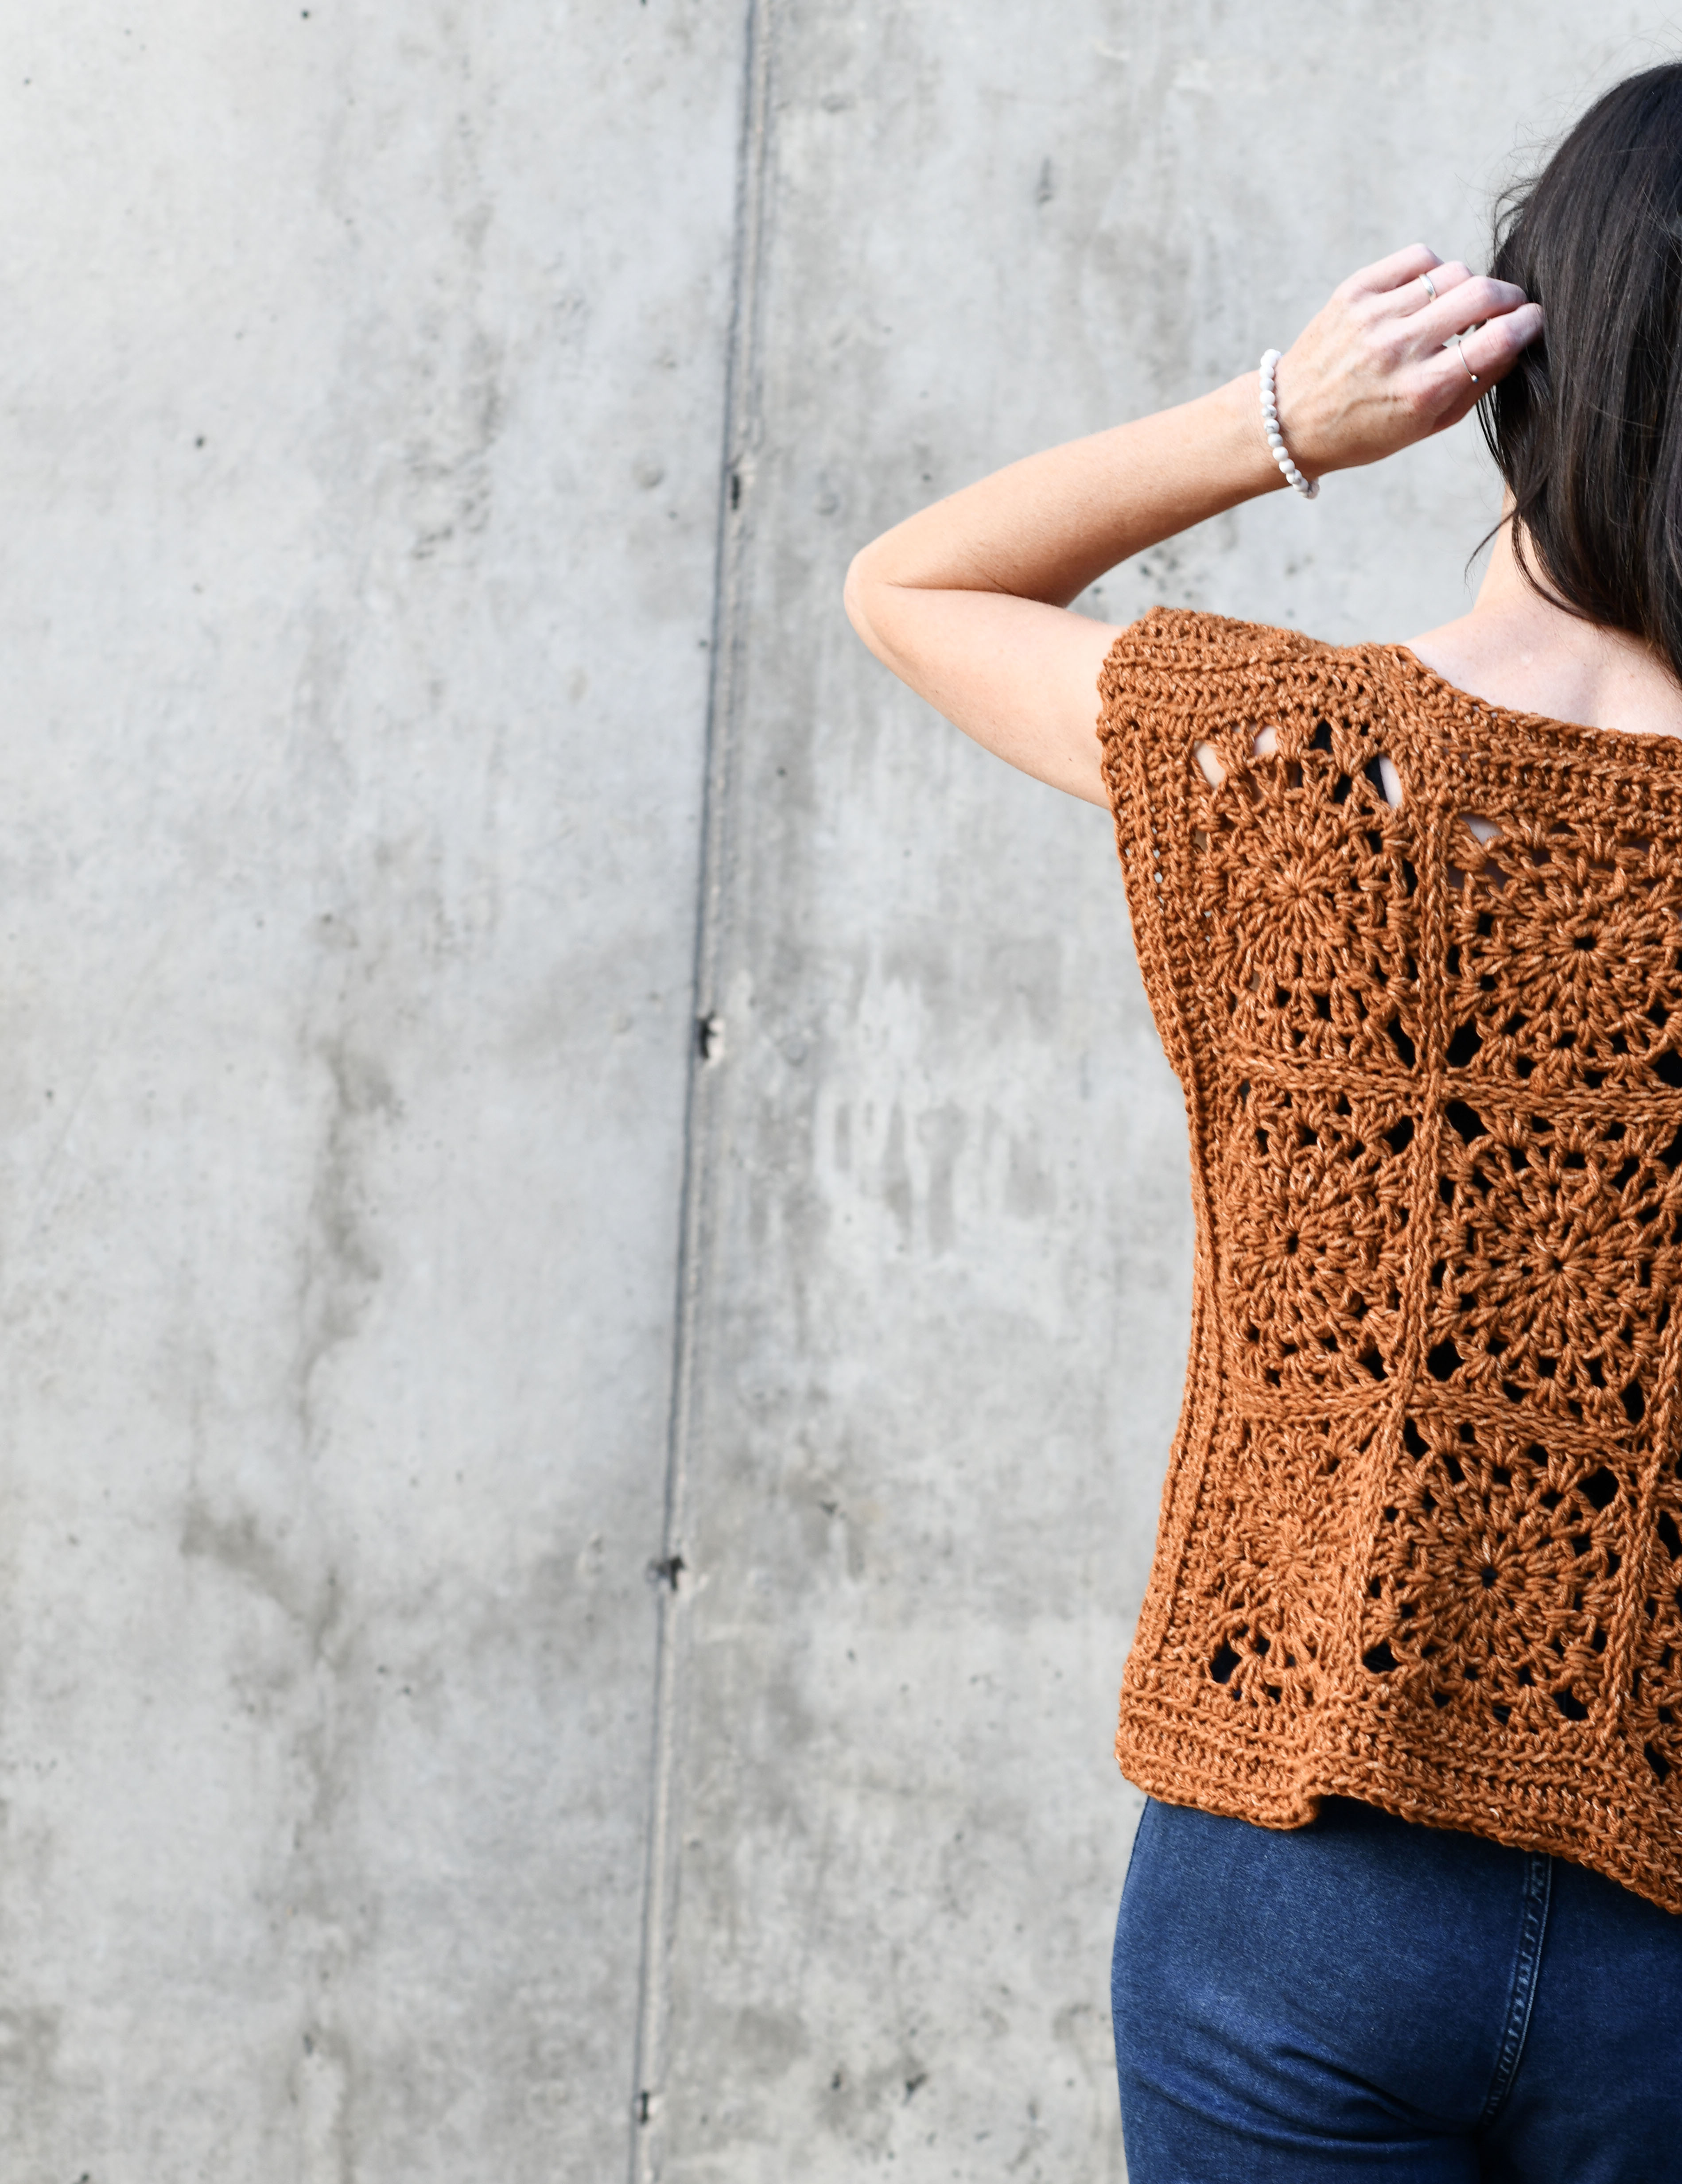
The feature that I like most about this top is the contrast between the front and back. On the front of the top, you’ll see the three granny squares along the neckline, and on the back they just take over! You can also play with the length of this “crop” by adding more rows to the bottom or crocheting fewer rows to make it shorter. The true crop top days are over for me, but feel free to make this just as long or short as you’d like!
There is just light shaping at the neckline that’s super easy to do. You’ll also find a simple variety of stitches in the front in order to give it some extra texture and interest.
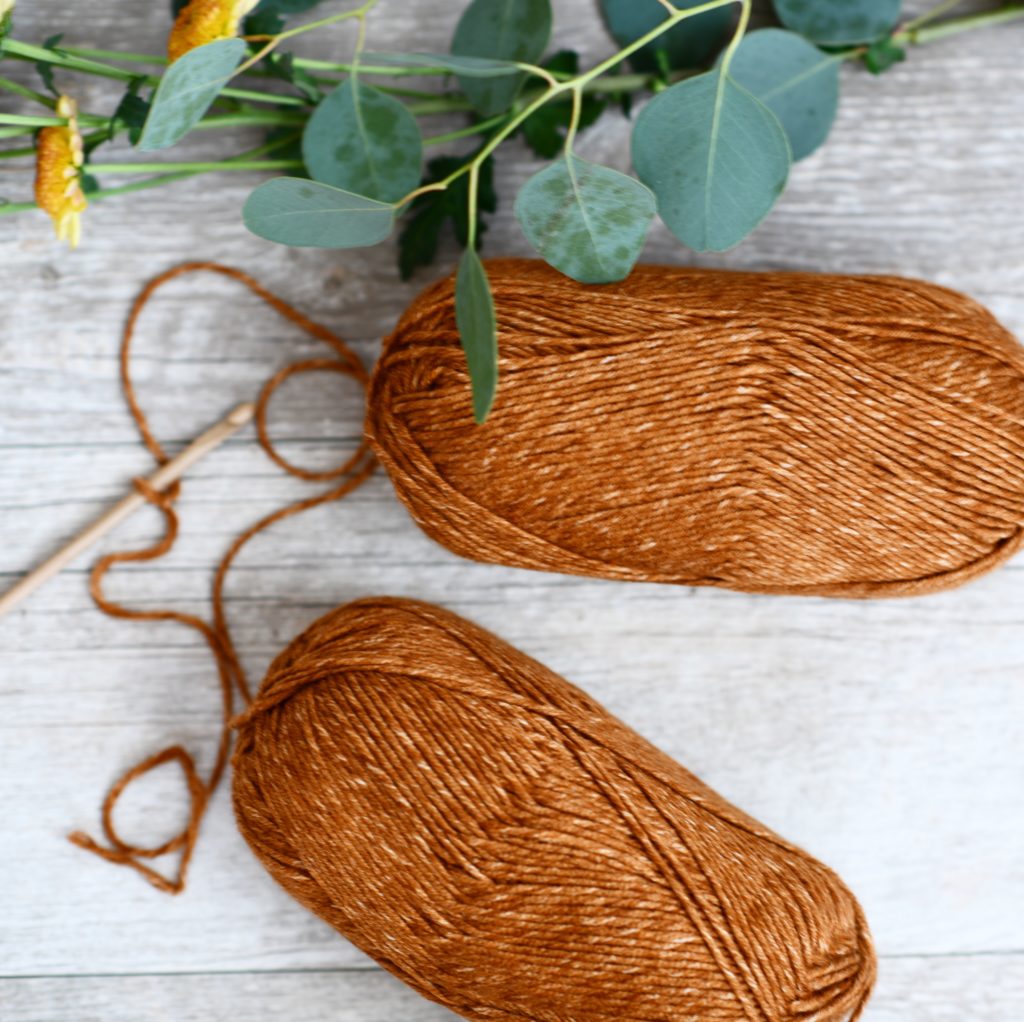
Below: This is the first time I’ve used this “Topstitch” color of the Jeans yarn. I’m so in love and this is such a trendy color right now! The yarn is so soft and drapey which is precisely why I love it for summer pieces. My Santa Monica Bias Wrap is soooo drapey and great for summer, thanks to this yarn.
Do you remember the Arlo Granny Square Cardigan Crochet Pattern ? That cardigan is also bohemian, hippy, but it’s made with wool and obviously can’t be used in the hot months of summer. (below) The granny square is one of those things that I love about crochet as it’s much more difficult to knit a granny type square in my opinion. Do you agree?
![]()
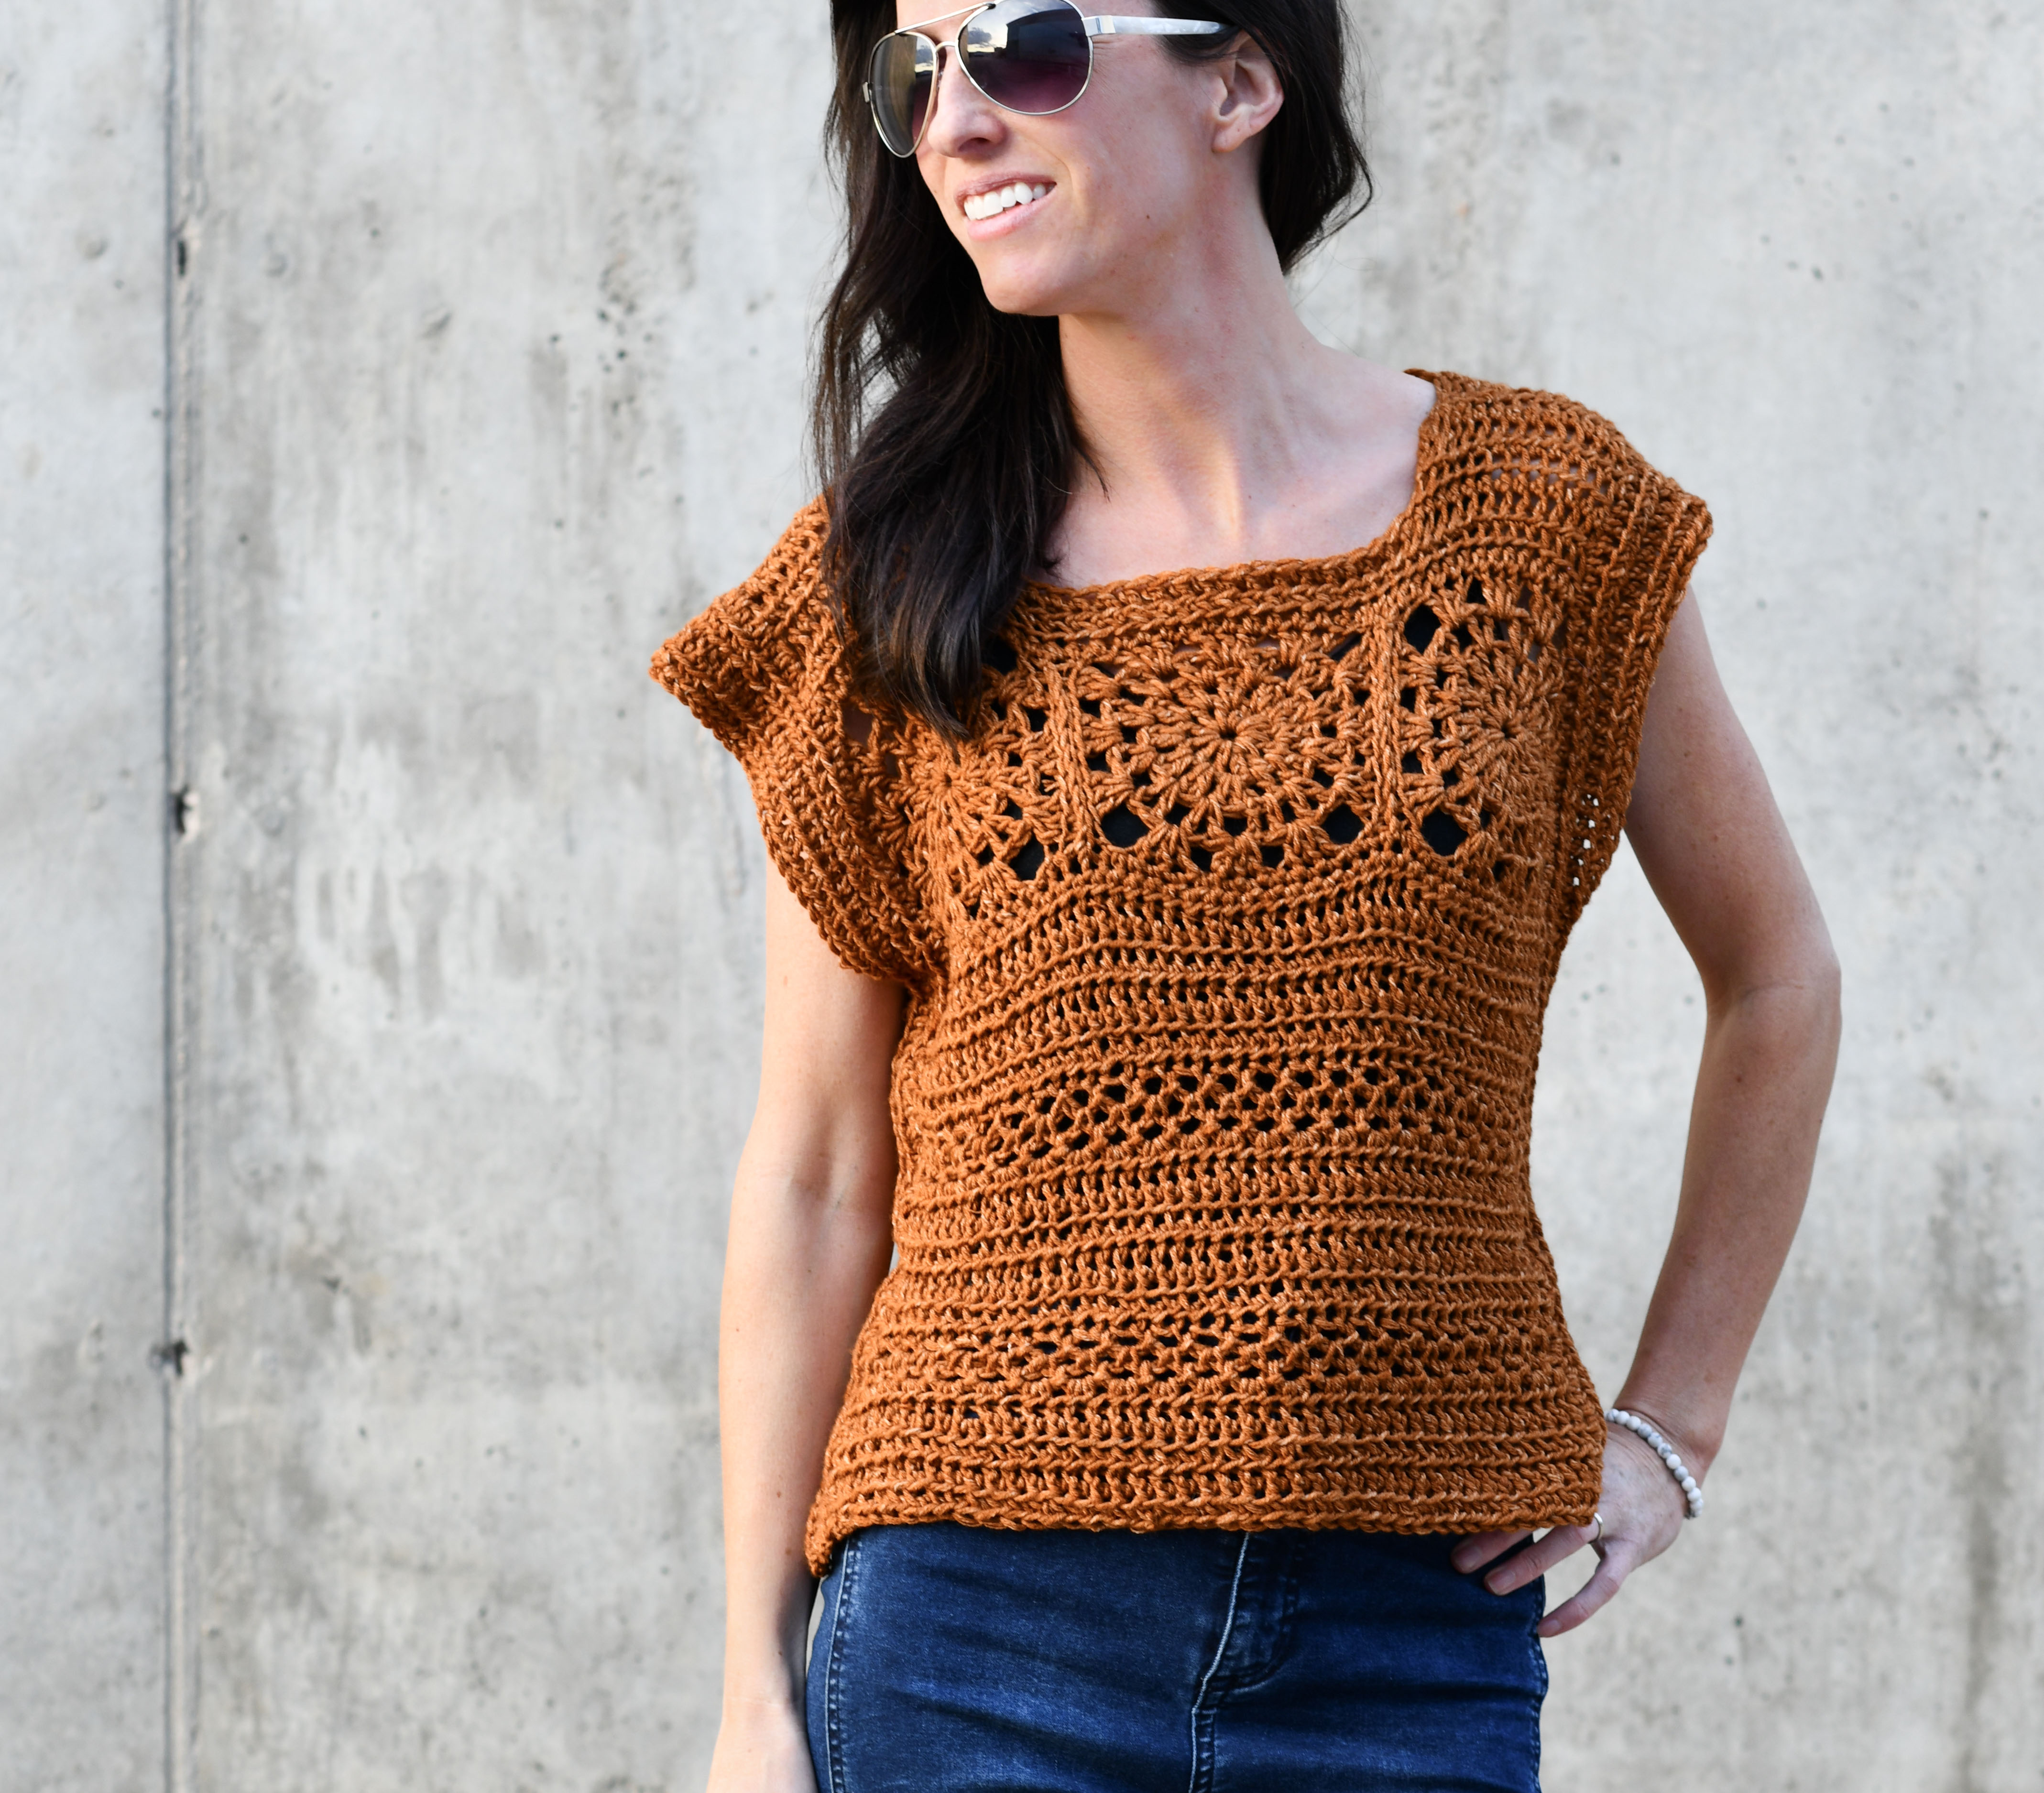
I also love granny squares that have a circular center, but then become a square. Both the burnt orange color as well as a circular “sun” shape were the inspiration for the name the “Sunburst Crop”. I hope you enjoy it! Shall we get to this summery pattern?
Here’s the free pattern below, or you can find the printable, ad-free version available for purchase in my Etsy shop HERE
How To Crochet A Boho Crop – The Sunburst Crop Crochet Pattern
Description: Bohemian sunburst granny squares blend with various textures to create a playful, hippie-worthy top that’s sure to be noticed. Perfect for summer travels, days at the beach or lunch with friends.
Materials:
US Size J 6.0 mm Crochet Hook
3 (3,4,4) Skeins Lion Brand Jeans Yarn in Top Stitch (You can also find the kit available for sale from Lion Brand HERE)
Pattern uses approximately 225 g (256 g, 295 g, 321 g)
Tapestry Needle
Scissors
Measuring Tape
Sizes: Small, Medium, Large, XL
Follow the key for size indicated S (M, L, XL)
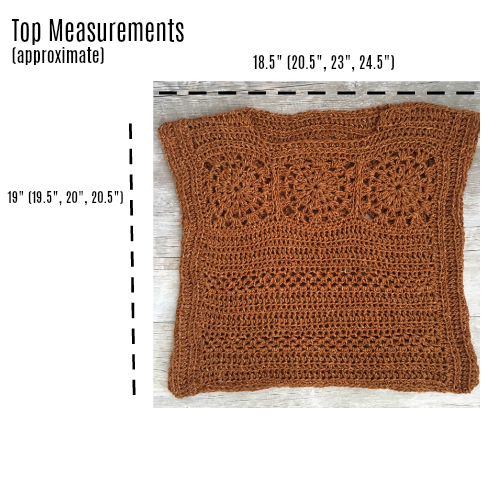
Bust Circumference: Approximately 37” ( 41”, 46”, 49”)
Length: Approx. 19” (19.5”, 20”, 20.5”)
Gauge: Approximately 11.5 stitches & 7 rows in 4” of hdc stitches
Squares should be minimum 5″ X 5″ block to size if needed or adjust hook size
Pattern Notes: This top is made by first crocheting granny squares and then assembling and crocheting rows to add length and width. The neckline includes light shaping. The top is made with two panels which are seamed at the sides and shoulders.
Abbreviations (US) & Skills:
ch – chain
dc – double crochet
sk st – skip stitch
hdc – half double crochet
hdc flo – half double crochet through the front loop
sp – space
st – stitch
sts – stitches
sl st – slip stitch
Sunburst Crop Pattern
Sunburst Granny Square Pattern
(See photos at end of pattern for additional assistance)
Size S & M – Make 12
Size L & XL – Make 16
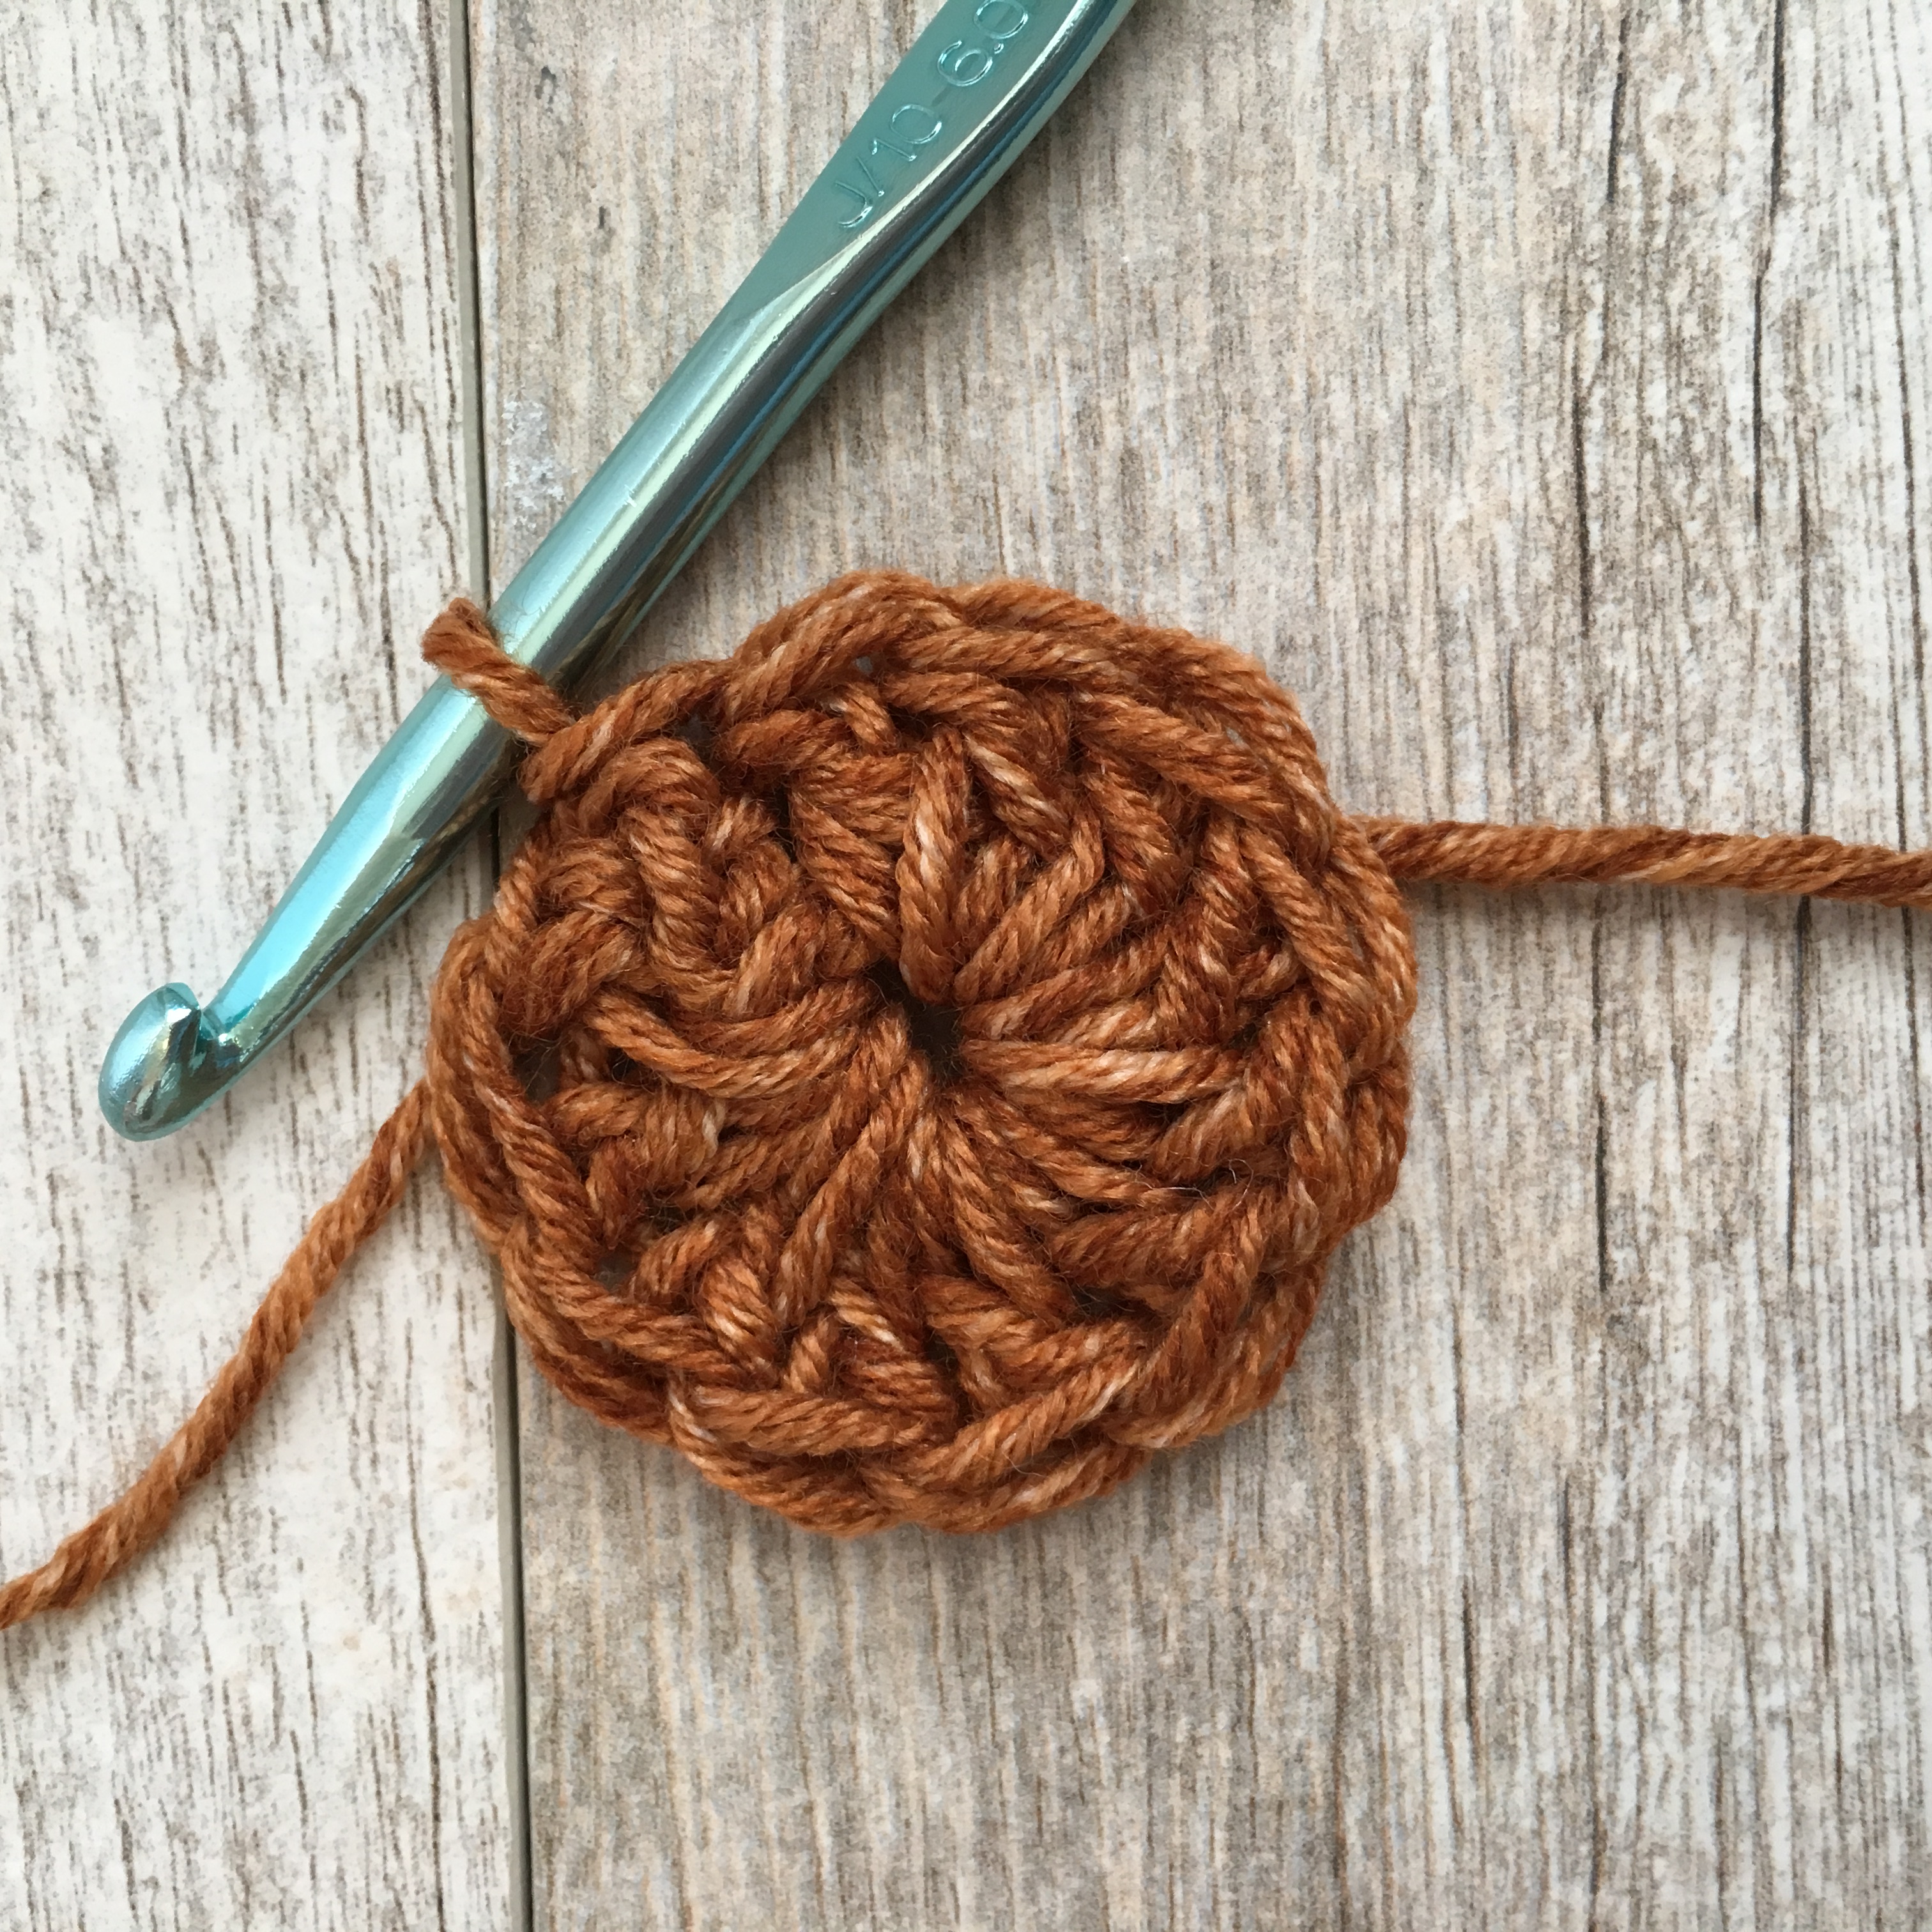
Ch 5, sl st in 1st ch to join and form a ring
Round 1 Ch 3 (counts as dc st), dc 11 times into ring, sl st into 1st st to join (12 sts)
Round 2 Ch 3 (counts as dc st), dc in sp just below, 2 dc in each sp around, sl st to join (24 sts)
Round 3 Ch 4 (counts as dc and ch st), dc in same sp as ch 4 (found just below ch 4) between dc set, * dc in next sp between dc set, ch 1, dc in same sp; repeat from * around working (dc, ch 1, dc) in each sp between sets around, sl st to join (36 sts)
Round 4 Ch 3, 2dc in same sp as ch 3 between (dc, ch1, dc) set, ch 1, 3 dc in next sp between (dc, ch1, dc) set, ch 1, 3 dc in next sp between sets, ch 3, *3 dc in next sp between sets, ch 1, 3 dc in next sp between sets, ch 1, 3 dc in next sp between sets, ch 3; repeat from * 2 more times, sl st to join.
Tie off and weave in ends. Block squares now or you may block the top later.
Back Panel Instructions
Using a flat slip stitch seam, sew granny squares together so the panel measures 3 (3, 4, 4) granny squares wide and 3 (3, 3, 3) granny squares long.
Top of Panel Detail
Attach yarn to upper corner of panel.
Row 1 Ch 2, work hdc sts evenly across the panel working into the granny square sts ending with an even number of stitches.
Row 2 Ch 2, turn, hdc flo in each st across
Repeat row 2 for 2 more rows. Tie off and weave in ends.
Bottom of Panel Detail
Attach yarn at bottom corner of panel. Work hdc sts evenly across the bottom as you did with the Top of Panel Detail (number of stitches should be the same as worked at top of panel) Next, work rows of hdc flo sts until piece measures approximately 19” (19.5”, 20”, 20.5”) long. You may make it longer by continuing to crochet (keep yarn needs in mind)
Side Detail Next, attach yarn at side corner. You will crochet hdc flo stitches along each of the two sides of the panel. Work an equal amount of rows on each side, following the pattern and guidelines below.
Row 1 Ch 2, work hdc sts evenly along side of panel
Row 2 Ch 2, turn, hdc flo in each st across
Next, repeat row 2 for as long as needed until piece measures approximately 18.5” ( 20.5”, 23”, 24.5”) wide, ensuring there is an equal number of rows on each side of panel. Tie off and weave in ends.
*note – if panel is buckling or ruffling, you may need to adjust and add more or fewer stitches.
Front Panel Instructions
Using a flat slip stitch seam, sew together 3 (3, 4, 4) squares together widthwise.
Upper Neckline
Attach yarn to upper corner of granny squares.
Row 1 Ch 2, hdc evenly across, working and even number of sts (the same number of sts worked on Back Panel, Top of Panel Detail)
Row 2 Ch 2, turn, hdc flo in each st across the row
Row 3 Repeat row 2
Row 4 Ch 2, turn, hdc flo in next 14 ( 16, 18, 20 ) sts
Rows 5 & 6 Repeat row 4
Cut yarn, pick up yarn at opposite, upper corner of top
Row 1 Ch 2, hdc flo in next 14, (16, 18, 20 ) sts
Rows 2 & 3 Repeat row 1
Mid & Lower Panel
HDC FLO Section
Attach yarn to lower corner of granny squares
Row 1 Ch 2, hdc evenly across the row working the same even number of stitches as worked at the beginning of the Upper Neckline
Row 2 Ch 2, turn, hdc flo in each st across the row
Rows 3 – 5 Repeat row 2
Mesh Section
Row 6 Ch 2, turn, sk st, sl st into next st; *ch 2, sk st, sl st into next st; repeat from * across the row.
Row 7 Ch 2, turn, sl st into ch 2 sp, * ch 2, sl st into next ch 2 sp. Repeat from * across the row.
Row 8 Repeat row 7
HDC FLO Section
Row 9 Ch 2, turn, 2 hdc in each ch 2 sp across the row
Row 10 Ch 2, turn, hdc flo in each st across the row
Rows 11 – 13 Repeat row 10
Mesh Section
Repeat rows 6 – 8, 1 time
HDC FLO Section
Repeat rows 9 – 13, 1 time and continue working rows of hdc flo if needed until front panel measures the same length as back panel.
Add additional rows to bottom of panel if you would like to add length to the top. Keep yarn needs in mind.
Tie off and weave in ends.
Side Detail
Next, attach yarn at side corner. You will crochet hdc flo stitches along each of the two sides of the panel just as you did with the back panel. Work an equal amount of rows on each side, following the pattern and guidelines below.
Row 1 Ch 2, work hdc sts evenly along side of panel
Row 2 Ch 2, turn, hdc flo in each st across
Next, repeat row 2 for as long as needed until piece measures approximately 18.5” ( 20.5”, 23”, 24.5”) wide, ensuring there is an equal number of rows on each side of panel.
Tie off and weave in ends.
Assembly
Place two panels together with right sides facing inward. With a length of yarn and your tapestry needle, whip stitch seam up each side, leaving openings for the arms. Seam inward at the shoulders, leaving an opening for the head and neck and the neckline. Tie off and weave in ends. Turn right side out.
Block to shape as squares tend to be rounded. The top may need to be blocked in order to shape.
Sunburst Granny Square Picture Tutorial
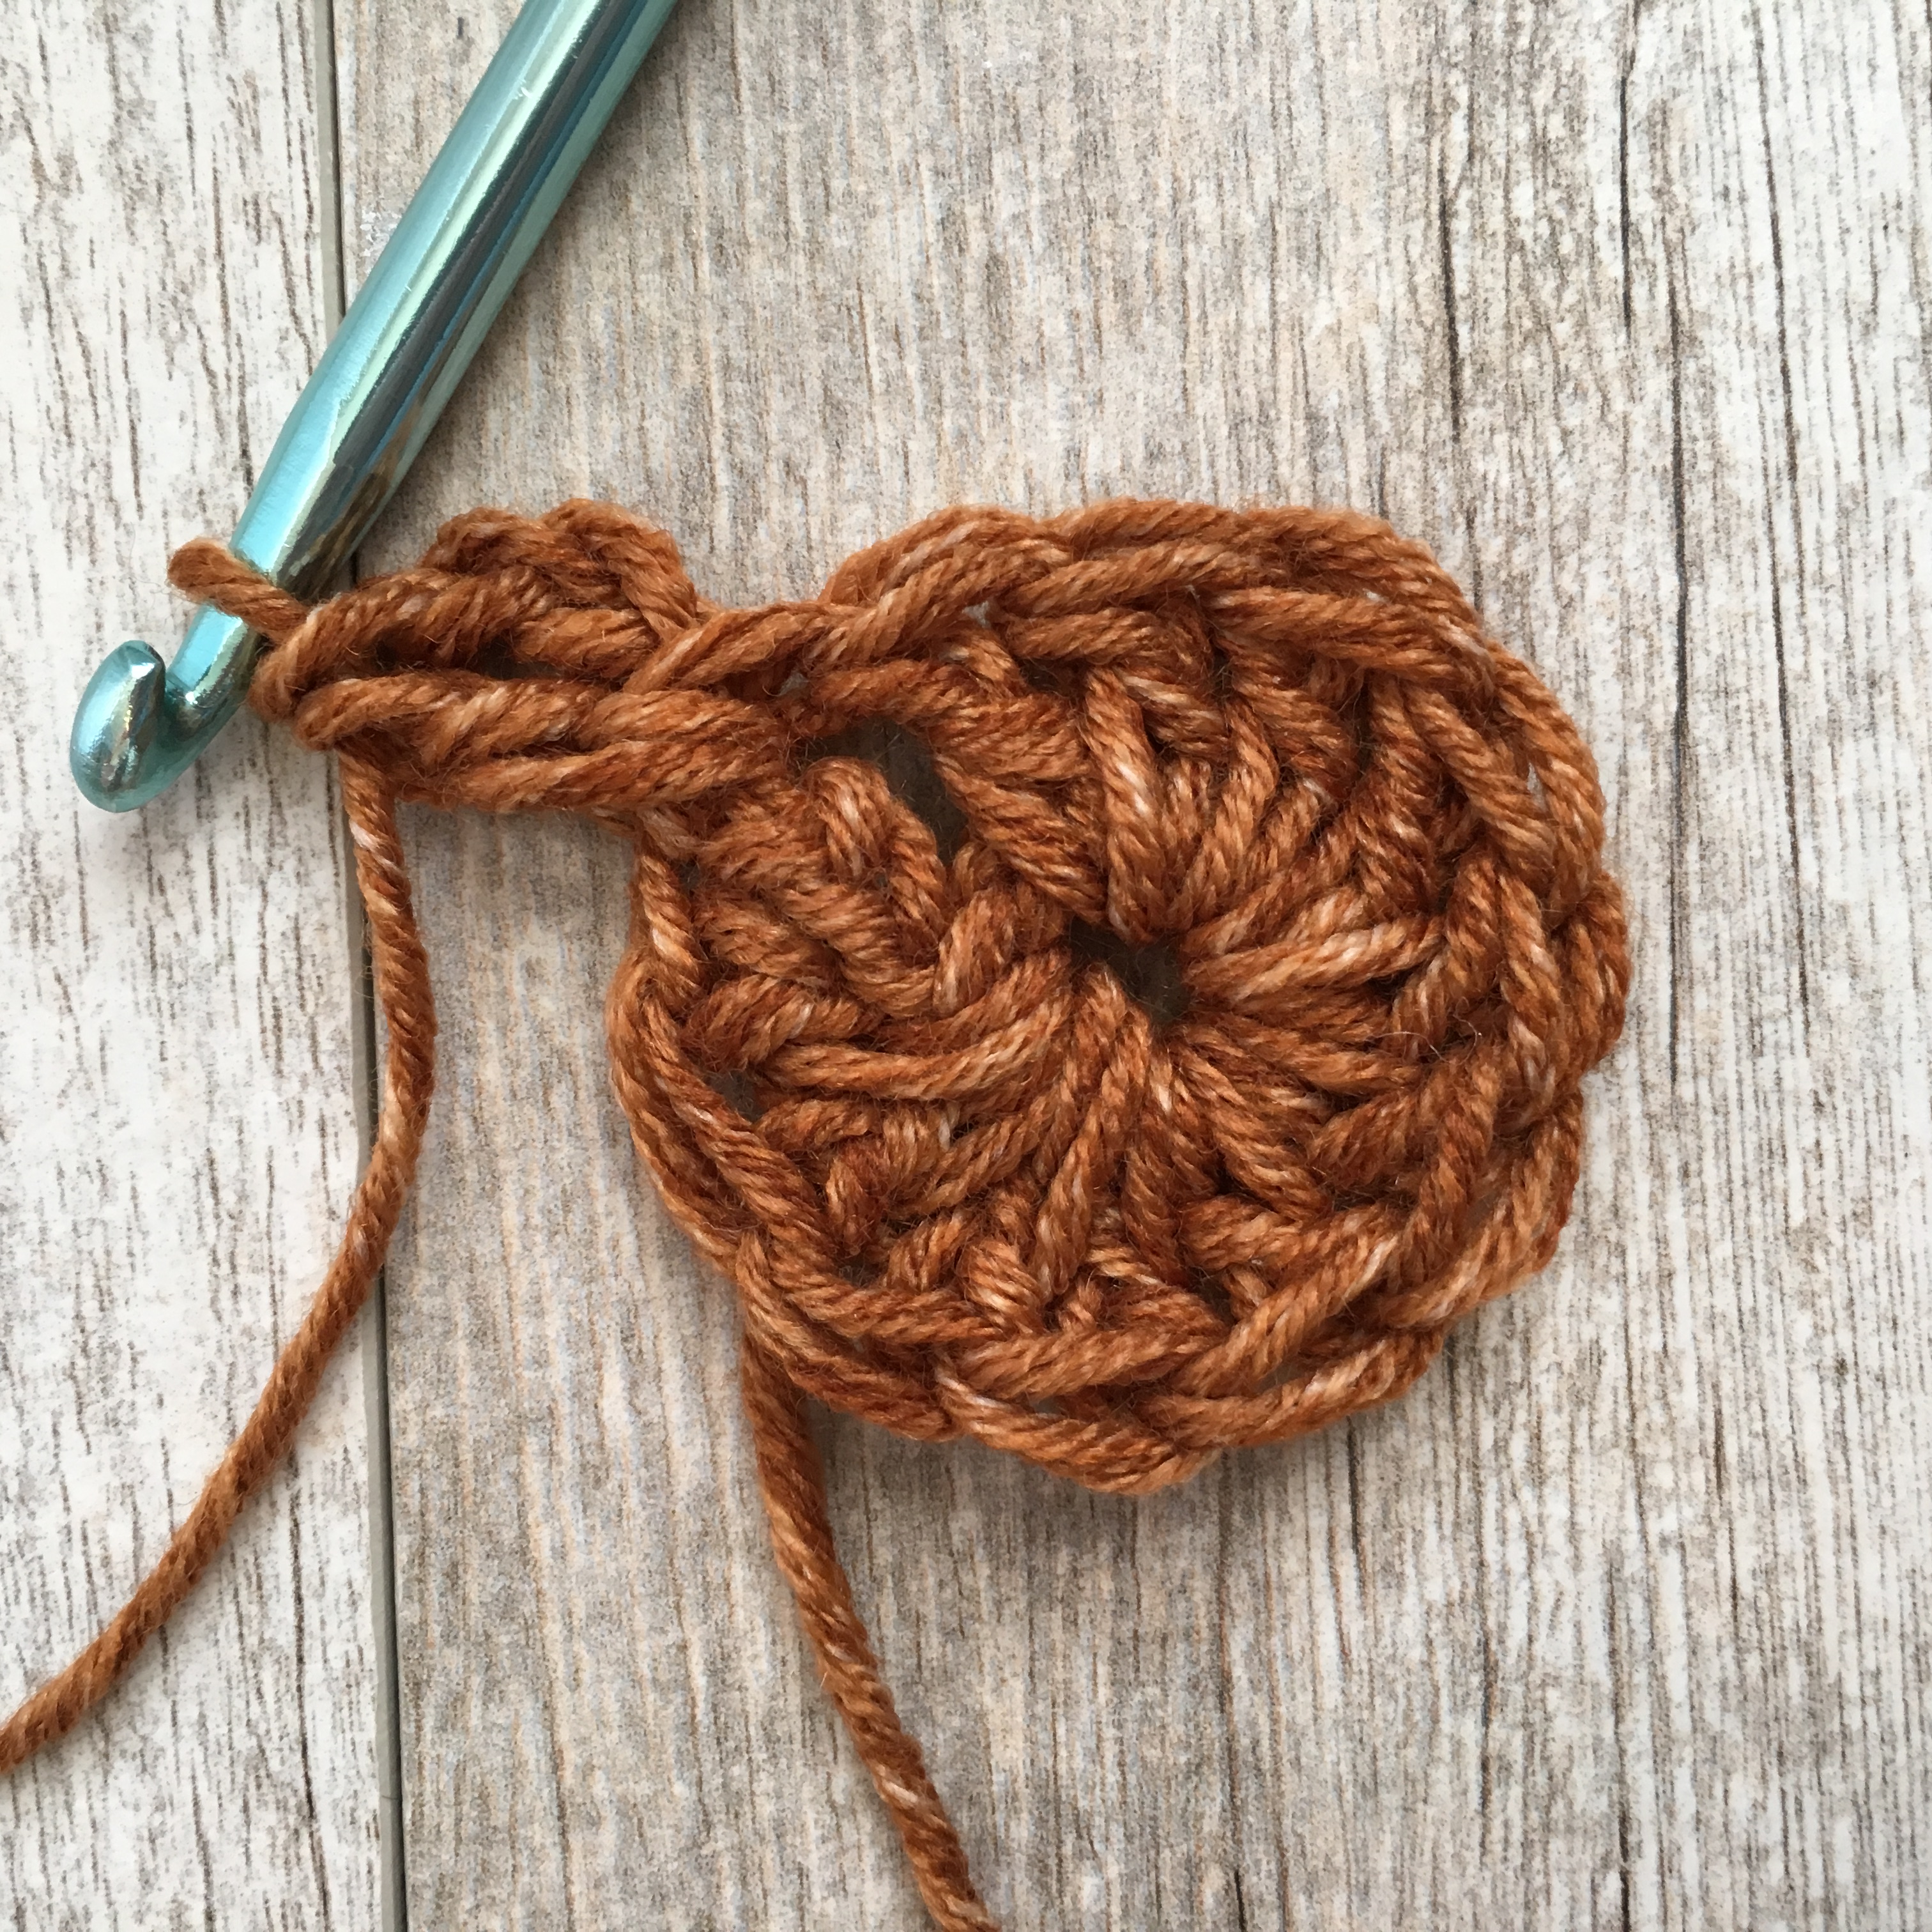
Round 1
Round 2 This is how you will begin round 2. Work into the space where you made your chain 3.
Round 3 Working dc, ch 1, dc around. Still working into the spaces and not the stitches.
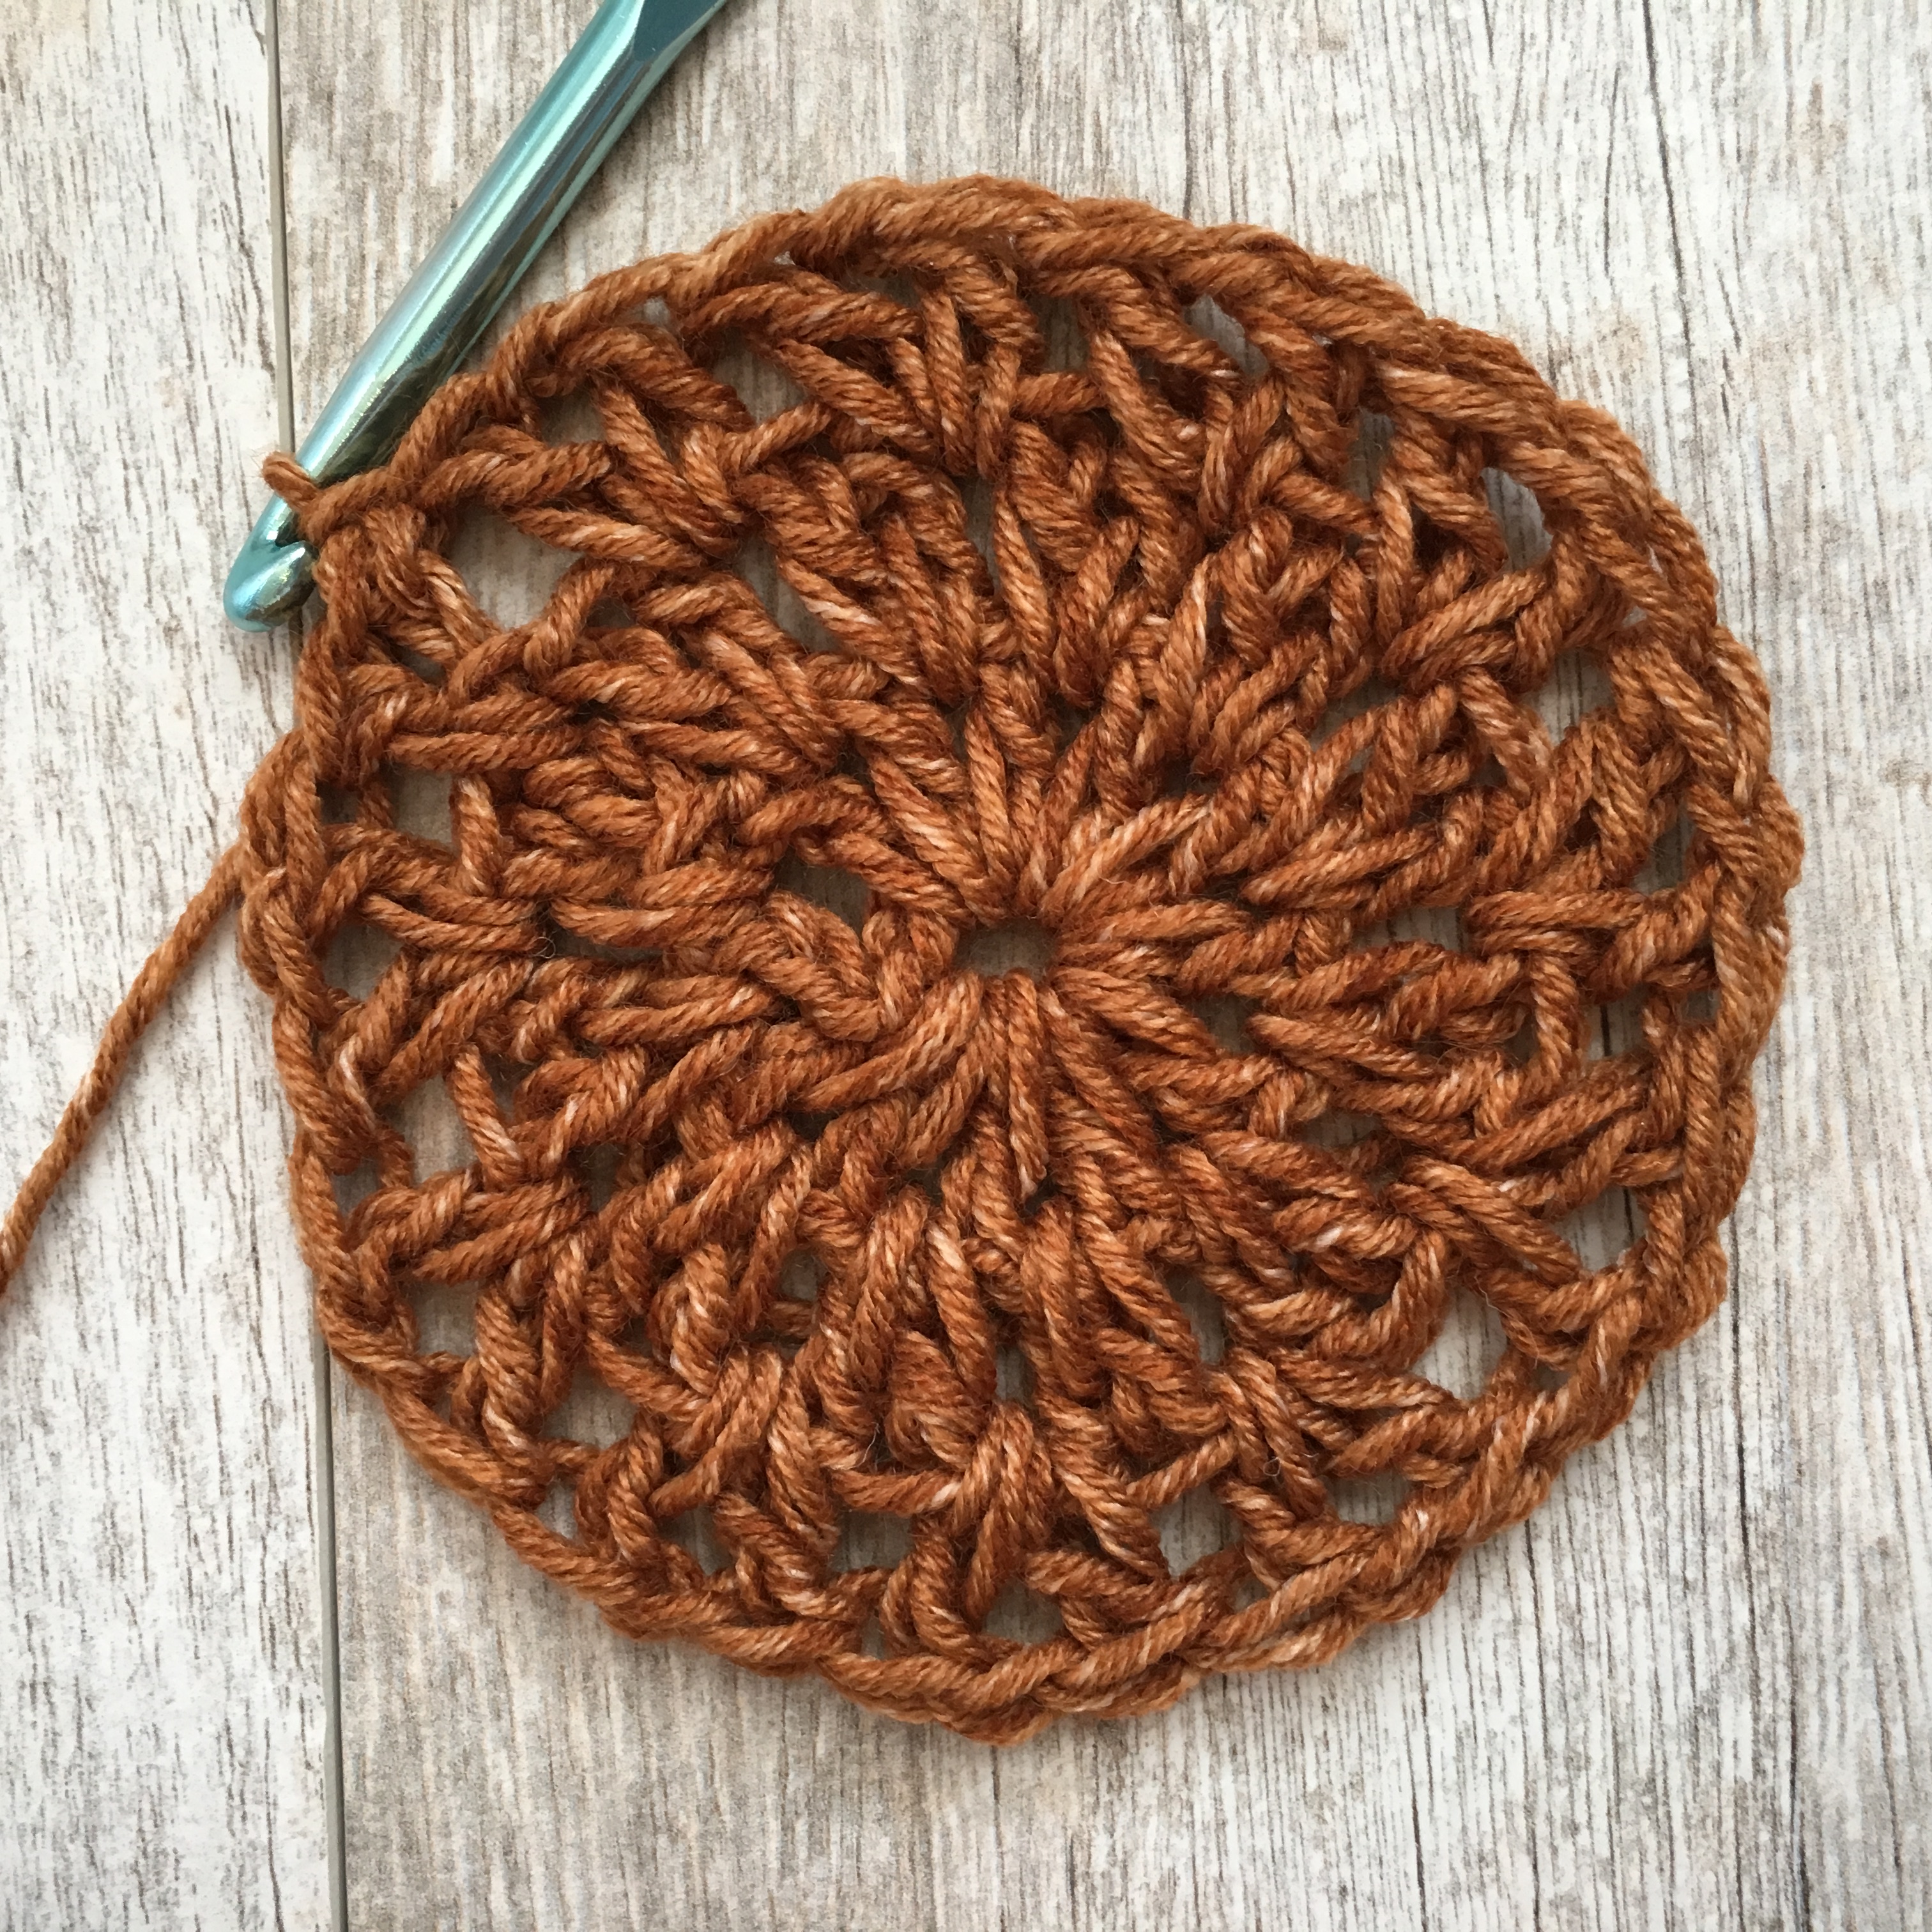
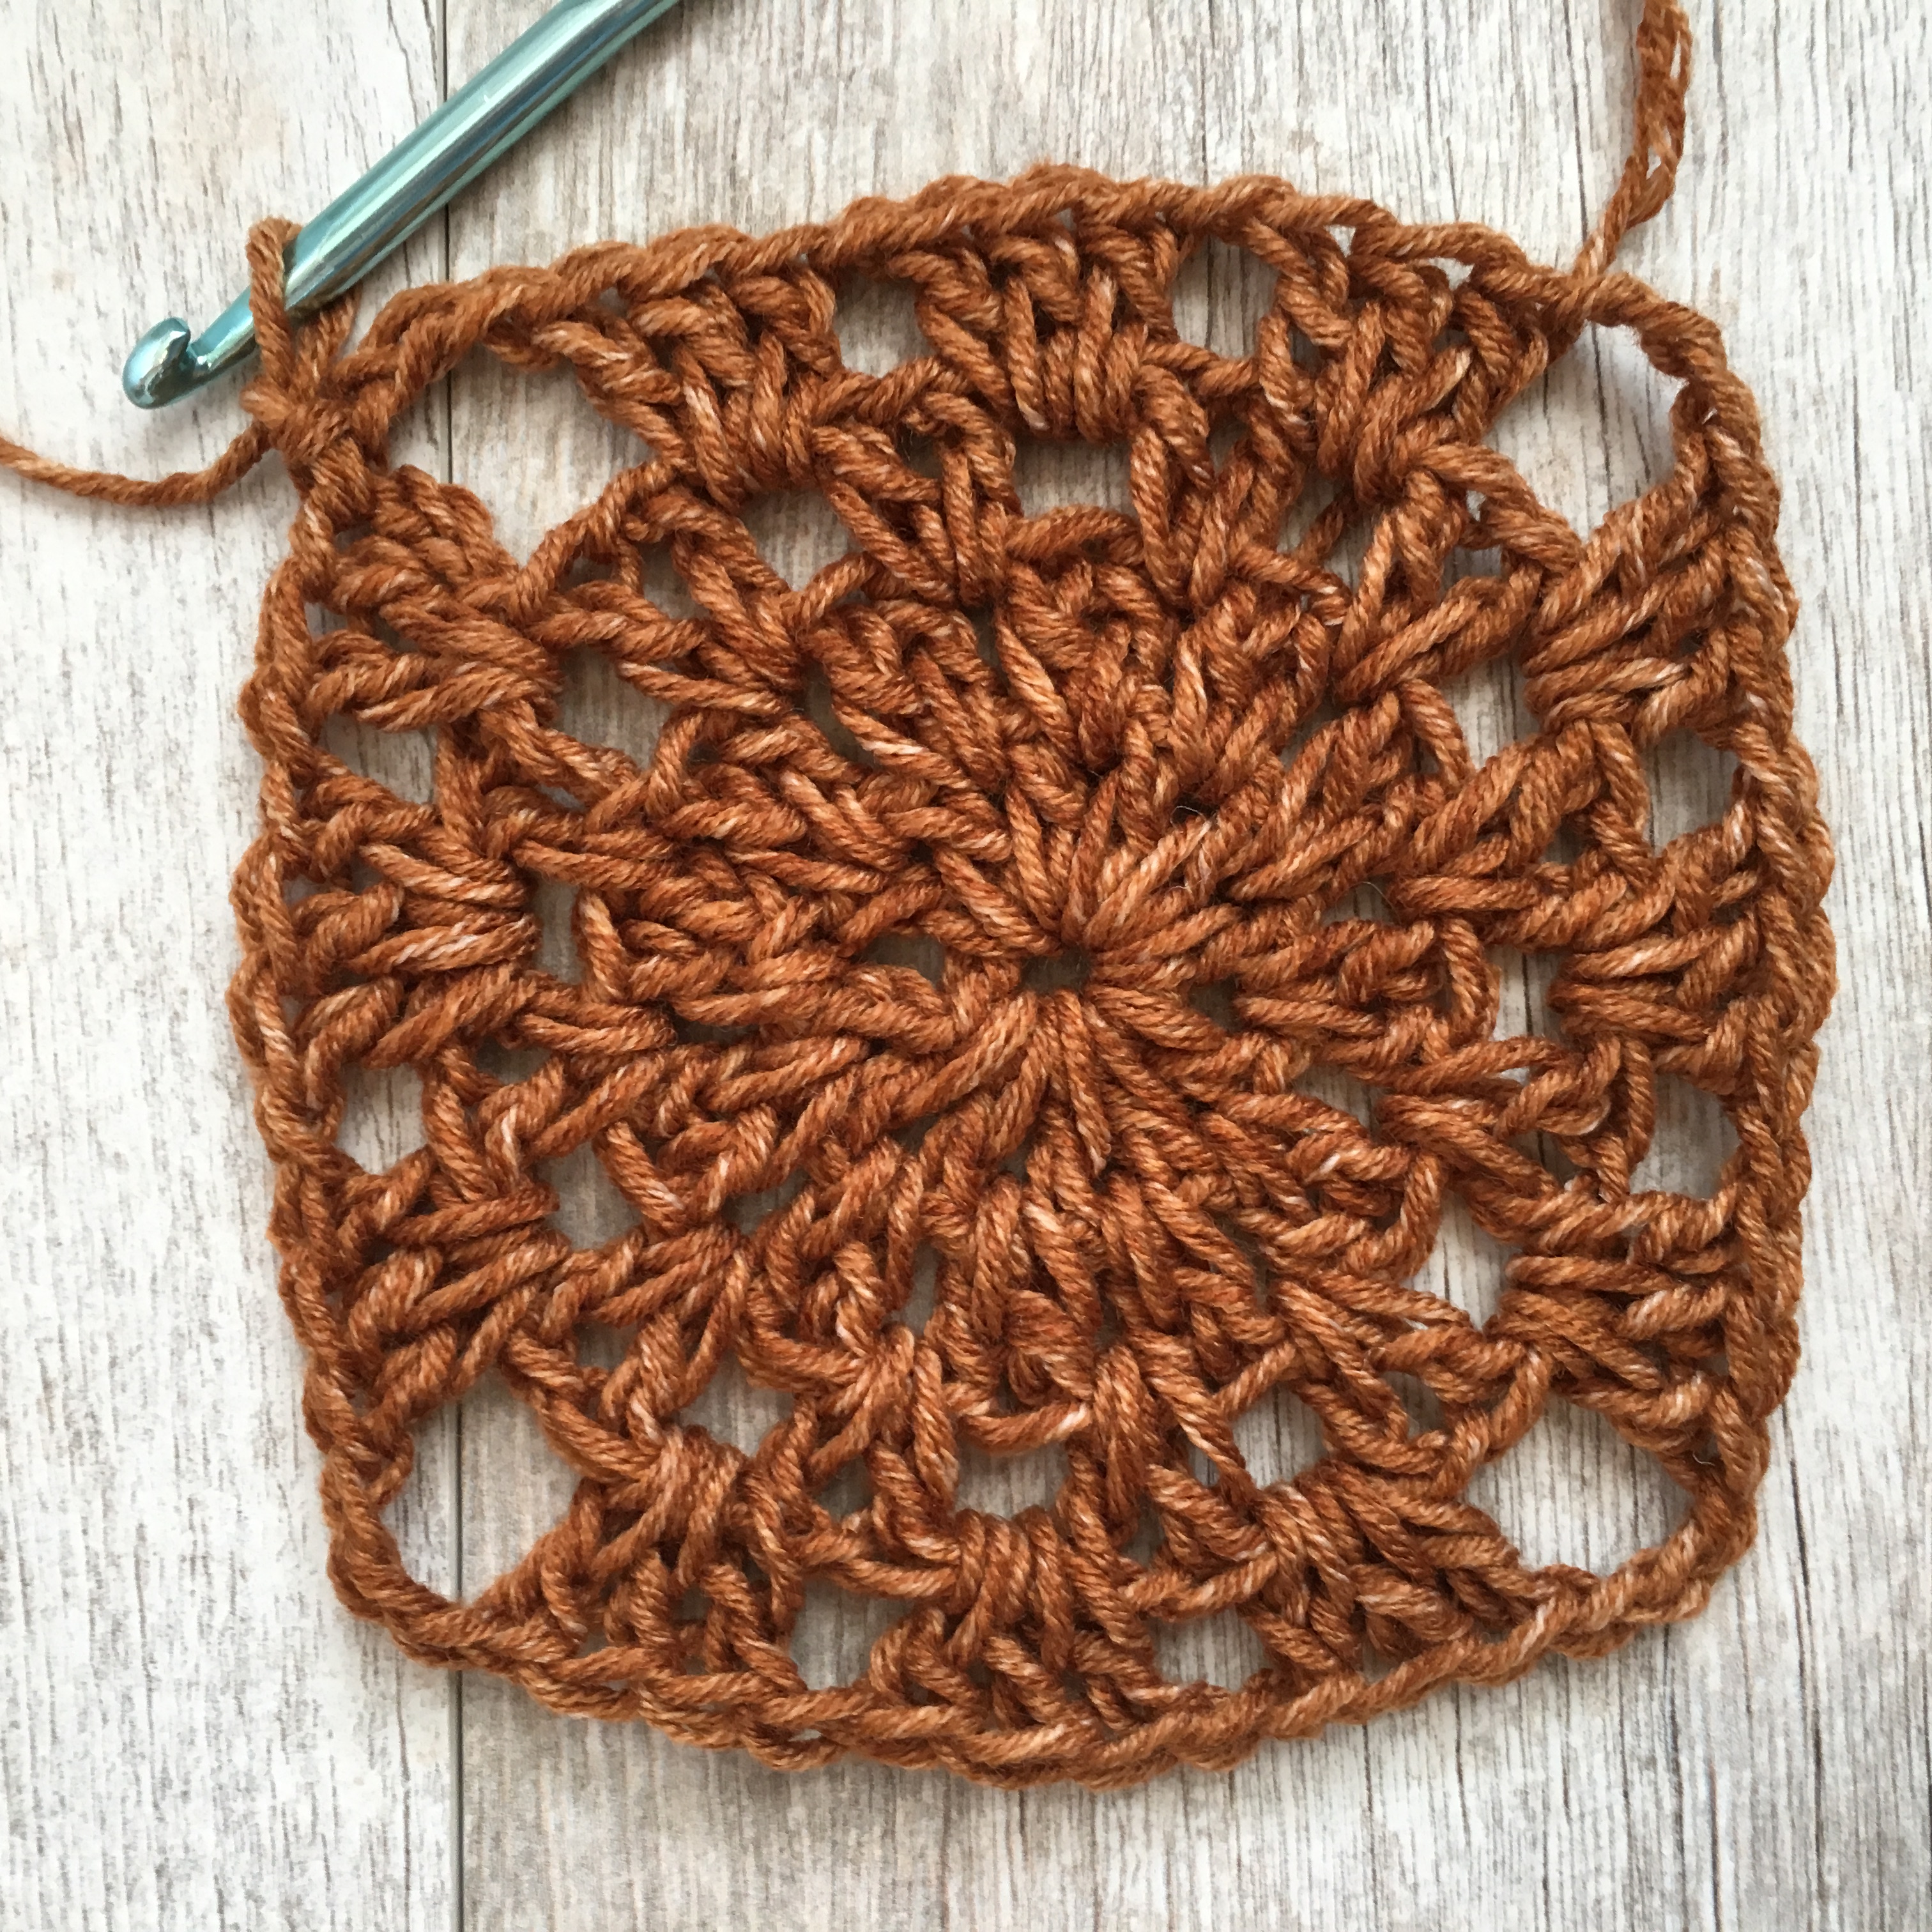
Round 4 It’s turned into a square but is still a bit round. Block the squares now or when the top is finished to shape as desired.
Finally, here is the measurements that your top should measure close to:
I hope you’ve enjoyed this bohemian inspired top! Happy almost summer!
XO,
Jessica
This post was sponsored by Lion Brand Yarn. All opinions are 100% my own.
If you like granny squares, you might also like:
Modern Vintage Potholder Crochet Pattern

Yellow Brick Road Granny Blanket Crochet Pattern
![]()
Thanks again and come back soon!
A lovely pattern! I love the color, too. Suddenly burnt orange is so new and interesting again.
Gorgeous! Going to queue-jump it up my To-Make list – thanks so much for sharing this lovely pattern.
That is truly beautiful!!!! The color is gorgeous
This is gorgeous Jessica! I am working on one of your kimonos right now but when that’s done this is next!
Ahh I’m so happy you like it! And hope you’re enjoying the Kimono!
I think this pattern is beautiful! I love the cap sleeve and the color is gorgeous! One drawback; I can’t crochet .:( Is there a chance you might do something similar in knit? I love your patterns and look forward to your emails every week! Jennifer
Wow! Nice job, Jessica! That color is perfect for fall and it can be worn over a blouse so it is perfect for all the seasons. You are so generous to share your patterns with us. Thank you!
My granny squares seem way too small! I know I should have done a gauge swatch, but I didn’t. Do you have measurements for the squares?
Hi Dollie! They should be 5 x 5 inches. you can block them or go up a hook size if you need to as well! I’ve written this in the pattern now too and thanks for asking!
Thanks! Mine are way too small, 3.5”! Oops. Well, I’m starting over and doing a gauge swatch this time .
One other thing, do the chain 2 at the beginning of the rows in the panel crocheting count as a stitch? Will it matter in the overall construction of the sweater?
Hi! I love this pattern and have started making it. I have run into a snag in round 3. Says I should have 36 double crochets but I only have 24 because Round 2 only has 24 and I am crocheting 2 double crochets in the space between 2 DC stitches. What am I doing wrong? Thanks!
Hi Sharon! Make sure you’re counting the chain stitch as a stitch! And if you have to, really study the photos of the rounds that I posted. I hope this will help!
Love the color ! i am making this one . Perfect for summer.
Hi Jessica. I love pattern for LB Jeans yarn but it’s discontinued in Australia.
We don’t have your gorgeous US yarns here. What type of yarn can I substitute for a Summer top?
Cheers, Alicia
Hi Alicia – you can really use any worsted weight #4 yarn. Try to find one with a good drape if you can!
I purchased the kit and enough yarn for size medium. My chest measures 1 inch bigger but the large size would be 6 inches bigger than my chest size. Any suggestions on how to adapt the pattern? I fear the large size will be falling off my shoulders.
Hi Nancy,
You can add more rows for the stitching along the sides of the front and back panel to add width. You just need to keep yarn needs in mind as the kits are made to follow the particular pattern. So hopefully you won’t run out of yarn, but you can certainly give it a whirl!
I just finished this Jessica. Love the pattern! My first crocheted garment and it looks like yours. Fits to! Thanks!
So excited to hear this, Tammy! Congrats!
I see you’ve added sleeves, but it’s not on the written pattern. I’m fine adding that myself. I love everything about how mine is turning out, except for the neck. I’m not sure the opening is large enough or the shoulders wide enough? Would it hurt to add a couple rows to the shoulder? Or would I need to remove stitching from the front or the back to make up for this? TIA! This is beautiful and I can’t wait to wear it everywhere!