Mexican Serape Blanket Crochet Pattern
Scroll down for the free pattern below or you may choose to purchase the ad-free, printable PDF version from my Etsy shop (here), or the kit (currently 35% off!) including yarn from Lion Brand Yarn (here)
Every crochet project is a special one, but occasionally you make something that rises above the hat or scarf you made last month. This serape blanket is one of those project for me and I’m thrilled to share it with you today. The look of the serapes and the history behind them is so intriguing (more about that in a bit) and it was a pleasure to make this unique piece. The very first knit blanket shared on the blog (here) was also inspired by the serape so it was a lot of fun to make this crochet version. This blanket uses a variety of simple crochet stitches and neutral colors with just a pop of mustard yellow. While it’s made with fairly basic stitches, the way in which they are put together gives it a “woven” look. I’m so pleased with how it turned out!
![]()
Serapes are known for their colorful, mirroring repetitive stripe patterns and they originate from Saltillo, Mexico. Traditionally, these blankets were used as shawls or ponchos but today I often see them used as blankets and decorative pieces. With the popularity of boho style and design in recent years, these blankets and similar pieces have become more prolific. Their inspiration can be seen in many places including clothing and home decor. I’m so lucky to have had the chance to study abroad in Mexico and also teach English in Ecuador where woven blankets and rugs like the serape can be seen all over the place! While I got to bring home a rug or two, it was really neat to be able to create a crocheted blanket inspired by the artistry from Mexico.
![]()
The goal for this blanket was for it to have a “woven” look within the fabric. Of course, crochet is beautiful in it’s own right, but the look of weaving lends to a more authentic appearance to the blanket. It’s made with super bulky Wool Ease Thick & Quick yarn so it works up fairly quickly and it only takes 8 skeins of yarn to create. It took a lot of frogging, retrying, changing colors, and frogging again to get the striping just right (and some pulling my hair out – lol!). Although it was a little challenging to get the design finished correctly, now that the pattern’s written it’s actually super simple to crochet! The stitches are easy and if you know basics, you are good to go with this serape.
![]()
![]()
![]()
![]()
Above: I love how these colors came together using the Lion Brand Wool Ease Thick & Quick! However, you can be as creative as you’d like with the colors for the stripes. 🙂
(See the free pattern below or you may also choose to purchase the ad-free, printable PDF version from my Etsy shop here. It includes all relevant photos and pattern information)
Mexican Serape Crochet Blanket
Pattern Description:
Achieve the look of a woven serape Mexican blanket with this rustic modern crochet pattern. Easily recognized by their repetitive striping pattern, serapes make a beautiful decorative statement and are great to curl up with on cold days. The mirroring stripes give visual interest and the vibrant touch of color will add dimension to any room. Fringe along the ends lend to the authentic look of the serape while also adding warmth and charm. Crocheted with super bulky yarn, this version is especially warm and makes a wonderful accessory for practically any room in your home.
Skill Level:
Intermediate
Materials:
US Size N 10.0 mm crochet hook
US Size P 11.5 mm crochet hook
(Kit with pattern & yarn available from Lion Brand Yarn HERE)
2 Lion Brand Wool Ease Thick & Quick Yarn in Black (170 g/skein) You can even get creative and use any other colors you like! See them all HERE
3 Lion Brand Wool Ease Thick & Quick Yarn in Oatmeal (170 g/skein)
1 Lion Brand Wool Ease Thick & Quick Yarn in Mustard (170 g/skein)
1 Lion Brand Wool Ease Thick & Quick Yarn in Fisherman (170 g/skein)
1 Lion Brand Wool Ease Thick & Quick Yarn in Grey Marble (170 g/skein)
Pattern uses approximately 1,071 grams of yarn
Scissors
Tapestry Needle
Dimensions (approximate):
37” X 41” Lapghan Size (includes border edge)
Abbreviations & Skills:
ch – chain
st – stitch
sc – single crochet
dc – double crochet
sc flo – single crochet through the front loop only
dc flo – double crochet through the front loop only
sl st flo – slip stitch through the front loop only
sc blo – single crochet through the back loop only
RS – right side
CC – change colors
Gauge:
Not important for this pattern, however, approximate gauge is just over 7 stitches in 4” of double crochet
Notes: This blanket is created by crocheting 6 panels and seaming together. This method is used because it is the best way to create the reflective, mirrored striping that you see in serapes. There are two panel patterns, Panel Pattern #1 which you will make for a total of 4 times and Panel Pattern #2 which you will make for a total of two times. A simple striping pattern is created by using a variety of simple stitches. Change colors when indicated throughout the pattern. The US size N hook is used throughout the pattern except for the slip stitch rows where indicated. The US size P hook is used for all slip stitch rows as the slip stitches are typically crocheted tighter than the other stitches in the pattern. Using the size P hook will create stitches that more closely match the gauge of the rest of the pattern, however, please use the hook that best matches gauge depending on your tension. Note that you might see the edges curling inwards on some panels. This will be corrected once they are seamed with the flat slip stitch seam during assembly.
Mexican Serape Blanket Pattern Instructions
Panel Pattern #1
Using the size N crochet hook and Oatmeal yarn
Ch 73
Row 1 Dc in 3rd ch from hook and in each st across the row (71) (RS)
Row 2 Ch 3 (counts as st), turn, dc in 2nd st of row and in each st across the row (71)
CC Black
Row 3 Ch 1, turn, sc flo in each st across the row (71)
CC Oatmeal
Row 4 Ch 3 (counts as st), turn, dc flo in each st across the row (71)
Row 5 Ch 3 (counts as st), turn, dc in each st across the row including final stitch which is the turn ch 3 of previous row (71)
CC Black
Row 6 (use P hook) Ch 1, sl st flo in each st across the row, sl st into turn ch 3 of previous row (71)
CC Grey
Row 7 (use N hook) Ch 1, turn, sc blo across the row (71)
Row 8 (use P hook) Ch 1, turn, sl st flo across the row (71)
CC Black
Row 9 (use N hook) Ch 1, turn, sc blo across the row (71)
CC Yellow
Row 10 (use P hook) Ch 1, turn, sl st blo across the row (71)
CC Black
Row 11 (use N hook) Ch 1, turn, sc blo across the row (71)
Tie off and weave in ends.
Repeat above pattern 3 more times to create a total of 4 panels from Panel Pattern #1. Set panels aside until assembly. Next you will crochet Panel Pattern #2.
Panel Pattern # 2
Using the size N hook and Grey Marble yarn
Ch 72
Row 1 Sc in each ch st across the row (71) (RS)
CC Yellow
Row 2 (use P hook) Ch 1, turn, sl st flo in each st across the row (71)
Row 3 (use N hook) Ch 1, turn, sc blo across the row (71)
CC Black
Row 4 (use P hook) Ch 1, turn, sl st flo across the row (71)
Row 5 (use N hook) Ch 1, turn, sc flo across the row (71)
Tie off and weave in ends
Repeat above pattern 1 more time in order to create a total of two panels from Panel Pattern #2
Assembly
With right sides facing up, place two panels from Panel Pattern #1 together with black stripes at the center creating a mirror image stripe. With black yarn, seam with a flat slip stitch seam (good tutorial from Craft Passion HERE) down the center, tie off and weave in ends. Repeat this for the final two panels from Panel Pattern #1. Next, with black yarn, seam both panels together from Panel Pattern # 2 with right sides facing up and black stripe at the center. Lastly, using grey yarn, seam all remaining panels together with the stripes from Panel Pattern #2 in the center. Tie off and weave in ends. (See photos of blanket for additional visual assistance on how stripes are assembled)
Below: Seaming panels from Panel Pattern #1
![]()
Below: Seaming the blanket together with grey
![]()
Below: Almost done seaming!
![]()
Border and Fringe:
Attach Fisherman yarn to corner of blanket. Working along the right side of the blanket, slip stitch evenly along the edge. At the end of the row, ch 1, turn, then slip stitch through the back loop only across the row. Tie off and weave in ends. Block to shape and size as desired.
![]()
Above: Slip stitching along the edge with Fisherman
Fringe:
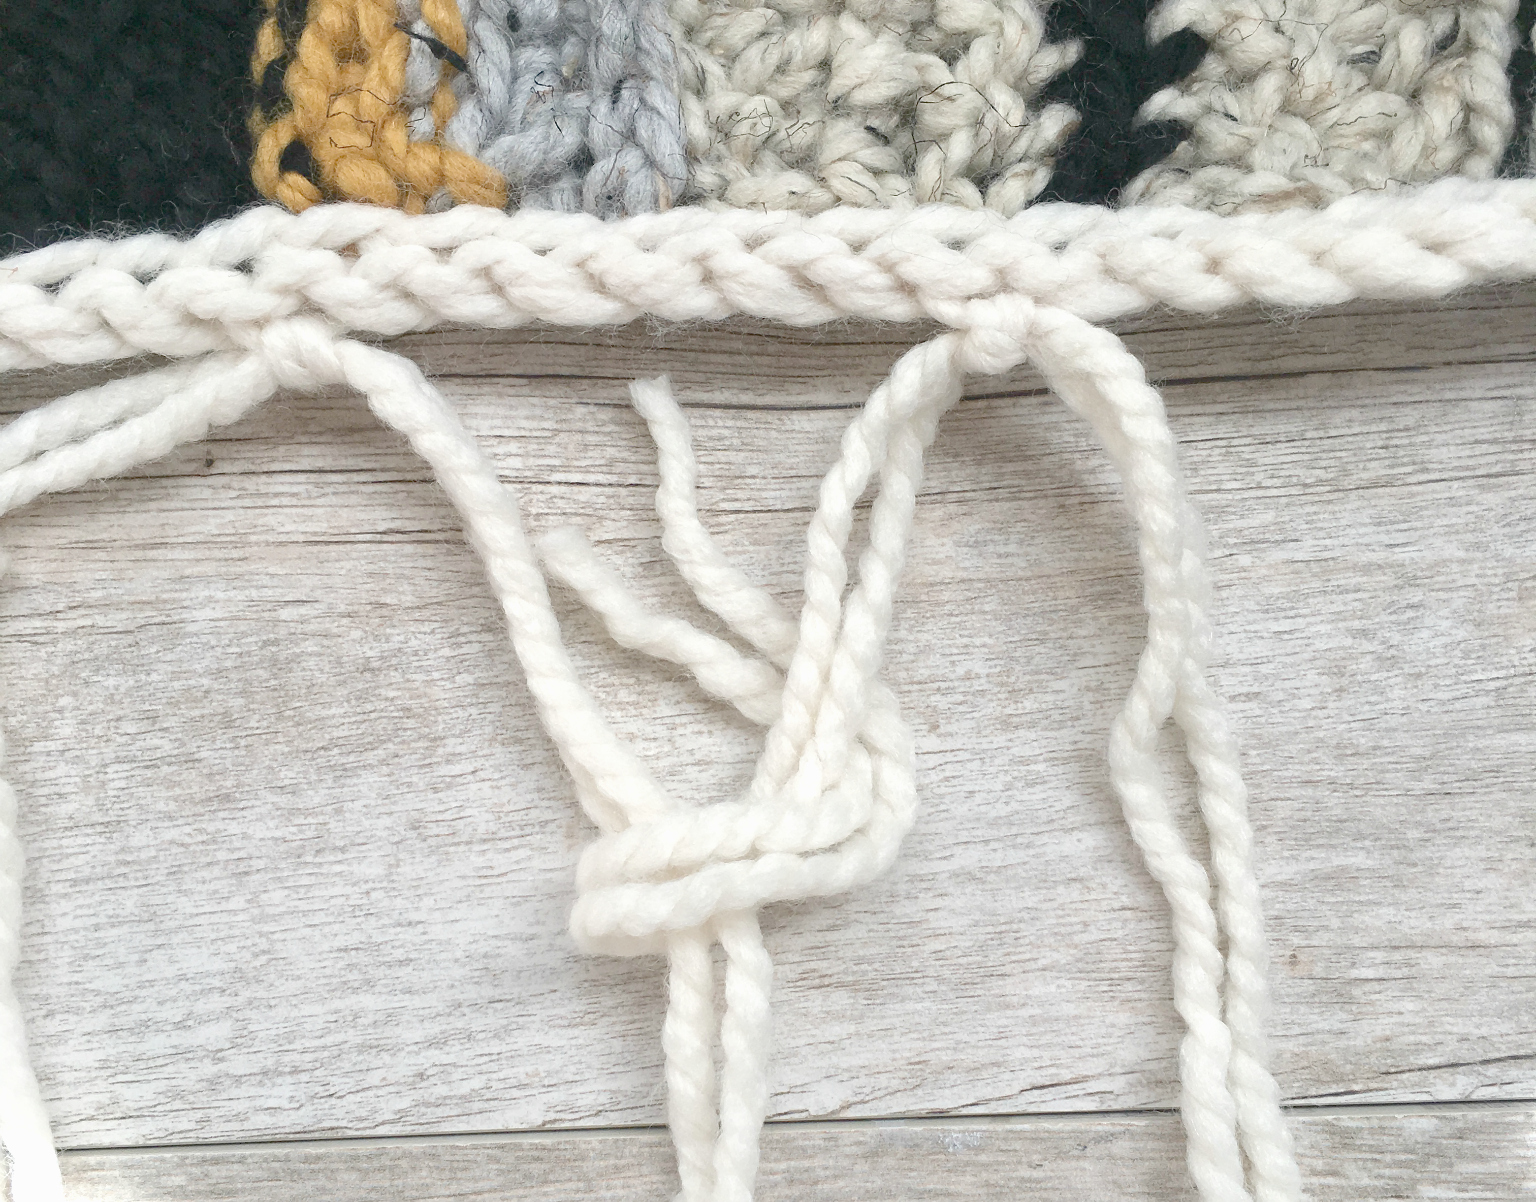
Cut two lengths of Fisherman yarn 16” long. Weave through blanket and tie. Repeat this evenly across the edge, making ten sets of fringe total. To make the macramé fringe look, divide each fringe evenly and tie together as pictured below. There are also many online tutorials if you do a simple search in YouTube or Google on how to create macramé fringe.
Attach two strands of yarn to make fringe and tie as pictured

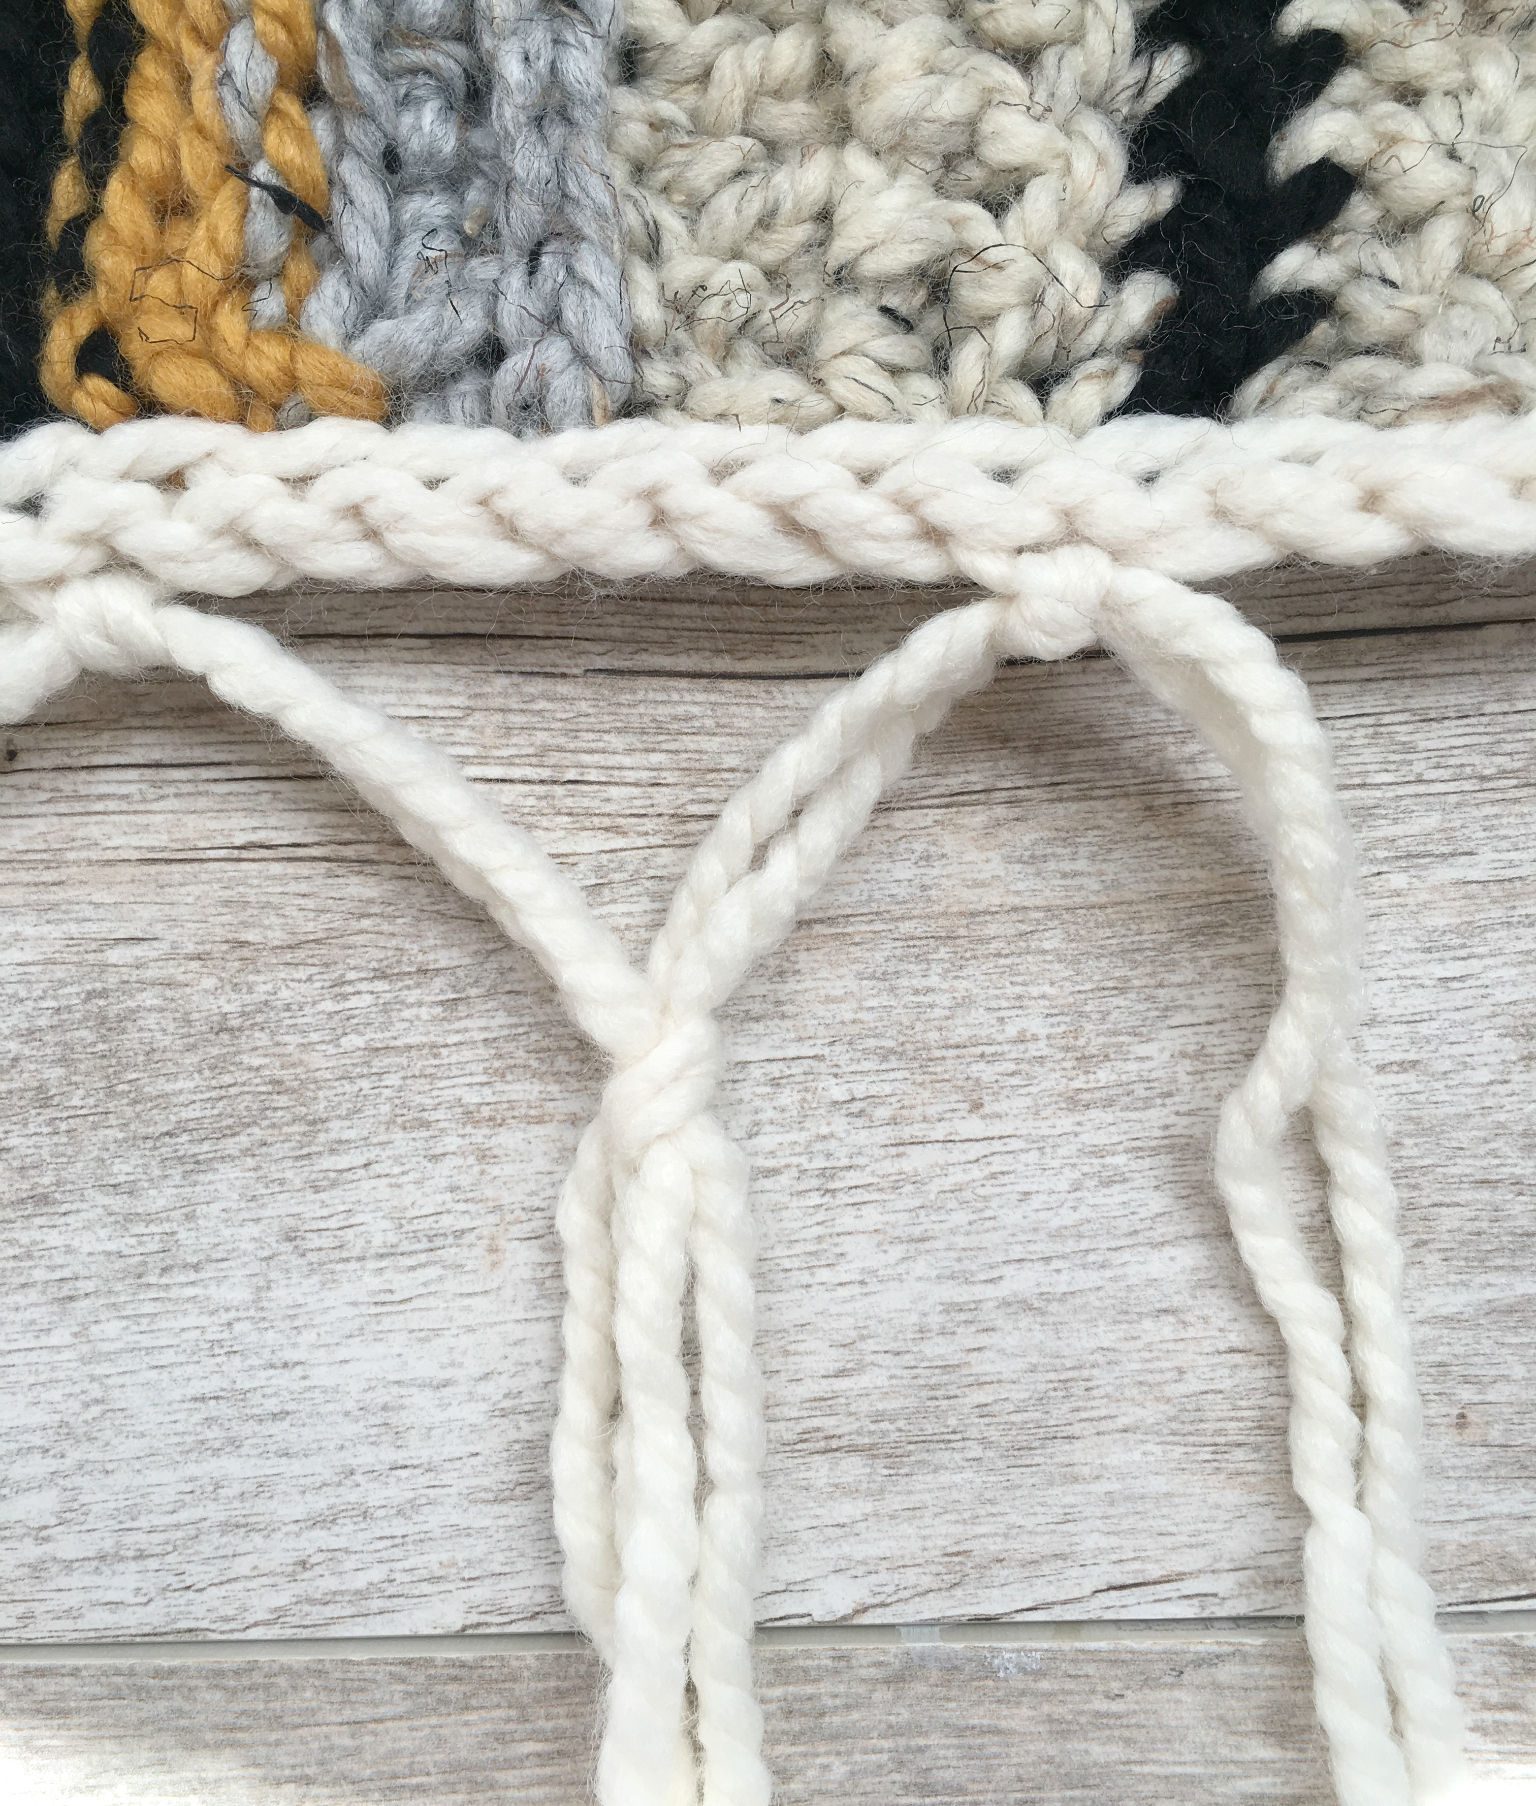
Split the fringe. Tie two right strands around left two strands as pictured.
Tighten knots and finish. Trim fringe evenly along bottom.
And there’s your Mexican Serape Crocheted Blanket!
![]()
Let me know if you have any questions and happy making my friends.
XO
Jessica
Thank you to Lion Brand Yarn for sponsoring this project – all opinions are always my own. 🙂
![]()
If you liked this, you might also like:
Mod Heirloom Crochet Blanket Pattern
![]()
Yellow Brick Road Blanket Pattern
![]()
My favorite!
Why did you do the Mexican – Serape blanket in panels and not just crochet it all as 1??
Oh my! I love it. The blanket does look authentic serape. I am definitely going to make this blanket. Great job.
It is! Thanks for reminding me to explain that above – it is done that way in order to get the effect of the mirroring stripes. It’s very difficult to create a mirrored stripe effect with crochet making it in one piece. You can make stripes but the reflective look is very difficult to achieve. Thanks for asking!
Oh yay!
So happy you like it Rebecca!
Bravo Jessica……it’s just lovely. Love everything you create but I personally think this is the “star” of them all !!!
Thanks Jessica for sharing another great pattern. I just finished yesterday the knit summer kimono in deep purple. It may be cold here in Jersey but I’ll still wear it!
Your designs ar so simple but the results are gorgeous. I love how this is made of panels. You can achieve the special pattern of stripes and it is easier to my joints to crochet it in pieces. Now I need to find a suitable yarn for this.
Jessica, this blanket is beautiful! I love the colors you used, you are so talented!
Jessica I love your blanket patterns and this one is no different! I was thinking of making this for my honey who is 6’4 & wondered if any changes I might need to make or add to this pattern? Thank you!!
If you simply increase the beginning chain (they need to match for each panel), this will make the blanket longer, which will make a larger size. This would be the easiest way to go about it!
I want to say thanks for all you do for us. You are a great person to know. I love your work. I know the time it takes to get it right. Thanks again. Happy Thanksgiving to you and your family.
I attempted to make this blanket. But my panels came out different lengths . I don’t know what I did lol. Anyway I took it apart and may try again or do something else with the yarn. I just wanted to say this is a beautiful blanket in any case.
I absolutely love this! Since I first saw it when your email came out, I haven’t been able to get it off my mind…. I loaded my cart online then deleted (more than once…), went to 2 different stores to find the yarn but couldn’t get everything at once, all justifying why I didn’t need this right now.. you know, in the spirit of finishing what I have already started and projects lined up since last year, etc… But today I couldn’t wait any longer; I went to the store, purchased the yarn and am about to begin. The favorite projects I’ve made have all been thanks to your patterns. Thank you for doing what you do and sharing it with us!! 🙂 Happy holidays!
Gorgeous. It truly looks authentic. My husband grew up in Mexico and he gave it a thumbs up. Thank you so much for the pattern.
Can’t wait to make this but would love to print the pattern. Do you offer a printed version?
Love the Mexican blanket .I do buy a lot of yarn from Lion . I am in Australia though and the yarn used is too heavy for our climate . Colours are perfect for a gift for my best friend . Is there any way I could adapt the pattern and use a lighter Lion yarn in the same colours ? Not experienced enough to adjust your lovely pattern . Odd request I know but thanks anyway .
Yes Marcia, it’s for purchase in my Etsy shop. 🙂
Hi Jessica,
I am about 1/2 finished the blanket. I must be crocheting too tightly because the panels are curling….a lot. I stitched two of the panels together to see if they would curl less as you had suggested, and the center lays more flatly now but the outside edges still curl enough to not look great. I find this yarn to be somewhat “stretchy” feeling as I also did with the Vanna Yarn which I used in a previous afghan. This seems to be a Lion Brand thing. Wondering if that could be contributing to the curl? If I took it all apart and redid it crocheting more loosely do you think it would help? I was hoping to give it as a Christmas gift so I would like it to look its best. I’m also concerned that the yarn itself might not look its best after the redo. Thanks, any advice you could give will be greatly welcomed.
Cindy – feel free to email me as well and I will help you through this! They do indeed curl, but you’re saying the ends curl also? I do wonder about crocheting tightly if that would make a difference. Feel free to send me a photo at mamainastitch@gmail.com – so sorry to hear this! The panels did curl, but for me, once they were seamed it flattened the entire thing out.
Im wanting to use worsted weight could you tell me the stitch count for this pattern so i can fiqure out. I live in texas so i always make lite throws thank u so much for sharing!
Hi Jessica,
I just noticed your response to my panels curling.
I was in a panic as I had promised to crochet my daughter in law an afghan for Christmas,
so I just tore it all apart and used a different pattern.
Now that I can go slower and try to crochet more loosely I’ll try your pattern again as I really love it. If I still have difficulties I’ll send you a picture.
Thanks for your help and all the great patterns.
I love this pattern! I’m almost done with the blanket… I chained 114 in hopes of it being a bigger blanket but it is still very short, like it’s missing half of it. My tension must have been too tight? might make another blanket and sew those together
I love this blanket – and it would be perfect for me to make for my University of Colorado-bound son!! My only issue is that I knit, but know NOTHING about crochet – do you have the pattern as a knitting option as well, or any suggestions on how to convert to a knitting pattern?
So sorry, Sarah! I don’t have a knit version! But yeah for CU!!!! That’s where I went to school!
I typically love your patterns Jessica but this one was a miss for me. Mine turned out much smaller then you listed (and I guess I didn’t realize how small the blanket was meant to be. Definitely not long enough to cover my legs, it looked more like a very thick baby blanket). So I ended up going to the store several times for more yarn and adding to it and by the time I was done it cost much more money then I’d intended to spend :-/ love all your other patterns that I’ve tried though.
So sorry to hear that, Amy! It’s definitely not a large throw, but I’m wondering what may have happened that it was so much smaller than what I listed. I do crochet loosely, so if you crochet tightly, it will come out smaller even with the same hook size. Sometimes going up a hook size can make a difference. Again, so sorry it didn’t work out as hoped! Next time, please feel free to reach out over email if you have any concerns or questions as you make it in case I can help mamainastitch@gmail.com.
Thanks for responding Jessica! I just added to it too make it bigger and it turned out nice. I do think I crochet pretty tight so I’ll have to keep that in mind next time. I’ve made several of your patterns before though and loved those 🙂
Also turned out super duper small for me 🙁 I don’t think I am a tight crocheter by any means but this blanket is nowhere near the size shown in the pictures and dimensions given. It’s a beautiful blanket though!
Ahh so sorry to hear that! I do crochet loosely, and have written the measurements in the pattern. It’s not a huge blanket, but it definitely will vary in size with a different tension. I’m glad you still think it’s pretty, and thank you for sharing!
Thank you for this great pattern! I have enjoyed every minute of making it and might make two more for my daughter and granddaughter. I just love it!
Joann
in Wilsonville,Oregon
I have not yet blocked my blanket. I am wondering how you go about blocking a blanket and what you use to lay it down on.
Thank you
Joann
I love this blanket and went to order the kit but it is not available on Lyon Brand’s site at the moment. I will have to look for other yarns elsewhere – but so loved the colors in the kit.
Thank you for sharing this pattern. R