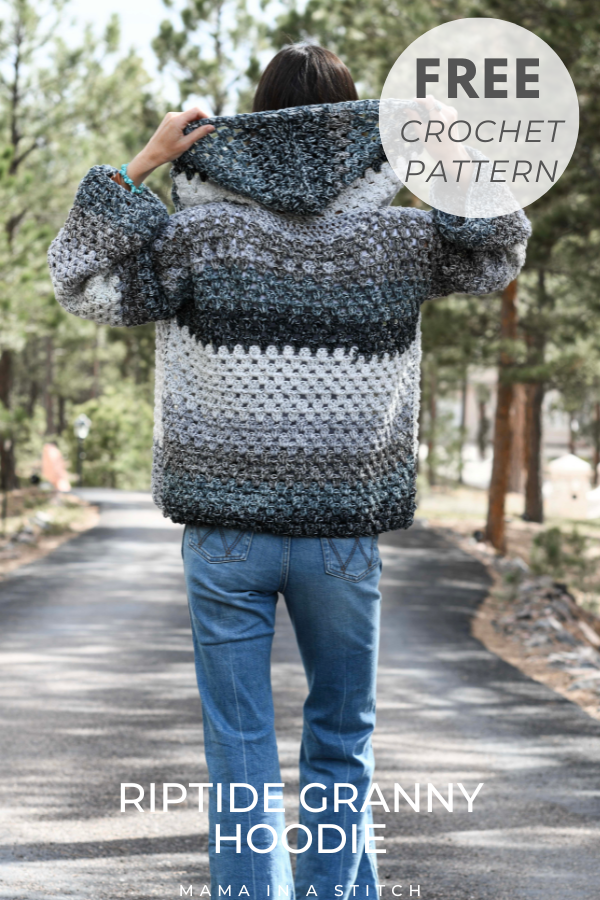
Riptide Granny Hoodie Crochet Pattern
I’m so excited to finally be able to share my granny stitch hoodie pattern today! It’s super easy to crochet, super eye catching, and it uses one of my favorite yarns. Read on!
See the full, FREE crochet hoodie pattern below, or you may choose to purchase the ad-free, printable version from my Etsy shop HERE (available in 8 sizes), or the kit from Lion Brand HERE.
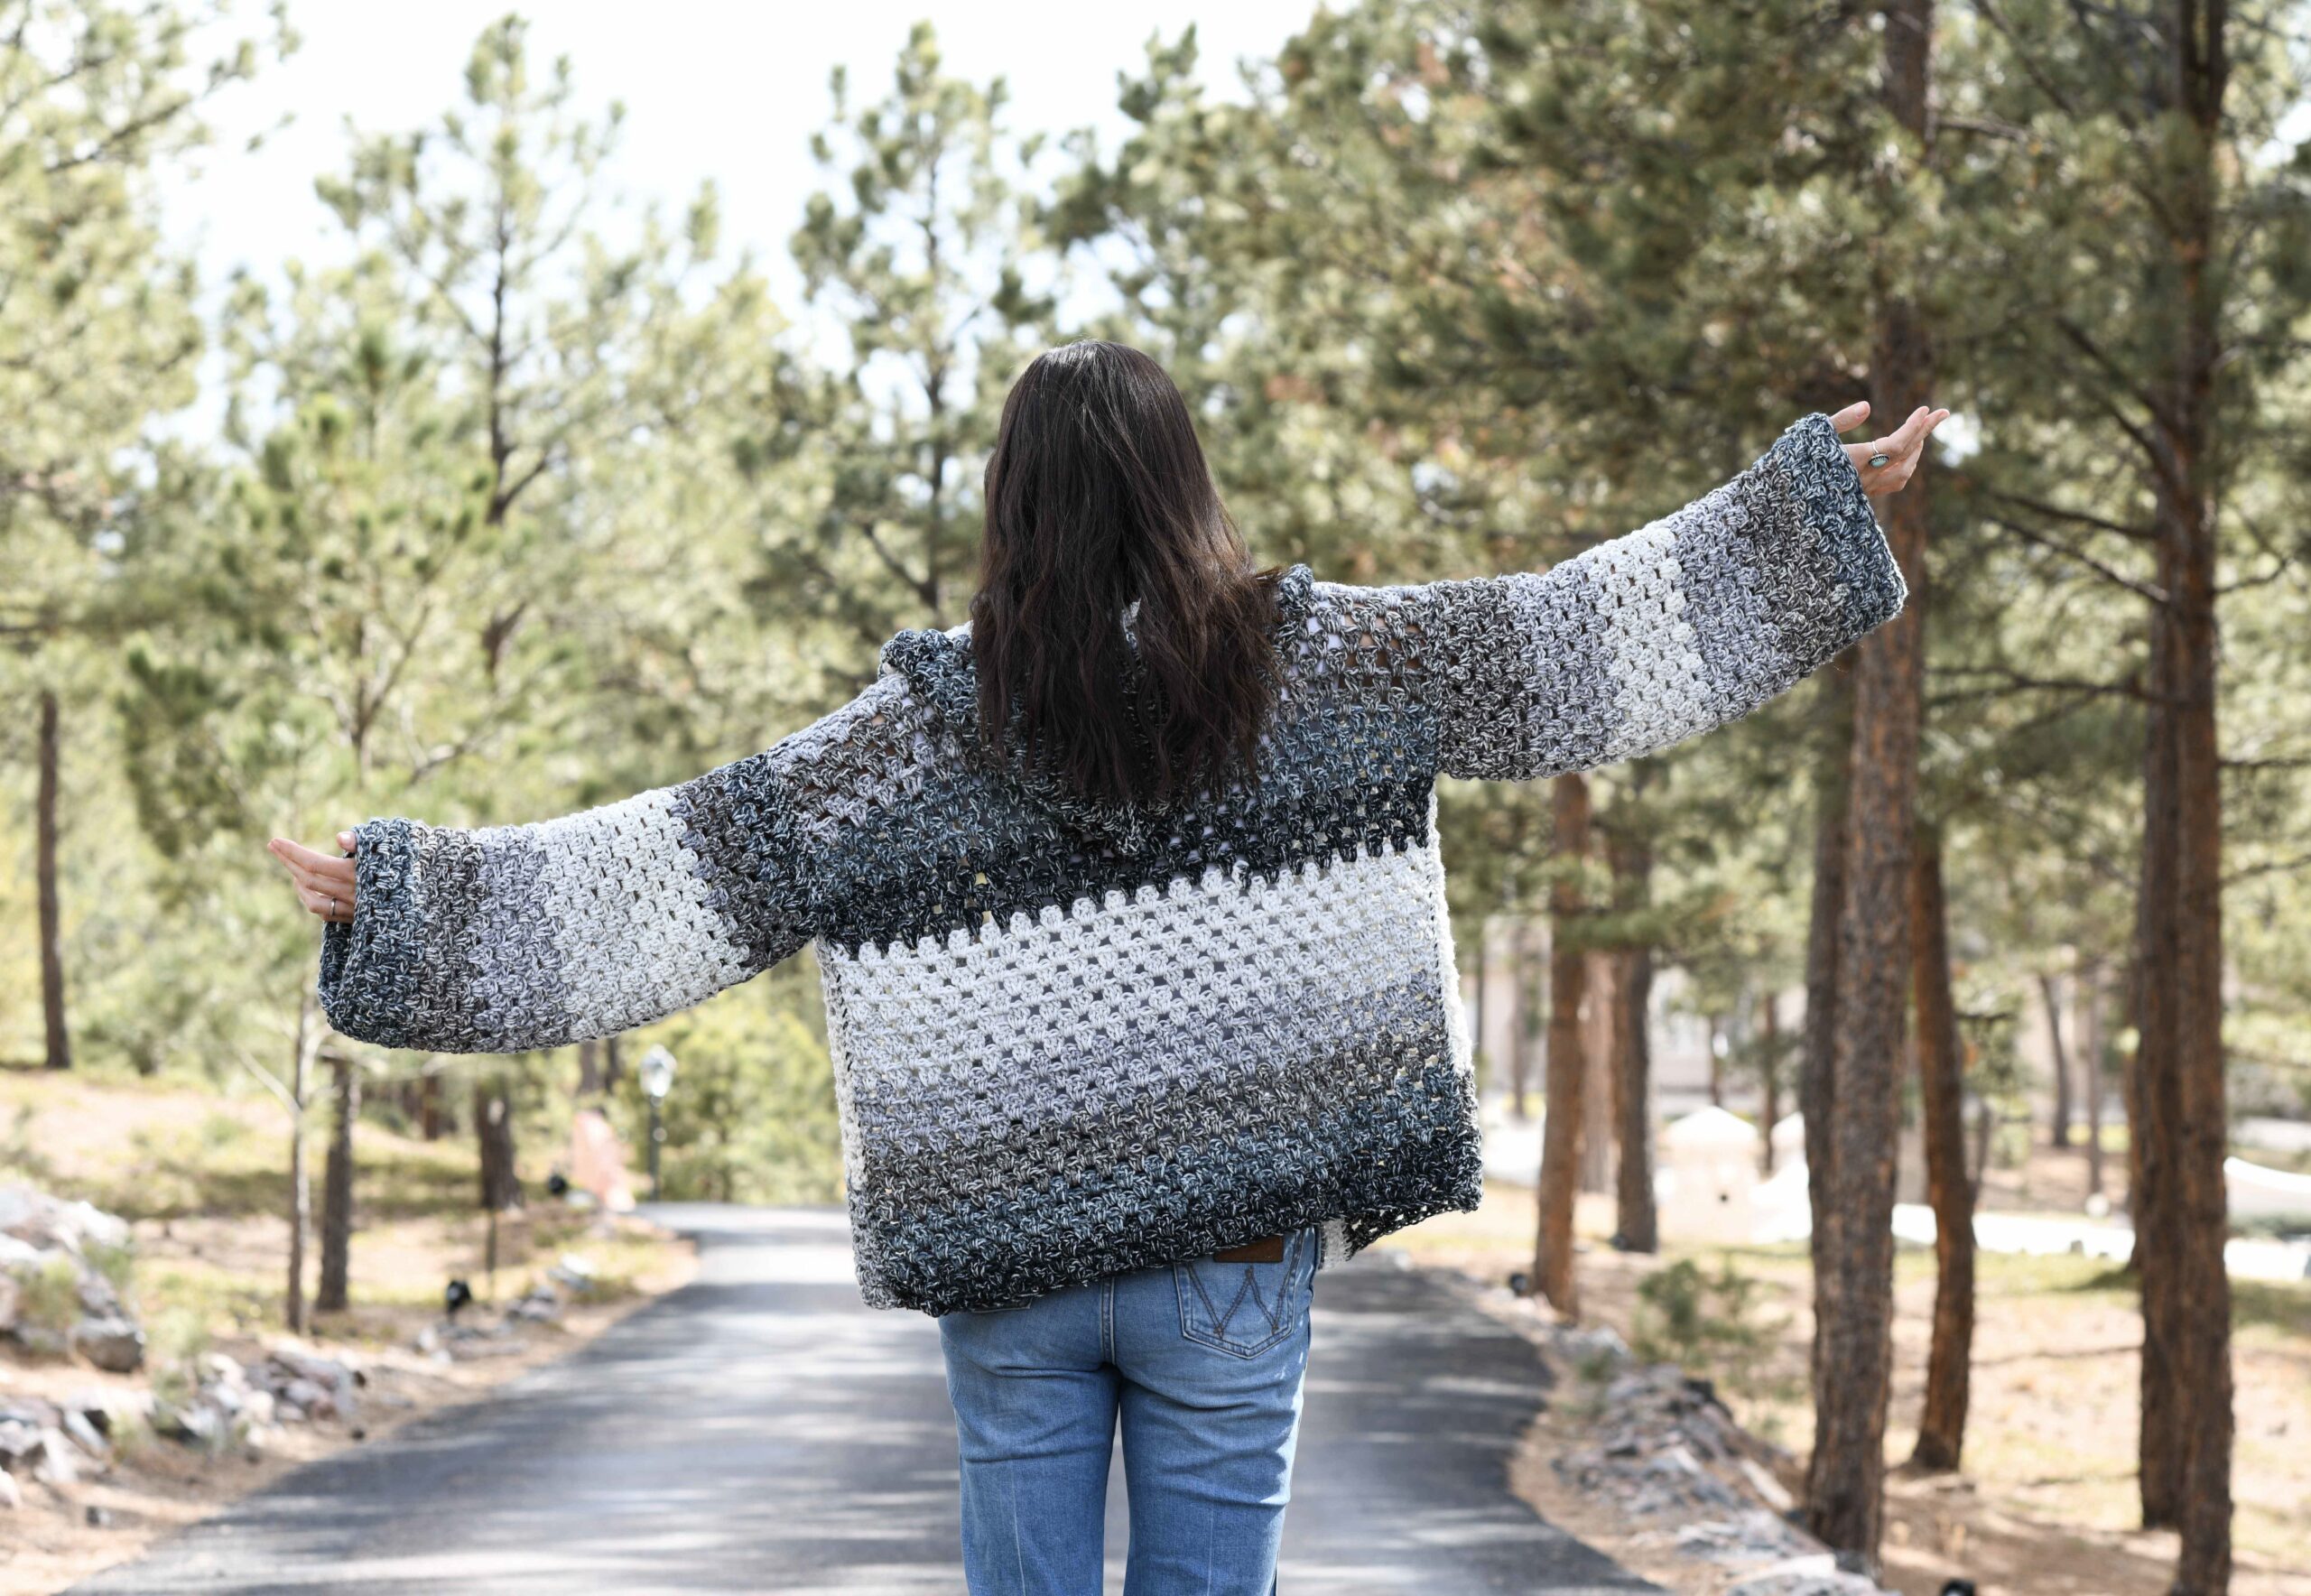
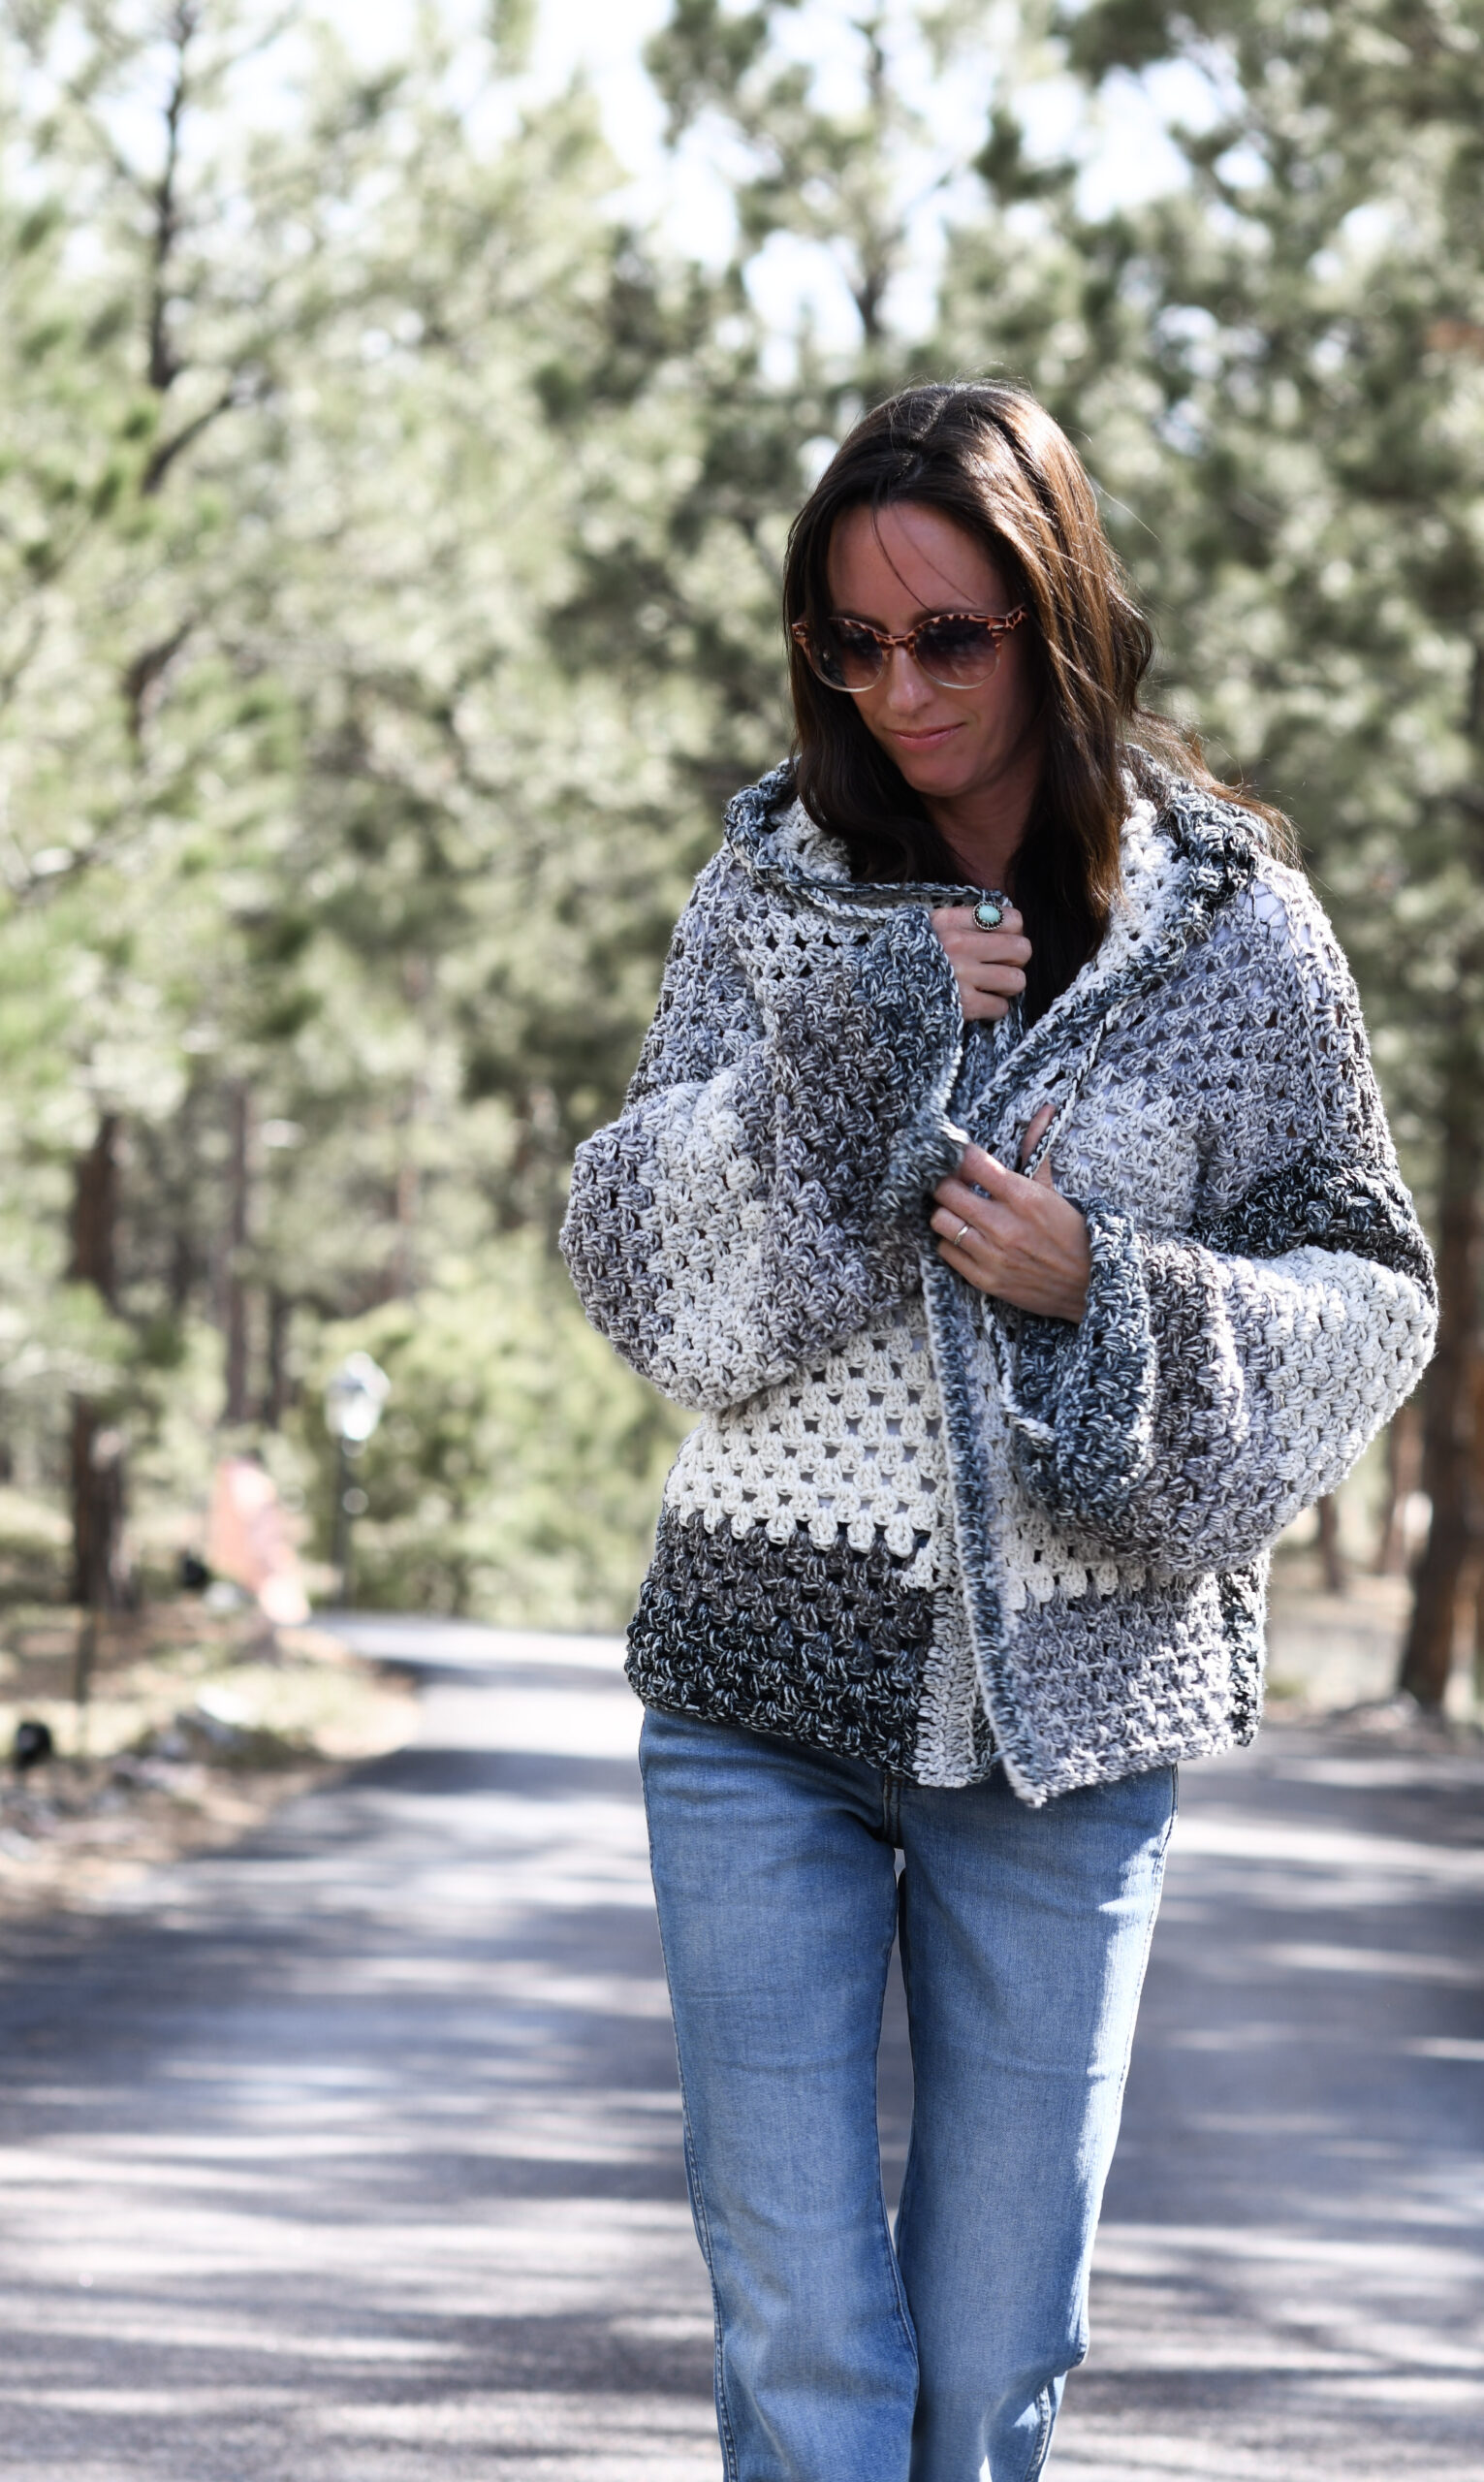
Isn’t the colorway awesome? And it’s such a nice, airy hoodie that can take you through summer and fall. It uses the basic granny stitch, which I’ve made a video tutorial for so that you can learn it quickly.
The hoodie is easy enough for newer crocheters because it’s literally made of rectangles that are seamed together. There is no difficult shaping, or counting. It’s about as simple as it gets!
If you follow me, you know I’m no stranger to hoodies ( The Alamosa Hoodie, Granny Square Vest Hoodie, and Tierra Stitchy Hoodie). Hoodies are so in style, and I love them to lounge around at home, go camping, or have as an extra throw-over.
This new Riptide Hoodie is probably my easiest, most straight forward, and comfortable option yet.
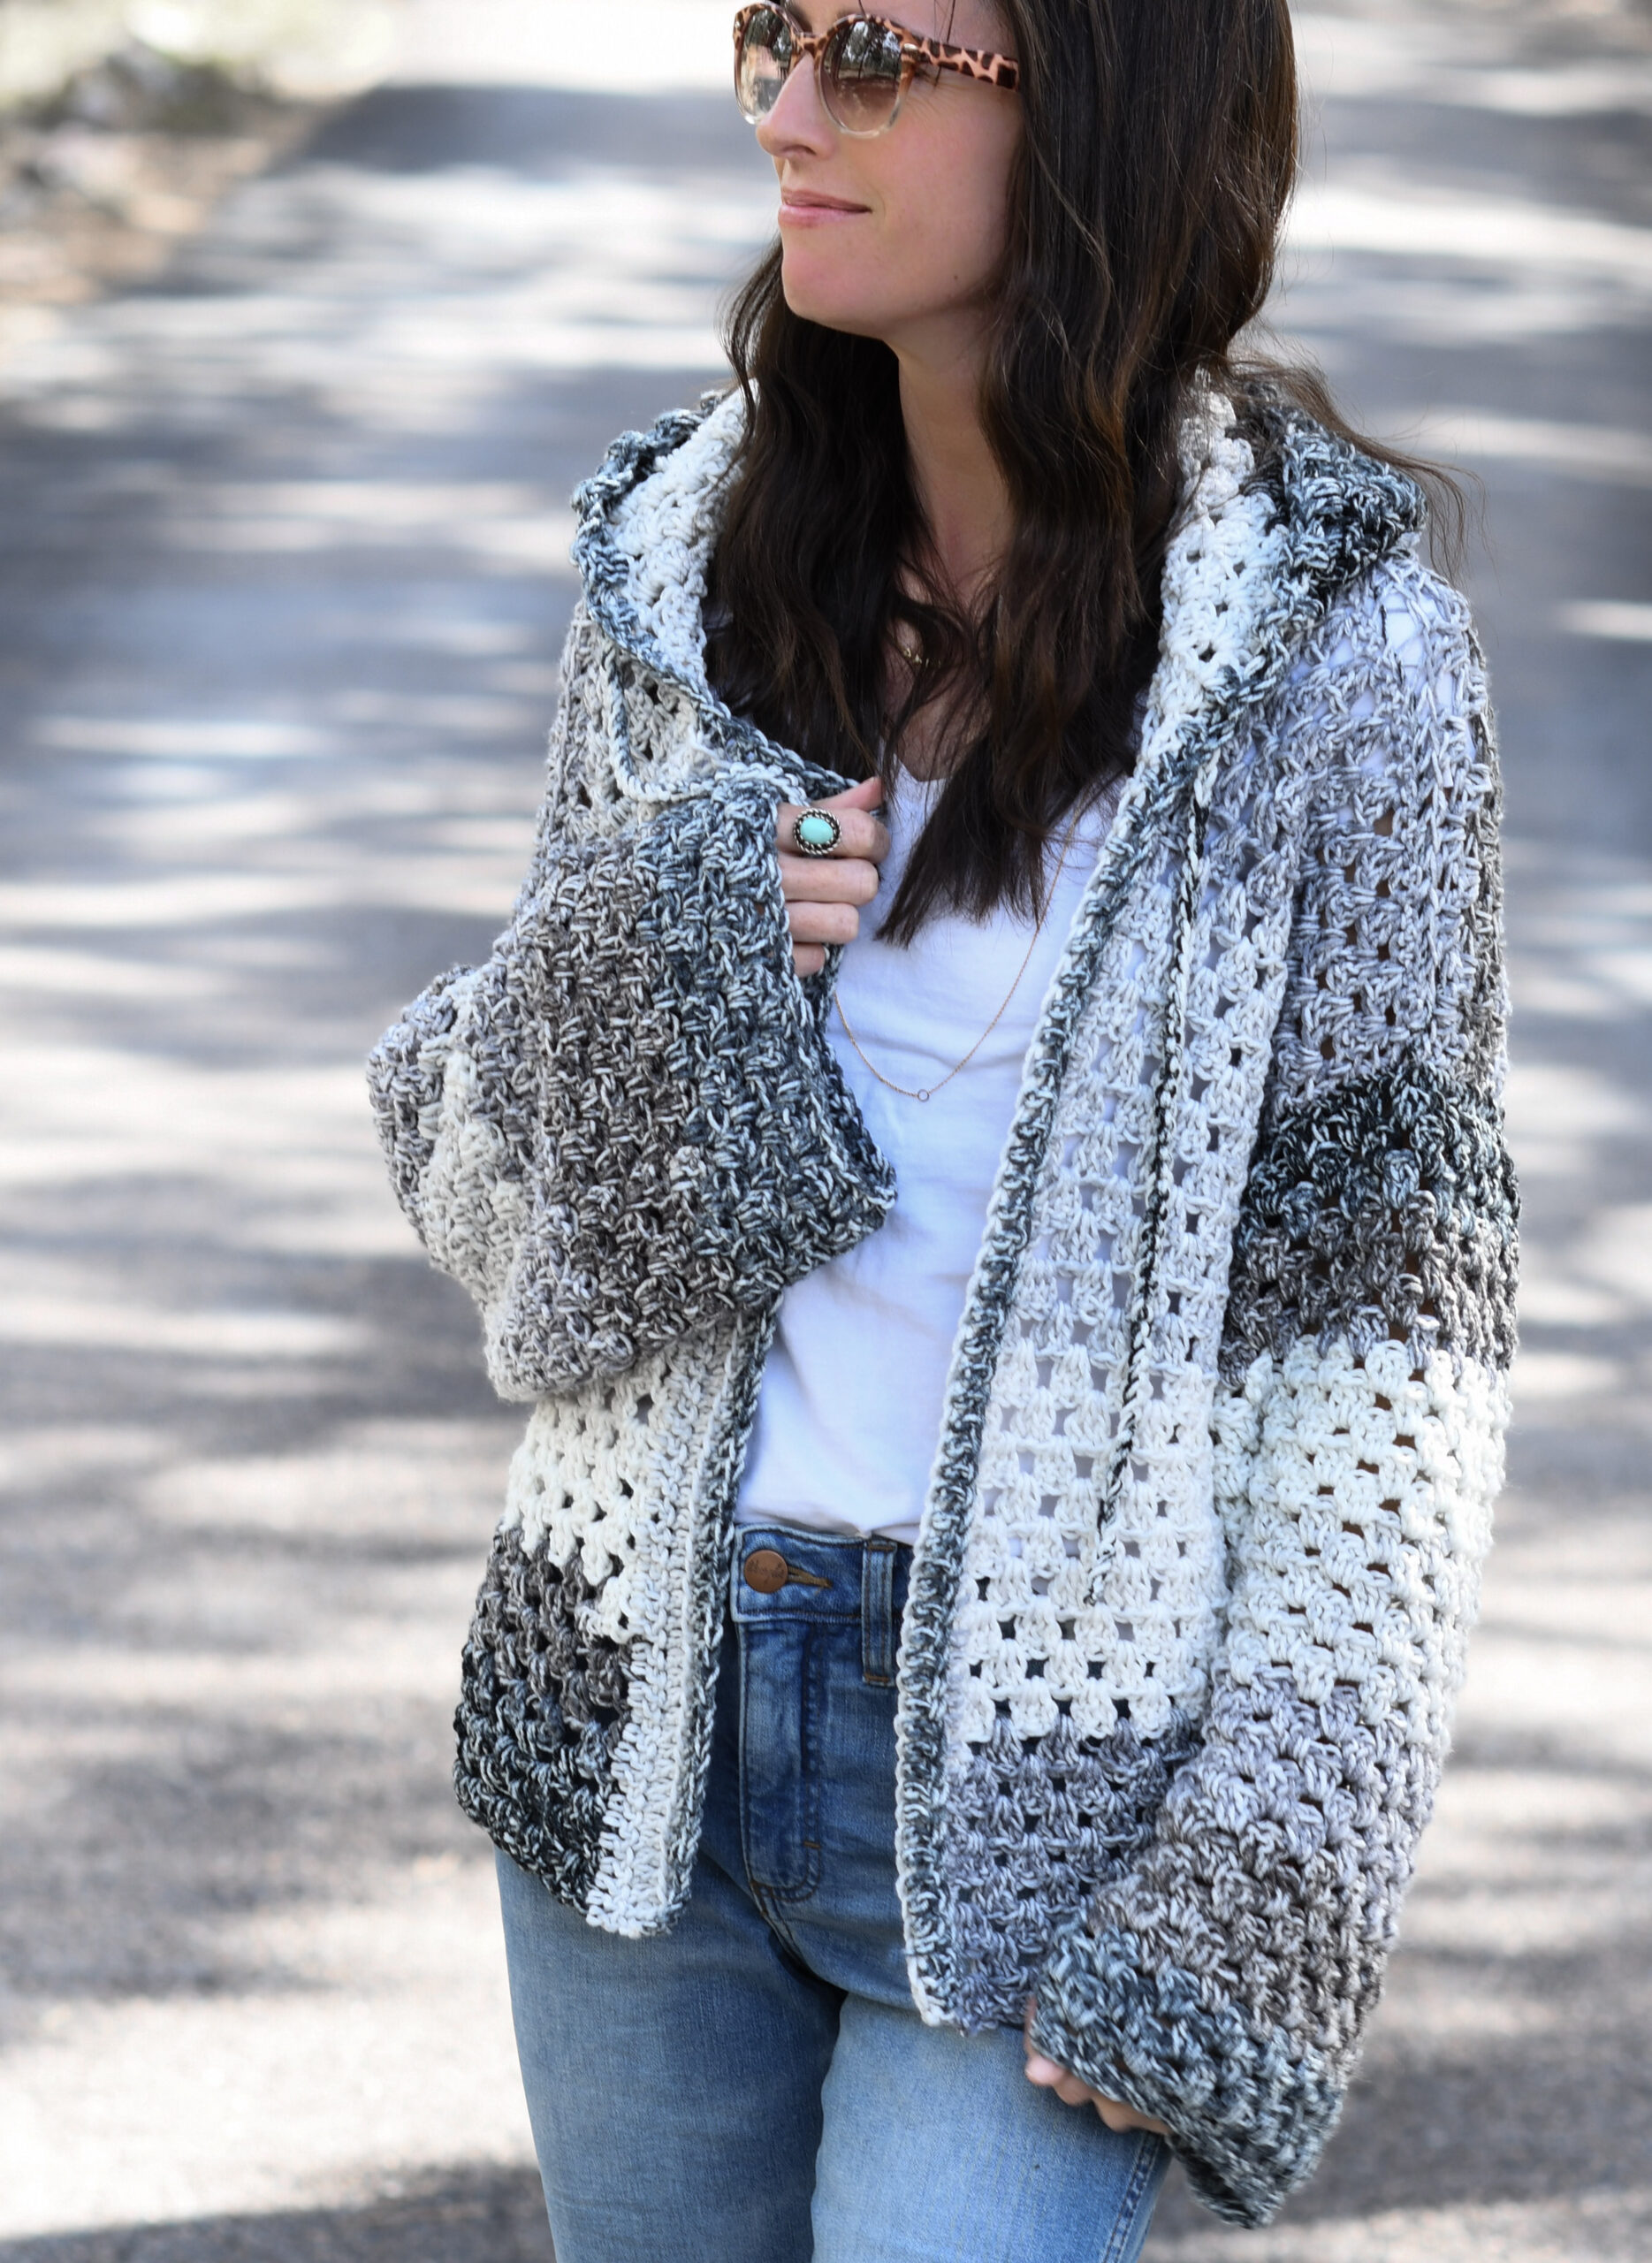
Below: You can make this hoodie a cozy sweatshirt style with a closed front, or an open style cardigan. All it takes is a seam up the front to make it a closed front! If you’re really adventurous, you could even add a zipper.
Also, many of you have mentioned that adding buttons or a toggle would be an easy way to close it up!
My daughter is a “tween” and she also loves this project! I’m happy because the yarn I chose to use comes in tons of fun color options, including several that are even great for teens and summer wear. What color would you make yours?
I mention this below in the pattern, but if you’d like to add pockets, it would be SO easy! Once you know how to work the granny stitch, you’d just make a couple of squares and seam them to either side of the cardigan. Voila!
What Yarn Do I Use To Crochet This Hoodie?
I know the yarn here is one of the stars of the show! This is Lion Brand Mandala Ombre (it’s a worsted weight #4 yarn), and I used the color “Cool”. I also LOVE the colorway “Harmony” as it’s a beautiful blend of blues. These two colors would be the most toned down and neutral, in my opinion. There are also many other colorways, including brighter blends of aqua, blues, and pinks! Definitely check them all out.
If you’re dreaming of making this in a solid color, your options are endless. Simply choose any worsted weight yarn that you like!
How Do I Crochet The Granny Stitch Used in the Pattern?
It’s easy and I love this stitch! You can see a full, video tutorial on how to work the granny stitch on YouTube below.
See the blog post HERE, where I tell you the stitch pattern and link to the video. Or watch the video on YouTube here:
Now that you know the stitch you’ll use, let’s get to the pattern!
Remember that you can purchase the ad-free printable version from my Etsy shop HERE!
Because this is a long pattern, the printable is a nice option. But do whatever works for you! 🙂
Riptide Granny Hoodie Free Crochet Pattern
Description:
Here’s your perfect, comfy, year-round hoodie! Throw it over a tank or tee and pair it with jeans, shorts or a skirt. You can even wear it as a super cute swimsuit cover up! Featuring an oversized fit and loose airy fabric, you’ll never want to take it off. Simply crochet rectangles and seam them together to make this super easy sweater. Crochet the open front cardigan style, or make it a sweatshirt style with a simple seam up the front! Directions included for both style options.
Skill Level:
Easy +
Materials:
US Size J, 6.0 mm crochet hook
Pattern uses approximately 680 g (837, 1011, 1201, 1406, 1628, 1866, 2121) grams
Scissors
Tapestry Needle
Sizes:
S, M, L, XL, XXL, 3XL, 4XL, 5XL
Please follow the key throughout the pattern according to the size you are crocheting:
S (M, L, XL, XXL, 3XL, 4XL, 5XL)
Bust Circumference (approximate finished measurements):
*hoodie features positive ease for an oversized fit
S – 40”
M – 44”
L – 48”
XL – 52”
XXL – 56”
3XL – 60”
4XL – 64”
5XL – 68”
Length (approximate): Note that the fabric is stretchy and length will increase slightly when worn.
S – 21”
M – 23.5”
L – 26”
XL – 28.5”
XXL – 31”
3XL – 33.5”
4XL – 36”
5XL – 38.5”
Abbreviations & Skills:
ch – chain
sp – space
sc – single crochet
dc – double crochet
Gauge:
Approximately 12 dc stitches and 7 rows in pattern stitch (granny stitch) in 4” x 4”
Notes:
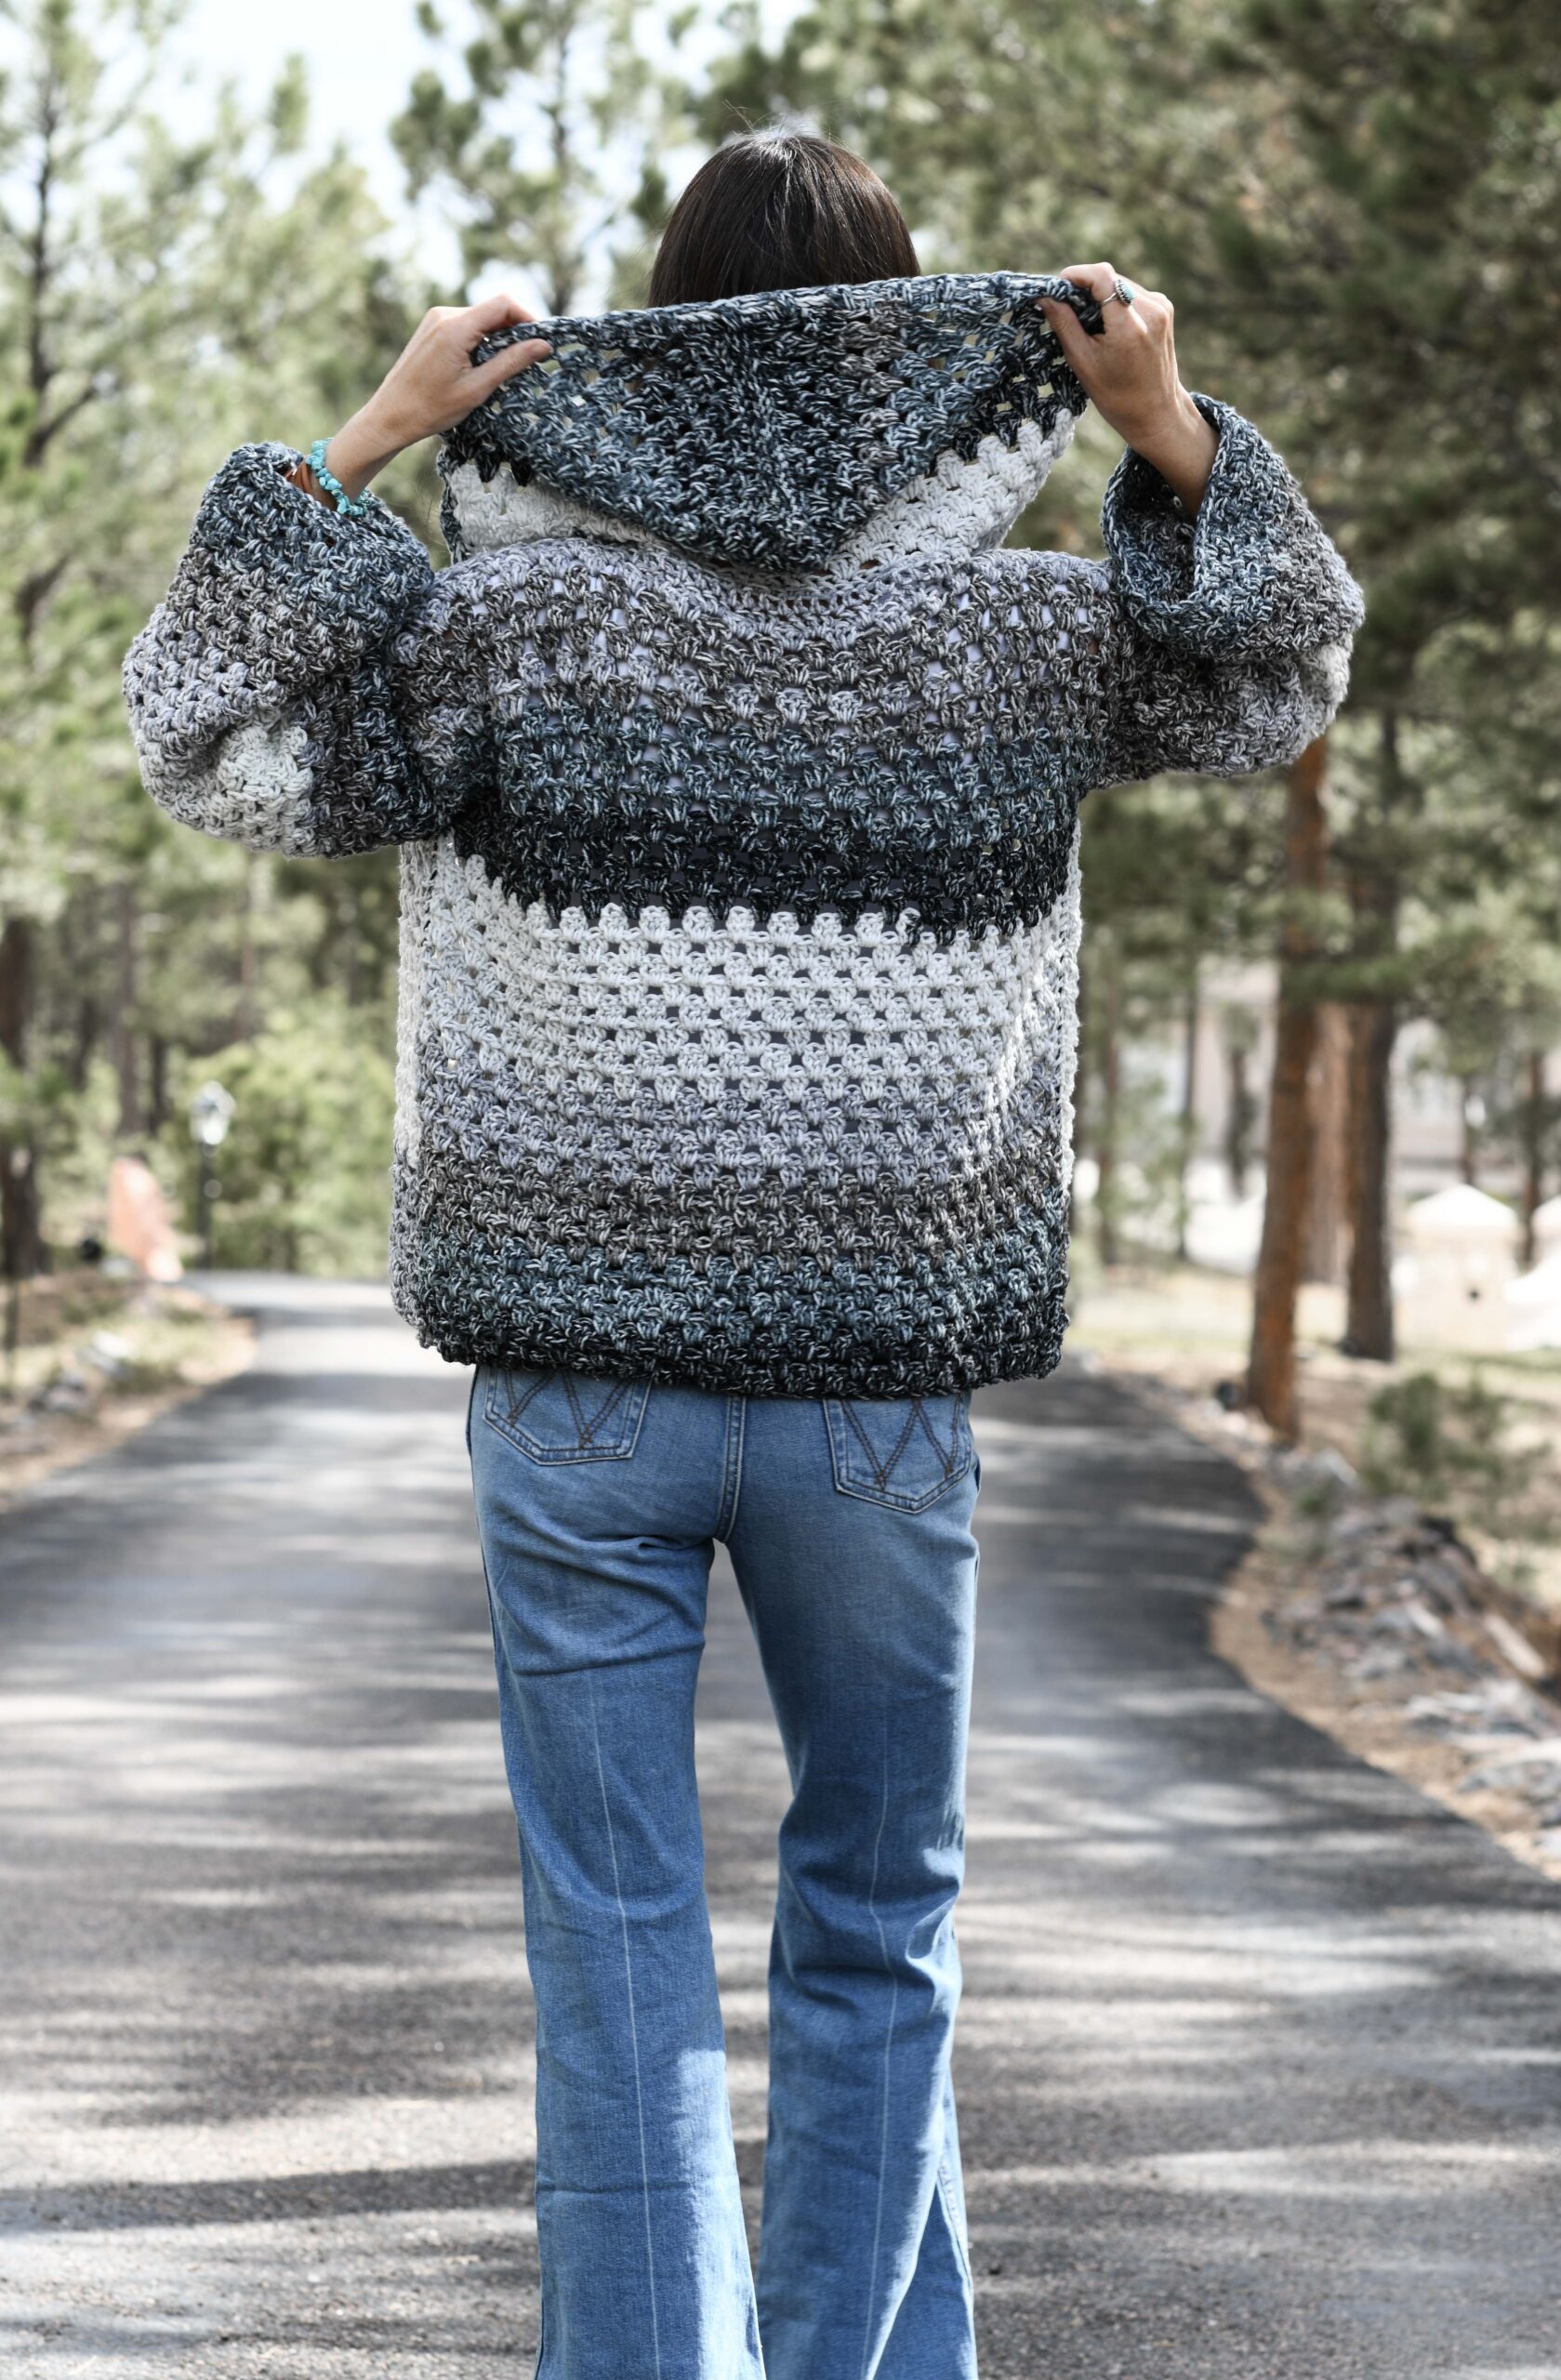
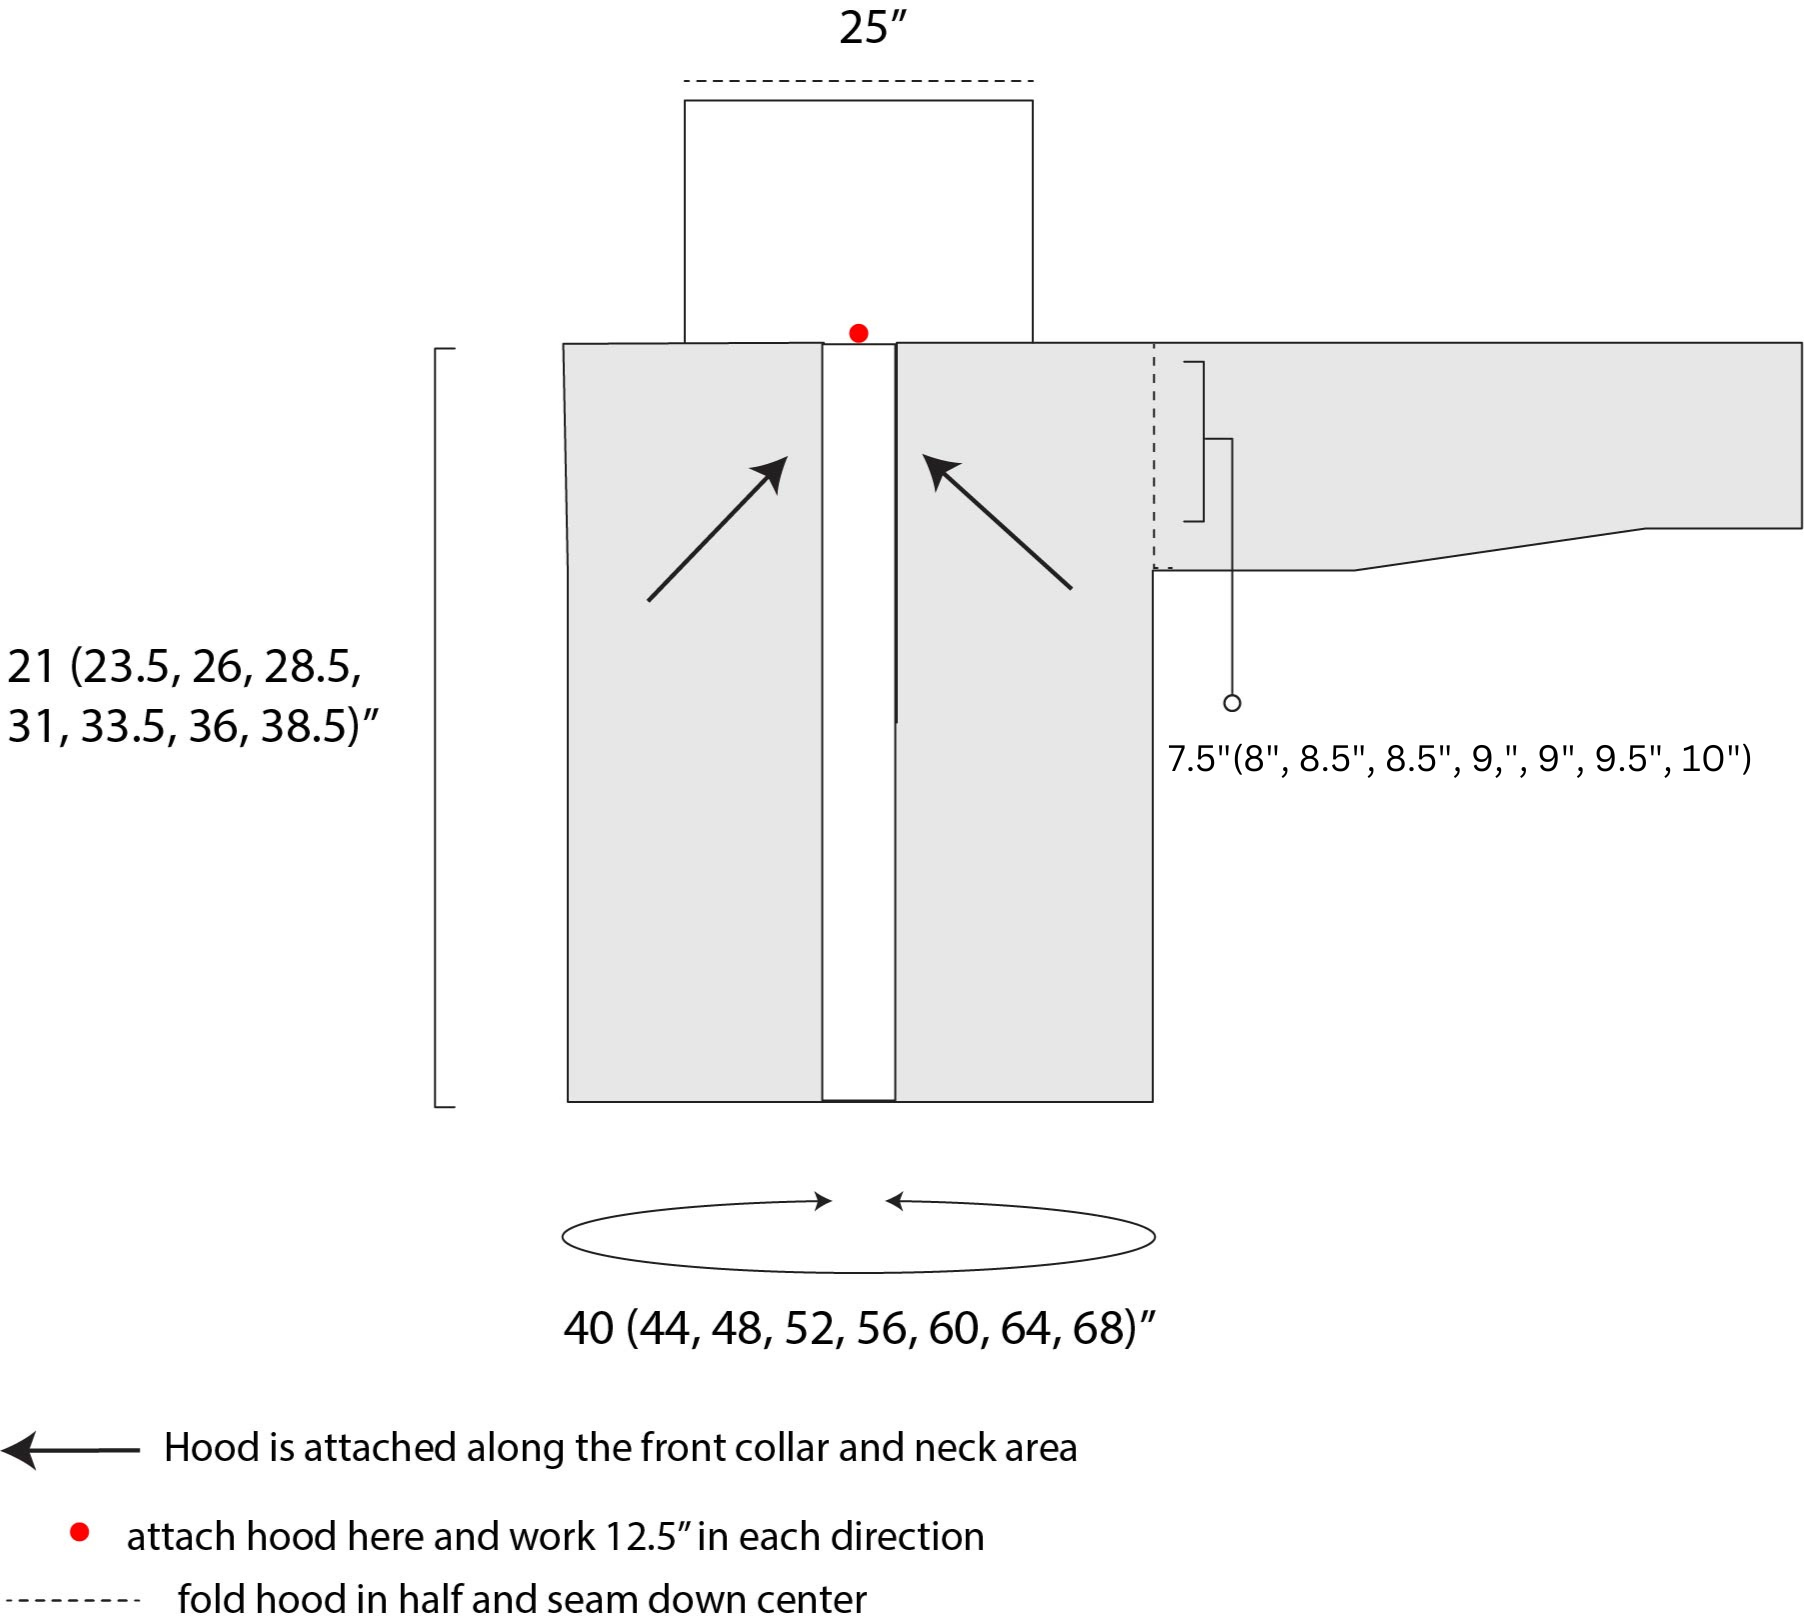
This hoodie is made by crocheting three rectangular panels and seaming them at the sides and shoulders to make the body. Two additional rectangular panels are crocheted for the sleeves which are folded and seamed to finish. The sleeves are sewn onto the hoodie during assembly.
The collar is added after the panels have been seamed and assembled. The hood is crocheted directly onto the sweater (see directions and schematic).
You may choose to make the hoodie longer or shorter by simply crocheting for more or fewer rows on the front and back panels. Keep yarn needs in mind when adjusting the size!
Note that the fabric is very comfy and stretchy, so it will stretch when worn. Crochet the pattern as written for both the cardigan style option and sweatshirt style option. The sweatshirt option simply includes seaming the front panels together at the end.
You may choose to keep colors consistent, or simply use the skeins of yarn as they work up, which may create a variety of color patterns on your hoodie. If you would like to keep a consistent, matching look, you might need to use a particular color when you come to the end of a skein. If you need to use a certain color, you may wind the yarn in the skein in order to reach the desired color and save the remainder for later use.
Helpful Tip: In row two you will begin with a group of 2dc then make groups of 3 across to the last stitch where you will end with another 2dc group. For the third row, you will begin with just 1dc, then work groups of 3 dc across, ending with 1dc in the last stitch. If you start with 1dc, you end with 1dc. If you start with 2dc, you end with 2dc.
Back Panel
Ch 56 (62, 68, 74, 80, 86, 92, 98)
Row 1 Sc in 2nd ch from hook and in each ch st across. 55 (61, 67, 73, 79, 85, 91, 97)
Row 2 Ch 3, turn, dc in same st as ch3, *sk 2 stitches, 3dc in next stitch; repeat from * across
row until final stitch, make 2dc in last stitch.
Row 3 Ch 3 (counts as 1dc), turn, make 3dc in sp between dc groups across the row to last
stitch, make one dc in top of last st of row.
(Note: “sp” refers to the space between the group of 3dc in previous row. Do not work into the stitch, but rather into the space between groups of dc stitches)
Row 4 Ch 3 (counts as 1dc), turn, dc in same st as ch 3, 3dc in each space across row until final stitch, make 2dc in last st of row.
Repeat rows 3 & 4 for remainder of the pattern until it measures approximately 21”(23.5”, 26”,
28.5”, 31”, 33.5”, 36”, 38.5”) long.
Front Panel Pattern (make 2)
Ch 26 (29, 32, 35, 38, 41, 44, 47)
Row 1 Sc in 2nd ch from hook and in each ch st across. 25 (28, 31, 34, 37, 40, 43, 46)
Row 2 Ch 3, turn, dc in same st as ch3, *sk 2 stitches, 3dc in next stitch; repeat from * across
row until final stitch, make 2dc in last stitch.
Row 3 Ch 3 (counts as 1dc), turn, make 3dc in sp between dc groups across the row to last stitch, make one dc in top of last st of row.
Row 4 Ch 3 (counts as 1dc), turn, dc in same st as ch 3, 3dc in each space across row until final stitch, make 2dc in last st of row.
Repeat rows 3 & 4 for remainder of the pattern until it matches the length of the back panel.
Sleeve Pattern (make 2)
Ch 44 (47, 50, 50, 53, 53, 56, 59)
Row 1 Sc in 2nd ch from hook and in each ch st across 43 (46, 49, 49, 52, 52, 55, 58)
Row 2 Ch 3, turn, dc in same st as ch3, *sk 2 stitches, 3 dc in next stitch; repeat from * across row until final stitch, make 2dc in last stitch.
Row 3 Ch 3 (counts as 1dc), turn, make 3dc in first space of row below and in each space across the row until last stitch; make one dc in top of last st of row.
Row 4 Ch 3 (counts as 1dc), turn, dc in same st as ch 3, 3dc in each space across row until final stitch, make 2dc in last st of row.
Repeat rows 3 & 4 for remainder of the pattern until piece measures approximately 15” (15.5”,
16”, 16.5”, 16.5”, 17”, 17”, 17.5”) inches long. For best results, do not completely tie off sleeves until your hoodie is assembled and you can try it on. At that point, you can determine the length of sleeve that you’d like and crochet for more rows, or take out rows to get the length you like.
Assembly & Seaming
Note: You may use simple whip stitch for all seaming and sewing of this cardigan. Place two front panels directly on top of back panel, leaving space in the middle and outer edges aligned.
Seam panels together at shoulders. Seam front panels to back panel at the sides, leaving openings for the arms and sleeves approximately 7.5” (8”, 8.5”, 8.5”, 9”, 9”, 9.5”, 10”). Do not tie off the arm/sleeve opening until seaming the sleeve onto the cardigan in case you need to make slight adjustments to the opening to fit your sleeves correctly. Fold sleeves lengthwise and seam. Lastly, sew sleeves onto the cardigan.
Collar
Attach yarn to bottom inner corner on the front of the sweater cardigan.
Row 1 Ch 3, work dc sts evenly across to opposite end of collar, working along the
neckline.
Row 2 Ch 2, turn, dc in each st across.
Tie off and weave in ends.
Hood
You will crochet the hood directly onto the cardigan sweater working along the collar and neckline. Essentially, you are picking up your yarn and crocheting a rectangle along the cardigan, which will then be seamed at the top to create the hood. Pick up yarn evenly along upper portion of collar and along front inner panels measuring 25” with the center at the neck of the cardigan. See schematic diagram. It seems strange to work along the front panels, but it’s necessary and it works. 🙂 Crochet in rows using the same granny stitch pattern until piece is approximately 12” inches tall. Tie off. Fold hood and seam along top with a simple whip stitch.
Next, pick up yarn in lower front corner of cardigan and work double crochet stitches along
entire front edge, working up along entire edge of hoodie and back down to opposite front
corner edge of cardigan to make a nice, clean finish.
Hood Drawstring
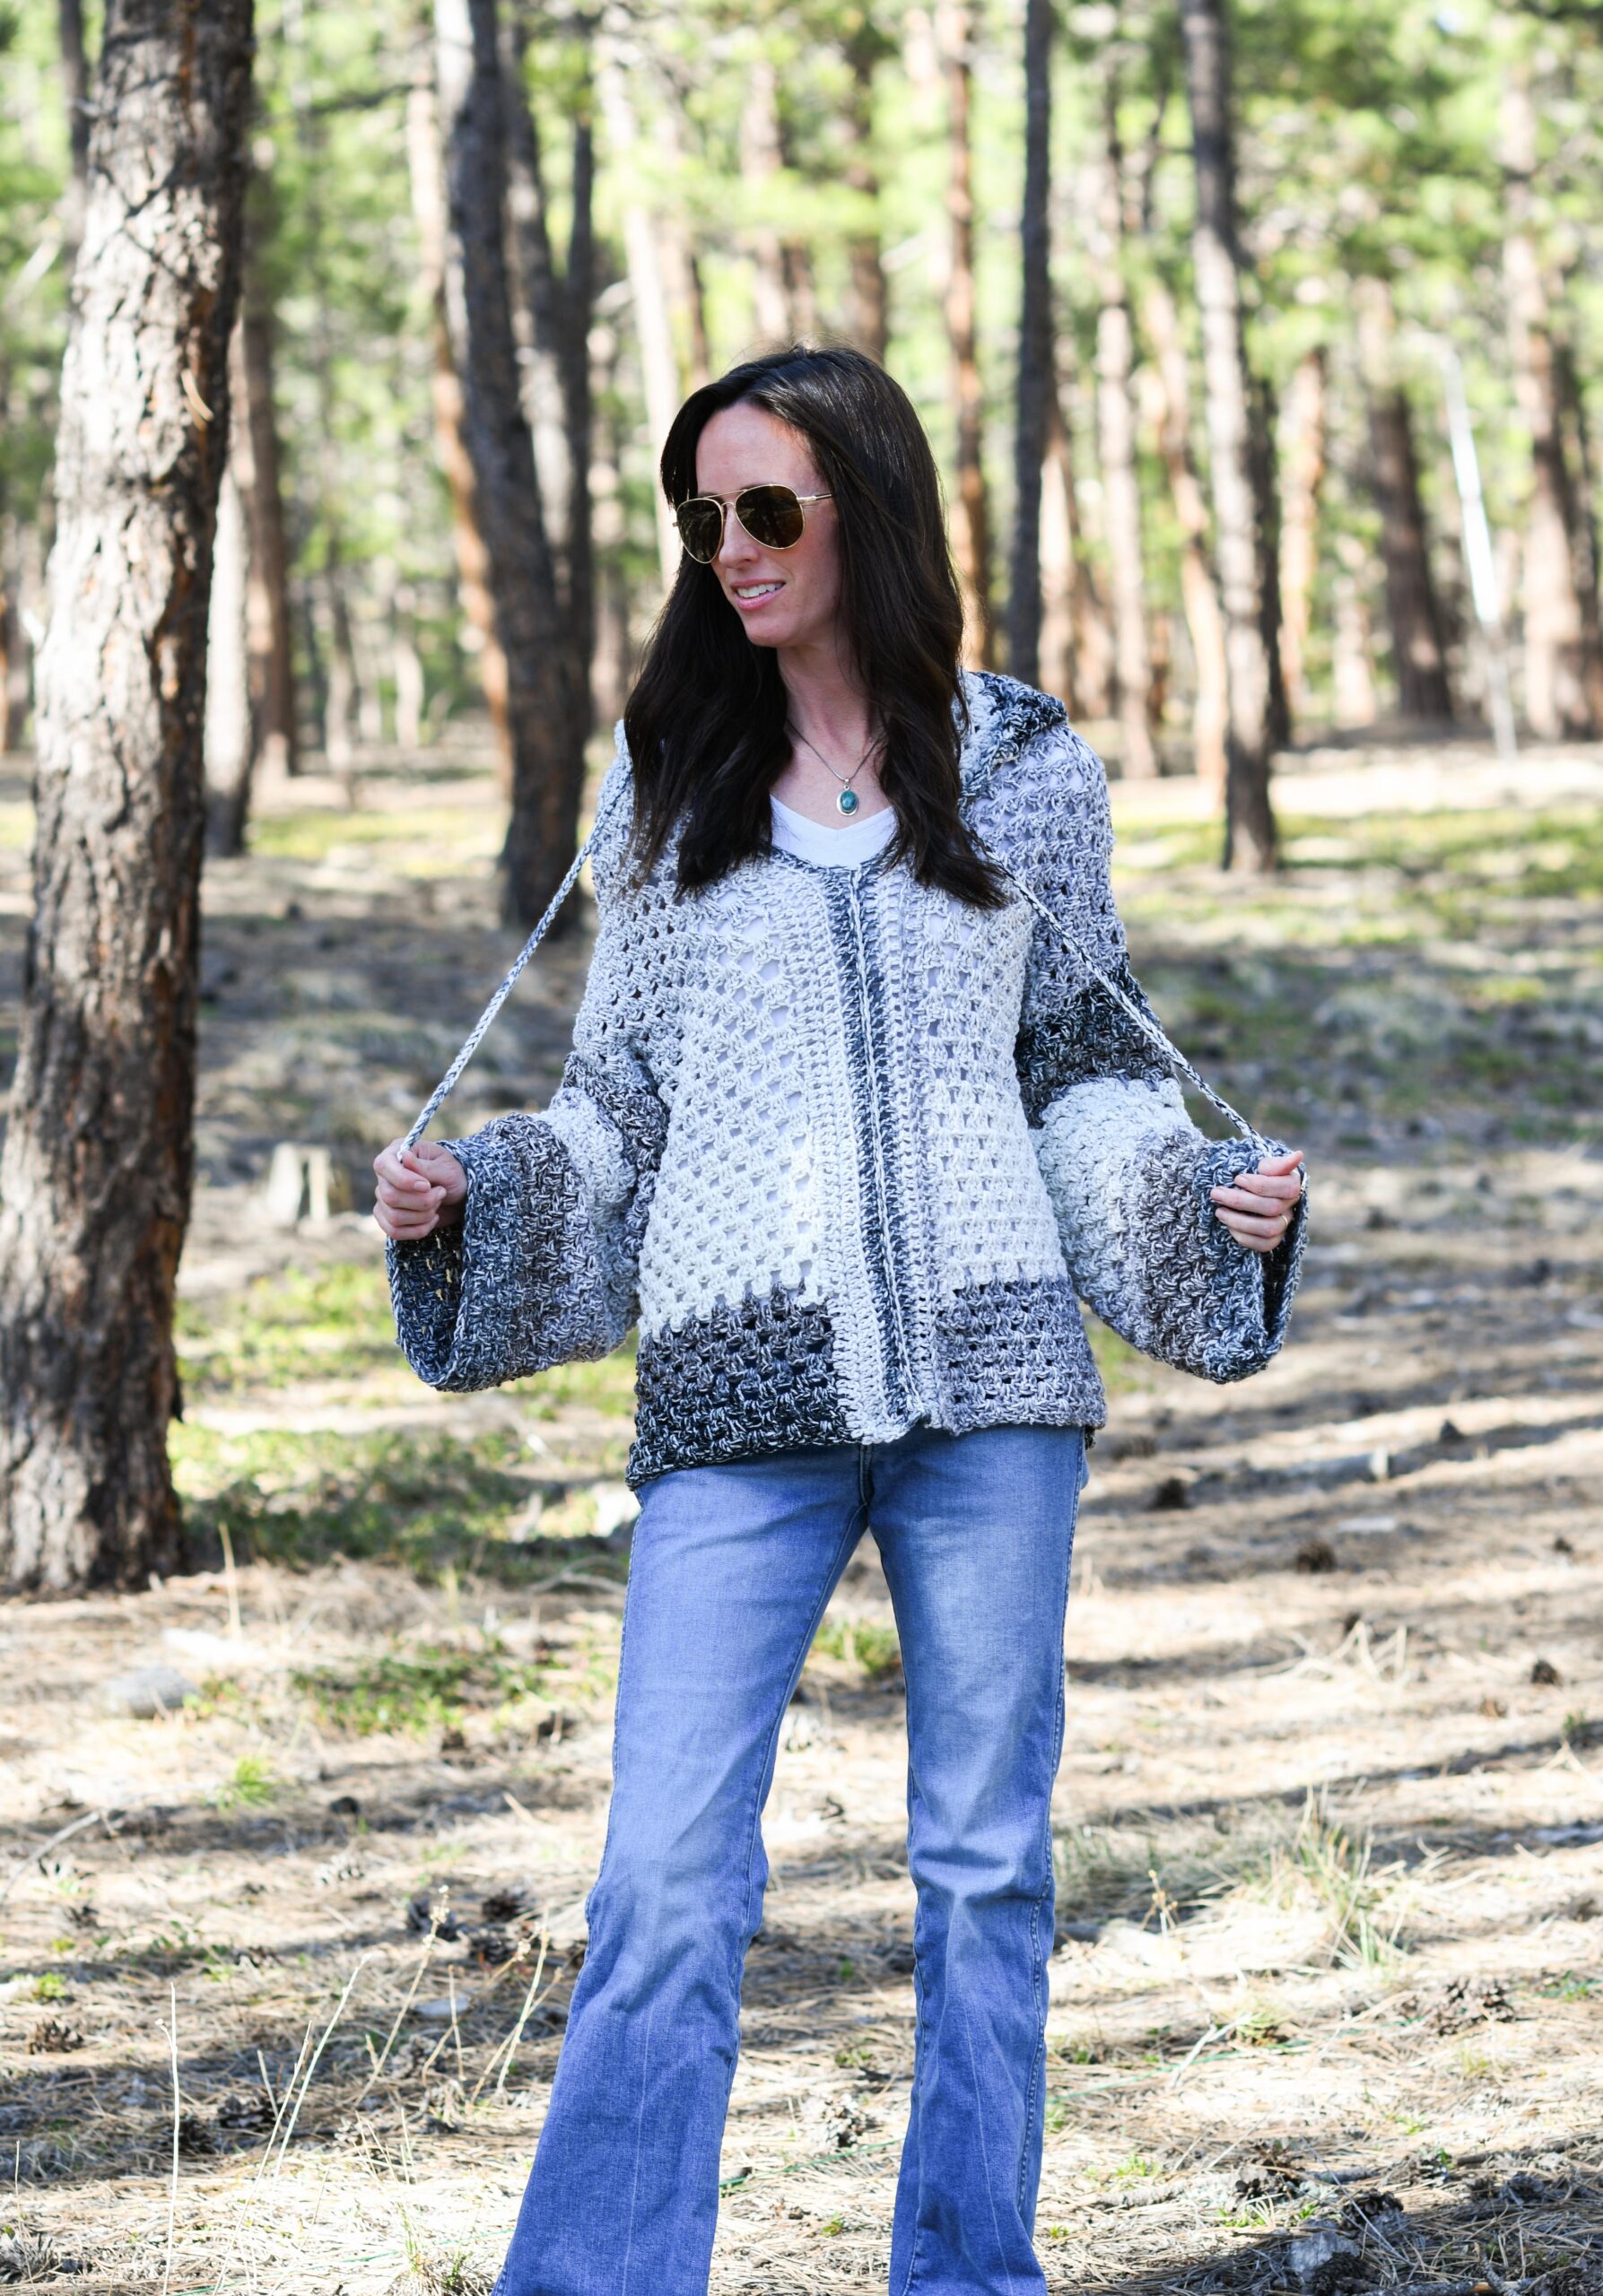
Holding two strands of yarn together, use your hook to make a chain approximately 52” long. Tie off and weave in ends to fabric, or leave them out and trim them neatly. Simply ensure there is a secure knot at the end of the drawstring. Next, weave the drawstring in and out of the fabric along the front edge of the hood, working them through every two double crochet stitches. Pull both sides until the ends of the drawstrings line up evenly at the front of the hoodie.
Sweatshirt Style Closed Front Hoodie
To make the sweatshirt style, you will want to seam the front closed. Pick up yarn at the bottom lower corner of on of the front panels. Slip stitch seam the two front panels together, working through one leg of each stitch along the entire front. Tie off approximately 3” – 4” from the top of the shoulders. You could also use a whip stitch seam or any seam you like. Weave in ends.
Block to shape and size if desired.
FAQ Can I Add Pockets?
If you have leftover yarn, you could easily crochet pockets by making two squares following the granny stitch pattern. Simply seam them to the front panels of your cardigan hoodie leaving the tops open.
I hope you enjoyed this pattern my friends. I’ve been on a blanket kick, so it’s nice to see something a little different hit the blog.
Enjoy your new, beautiful hoodie!
XO, Jessica

Jessica,
I’d dearly love a raglan sleeved bulky sweater pattern….is that anything likely?
Thanks for so many good patterns. I don’t have the time to try them all, but I know they are available for winter when the time allows.
Thanks for info on the raglan possibility.
How did you make the sleeve match on each sleeve?