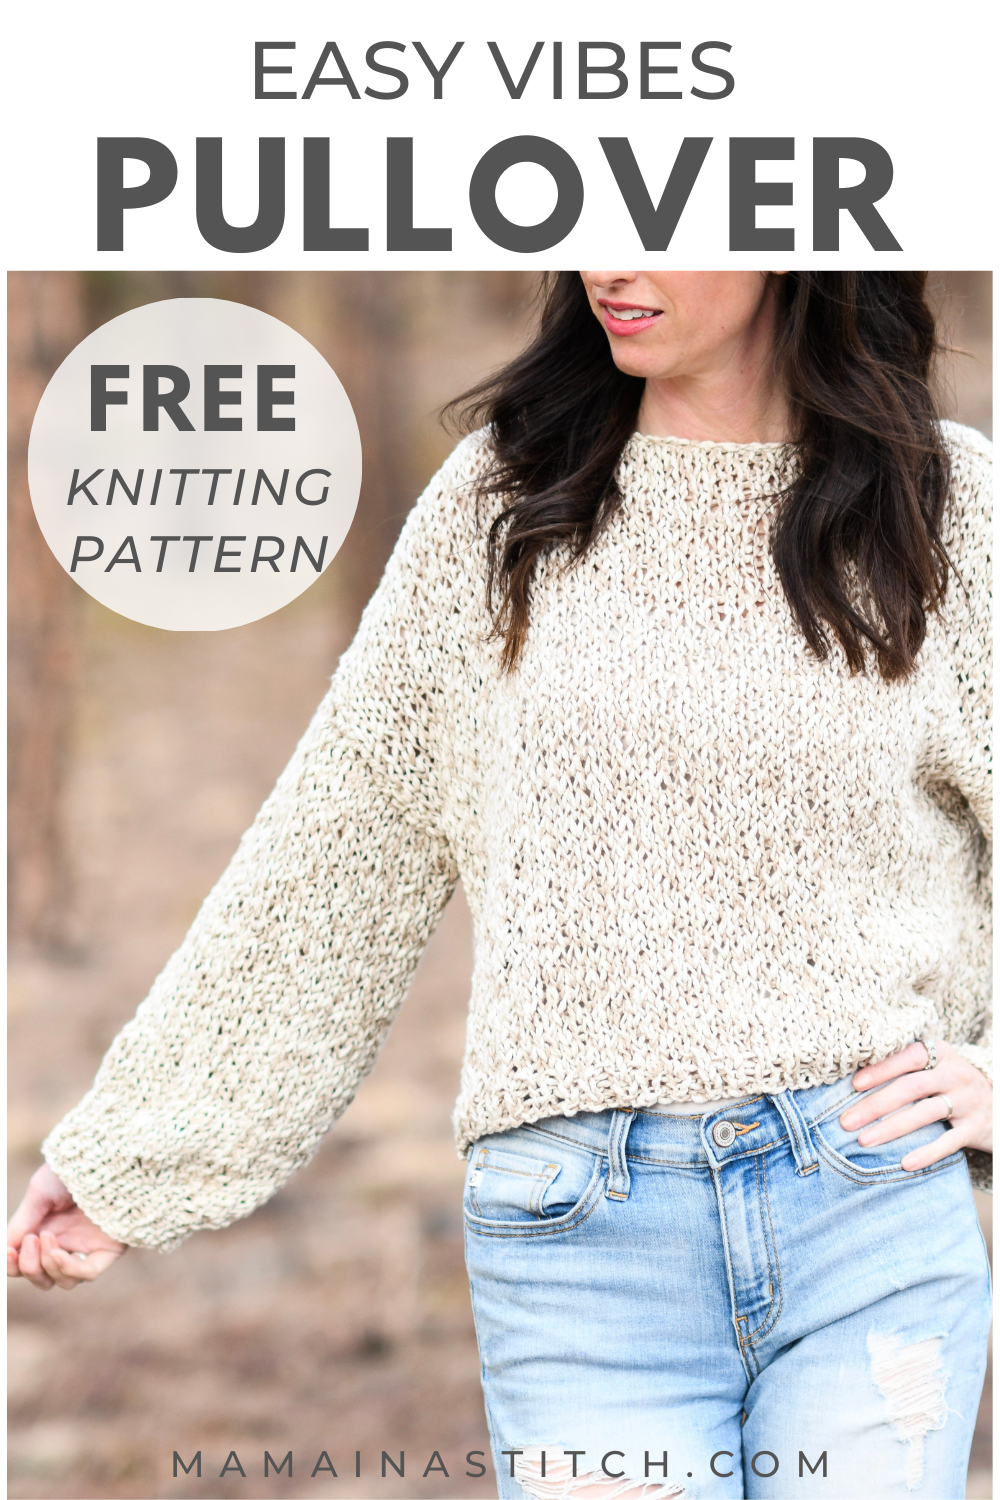
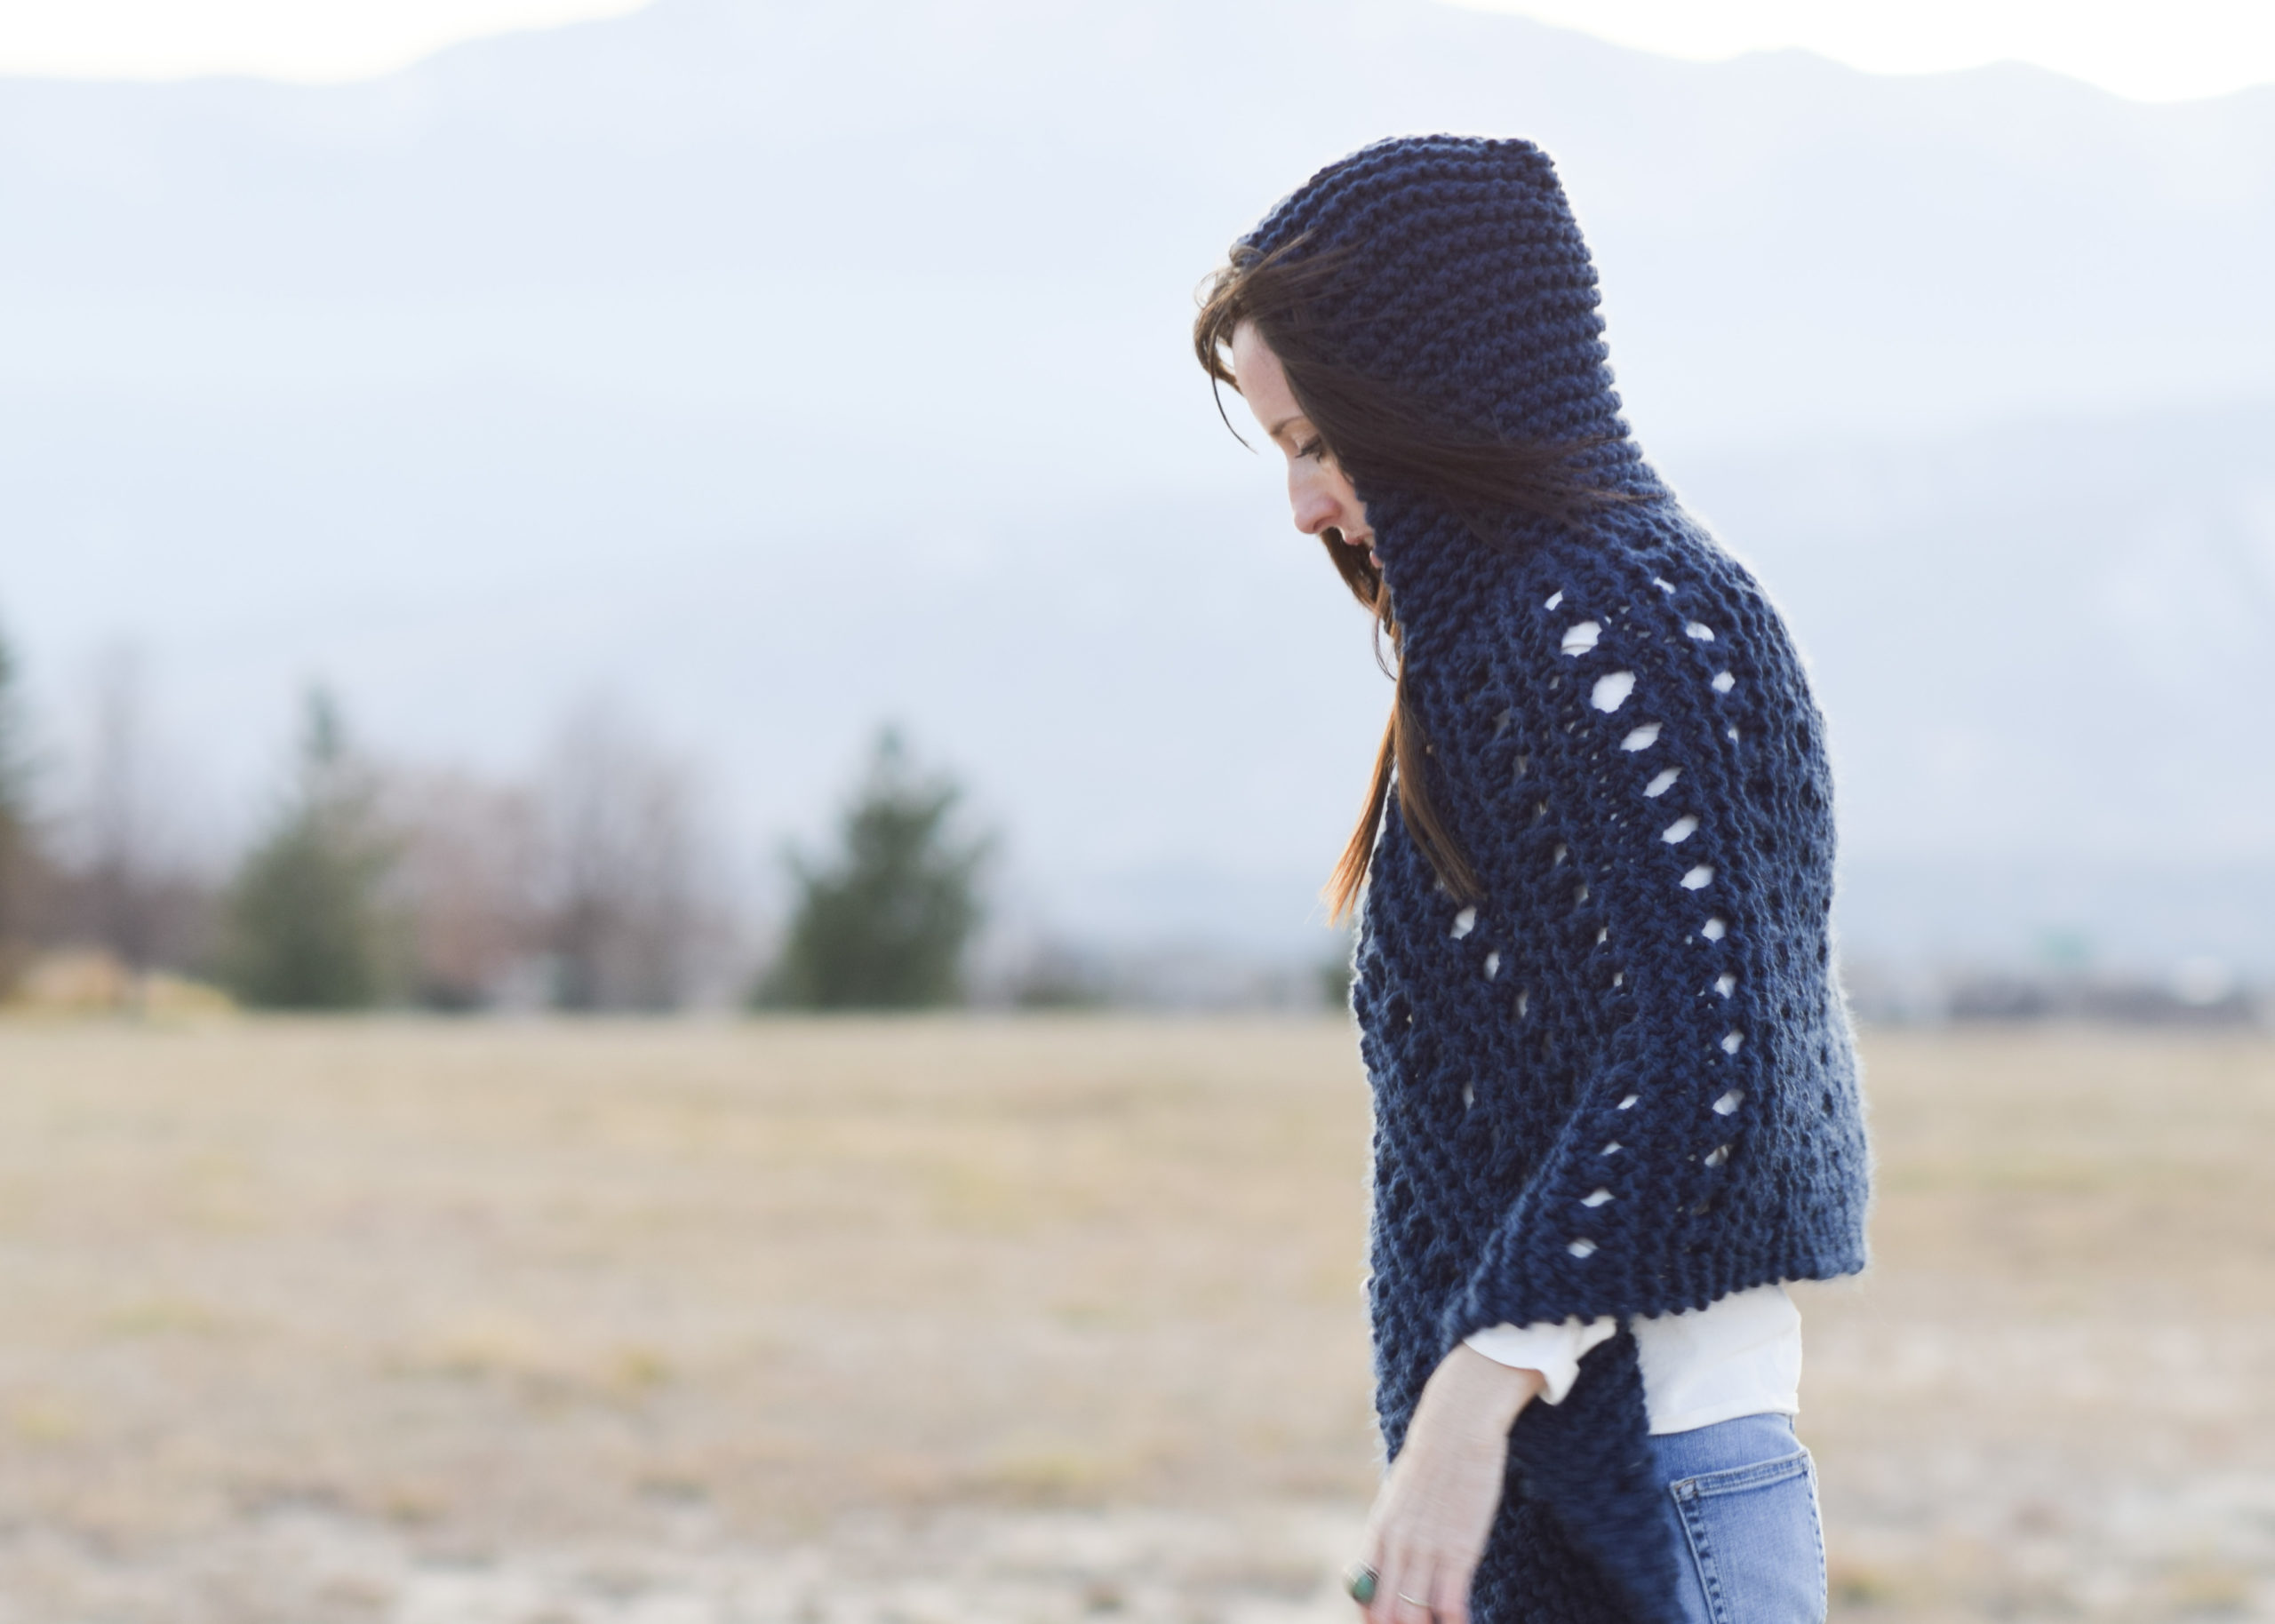
Easy Pullover Sweater Knitting Pattern
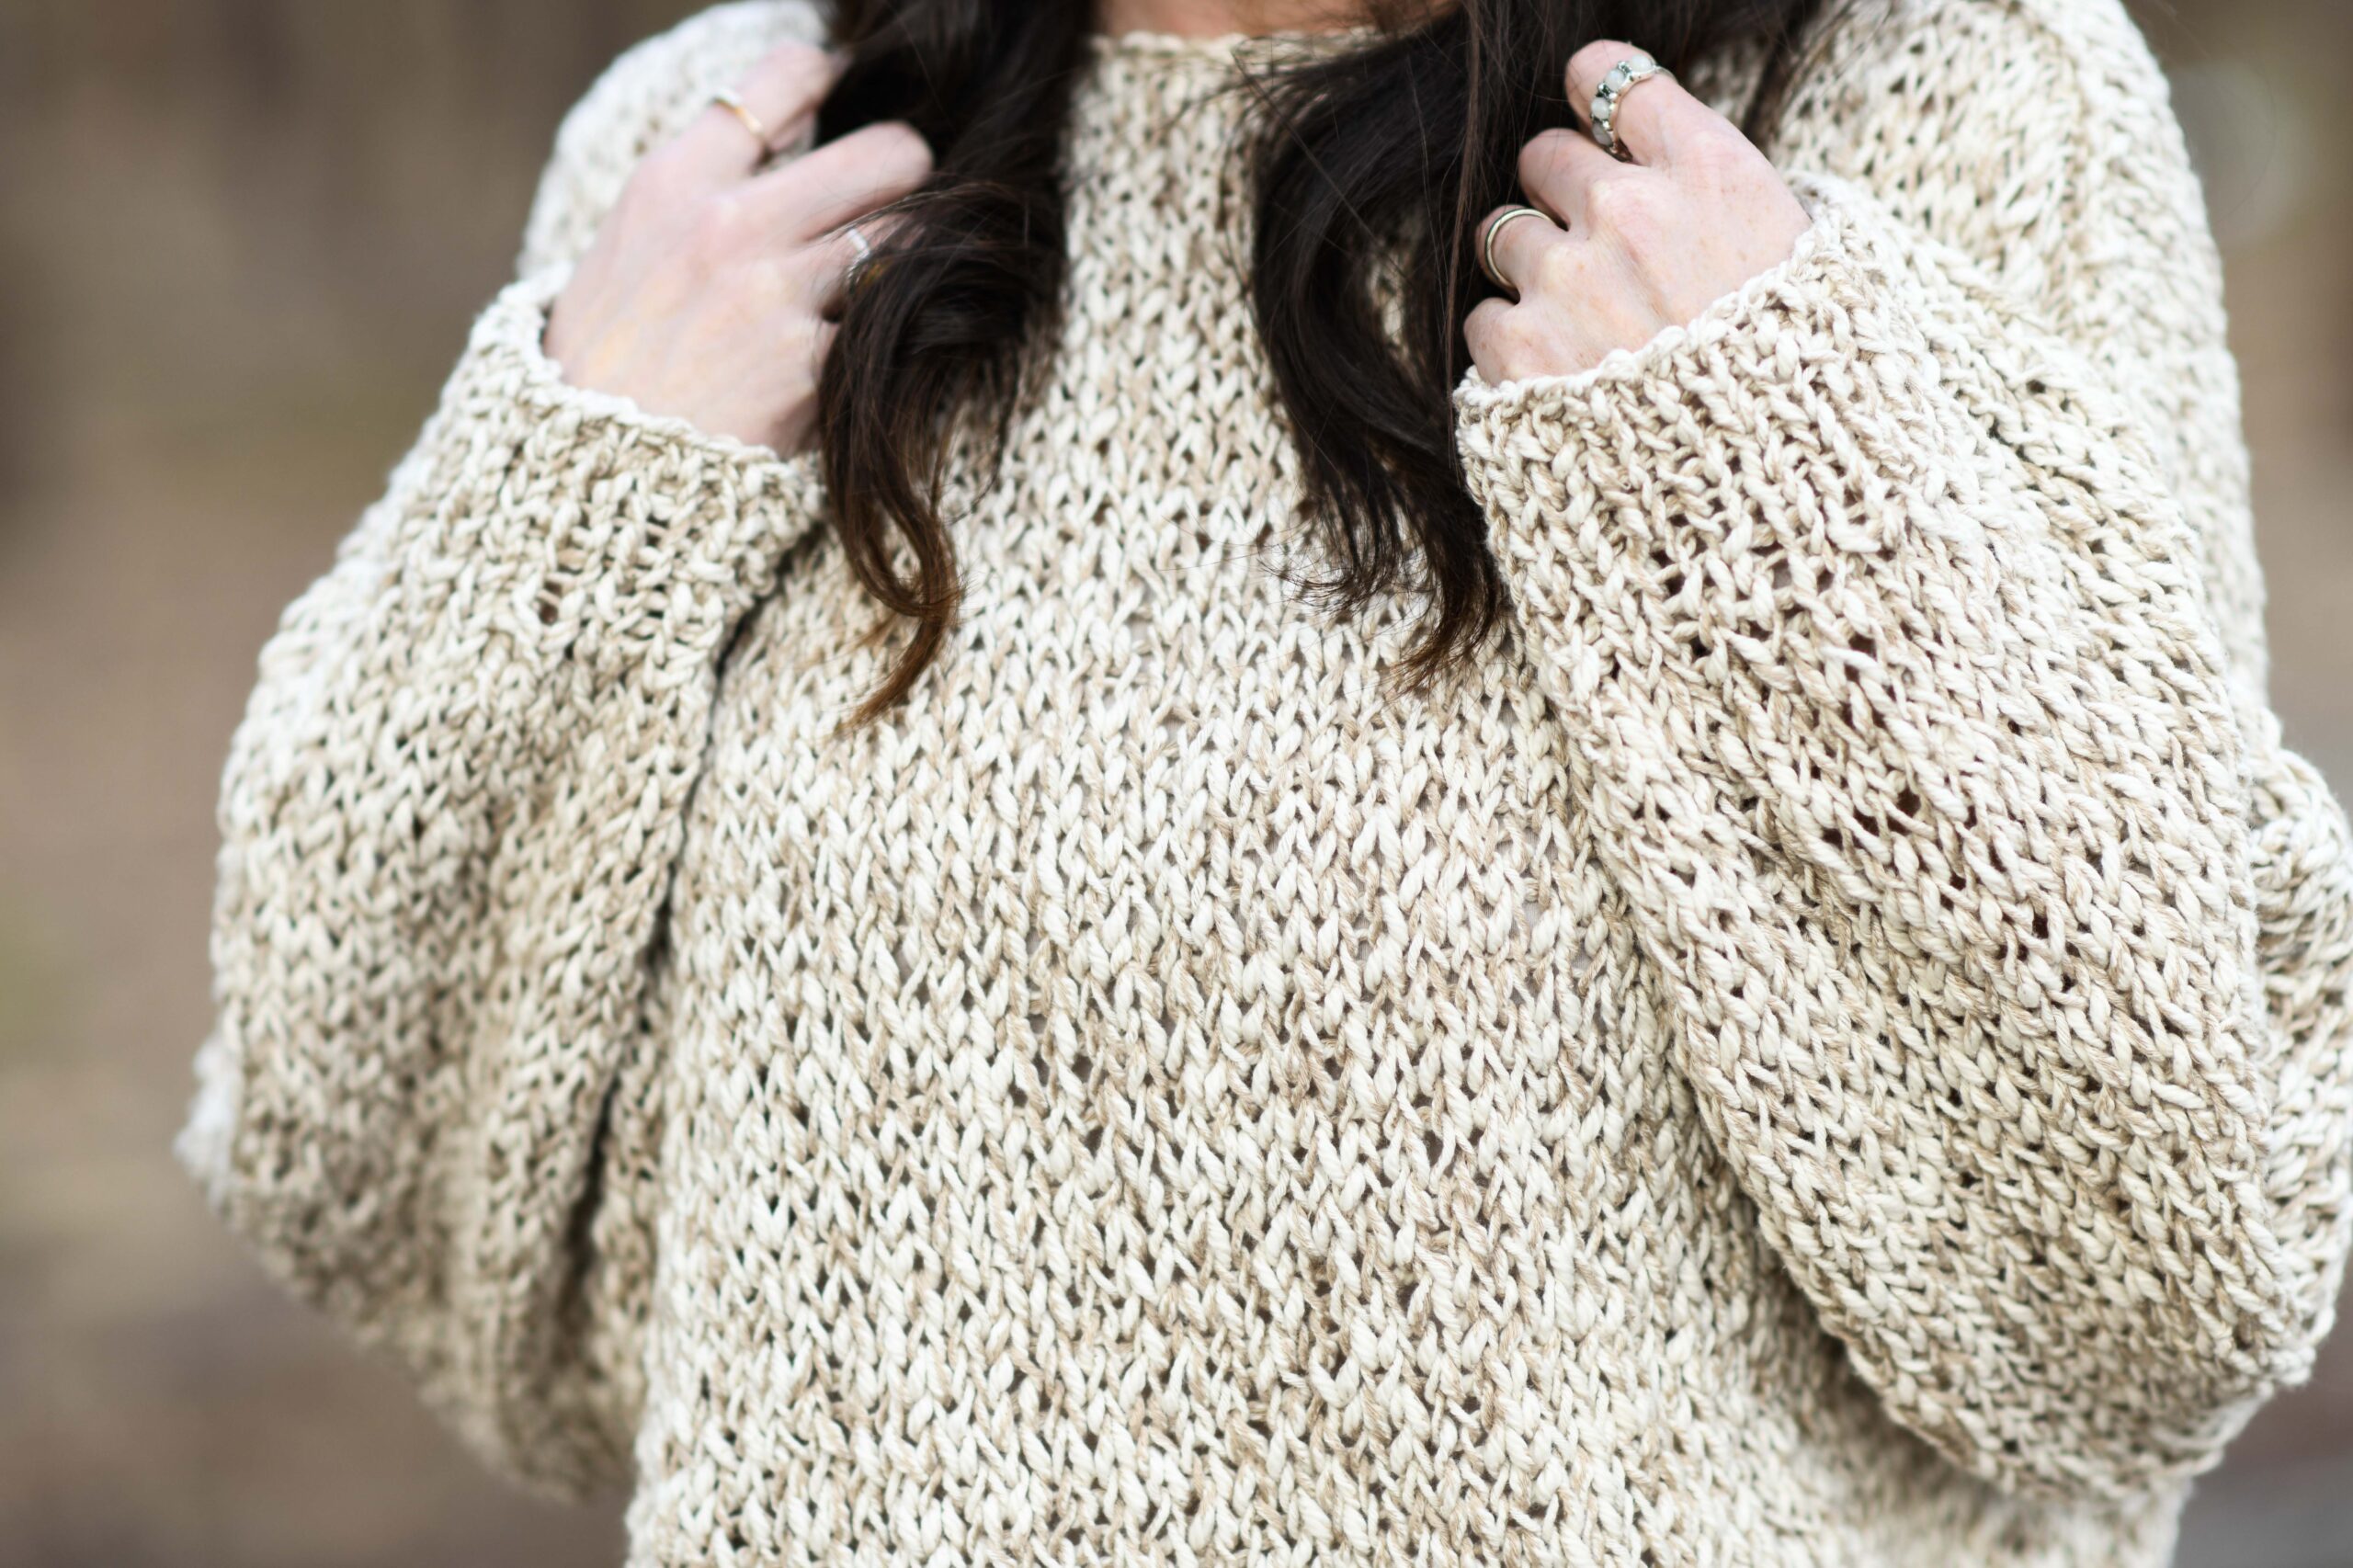
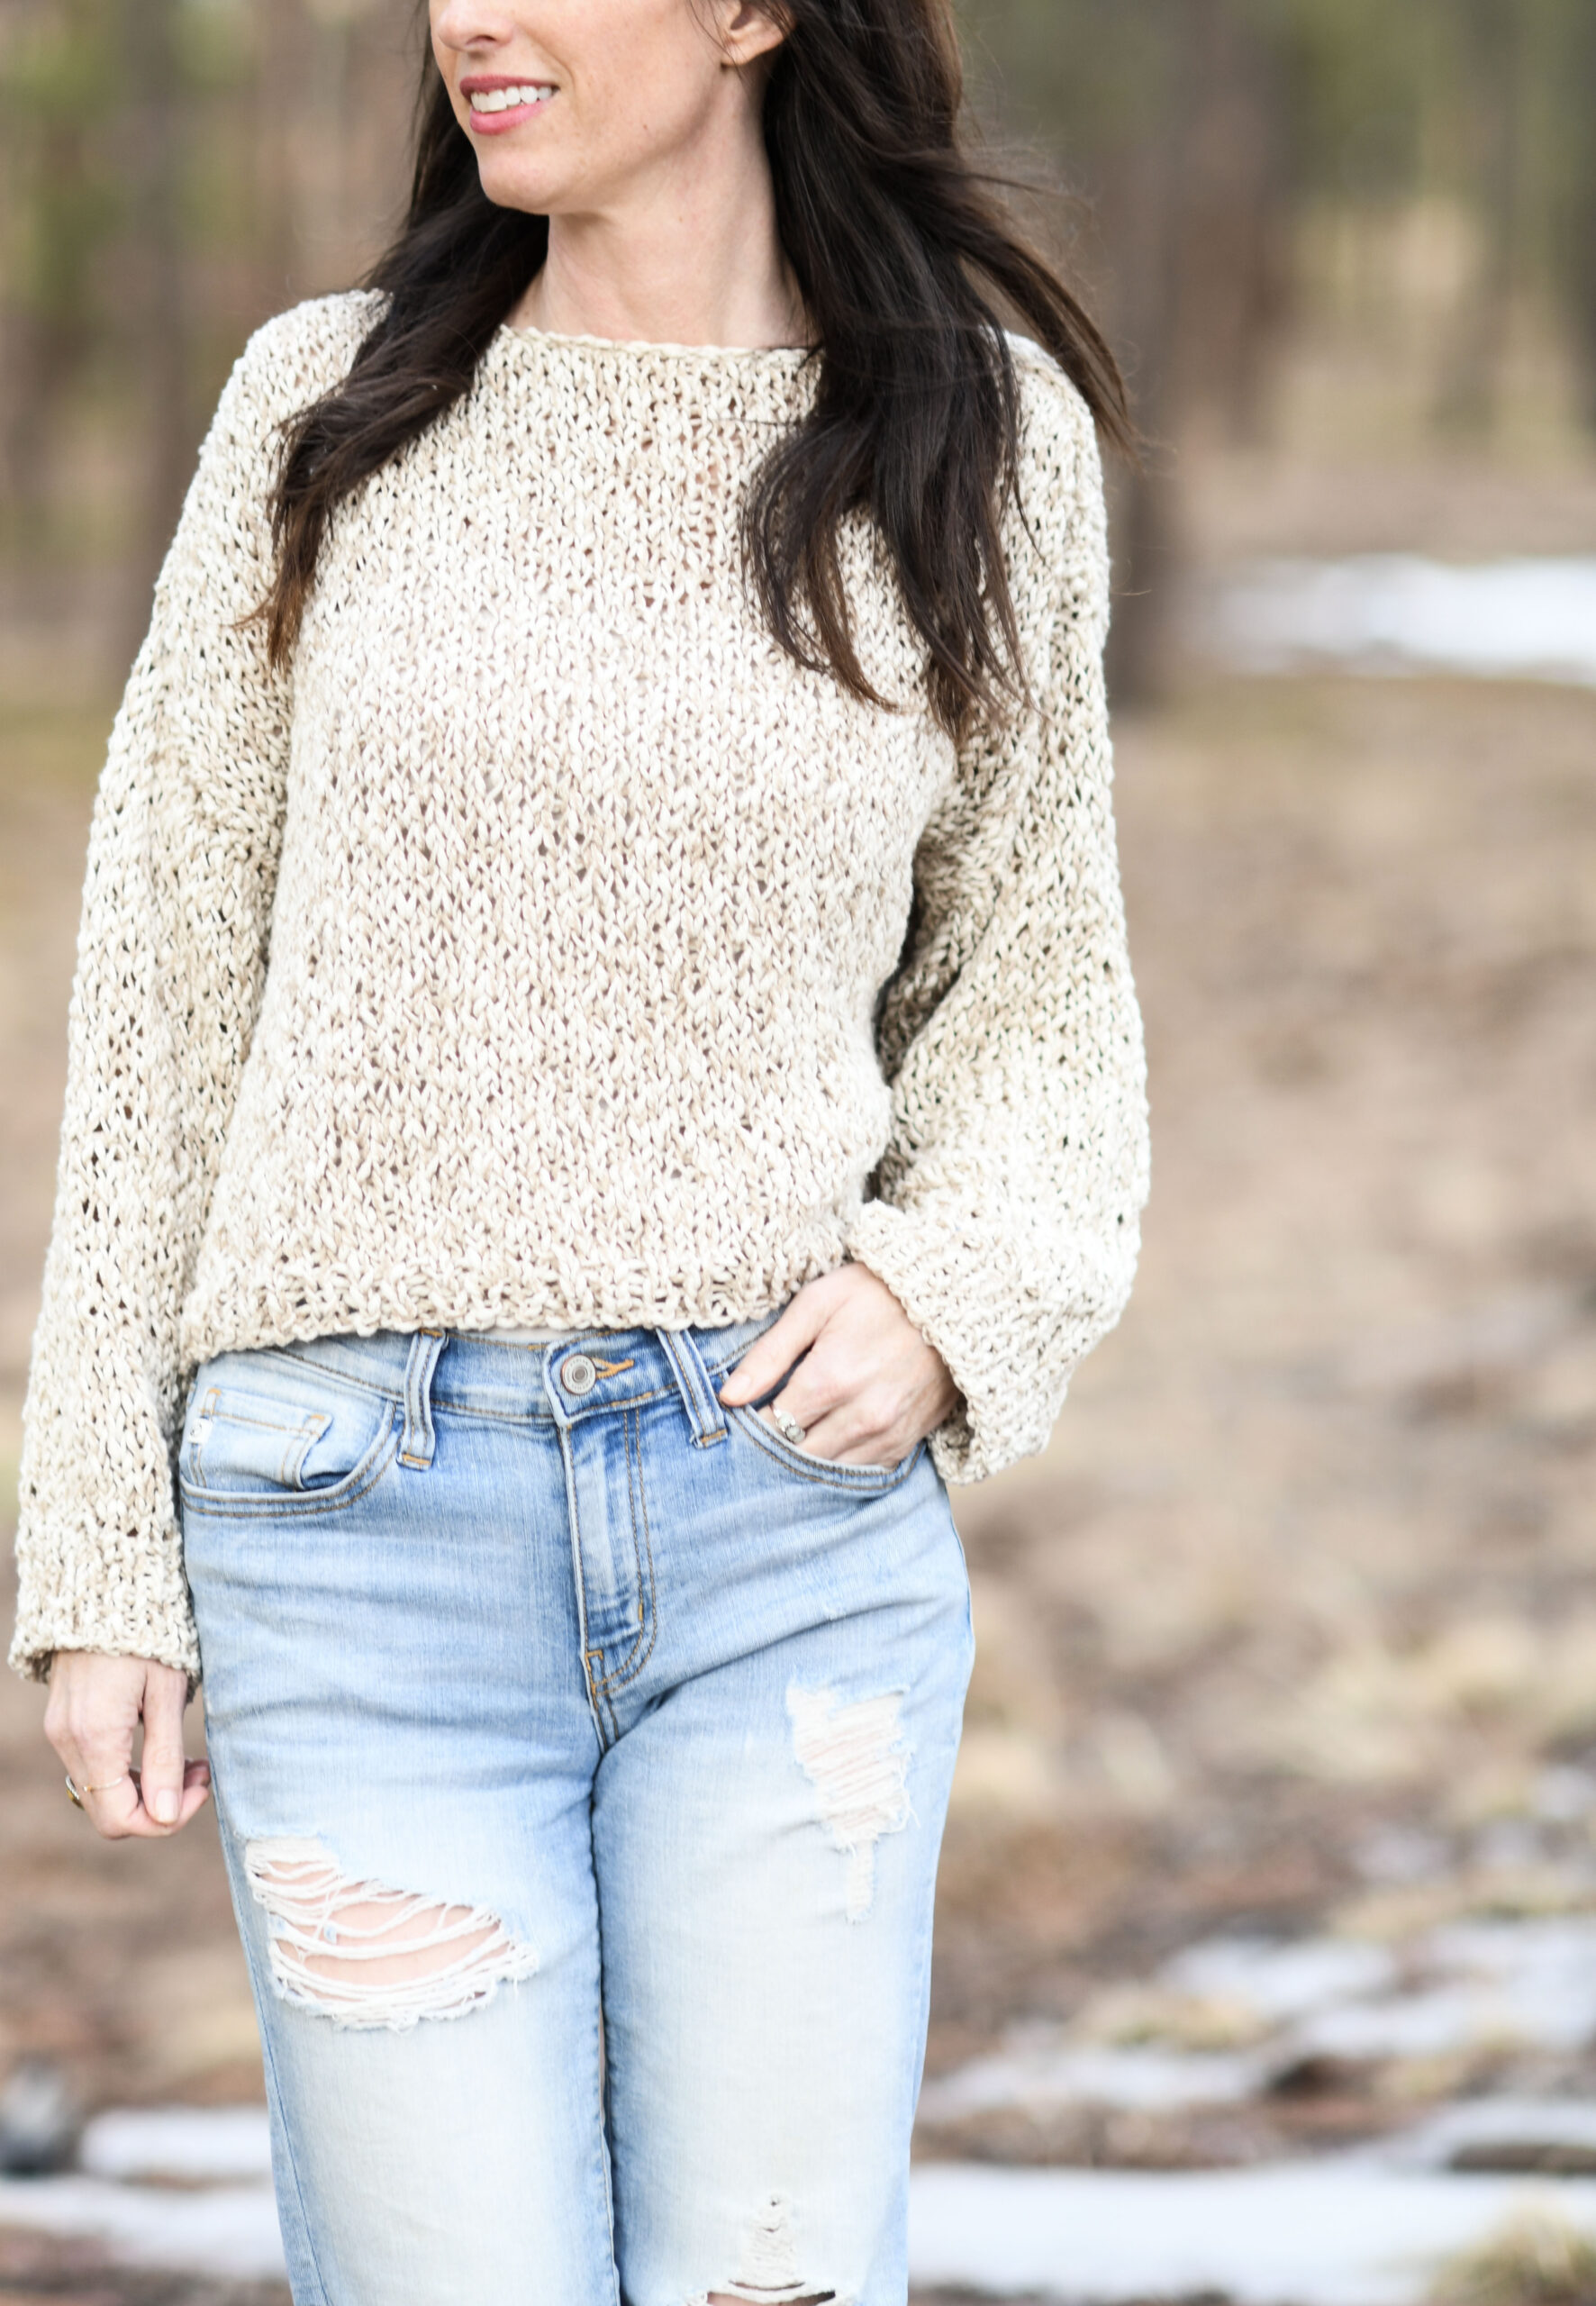
This is the easiest knit pullover ever, yet it’s right on trend and perfect to wear year round! It’s made with a lovely cotton blend yarn, but you can use any comparable weight yarn that you like. 🙂 The basic shapes make it super simple, and I love the oversized fit and the understated, trendy bubble sleeves. It’s a true, beginner friendly pattern!
Check out the free pattern below, or you may choose to purchase the ad-free printable version from Etsy HERE 🙂
This pullover is definitely beginner friendly (the blog is no stranger to beginner friendly sweaters Boxy Knit T Shirt Pattern HERE or Moonbow Slouchy Knit Cardigan HERE), but the style is for anyone.
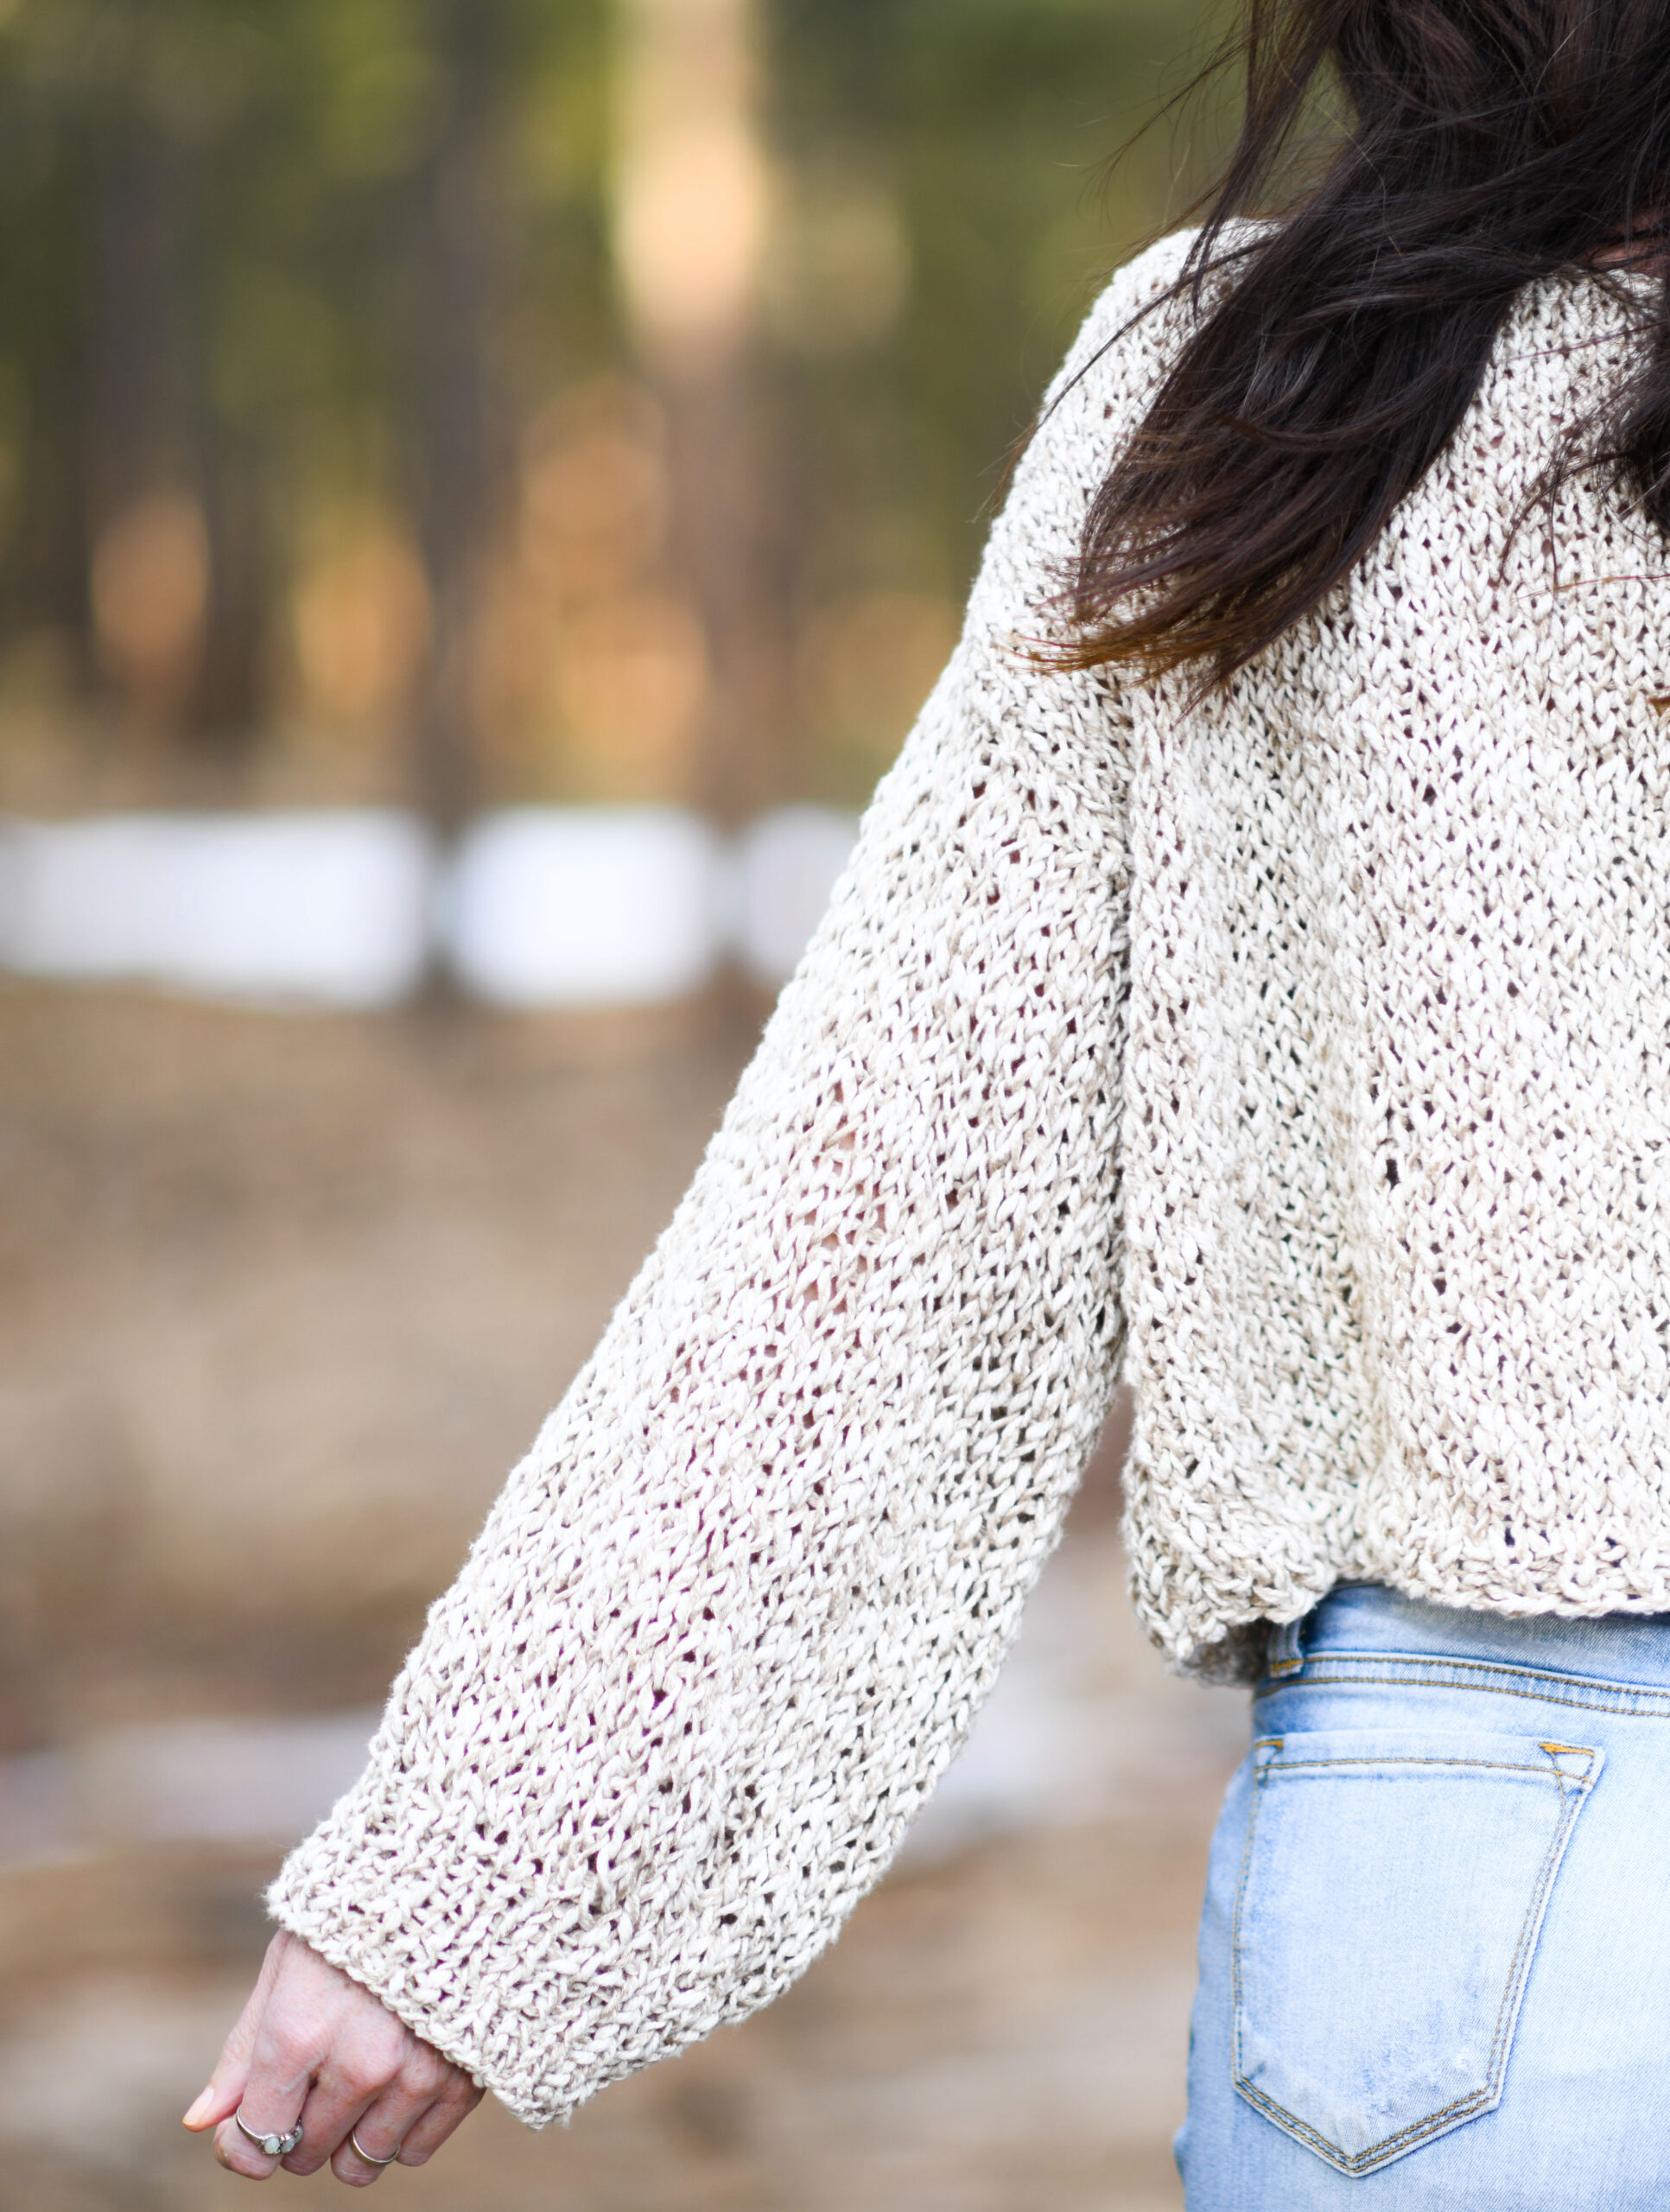
It’s got an oversized fit and wide sleeves, as well as a cute boatneck. You can totally make the neck opening as wide or narrow as you like. For a flirtier, relaxed look, keep it wide.
It’s also super easy to knit this sweater longer or shorter. If you’re young, or you’ve got a teen in your life, the cropped look may be perfect. Or if you’re older and you like crops, go you! In this case, you can simply knit fewer rows to make it a true crop. If you like more coverage over your bottom (lol), just knit for more rows on the front and back panels. And that drape. It’s soooo comfy!
How Do I Knit This Pullover Sweater?
You’ll simply knit a front panel, back panel, and two sleeves. They are all knit flat and the sleeves are so easy to create. There is no difficult shaping because you will just change to smaller needles at the cuff, and do a one time decrease to get the cool shaping. I’ve wanted to create a bubble sleeve knit top for a while now, and I’m so pleased with how it turned out.
What Yarn Do I Use To Make This Sweater?
Who else loves discovering a new yarn they love? This is the first time I’ve used the Twisted Cotton Blend from Lion Brand. It is a soft, thick and thin yarn, meaning some of the yarn is like a light weight and some is like a bulky. However, they’ve discontinued this one unfortunately, but ANY worsted weight yarn will work!
I do love a good cotton blend, but you could also use acrylic or wool yarns. It’s truly up to you. Just pick something that you will be comfortable in!
What Stitches Do I Need To Knit The Pullover?
Here’s the cool part – you only need to know the beginner knit stitch and purl stitch! Once you have those down, you can totally make the sweater. And because it’s so basic, it can be adapted in so many ways!
Scroll down for the full pattern, and if you need to first learn to knit and purl, you can check out these video tutorials below as well!
OKAY! Now you are ready to make your first sweater!

Ready for this easiest ever knit sweater? Let’s get to the pattern!
Remember that you can see the full, free pattern below, or you might want to purchase the ad-free, printable version from my Etsy shop HERE. 🙂
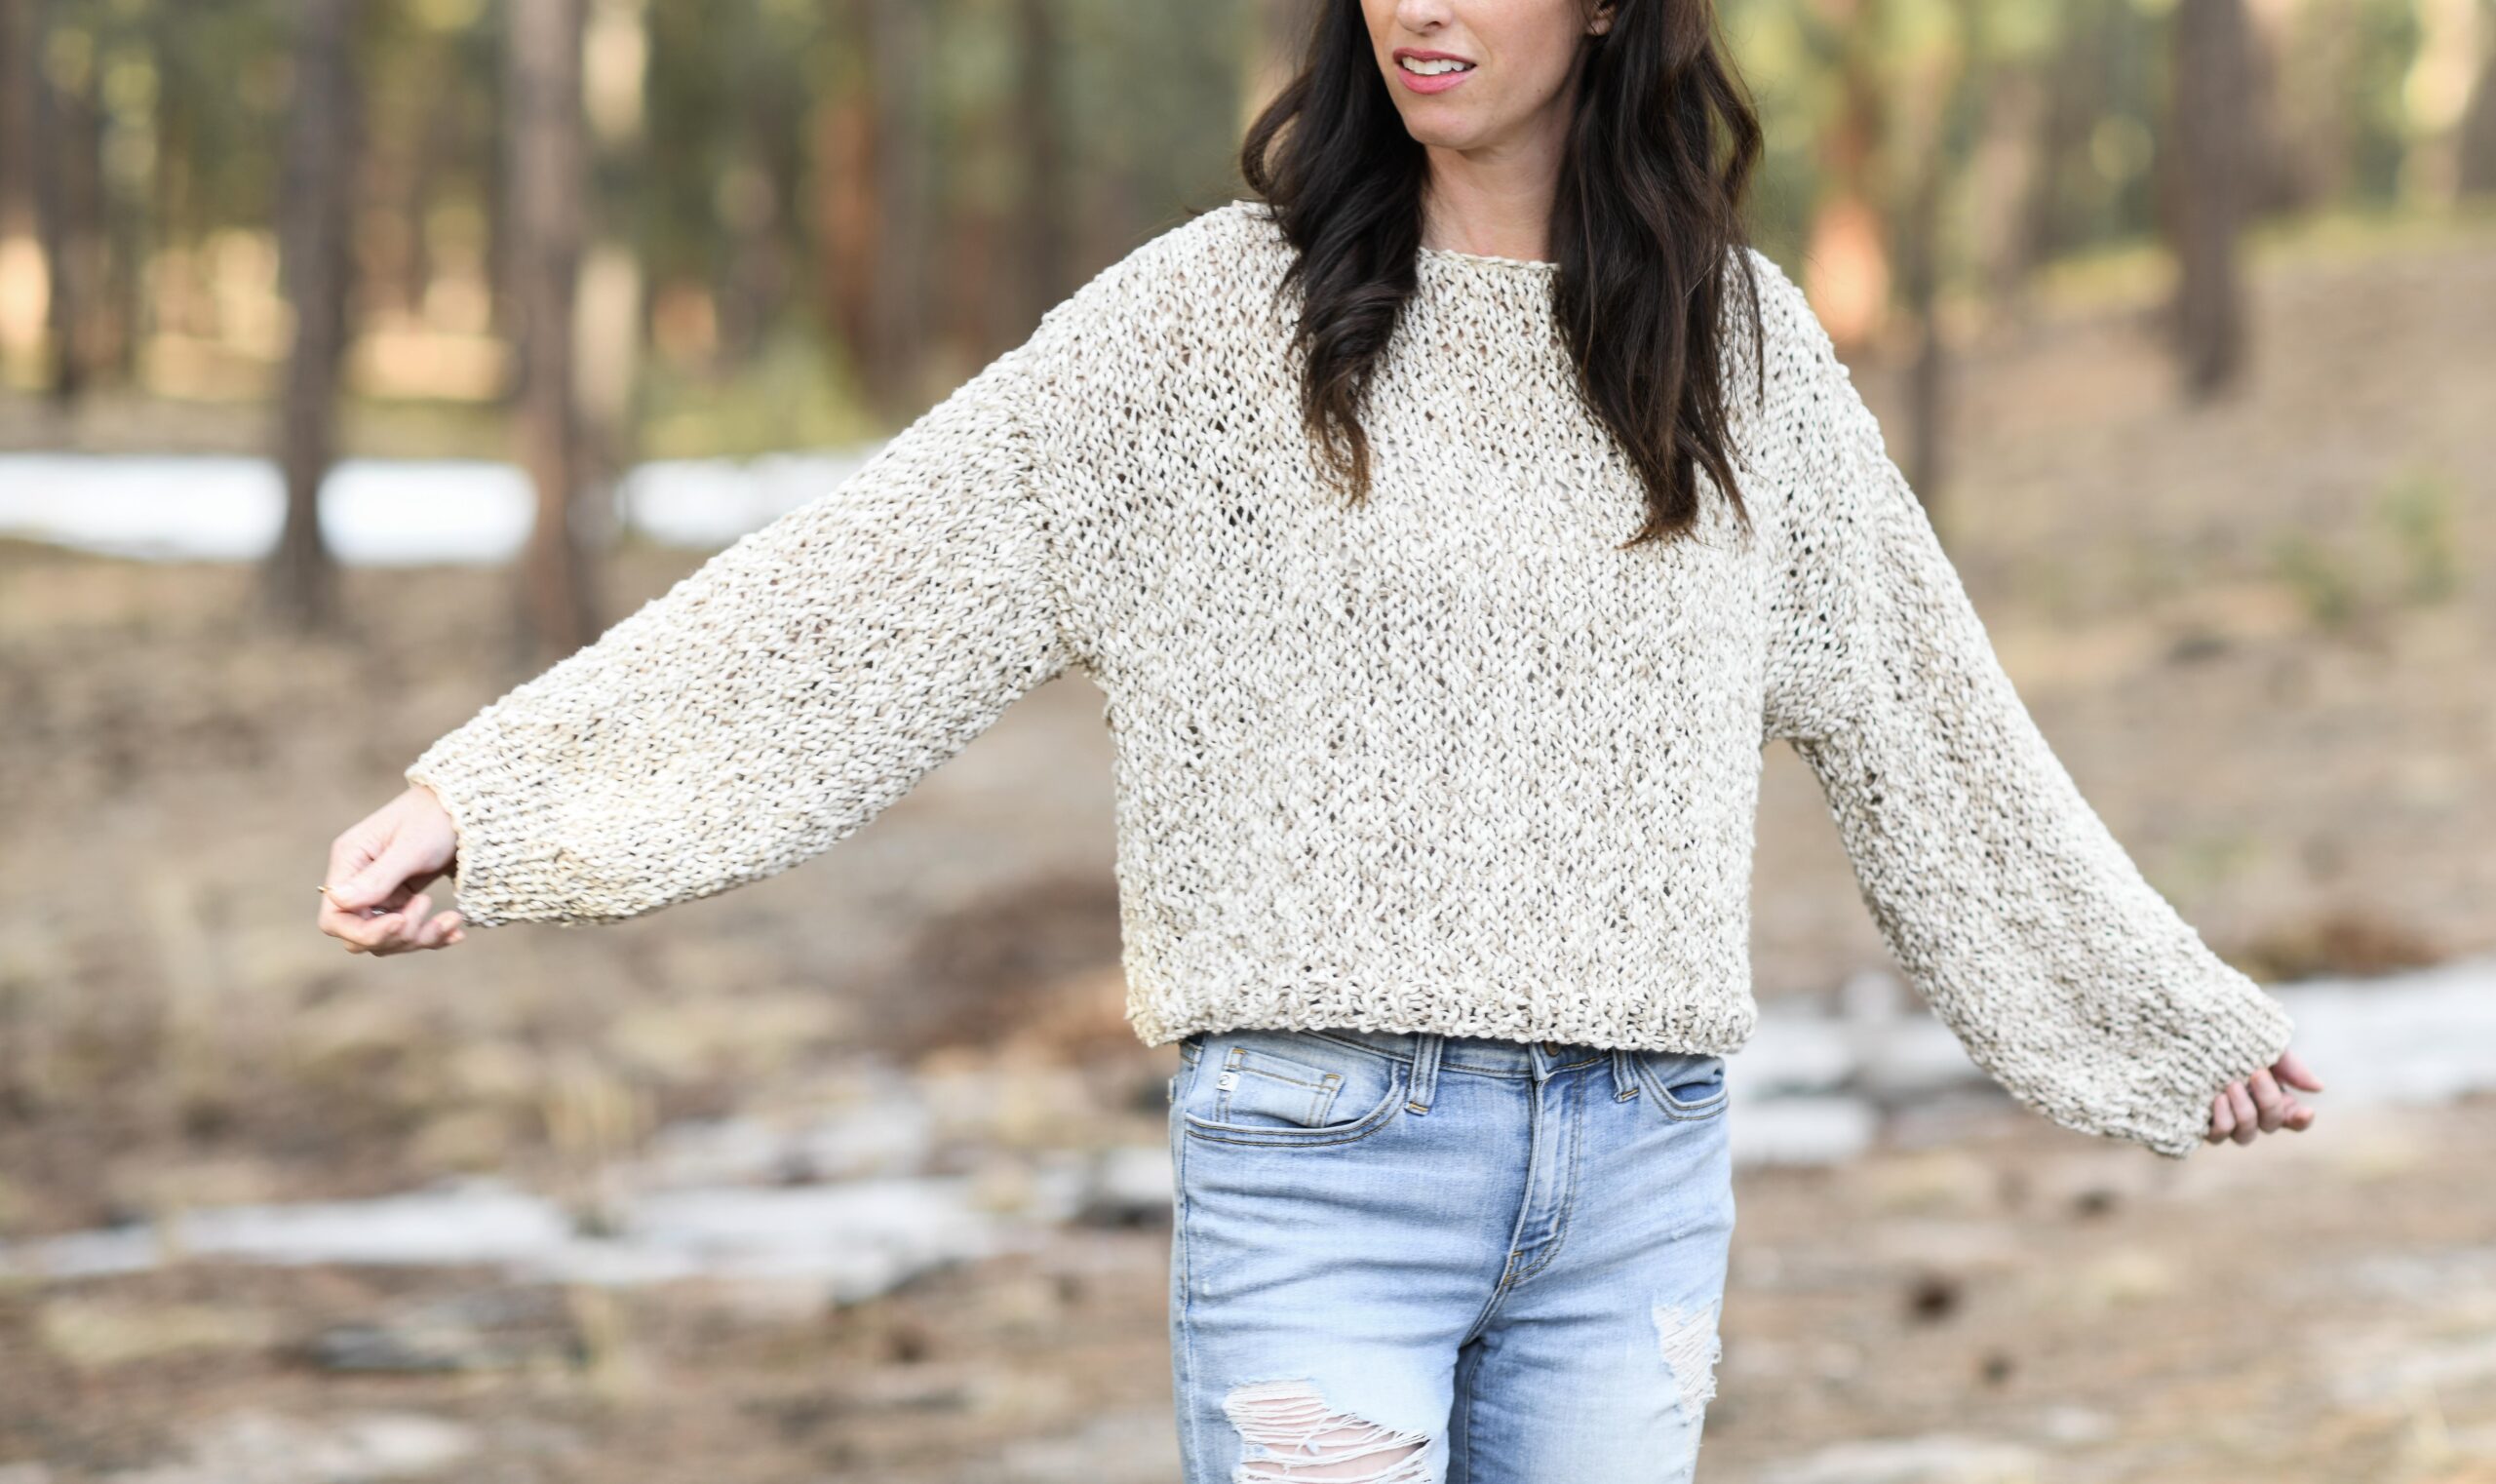
Pattern Description: Featuring a slouchy silhouette, an oversized fit, and comfy fabric, this is the perfect laid back pullover for everyday wear. Knit on large needles, you’ll use just basic knit stitches for this relaxing, quick project. New knitters can enjoy making this beautiful pullover without any difficult shaping, while the thick and thin yarn creates an effortless texture. The loose fabric makes it fun to wear in any climate, while the wide drop sleeves are right on trend. Enjoy!
Skill Level: Beginner +
Materials:
US Size 13 mm 9.0 mm 29” circular knitting needles
US Size 9 5.5 mm knitting needles
6 (8, 10, 11, 13) skeins Lion Brand Yarn Twisted Cotton Blend #5 yarn in Tan/Ecru 100 g/skein NOTE: You can sub with a worsted weight #4 or chunky #5. Simply MAKE SURE TO do a gauge swatch first, and adjust needles or tension as necessary to match gauge. This way your size will turn out correctly.
Pattern uses approximately 570 g (728 g, 902 g, 1095 g, 1261 g) grams total
Measuring Tape
Tapestry Needle
Scissors
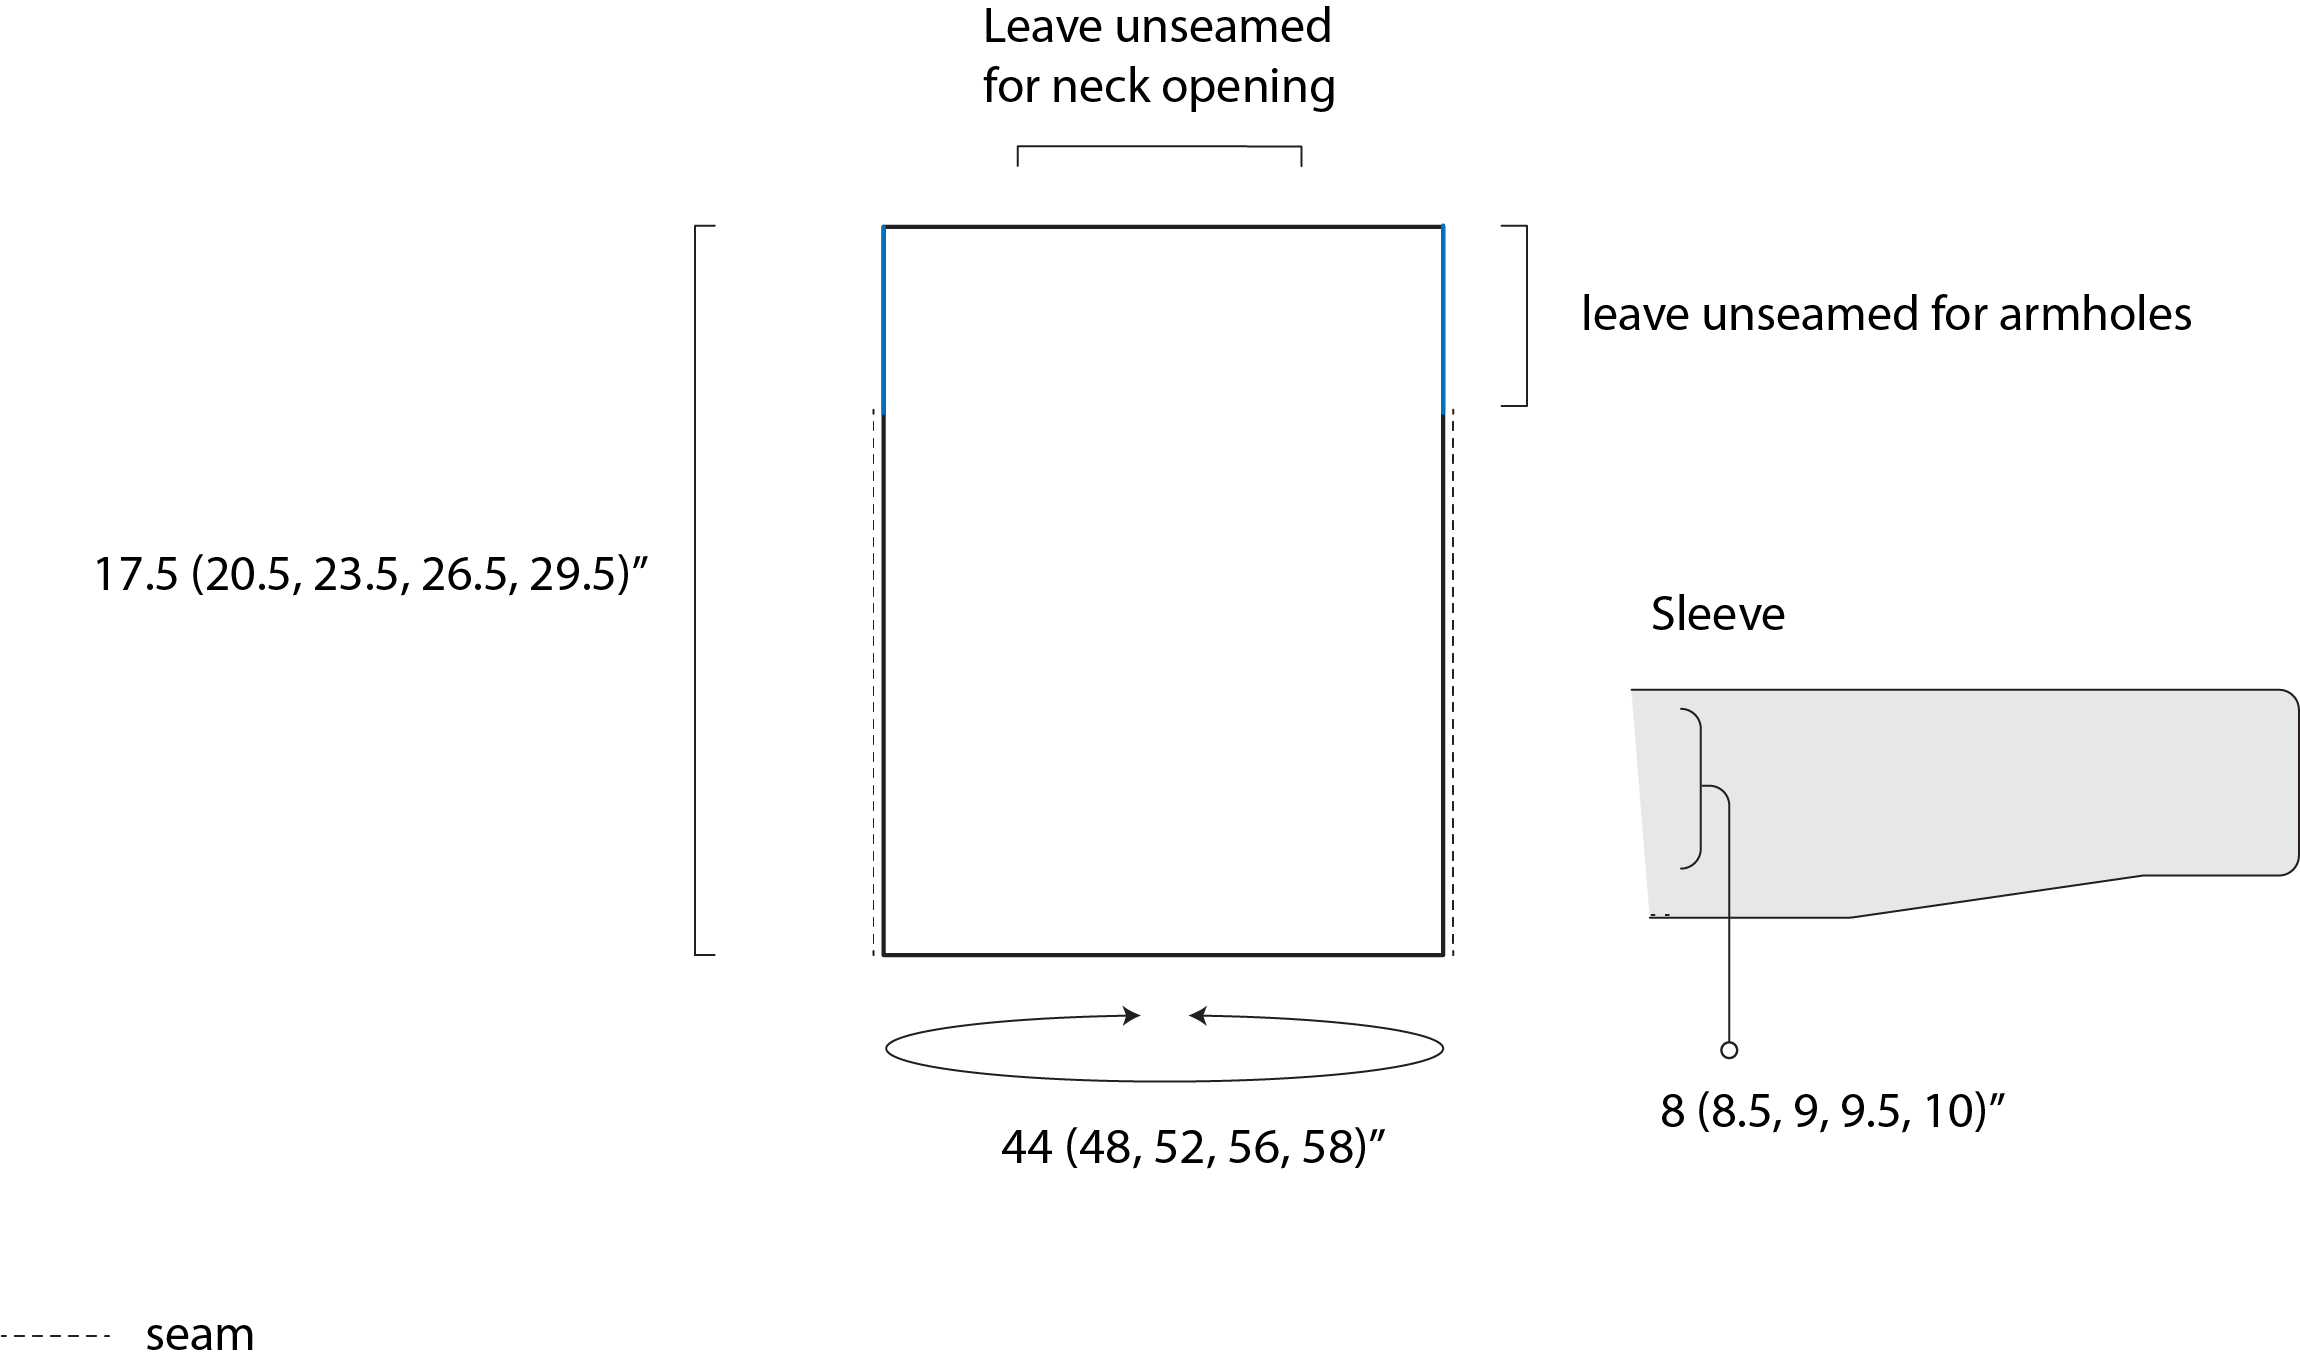
Dimensions (approximate):
Small, Medium, Large, XL, XXL
Please follow the key throughout the pattern according to the size you are crocheting:
S (M, L, XL, XXL)
Bust Circumference (approximate finished measurements):
(note there is positive ease) I’m 5’5″ and 100 lbs, 32″ bust, wearing the size S. Yes, there’s a ton of room!
S – 44”
M – 48”
L – 52”
XL – 56”
XXL – 58”
Length (approximate):
S – 17.5”
M – 20.5”
L – 23.5”
XL – 26.5” XXL – 29.5”
Sleeve Width at widest point when seamed (approximate):
S – 8”
M – 8.5”
L – 9”
XL – 9.5”
XXL – 10”
Abbreviations & Skills:
k – knit
p – purl
st – stitch
k2tog – knit two together (decrease)
1 x 1 rib pattern – You should know how to work a 1 x 1 rib pattern. (For row 1, you will work a knit stitch, followed by a purl stitch, repeating this pattern across the row. For row 2, you will knit the knit stitches and purl the purl stitches)
Gauge:
Approximately 11.5 stitches and 15 rows in 4” x 4” of stockinette stitch
Notes:
You will knit a back panel, a front panel and two sleeves. Each front and back panel is knit from the bottom up and all pieces of the pullover are knit flat. These are each sewed and seamed together to finish. If you’re experienced and would like to knit the sleeves in the round to avoid sewing and seaming, you may do so. This is a very forgiving pattern and you can adjust the sizing to make it your own! Feel free to knit for more or fewer rows to make it longer or shorter (keep yarn needs in mind). The current design features a slightly cropped fit, but it’s simple to make it longer!
Easy Vibes Pullover Sweater Knitting Pattern
Panel Pattern (make 2 – one for the front and one for the back)
Using the larger needles, cast on 64 (70, 74, 80, 84) stitch count remains the same throughout back panel pattern
Bottom Ribbing (1×1 rib)
Row 1 *K1, p1; repeat across the row
Rows 2 – 5 Repeat row 1
Row 6 Knit each st across the row.
Row 7 Purl each st across the row.
Repeat rows 6 & 7, working stockinette stitch until panel is approximately 17.5” (20.5”, 23.5”, 26.5”, 29.5”) long.
Cast off and weave in ends.
Sleeve Pattern (make 2)
Using the larger needles, cast on 46 (48, 52, 54, 58) sts
Row 1 Knit each st across the row.
Row 2 Purl each st across the row.
Repeat rows 1 & 2 until sleeve is approximately 14” long.
Next, transfer stitches onto US size 9 knitting needles to continue working the ribbed cuff.
Ribbed Cuff
Row 1 K2tog, k2tog, *k1, p1; repeat from * across to last 4 sts, k2tog, k2tog.
Row 2 *K1, p1; repeat from * across the row.
Repeat row 2 until entire sleeve measures approximately 16.5”( 16.5”, 17”, 17, 17.5”) long.
Cast off and weave in ends.
Assembly & Seaming
Place front panel on top of back panel.
Seam at shoulders with a simple whip stitch, leaving an opening for the head and neck as wide as desired.
Seam up sides using the mattress stitch seam, leaving openings large enough for the sleeves and arms.
Fold and sew sleeves using a mattress stitch seam.
Seam sleeves to arms with a basic whip stitch or preferred seaming method.
So, what do you think? Easy enough, right? It’s such a great go-to sweater and I really hope you enjoyed it!
As usual, I’d love to see if you make one! Just tag me on Instagram @mamainastitch #mamainastitch! I’m so ready for some light sweaters like this after too much snow this winter. Bring on spring. 🙂
XO,
Jessica
If you liked this, you might also like these!
More Beginner Friendly Knit Sweaters
10 Easy Sweater Knitting Patterns
My Comfiest Knit Cardigan Pattern HERE

Thank you to Lion Brand Yarn for sponsoring this post. All opinions are 100% my own.

This looks awesome! Is there a crochet version of this pattern?
Thanks for this super trendy easy pattern. I love the look of the yarn. This sweater can be made in all kinds of yarns for different looks. I love simple minimalistic knits and tend to try to find some special yarn for them.
I look forward to making this! I do wonder, why does the pattern call for a set of circular needles if its worked in rows???
Love this! Can’t wait to make it for my daughter! Thank you! (PS—there is a typo on this page under the 3rd photo—de/do.)
Hi Liz! I don’t currently have a crochet version. Sorry about that!