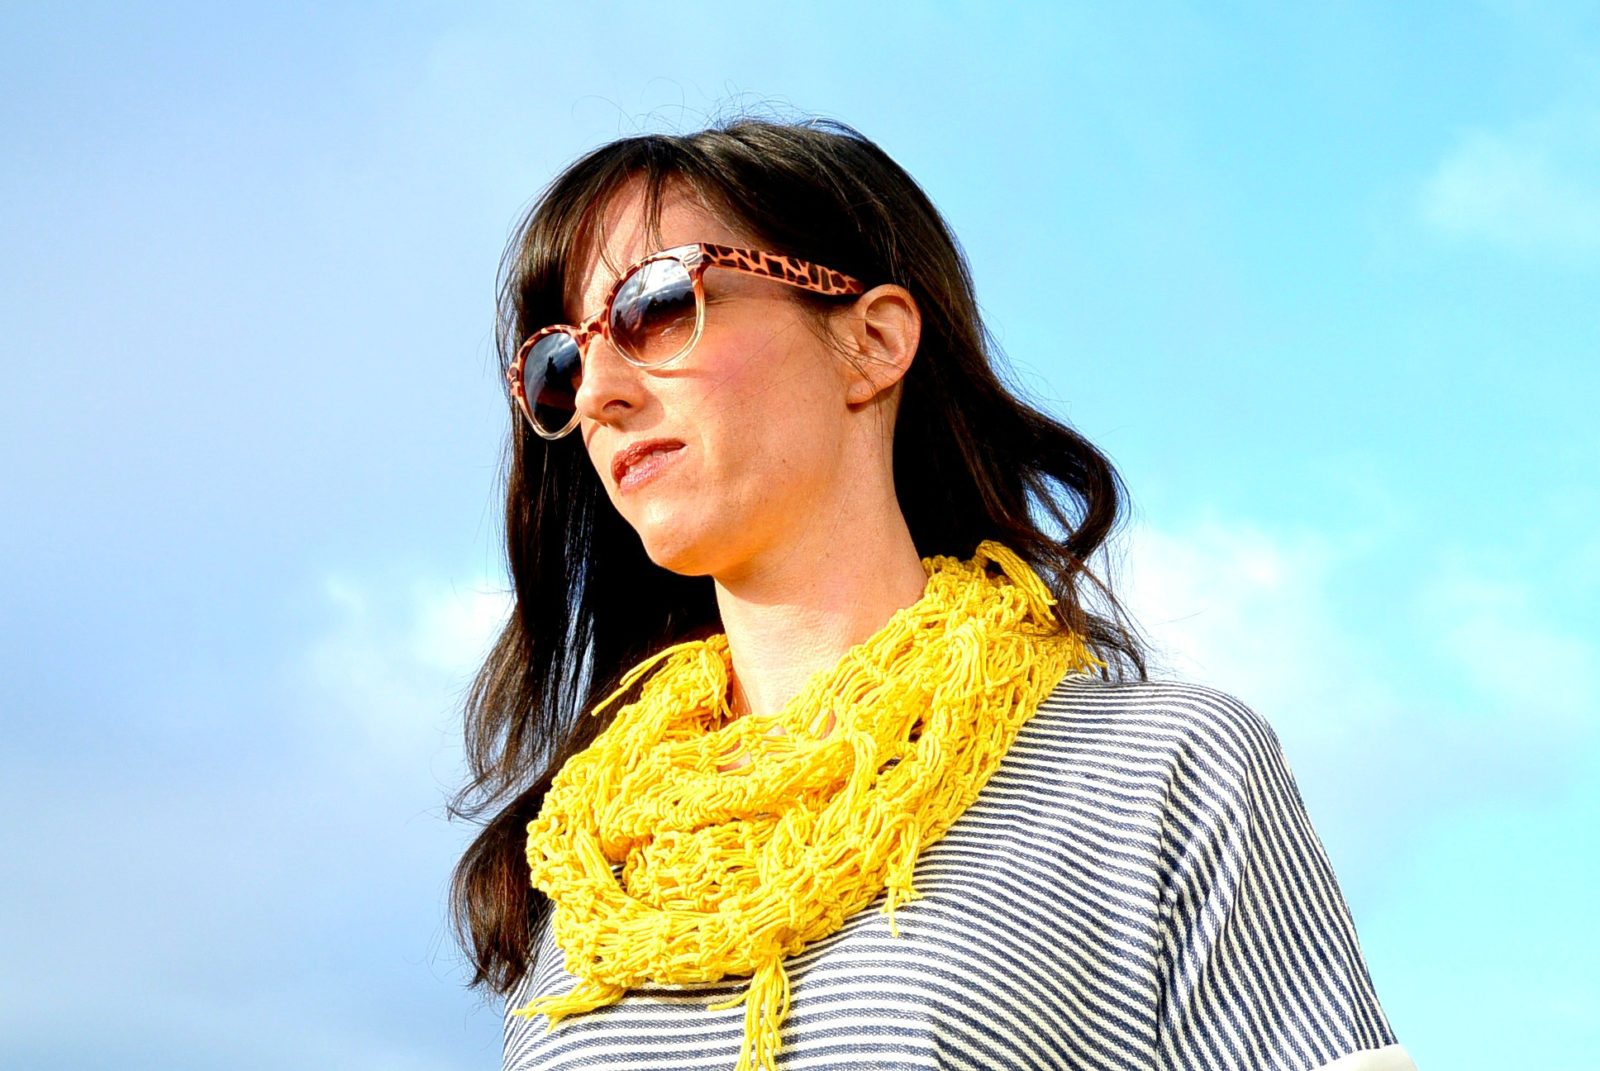
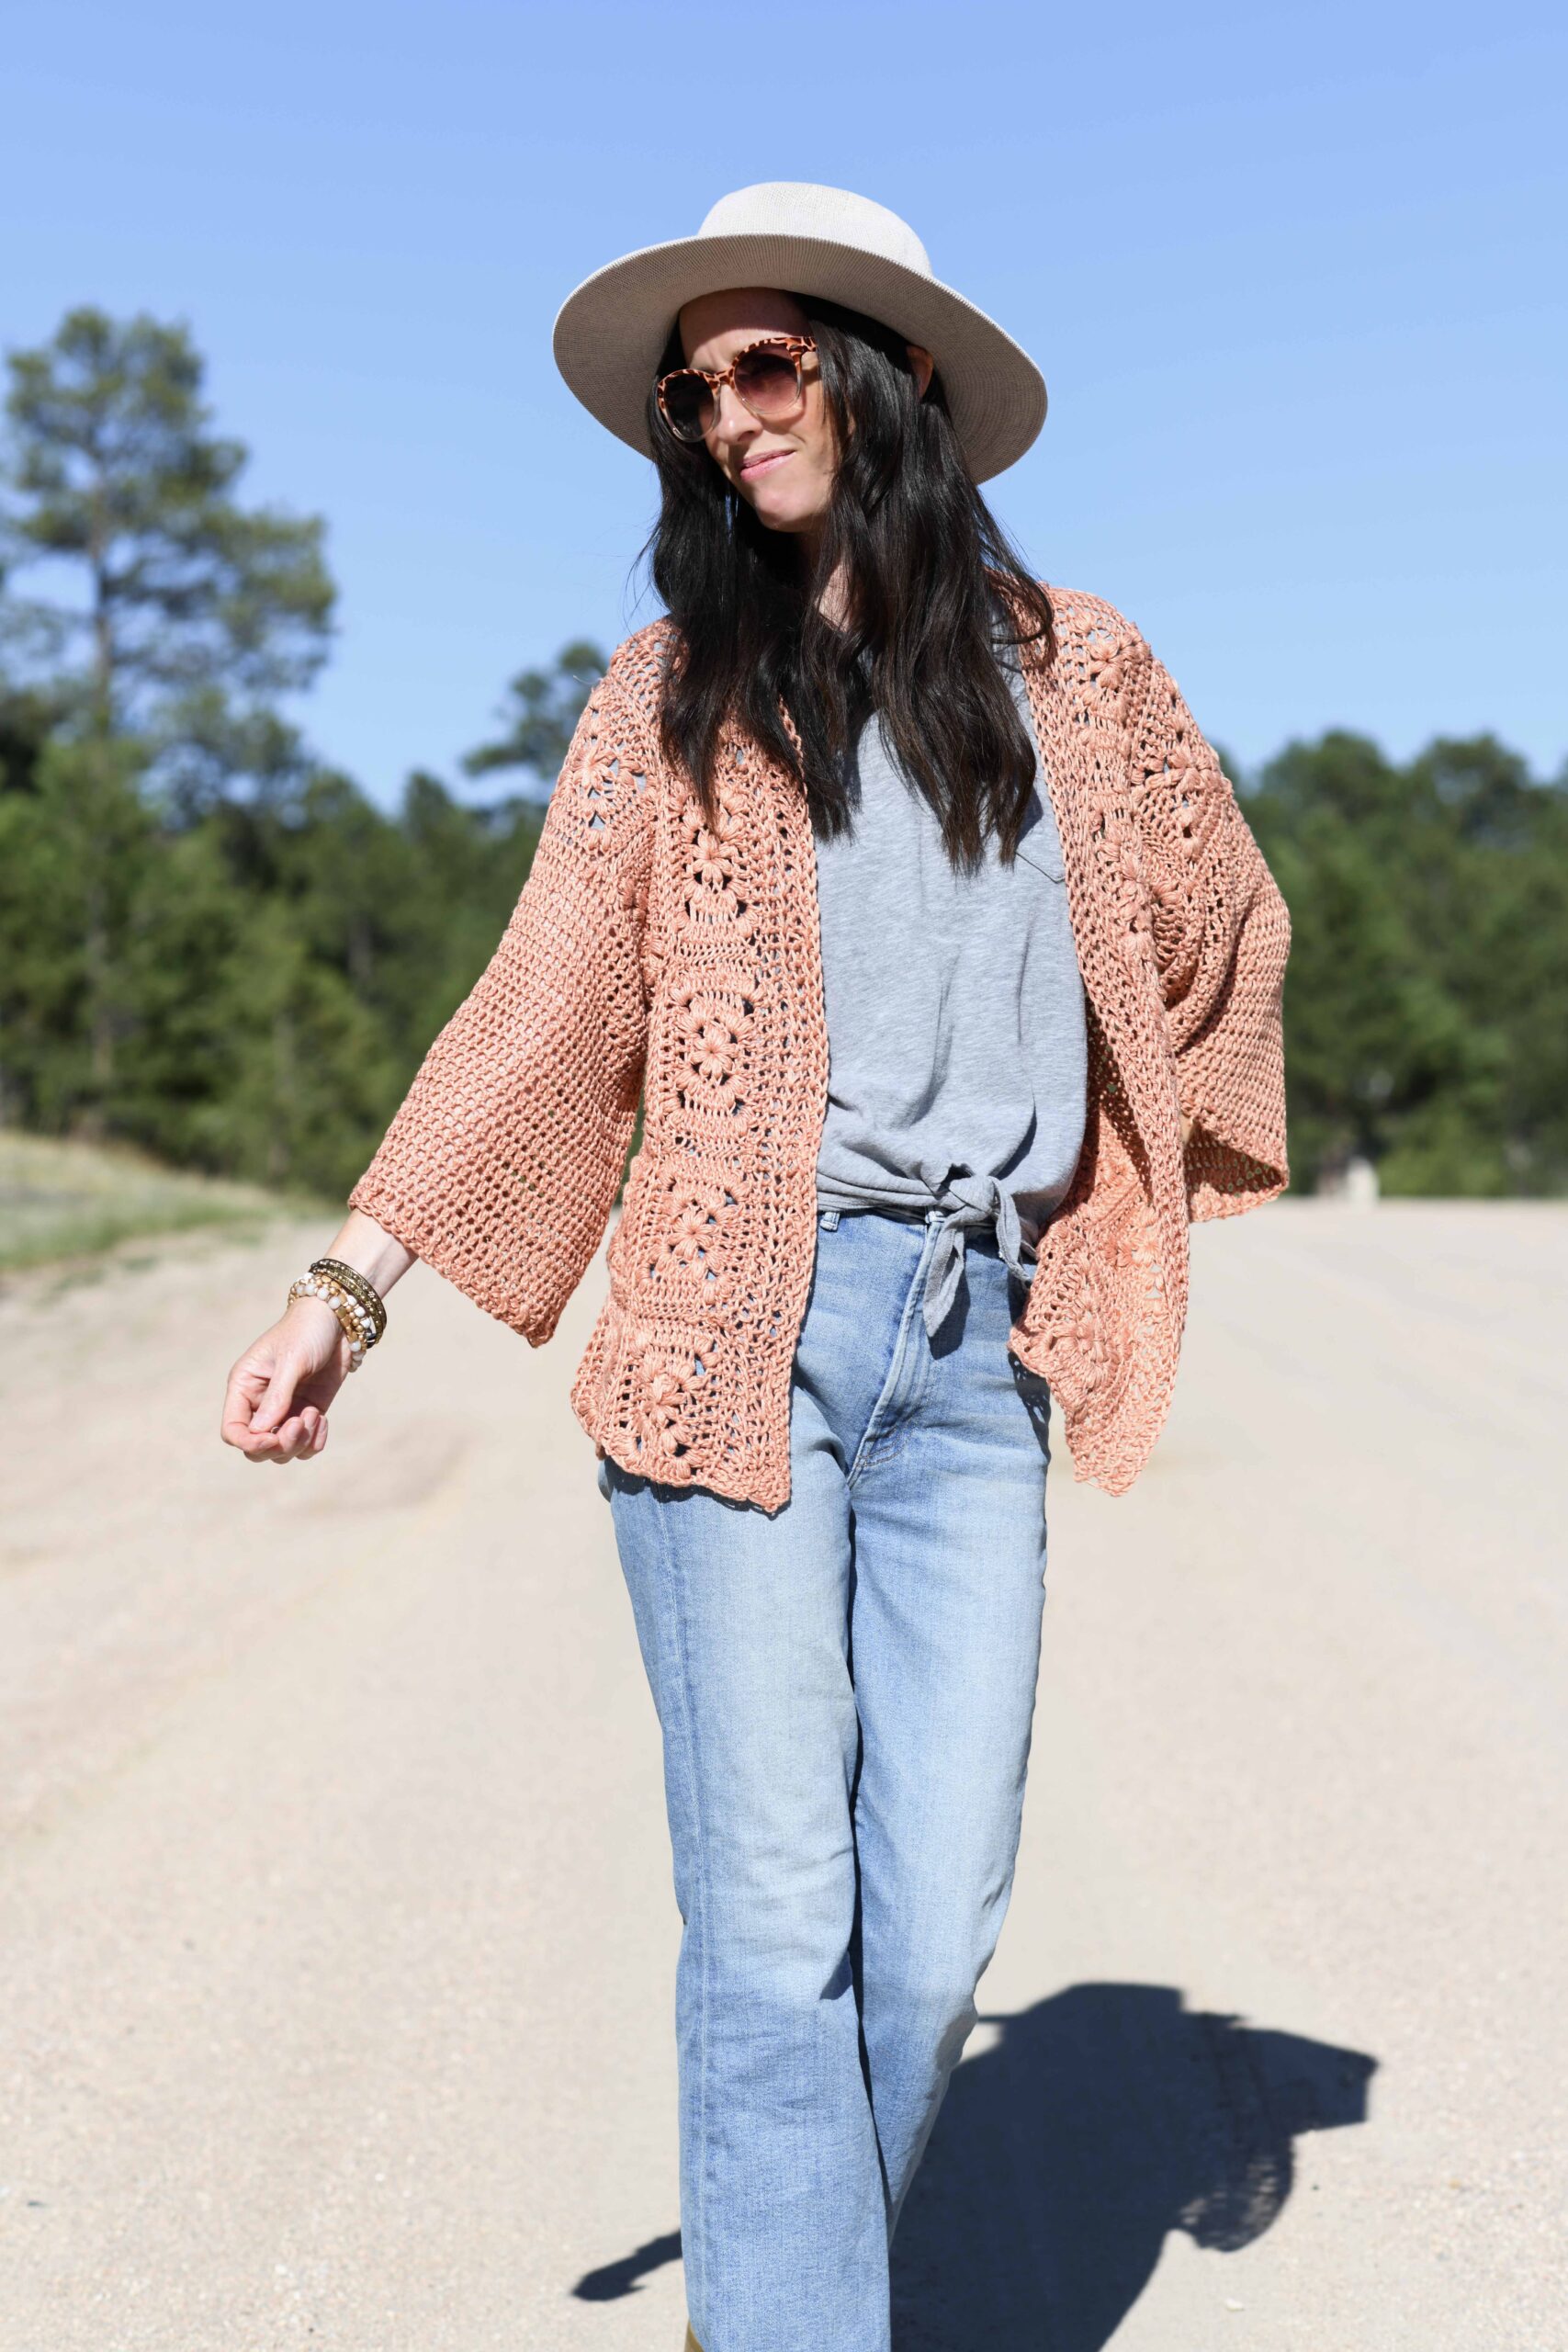
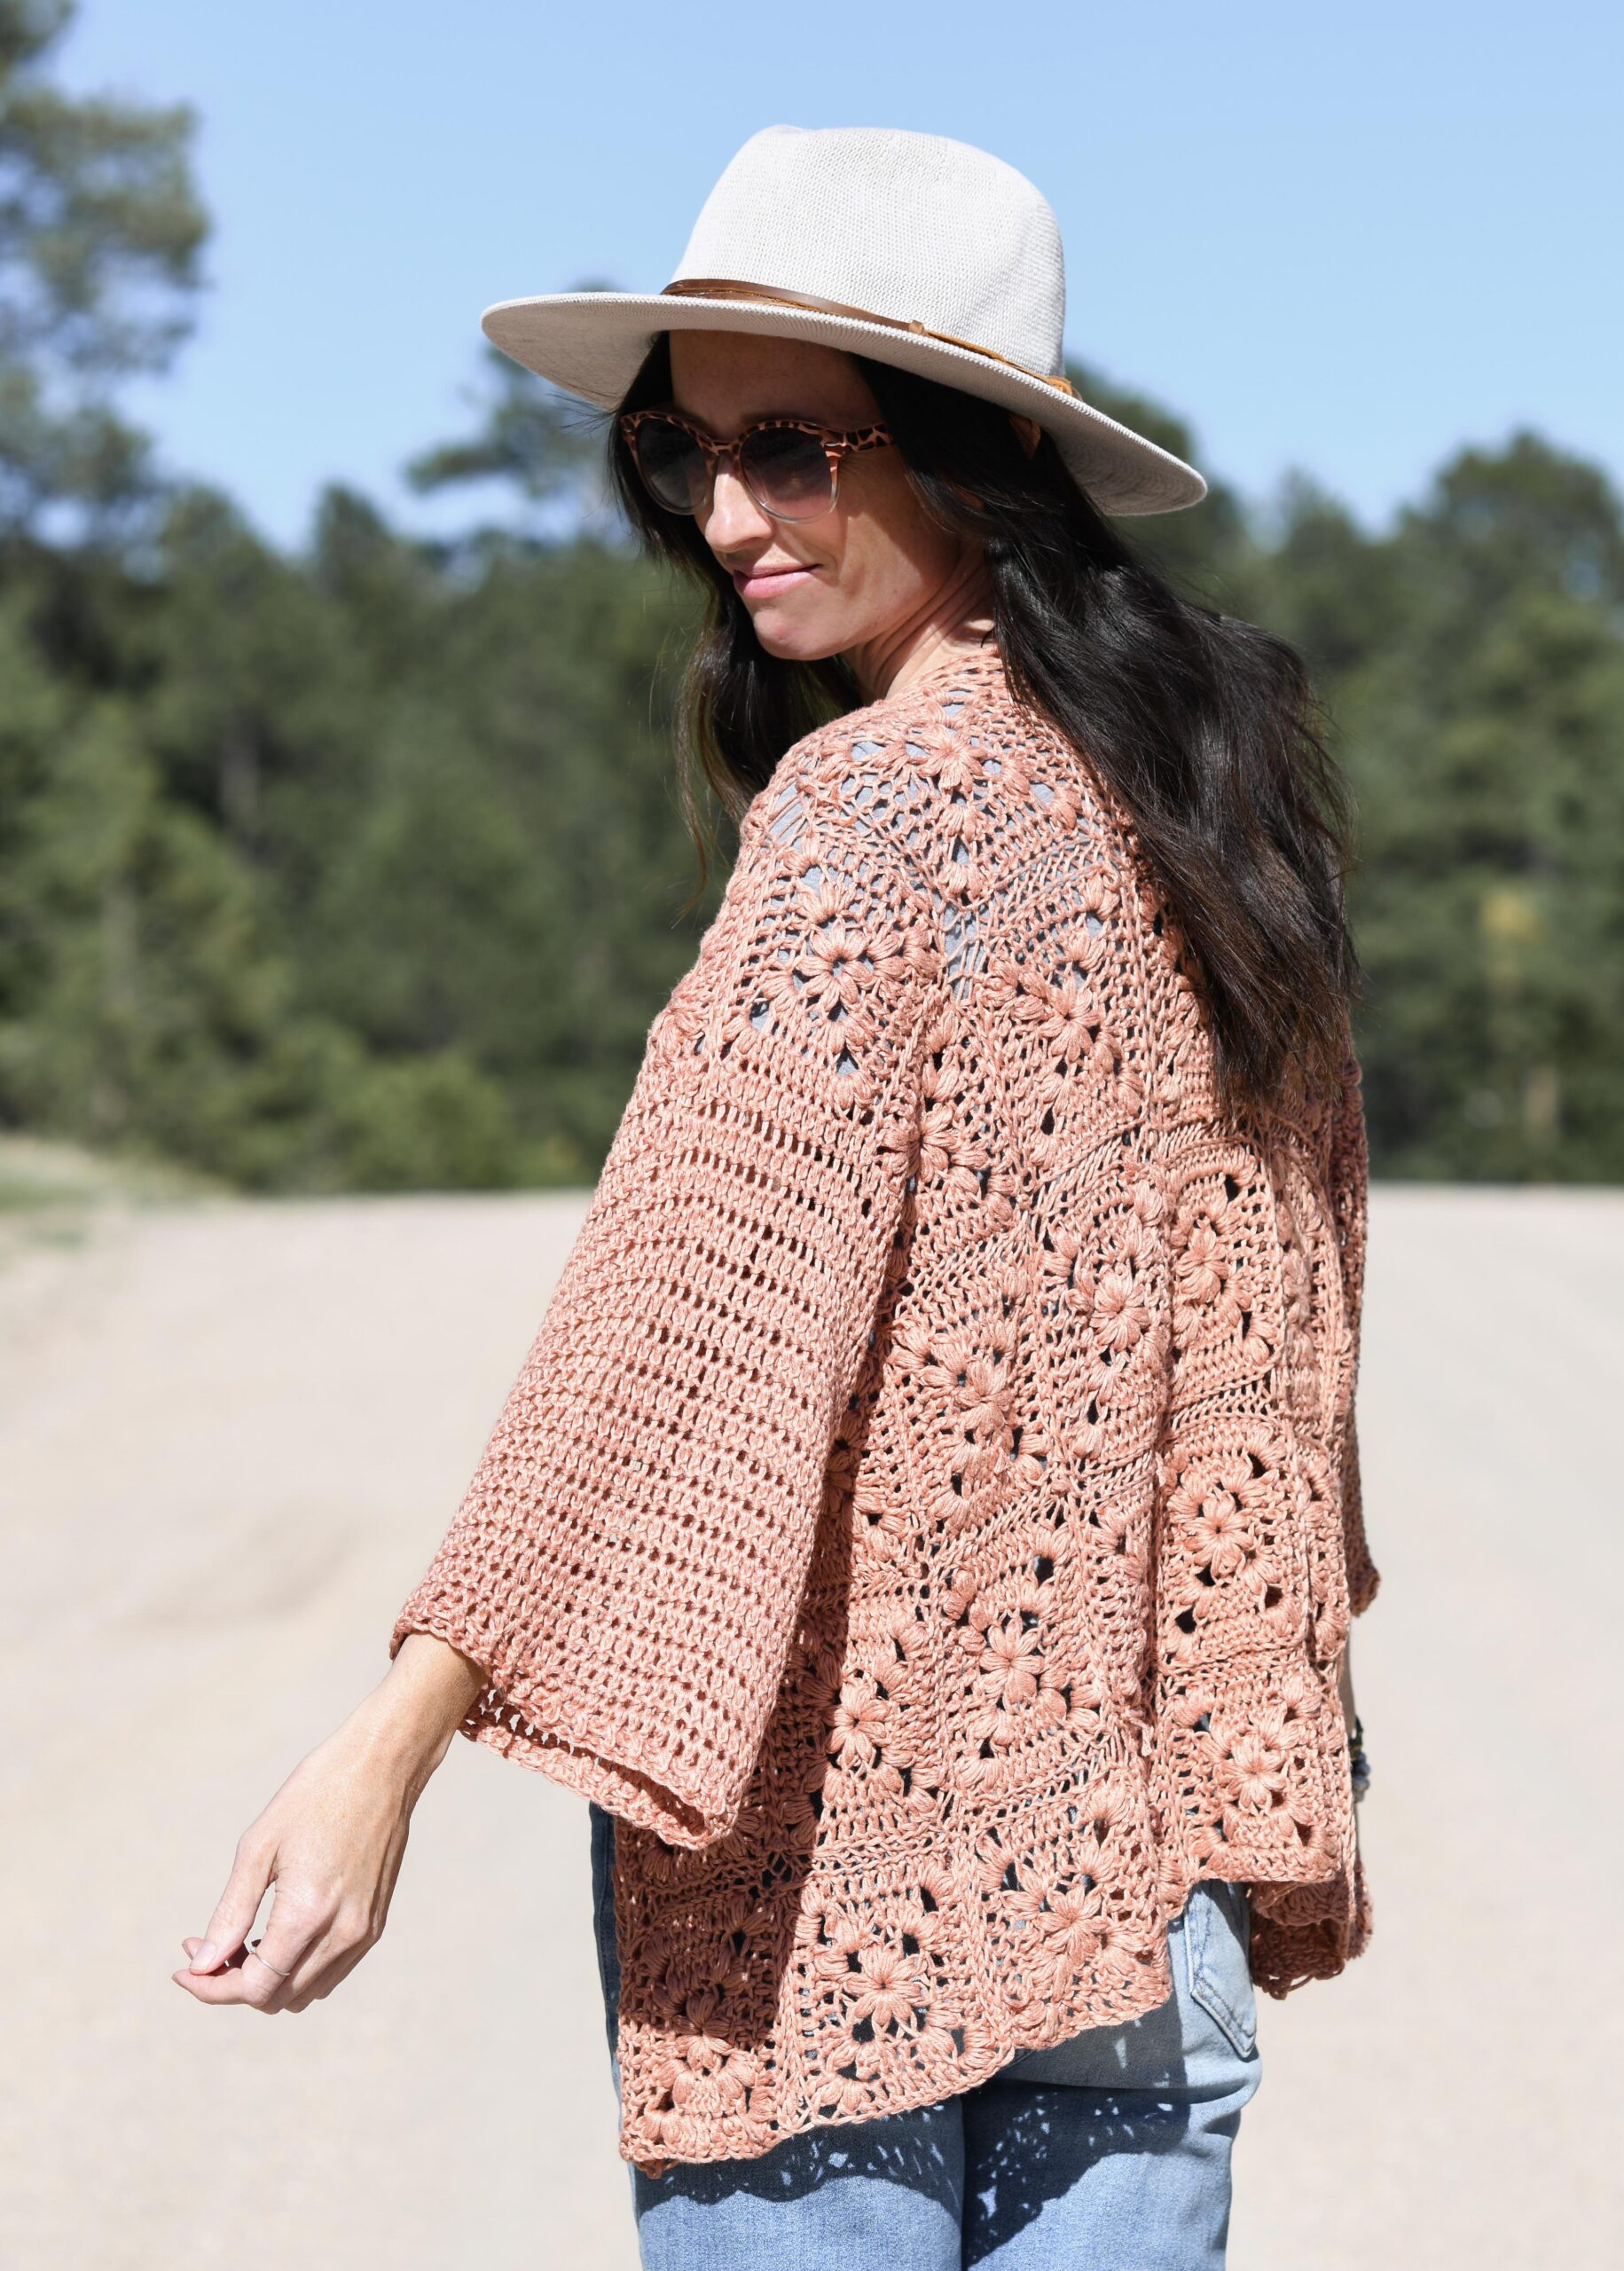
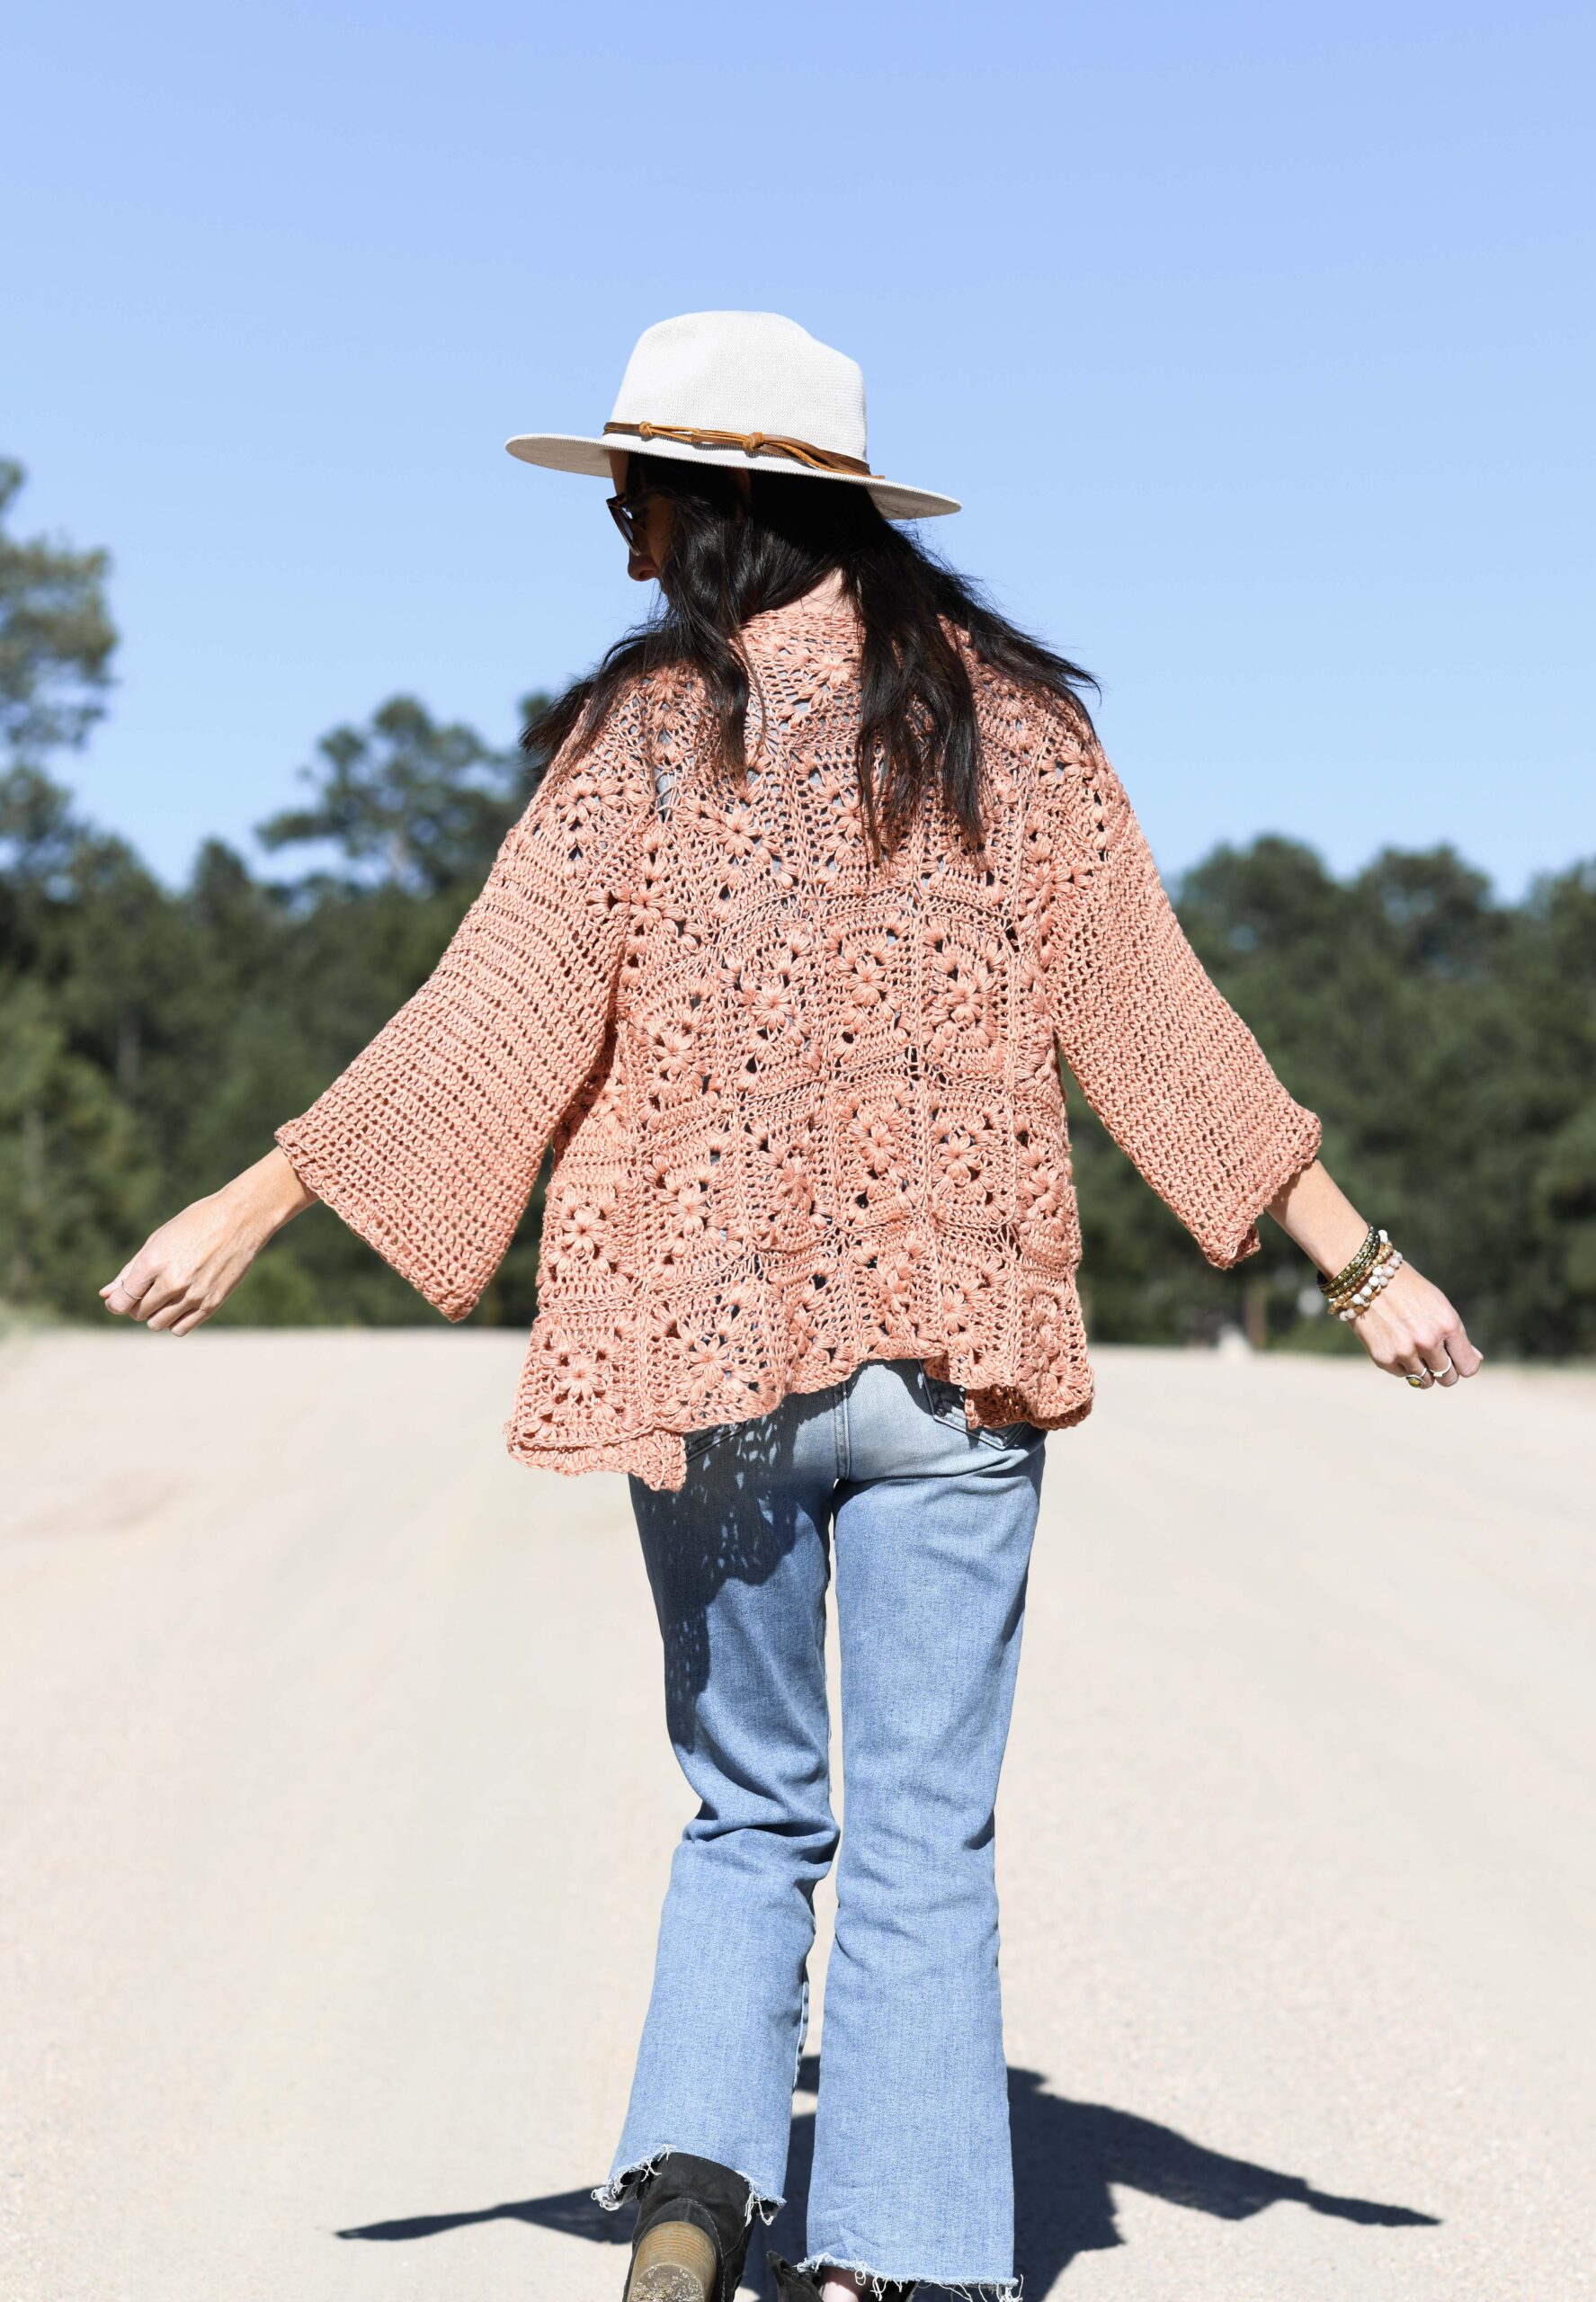
Wildflower Granny Square Cardigan Pattern
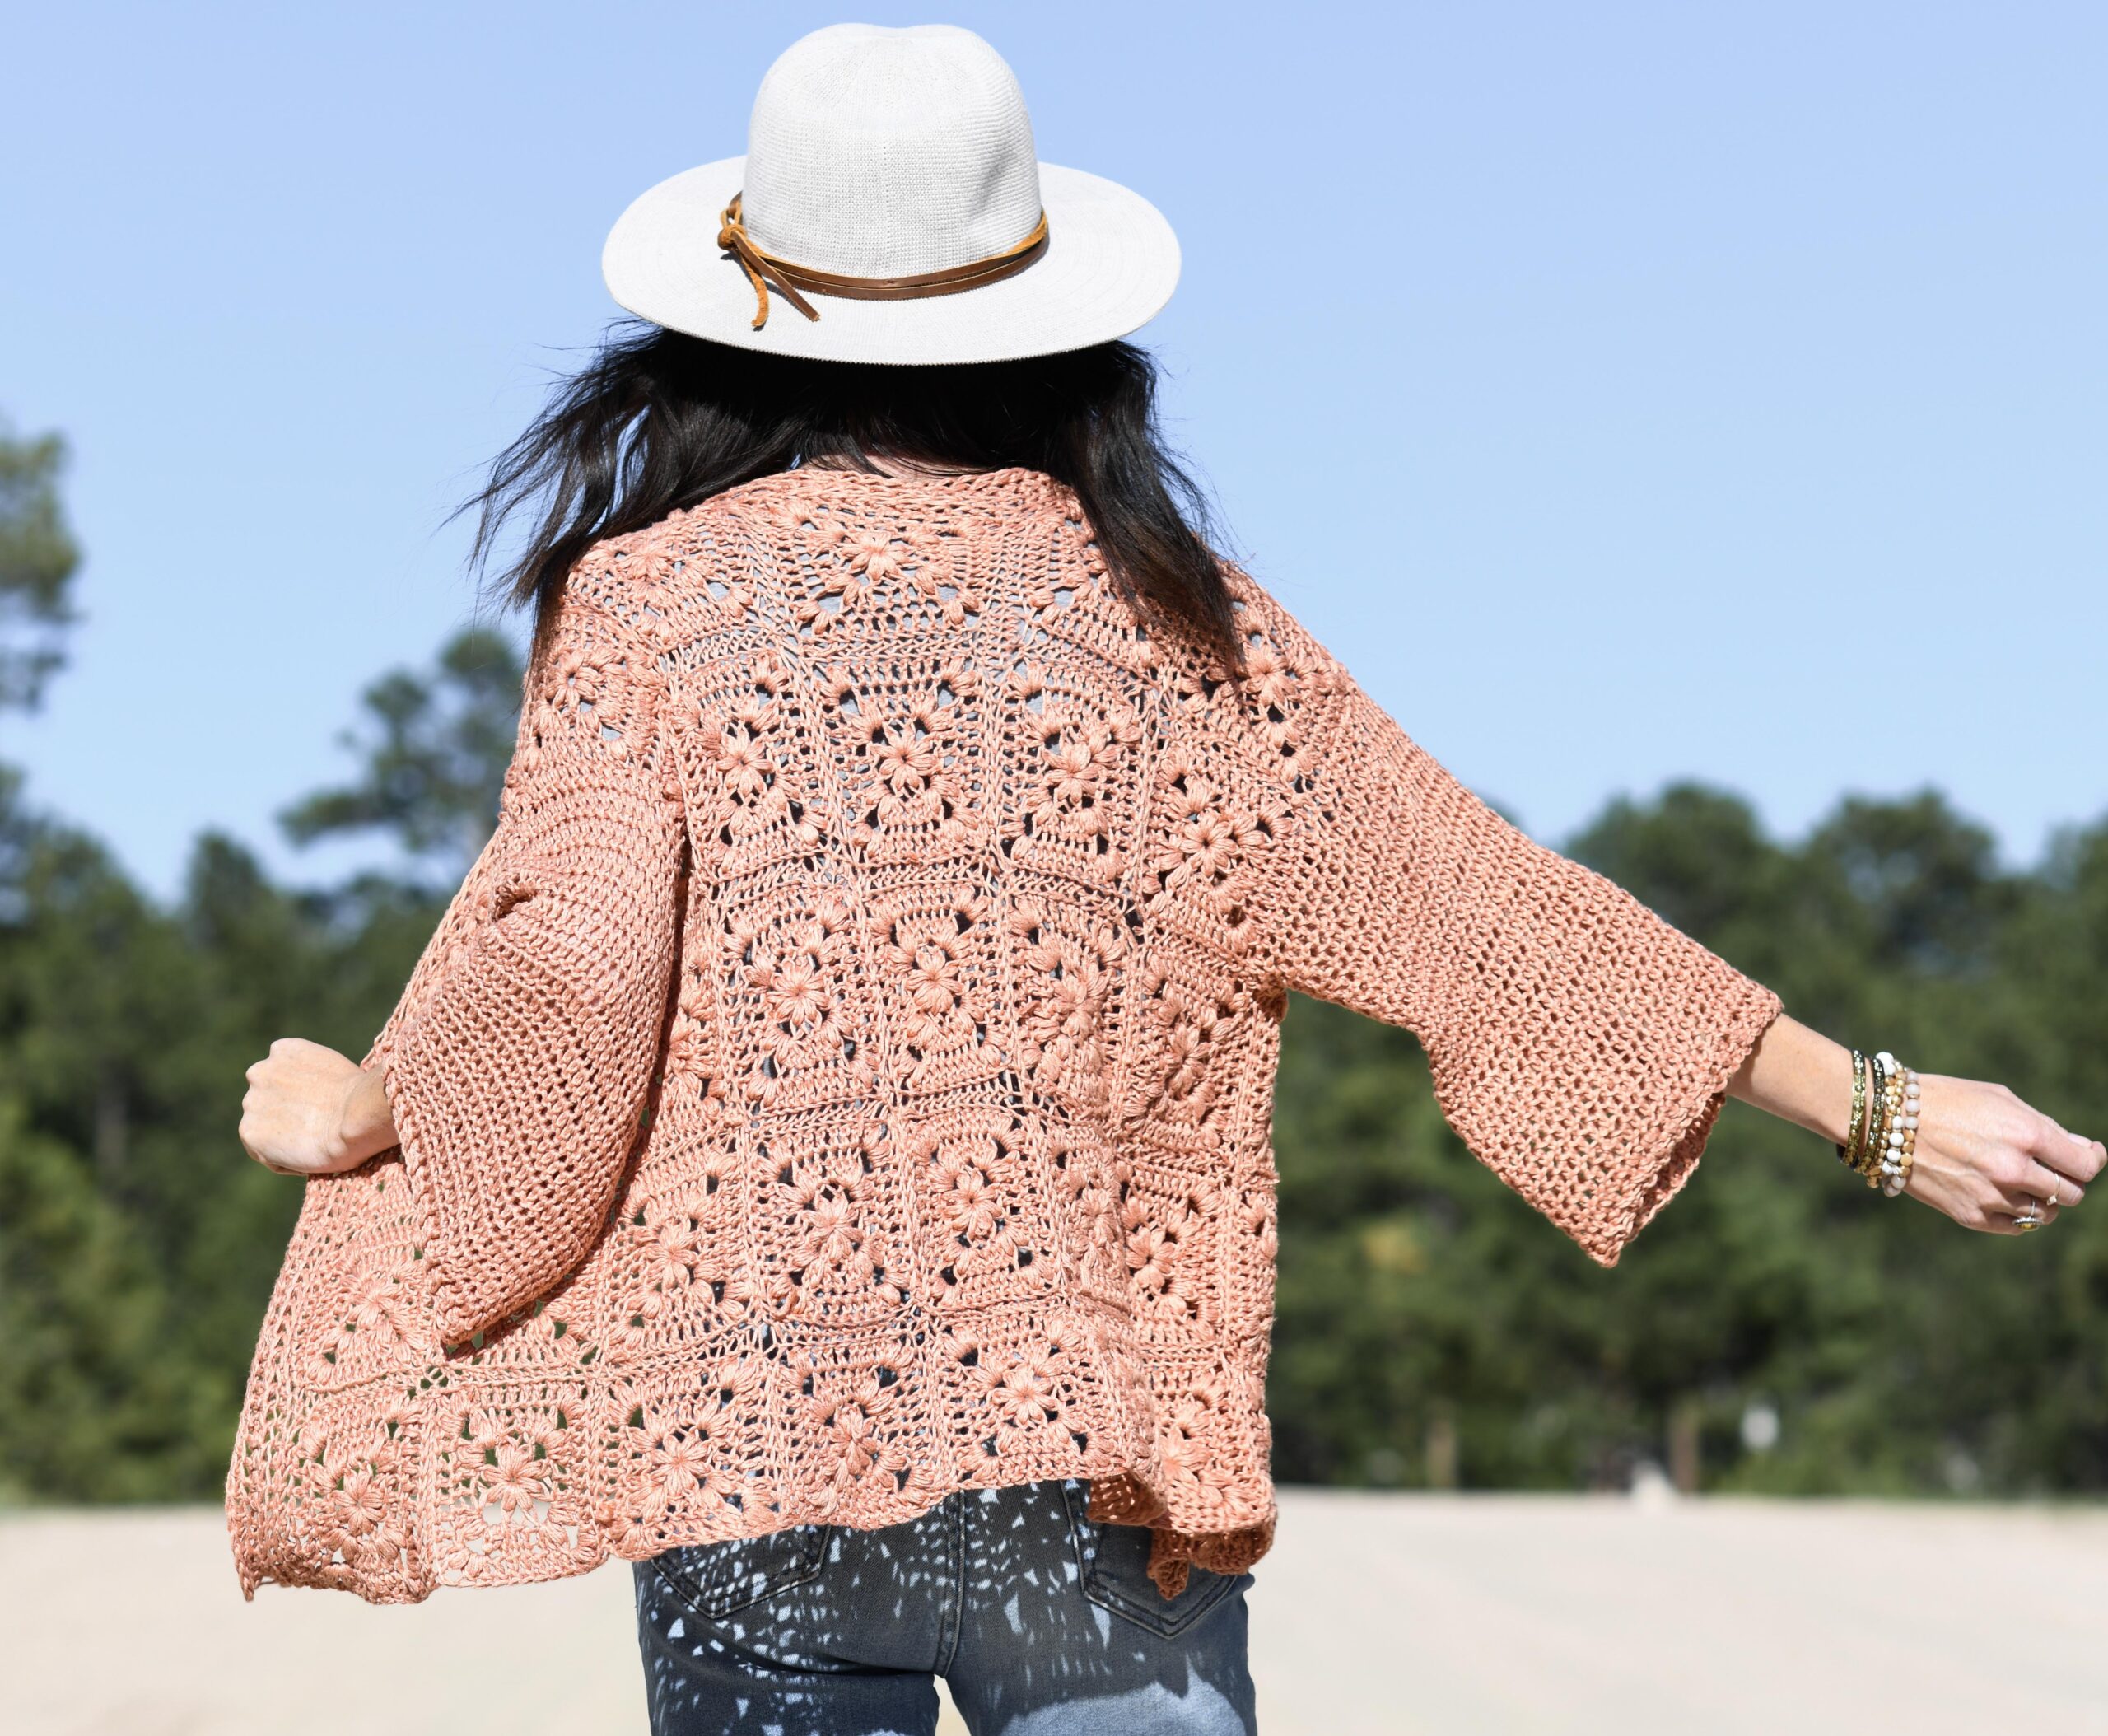
This boho inspired cardigan turned out to be so comfy, and it’s perfect for the warmer climates! It’s a lot of fun to crochet because it’s made up of pretty little “flower” granny squares, so it’s a nice portable project.
Definitely have a look at the free pattern and tutorial below! You may also choose to purchase the ad-free, printable version from Etsy HERE, or the kit from Lion Brand Yarn HERE (in several color options).
My fave thing about this top is how flowy, soft, and cool it is! It’s hard to describe, but the bamboo fabric almost feels cooling when it’s on your skin.
It’s almost got the same feel as silk, in my opinion. Have you tried bamboo yarn?
As many of you know, I climbed aboard the granny square train a while back (remember the Nora Granny Square Throw, Arlo Cardigan, Magnolia Tote Bag). Today’s pattern is kind of fun because while it’s a granny square, it’s a bit more understated because we are using just one color AND it features a pretty little flower design in the center.
To crochet this top, you’ll make several squares while following the pattern (see below), and will seam them together into rectangular panels ( one panel for the back and two panels for the front). Next, you’ll sew the panels together while leaving openings for the arms. Lastly, crochet the sleeves directly onto the cardigan. Boom!
While the construction of this pattern is simple, you should have some crochet experience to make this “flower” square. It’s not difficult, but it uses puff stitches and a bit of counting, so it’s not a great “brand new beginner” square. If you need to practice a super easy square first, head over to my Modern Granny Hot Potholer Pattern HERE (you”ll see a picture tutorial for an easy square).
The yarn I used, Lion Brand Truboo, is a bamboo, light, yarn that I like for garments that will be worn in warm climates. It does stretch a bit, and it is slick to work with, but it is worth it for the drape, softness and comfort when you wear your new top. I also think they have really nice color options with this yarn! I was really happy using it for the first time on my Verano Longline Cardigan a couple years ago.
So how do we crochet this flower granny cardigan that we shall wear all summer and fall? Let’s get to it….
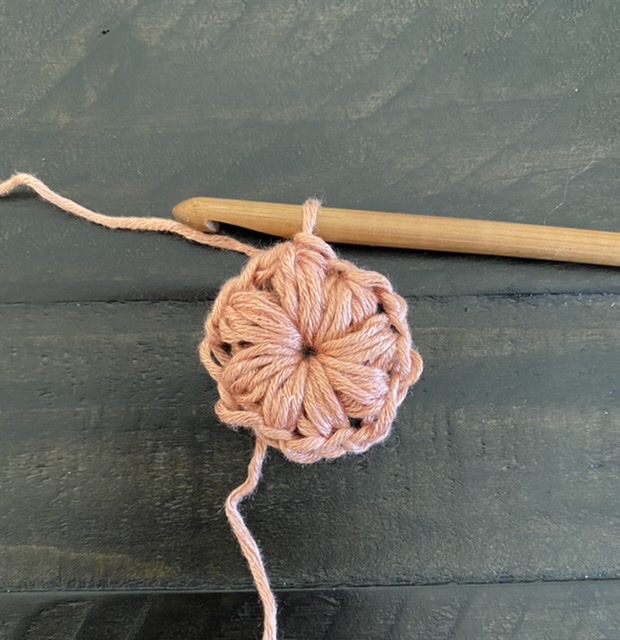
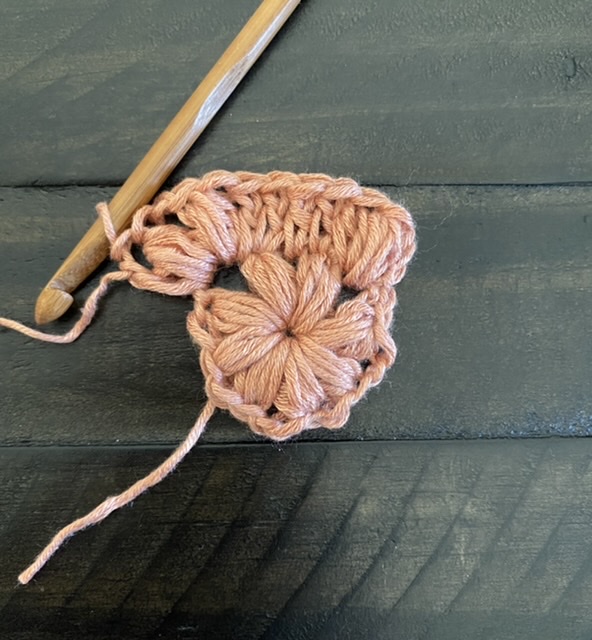
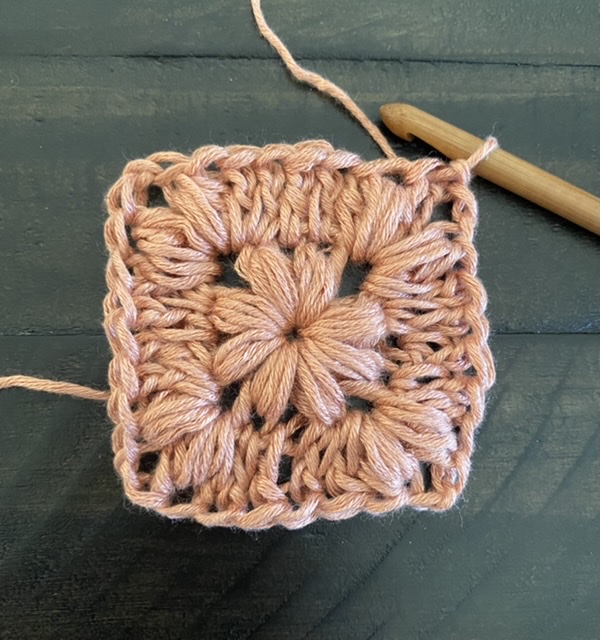
First, here’s a look at how the granny square comes together (the Etsy pattern includes this picture tutorial as well).
Wildflower Puff Square Picture Tutorial
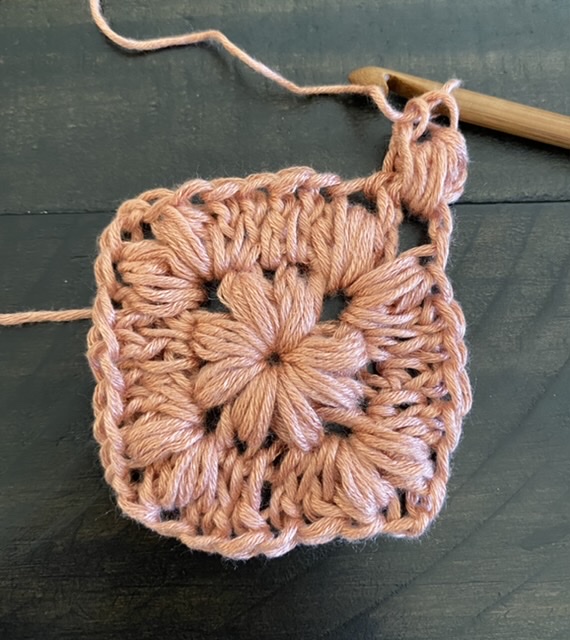

Remember that you can see the full, free pattern below, or you may choose to purchase the ad-free, printable pattern from Etsy HERE (It also includes the picture tutorial you see above). Enjoy!
Pattern Description: Flowy and breezy, this airy cardigan is perfect for the warm months,
and the feminine flower granny squares are right on trend. The fabric could not be any
softer (SO COMFY!), and this piece can be worn from spring through fall. Add a touch of
boho to your outfit, and pair it with cut off shorts or your favorite jeans. It’s a fun, portable
project since it’s made of squares!
Skill Level: Intermediate
Materials:
US Size J 6.0 mm crochet hook (or size to obtain correct gauge)
5 (7, 11) skeins Lion Brand Yarn Truboo in Sienna (100 g/skein and 241 yds per skein) Convenient Kit Available HERE in many color options!
Pattern uses approximately 460 g (612 g, 930 g) total
Tapestry Needle
Scissors
Measuring Tape
Sizes:
XS/S, M/L, XL/XXL
*NOTE: Because of the boxy fit of the cardigan, you will see that one size will work for two
sizes. For example, the smallest size fits both an XS and a S (XS/S). If you like a roomier fit,
and aren’t sure which size to choose, go up one size. I’m wearing the XS/S in the photo and
am 5’5” and 105lbs in case this helps you decide!
Follow the key throughout the pattern for the size you are crocheting. The smallest size is
listed first:
XS/S (M/L, XL/XXL)
Bust Circumference Approximate (finished cardigan):
XS/S – 37.5”
M/L – 45”
XL/XXL – 52.5”
Length (approximate) :
XS/S – 19”
M/L – 22 ¾ ”
XL/XXL – 26 ¾” 1
Abbreviations & Skills:
ch – chain
puff – puff stitch (see instructions below)
st – stitch
ch st – chain stitch
dc – double crochet
sp – space
yo – yarn over
FPdc – front post double crochet
BPdc – back post double crochet
You will also half double crochet through the front loop only hdc flo.
Puff Instructions:
*note that for Rnd 1, you will work the Puff Stitches into the circle
Yo, insert hook in next st, yo, pull up a loop [yo, insert hook in same st, yo, pull up loop] 3
times, yo, pull through all 9 loops on hook.
Gauge:
Finished square size is approximately 3 ¾” X 3 ¾”. Adjust hook or tension as needed to
match gauge so that sizing will turn out correctly. Squares may also be blocked to size if
needed.
Notes:
This cardigan is created by first crocheting several granny squares (see photo tutorial), and then seaming them together to make rectangular panels. You will make a panel for the back as well as two panels for the front. The front panels are finally seamed to the back panel at the shoulders and sides, leaving openings for the arms. Sleeves are crocheted directly onto the cardigan and are worked in the round with double crochet stitches. You may choose to add length to your finished cardigan by making half double crochet stitches worked through the front loop only along the bottom of the cardigan until it reaches your desired length. You may also choose to customize your sleeve length by crocheting more or fewer rounds. Keep yarn needs in mind if making adjustments!
Wildflower Puff Stitch Granny Square Pattern
XS/S Make 45
M/L Make 60
L/XL Make 91
*Helpful note – the ch2 are the corners of the square. After round one, puff stitches are worked only in the corner ch2sp’s. See photo tutorial at end of pattern for visual help.
*do not turn at the end of each round.
Ch 3, sl st to join to make a circle.
Rnd 1 Ch 3, [Puff (see instructions) ch 1, puff, ch2] 4 times, join with slip stitch in top of 1st puff. Total of 8 puff sts, 4 corners with ch2sp in this rnd.
Rnd 2 Ch 3, Puff in previous ch2sp, dc in same ch2sp, *dc in each st and ch sp across to next
ch2sp, (dc, puff, ch 2, puff, dc) in ch2sp. Repeat from *around to last ch2sp with 1st puff st, (dc, puff), ch 2, slip stitch to join in top of 1st puff.
Rnd 3 Repeat directions from rnd 2.
Helpful TIP:
Rnd 2 – 20 dc, 8 puff
Rnd 3 – 24 dc, 8 puff
Panel Sewing
Front Panel (make 2) *Sew squares together with a simple whip stitch seam using your
tapestry needle and a length of yarn to create a rectangular/square panel.
XS/S
Sew together a panel of squares, 2 squares wide (across), and 5 squares long.
M/L
Sew together a panel of squares, 2 squares wide (across), and 6 squares long.
Next, attach yarn to outer corner, long side of panel. Double crochet evenly along the long
edge, working 3 rows of stitches. Work these rows on one side only, the outer edge of each of
the front panels. This will add width to each of your front panels.
XL/XXL
Sew together a panel of squares, 3 squares wide (across) and 7 squares long.
Back Panel (make 1)
XS/S
Sew together a panel of squares 5 squares wide and 5 squares long.
M/L
Sew together a panel of squares 6 squares wide and 6 squares long.
XL/XXL
Sew together a panel of squares 7 squares wide and 7 squares long.
Assembly and Sleeves
Place two front panels on back panel with outer edges aligned (see schematic). Sew front
panels to back panels at the top/shoulder. Seam up the sides, leaving space for the arms
of approximately 7.5” ( 8”, 8.5”).
Sleeves
Attach yarn to bottom of arm opening. Work double crochet stitches around, slip stitching
to join at the end of each round. Continue working around until sleeve is approximately
10.5” (11.5”, 12.5”) or desired length.
Optional: On final round, alternate FPdc and BPdc around to create a ribbed effect for the
cuff. Tie off and weave in ends.
Collar/Front Opening
Attach yarn to lower, inner front corner of cardigan opening. Work half double crochet stitches evenly up the side, along the neck, and down to the opposite lower front corner. Make 5 rows of half double crochet stitches, working through the front loops only, along the collar/neckline. Feel free to add more rows for a wider collar if desired or you want more coverage at the front of your cardigan. Tie off, and weave in ends.
Steam block the cardigan to shape and size if desired. It is possible to block this garment to a slightly larger size if needed. When blocking my sleeves, the length did extend, so keep
this in mind!
Schematic:
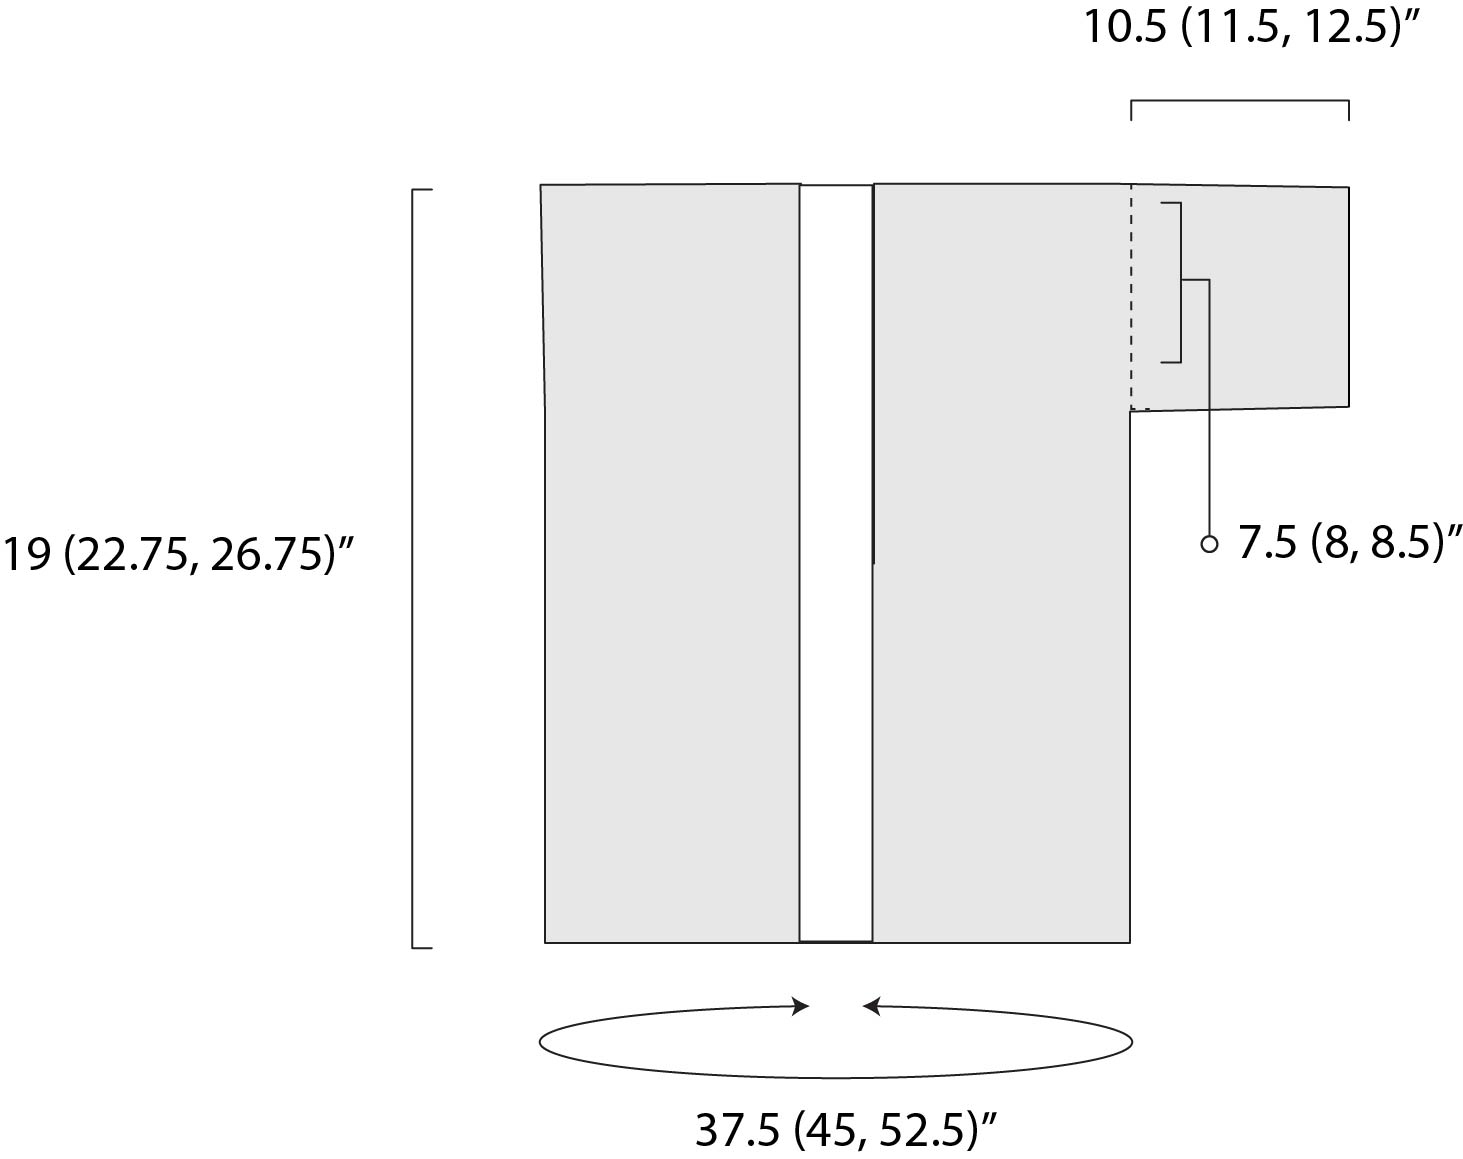
of the back panel and seamed at the sides and shoulders.
Openings are left for the arms, and the sleeves
are crocheted directly onto the cardigan.
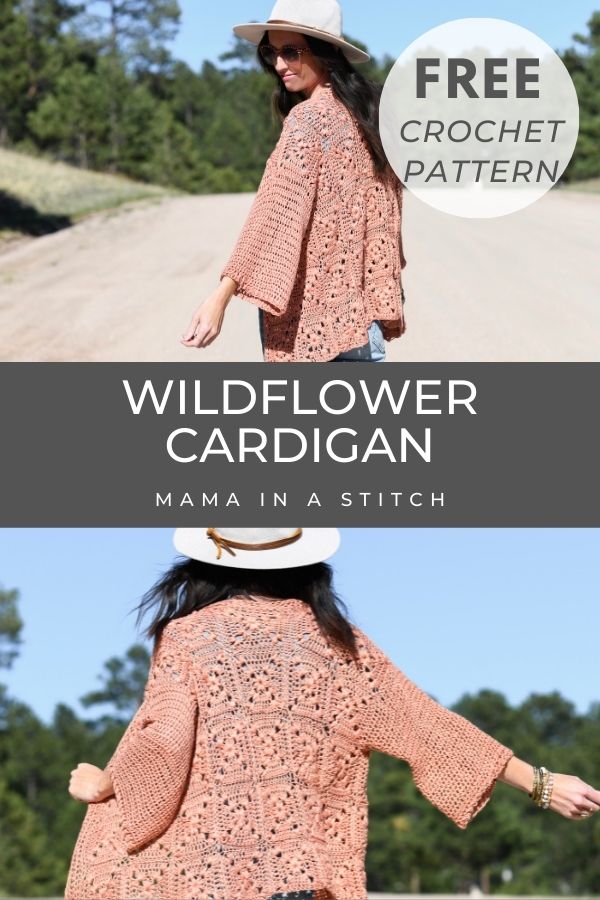
I hope you enjoyed this unique top today. I love a good chunky yarn, and fall sweater, but this might be one of my favorite summer projects so far! It’s definitely a show stopper in my opinion! I’d love to hear if you make one. Happy summer my friends!
XO,
Jessica
Thank you to Lion Brand for sponsoring this post. All opinions are 100% my own.