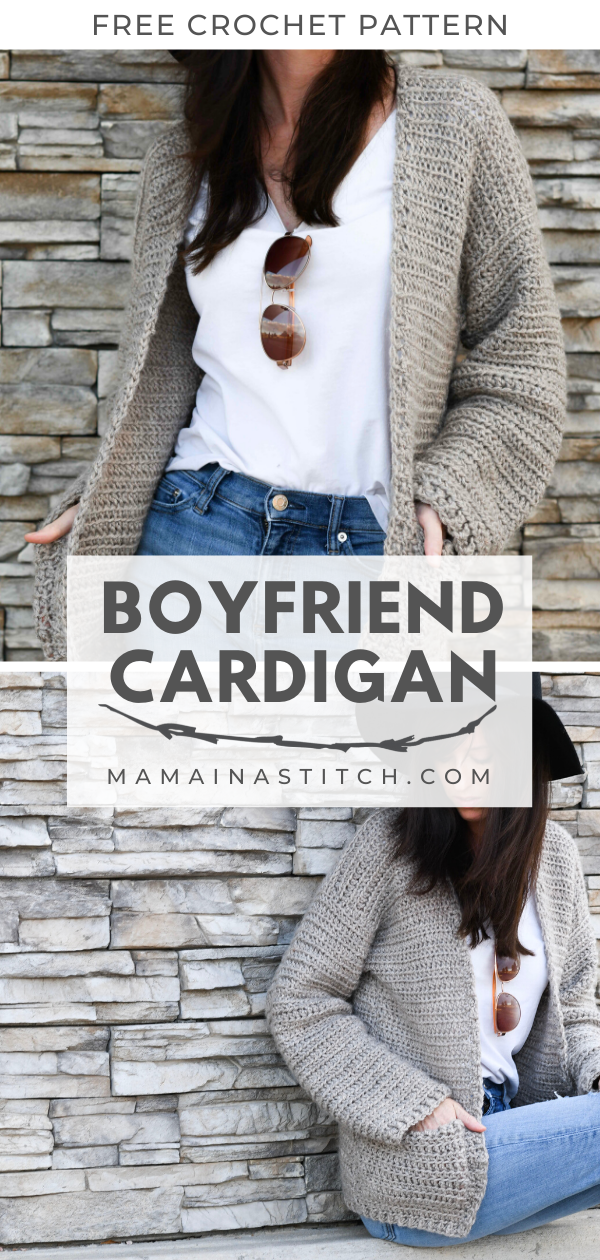
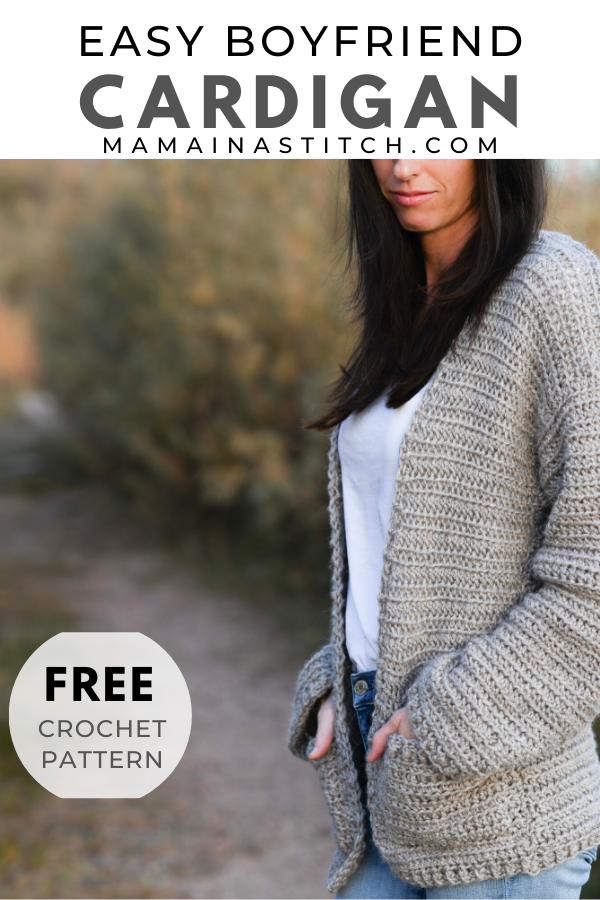
Easy Crochet Sweater Pattern – Boyfriend Cardigan

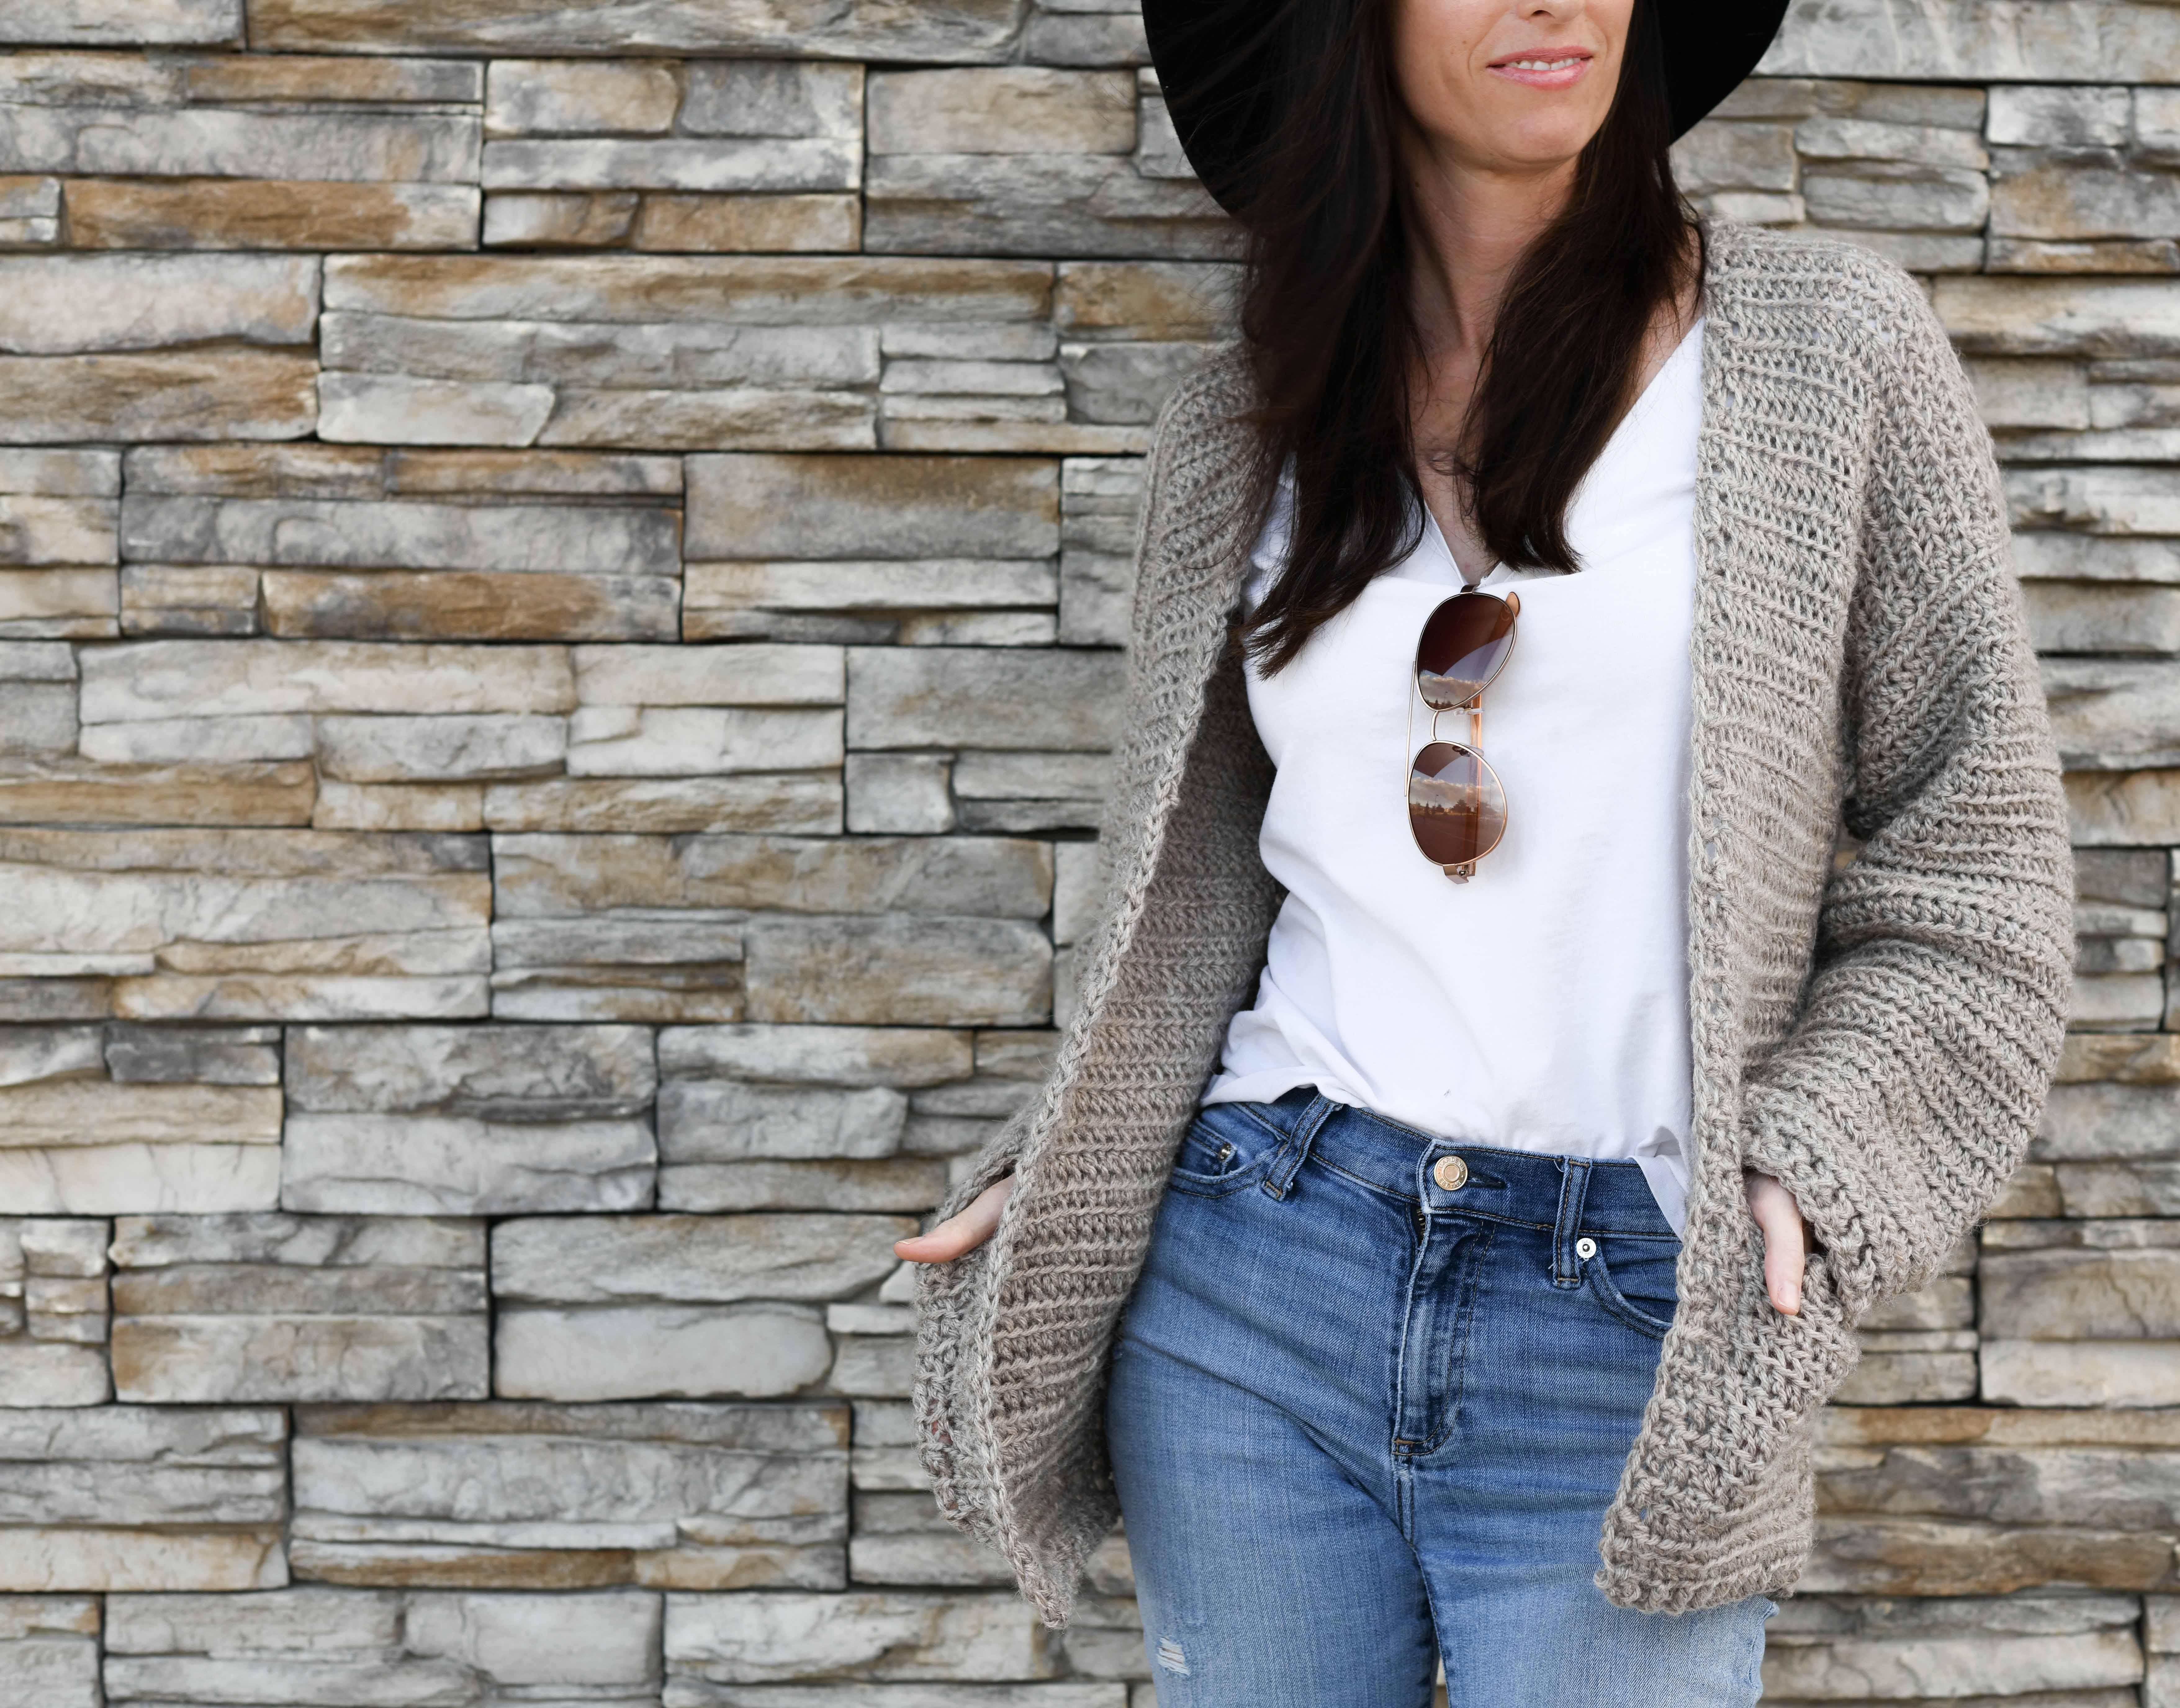
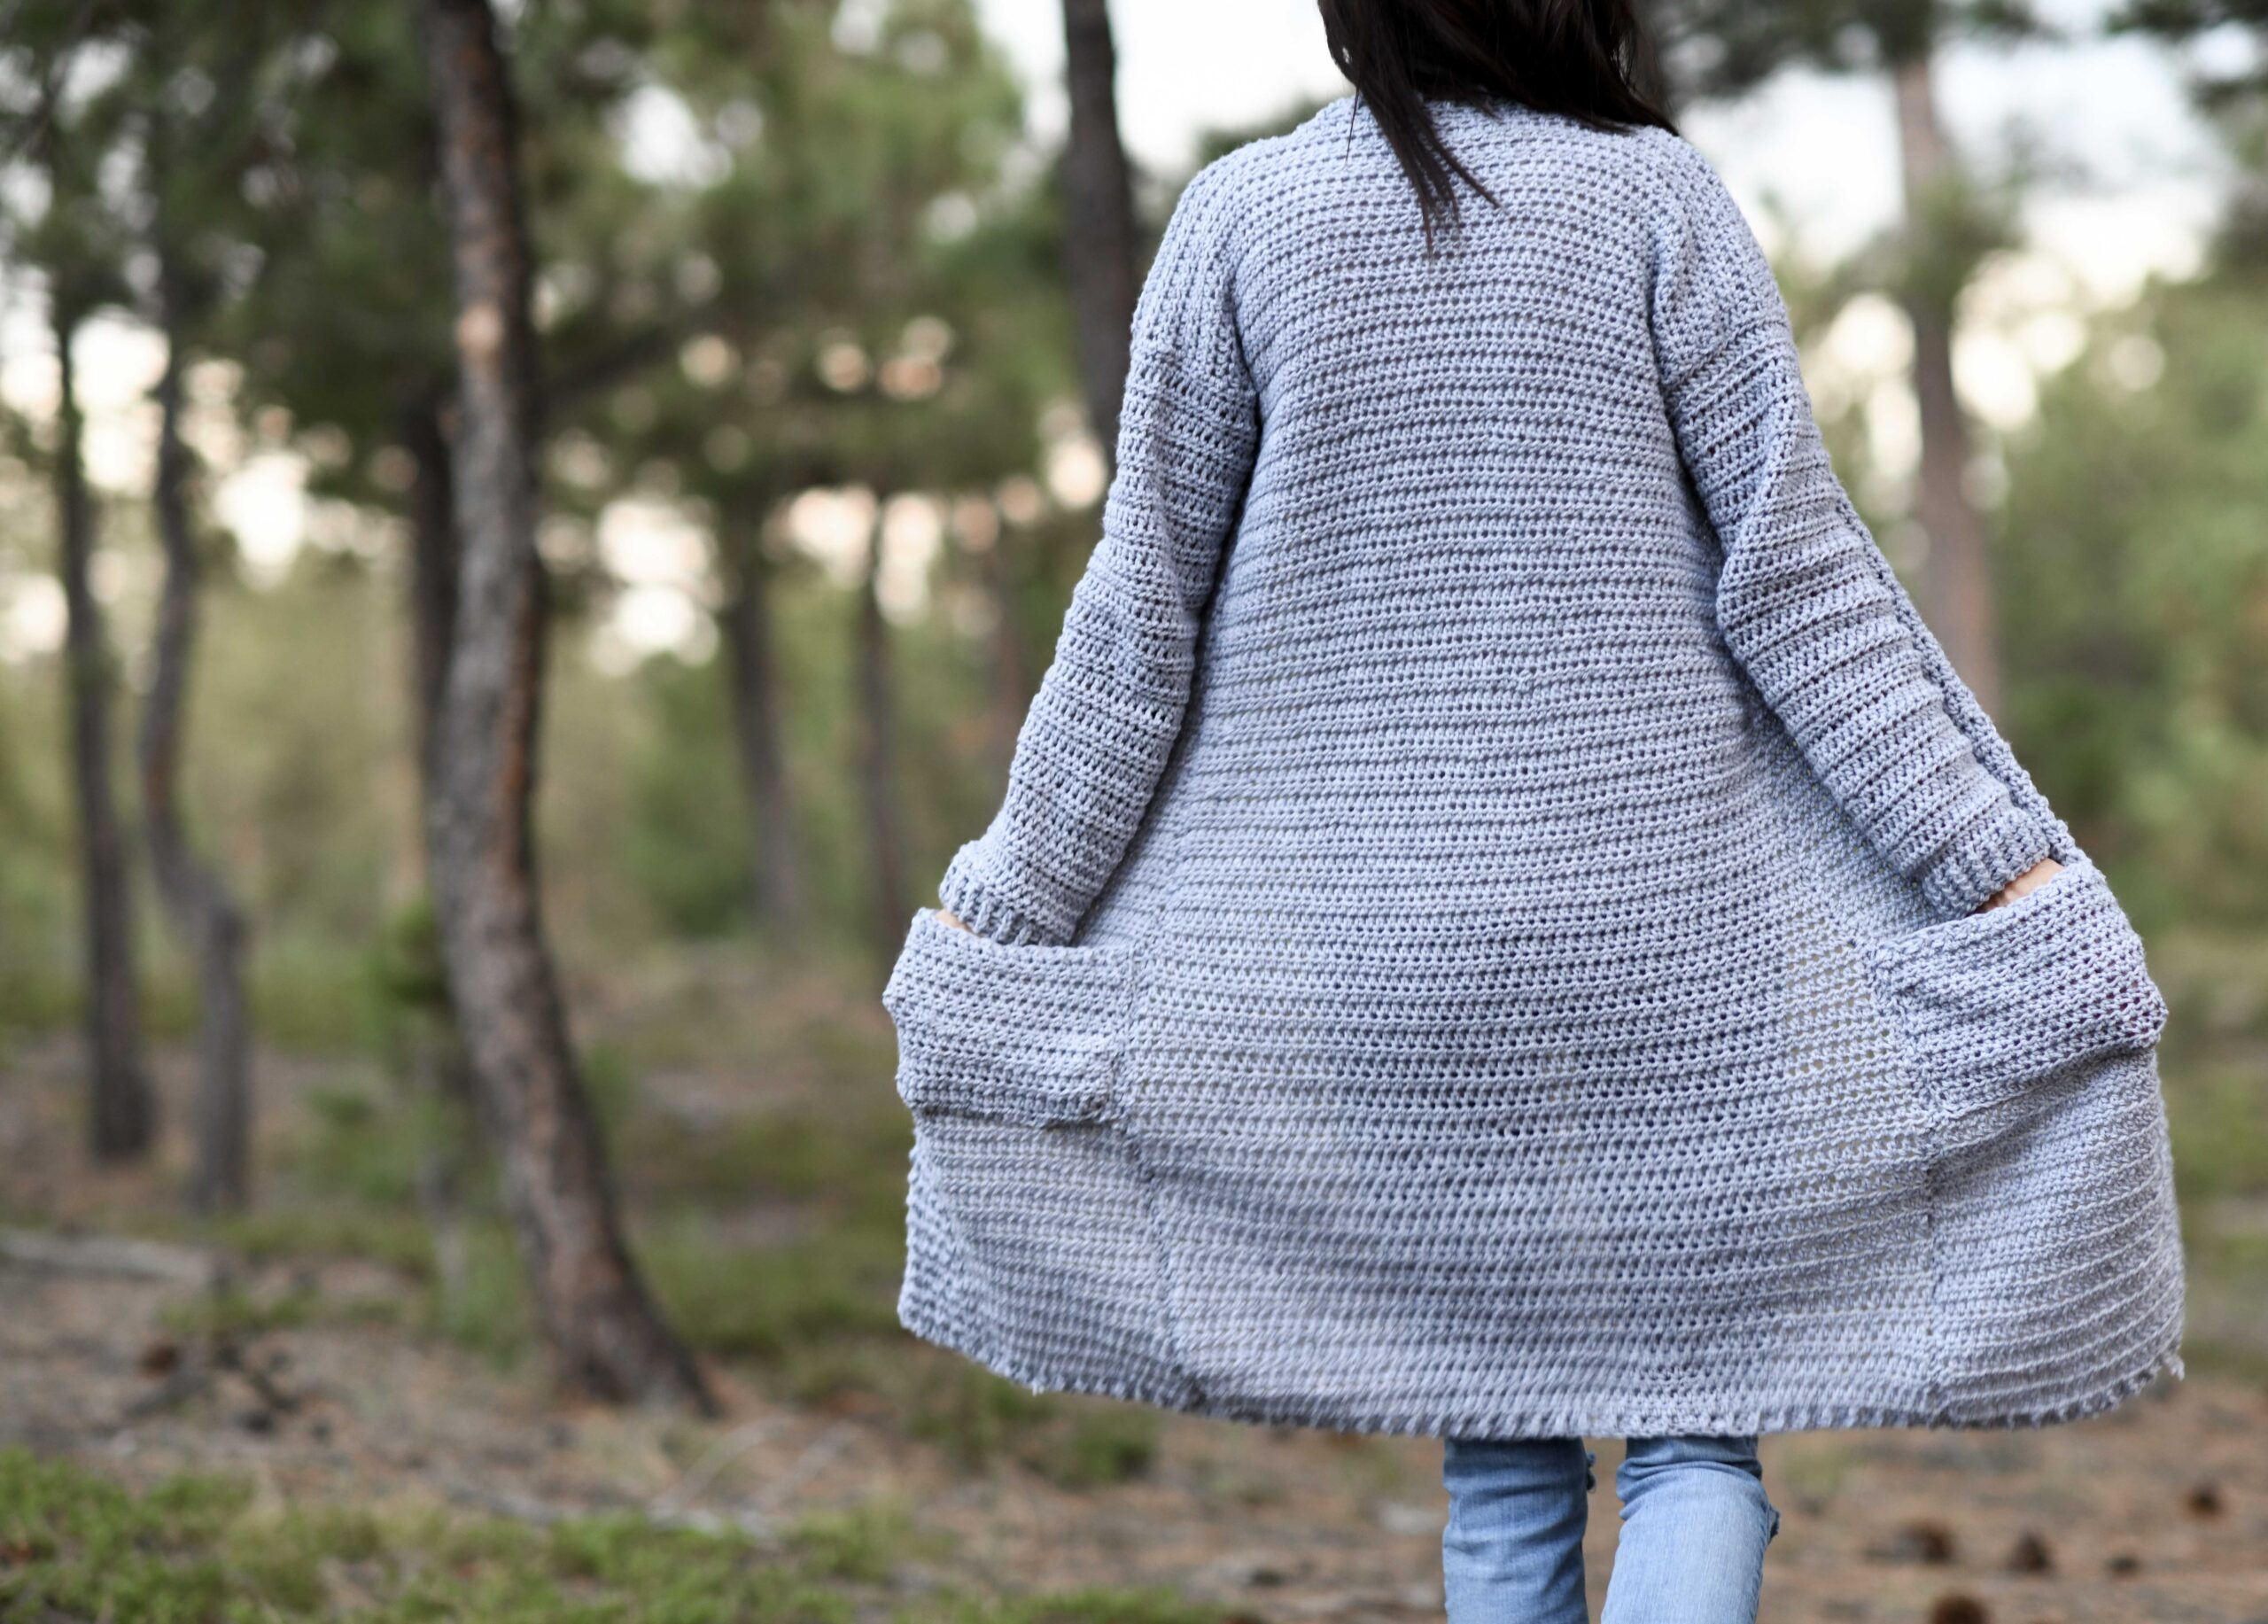
Here’s “My Boyfriend Cardigan”! You guys – I live in cardigans all winter long. They are the best for layering. Take them off when you’re hot, put them on when you’re chilly. This super easy crocheted cardigan is simple and soooo practical! It’s roomy (as a “boyfriend” cardigan would be) so you can layer underneath and the alpaca gives it a beautiful, cozy halo.
You’ll find the free, easy crochet pattern below, or you may choose to purchase the advertisement-free, printable PDF version from Etsy HERE or the kit from Lion Brand Yarn HERE.
Read on….
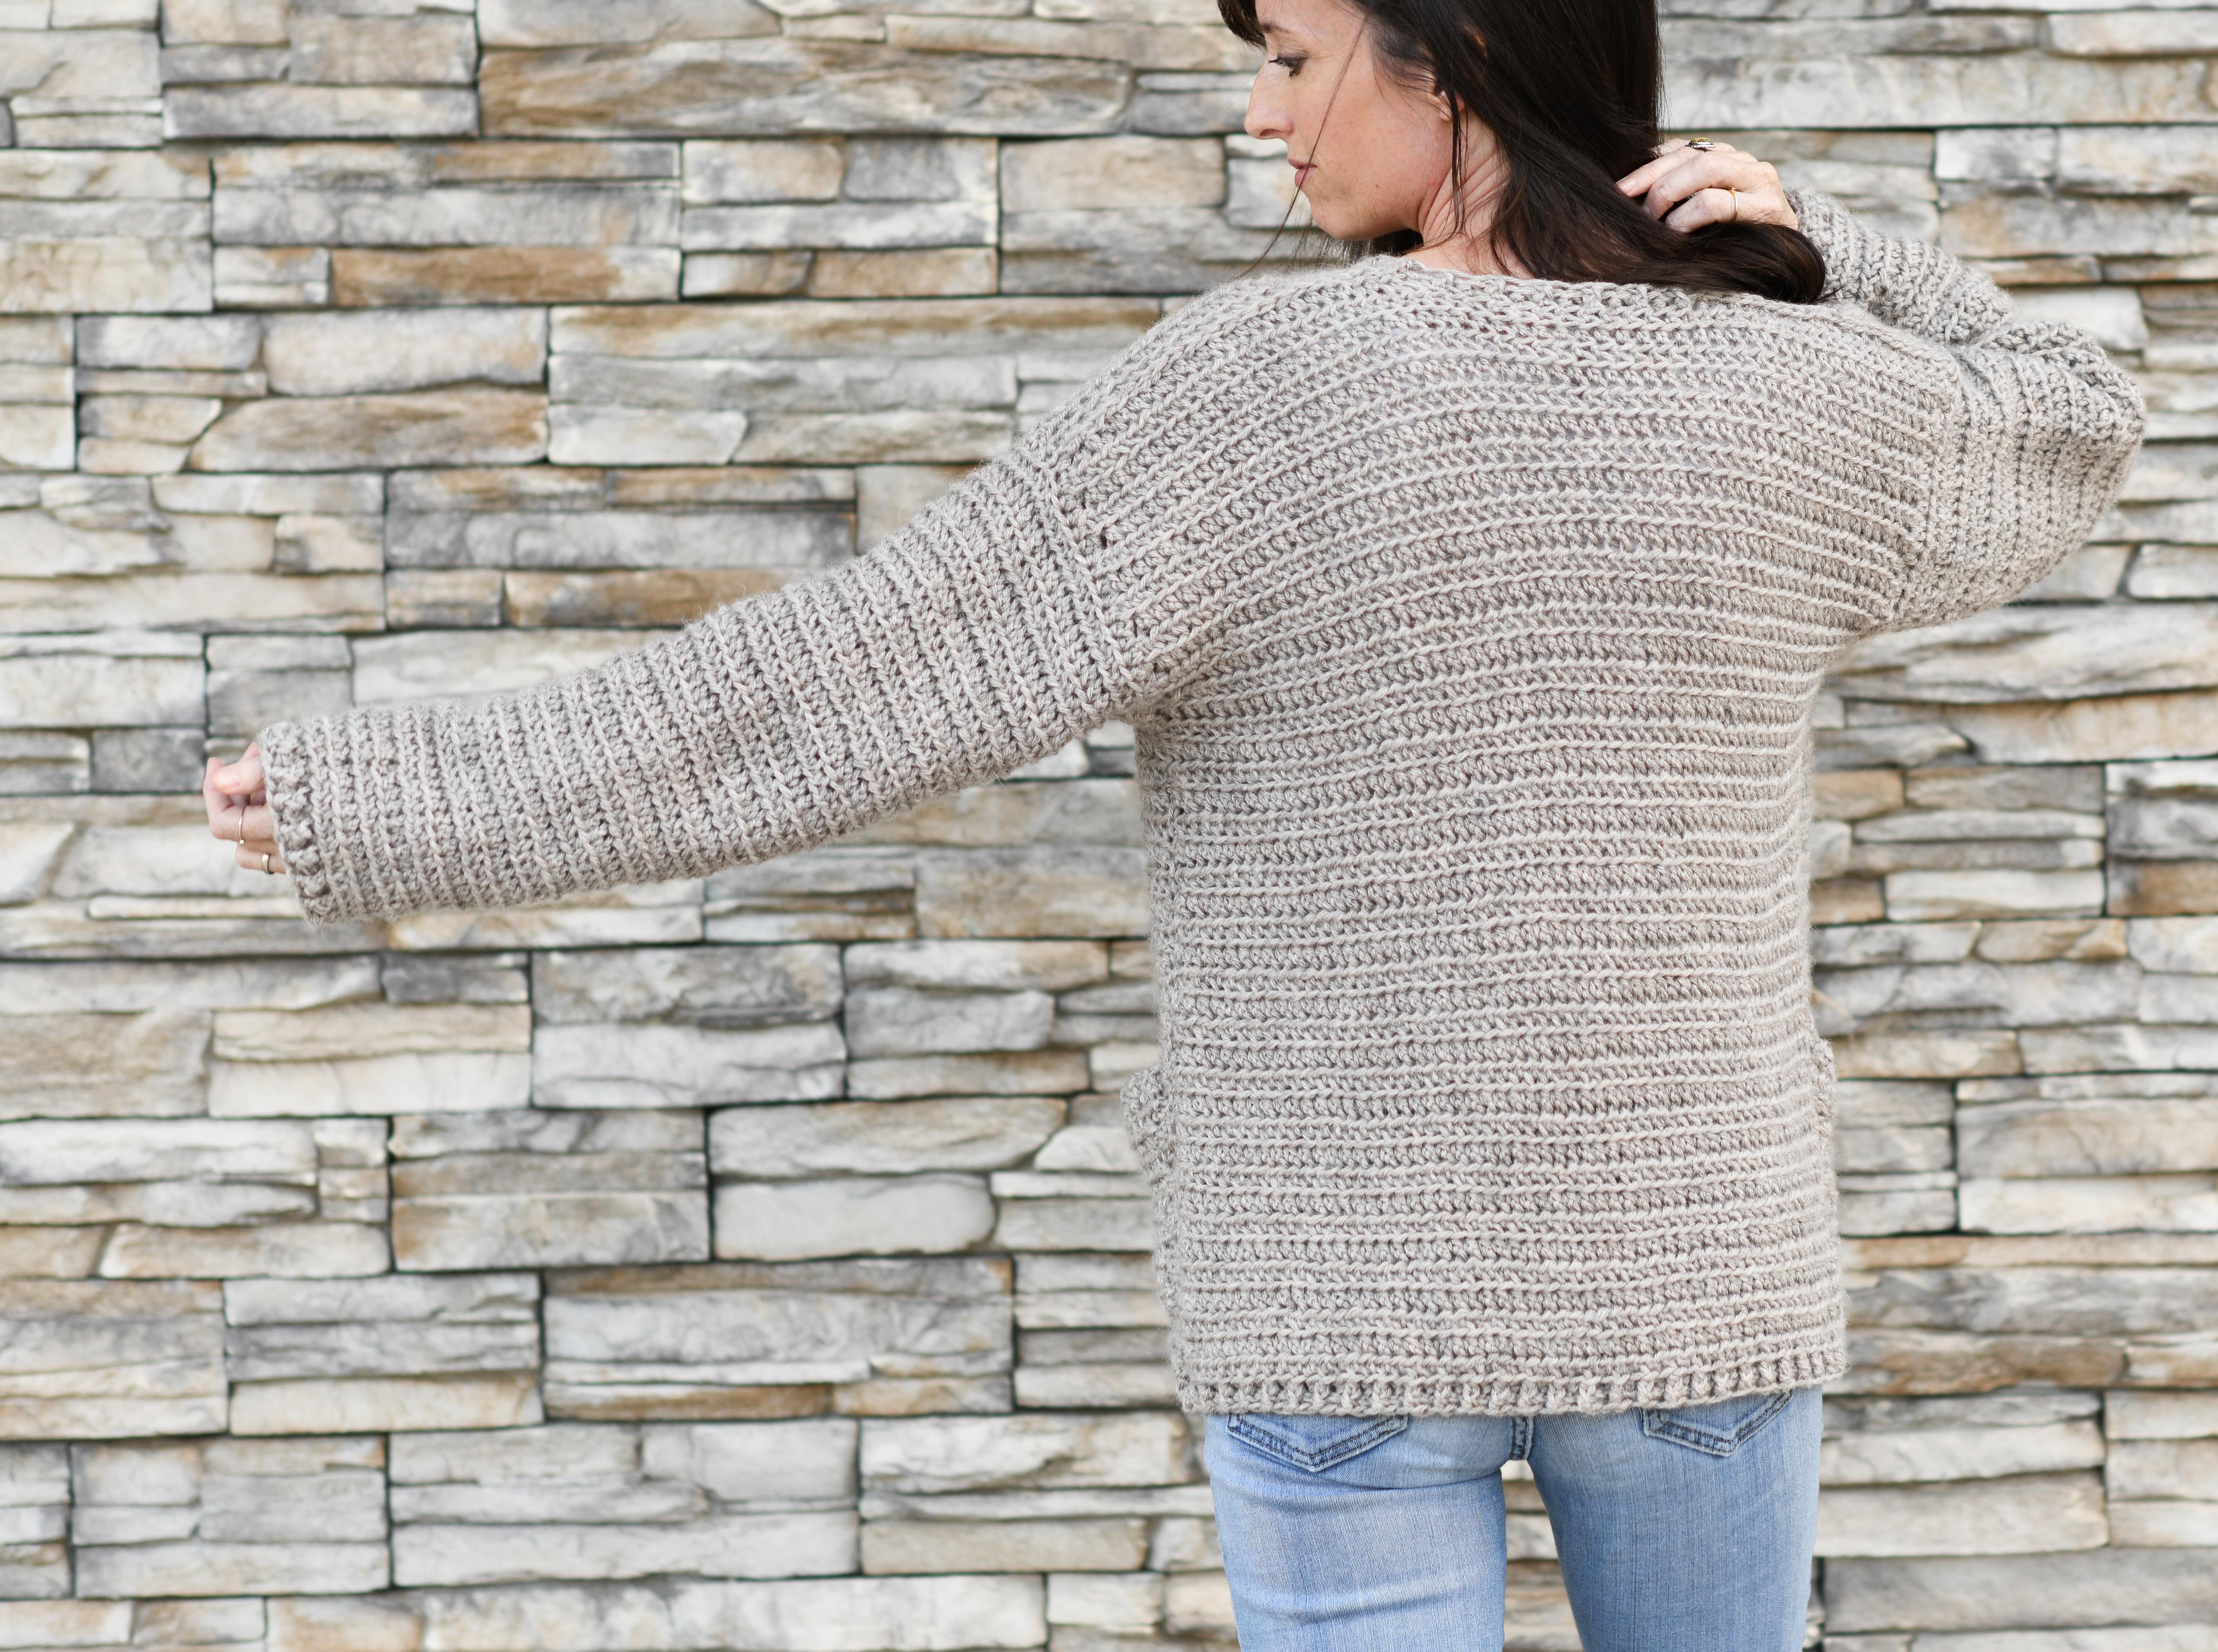
I made today’s crocheted cardigan pattern with beginner sweater makers in mind. The entire piece is crocheted with basic shapes and it has light shaping on the sleeves. And don’t fear the sleeve shaping! I’ll do some “explain’n” later in this blog post about how it works.
Boyfriend cardigans are all over the stores and it’s not hard to see why.
They are usually oversized, comfy and have cozy pockets making them perfect for cool days. With My Boyfriend Cardigan here, you can see that I’ve kept the arms roomy but still nicely shaped.
This lends to it’s comfortable fit and ability to have layers underneath. And, I don’t know about you, but I’ve never had a boyfriend (or husband) who’s cardigan would fit me snug on the arms. They are supposed to be nicely oversized in my book!
The length isn’t super long, but it’s not super short either. The coolest part about this pattern is that it’s so easy to make it any length that you’d like! Simply crochet for more rows on the front panels and back panel. Boom!
If you know how to half double crochet, and you can crochet in the round, you’re good to go! You’ll crochet a large rectangle for the back and two rectangles for the front. Once you’ve got that done and seamed, you’ll attach your yarn to crochet the sleeves.
Stay with me now – these sleeves are crocheted in “joined rows” or “turned rounds”. In a nutshell, you will work a row around the arm opening, join, then turn and work another row around, join, turn, and repeat. It might be a new concept for ya, but it’s not difficult!
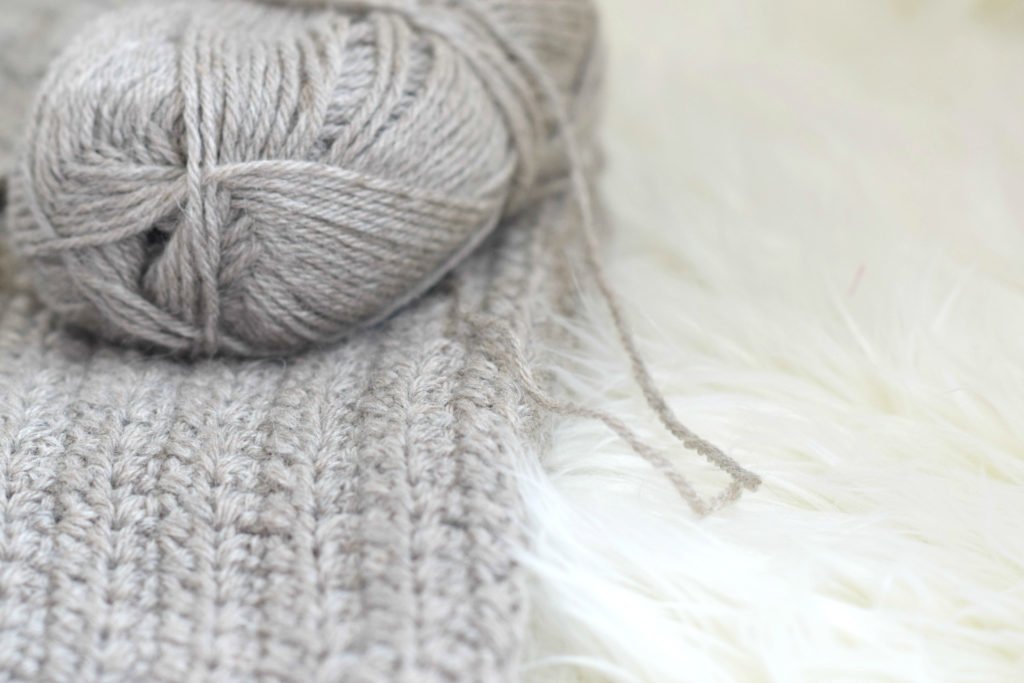
I’ve worked with Lion Brand Touch of Alpaca a few times because I really like the slight “halo” effect that it brings.
It’s also warm and affordable. But you know you can use any of your favorite worsted weight #4 yarns for this pattern. 🙂 And if you’re curious to see the projects that I’ve used this very same yarn in the VERY same color, see my kimono HERE and my poncho HERE.
So shall we get to this pattern?
Just a reminder that you can see the free pattern below, or find the printable, ad-free version available for purchase in my Etsy shop HERE!
My Boyfriend Cardigan Free Crochet Pattern
Description:
Boyfriend cardigans are everywhere this season! This comfy, classic version is crocheted with basic shapes and easy stitches, making it a great beginner sweater. It features a relaxed fit with minimal shaping on the sleeves so it’s both a fun and practical piece. The alpaca blend yarn will keep you warm while pockets in front add comfort and character to this season’s wardrobe staple.
Skill Level:
Easy +
Materials:
US Size J, 6.0 mm Crochet Hook
(5,6,7,8) Lion Brand Touch of Alpaca in Taupe Worsted Weight Yarn (100 g/skein) Find the kit HERE in multiple color options
Pattern uses approximately (476 g, 551g, 631g, 702g)
Measuring Tape
Tapestry Needle
Scissors
Stitch Markers
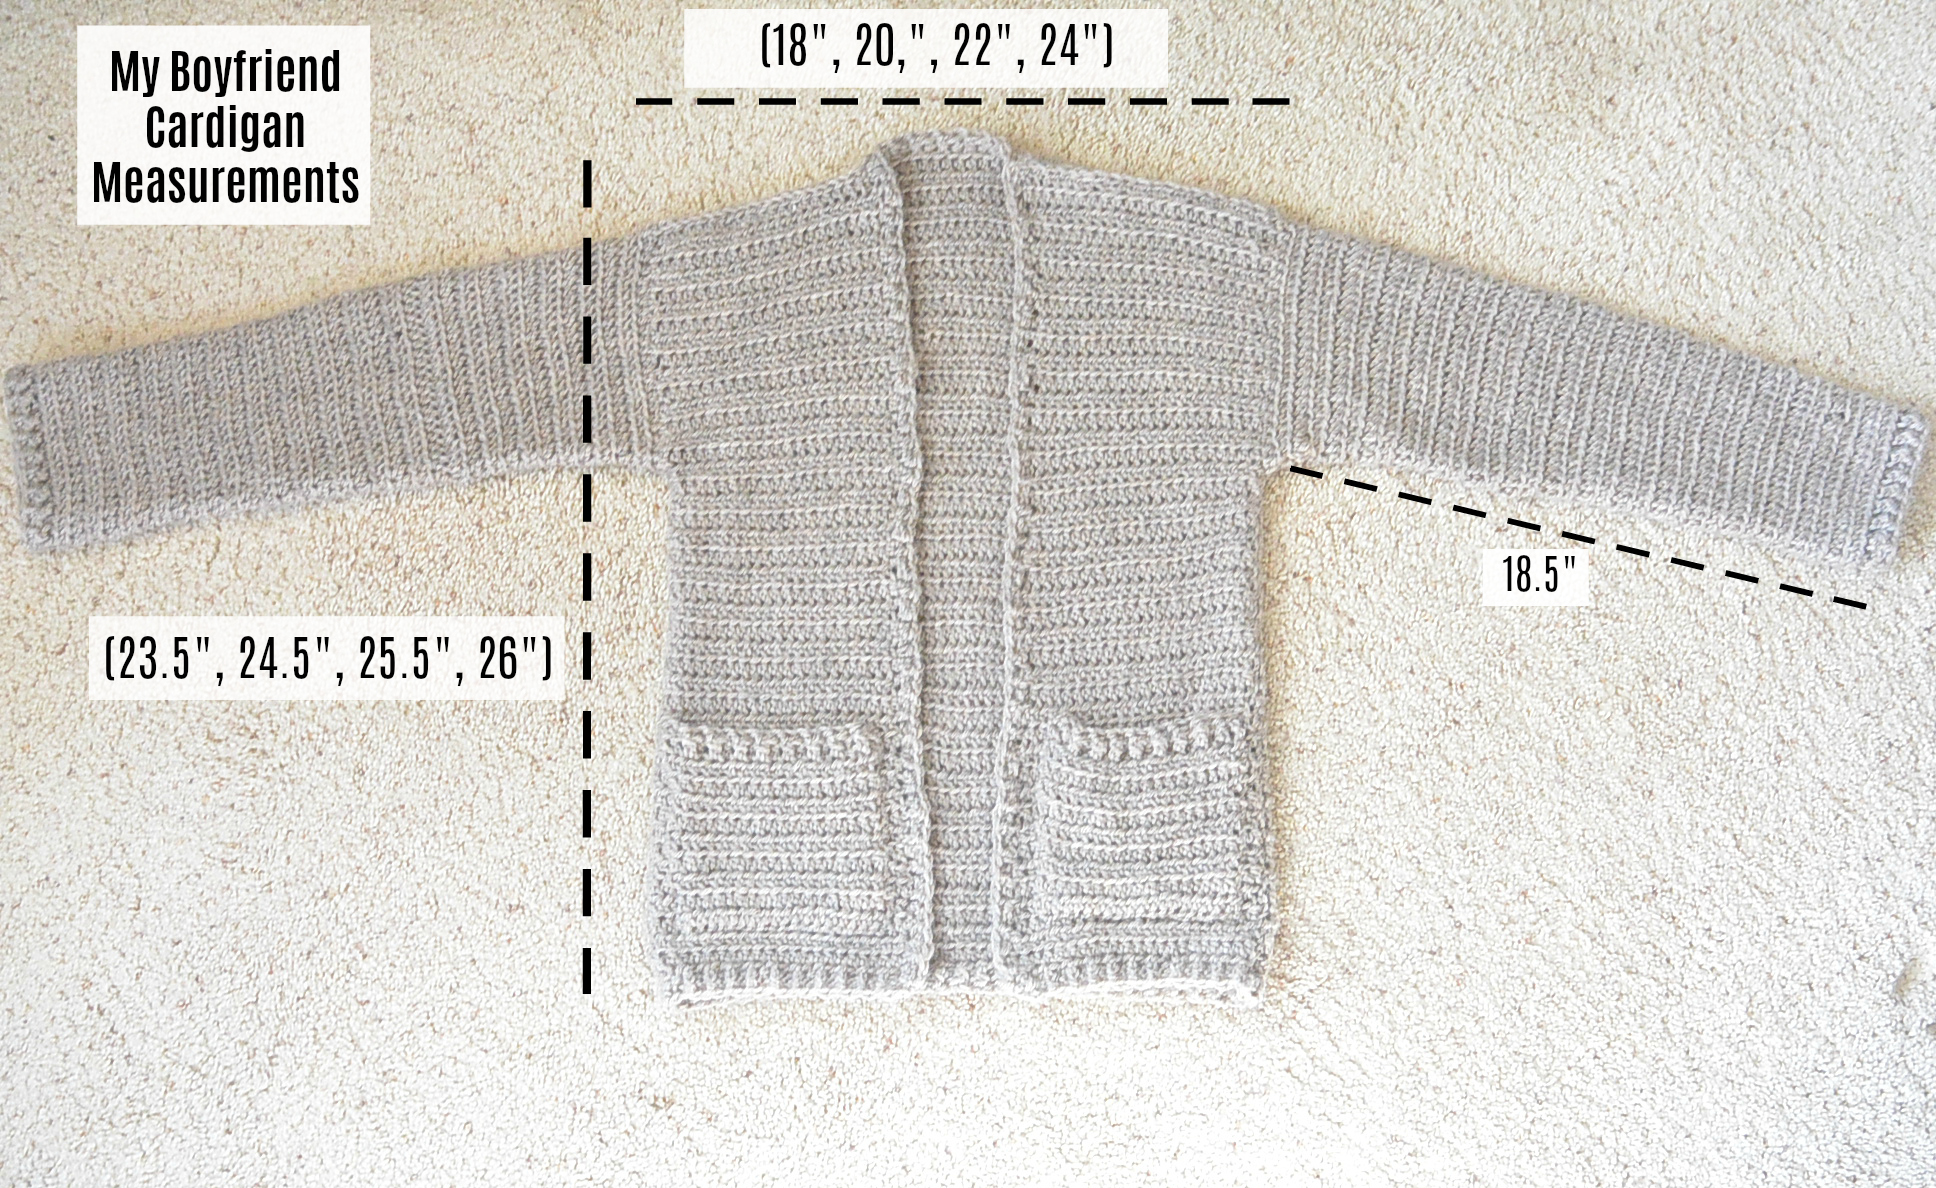
Dimensions (approximate):
Small, Medium, Large, XL
Please follow the key throughout the pattern according to the
size you are crocheting:
(S, M, L, XL)
Bust Circumference:
S – 36”
M – 40”
L – 44”
XL – 48”
Length:
S – 23.5”
M – 24.5”
L – 25.5”
XL – 26”
Sleeves Measurements:
Length: All sizes approximately 18.5”
Approximate width at widest point at upper portion of sleeve: (7.5”, 8.5”, 9.5”, 10”)
Approximate width at sleeve cuff: (5”, 6”, 7”, 7.5”)
Abbreviations & Skills:
ch – chain
hdc – half double crochet
hdc flo – half double crochet through the front loop only
hdc2tog – half double crochet two together (decrease)
sl st – slip stitch
st – stitch
sts – stitches
FPhdc – front post half double crochet (insert your hook from front to back around post)
BPhdc – back post half double crochet (insert your hook from back to front around post)
Gauge:
Approximately 13 stitches and 7.5 rows in 4” x 4” of hdc flo stitches (Adjust hook size if needed to obtain correct gauge)
Notes:
This cardigan is crocheted by making one rectangular back panel and two rectangular front panels which are seamed together at the shoulders and sides. Sleeves are worked in joined rows and are crocheted onto the sweater at the arm openings. The cuffs and collar are crocheted with post stitches and optional pockets are added at the end.
Cardigan Crochet Pattern Instructions
Back Panel of Cardigan
Ch (60, 66, 72, 78)
Row 1 Hdc in 3rd st from hook and in each st across the row (58, 64, 70, 76 sts)
Row 2 Ch 2 (doesn’t count as a st here or throughout pattern), turn, hdc flo in 3rd st from hook and in each st across the row (58, 64, 70, 76 sts)
Repeat row 2 until piece is approximately (22 ½”, 23 ½”, 24 ½”, 25”) long.
Tie off and weave in ends.
Front Panels (make 2)
Ch (24, 27, 30, 33)
Row 1 Hdc in 3rd st from hook and in each st across the row (22, 25, 28, 31 sts)
Row 2 Ch 2, turn, hdc flo in 3rd st from hook and in each st across the row (22, 25, 28, 31 sts)
Repeat row 2 until piece is approximately (22 ½”, 23 ½”, 24 ½”, 25”) long.
Tie off and weave in ends.
Assembly & Sleeves
Place two front panels directly on top of back panel, leaving space in the middle and outer edges aligned.
Shoulders
Using your preferred seaming method, sew the shoulders along the top on each side.
Seam Sides and Create Arm Openings
Using your preferred seaming method, sew up each side from the bottom-up. Leave arm openings that are approximately (7.5”, 8.5”, 9.5”, 10”) wide.
(Wait to tie off the seam to the arm opening in case adjustments need to be made to make it a bit wider or smaller when starting the sleeves in the next section)
Sleeves
Sleeves are crocheted in joined rows or turned rounds. You will sl st to join and then turn as if to work a row. Note: Remember that the beginning ch 2 doesn’t count as a stitch, so join in the first hdc st, not the beginning ch 2
Mark the first st of each row to ensure stitch count is correct.
Attach yarn to bottom of arm opening.
Row 1 Ch 2 (doesn’t count as st), hdc evenly around, sl st to join at end of row. Mark first st of row (approximately 48, 54, 59, 62 stitches around )
Row 2 Ch 2, turn, 1hdc flo in each st across, sl st to join
Row 3 Ch2, turn, hdc2tog flo, hdc flo in each st across, sl st to join
Row 4 Ch2, turn, hdc flo in each st around, sl st to join
Row 5 Ch2, turn, hdc flo in each st around, sl st to join
Repeat rows 3 – 5 until sleeve is approximately 17.5” long, or as long as you’d like (keep yarn needs in mind). The stitch count will decrease by one stitch every third row.
Once the sleeve has reached 17.5”, finish the last stitch of row by skipping a stitch and slip stitching into the next stitch. Next, begin the Sleeve Cuff part of the pattern.
Repeat this pattern for the second sleeve
Sleeve Cuffs
Ch 2, work FPhdc, followed by BPhdc. Repeat this pattern, alternating a FPhdc st, followed by a BPhdc st around for one round. Sl st to join, tie off and weave in ends. (To make the ribbing work out perfectly, work an even number of stiches around if possible)
Bottom Cuff
Attach yarn to the bottom inner corner on the front of the cardigan. Ch 2, work a FPhdc st, followed by a BPhdc st. Repeat these two stitches alternating a FPhdc followed by a BPhdc, across for one row. Tie off and weave in ends.
To make sleeves or sweater cuffs longer, you may add more length by crocheting for more rounds or rows. Keep yarn needs in mind.
Collar
Attach yarn to bottom inner corner on the front of the cardigan. Working along the collar, ch 2, work hdc stitches across (Row 1). Work up and around neckline to opposite side. Ch 2, turn, work FPhdc followed by BPhdc across (Row 2). Tie off and weave in ends.
Pockets (make 2)
All sizes
Ch 20
Row 1 Hdc in 3rd ch from hook and in each st across the row (18 sts)
Row 2 Ch2, turn, hdc flo in 3rd ch from hook and in each st across the row (18)
Repeat row 2 until pocket measures approximately 5” tall.
Next, alternate FPhdc and BPhdc across the top for one row, just as you did with the cuffs. Tie off and weave in ends.
Sew pockets to the lower front panels of the cardigan, leaving openings in the top. Tie off and weave in ends.
Block as desired to shape and size.
That’s all there is to it!
I hope you enjoyed this cardigan and please let me know if you have any questions!
XO,
Jessica
If you liked this, you might also like:
Light Snow Oversized Cardigan Crochet Pattern

This post was sponsored by Lion Brand Yarn. All opinions are 100% my own.

I love love LOVE this! I need a winter cardi, and was just sniffing around my stash of chunkies to see what I could make with them. This pattern is perfect, thank you sooooo much.
H xxx
Do you have a free pattern for something similar, but with a vertical row pattern?
Absolutely LOVE this! I’m noticing an increase of 6 chains per size. Could I continue this 6 chain increase to make a larger size?
How do we make this larger?
Love the sweater; any chance you can come up with a knit version.
Hi Jessica- love this pattern! I am a 3X size, and had tried to crochet another of your beautiful cardigans last winter. Sad to say, my efforts at enlarging the pattern were a total disaster! it sort of fit in the body, but the sleeves were so tight they cut off my blood supply! LOL Please, please can we have precise directions to make this a lot larger? You skinny wench you! Love your work. Thanks for all you do- Robin
I’m here to ask the same question as the previous two commentors. Since the front and back panels are rectangles, can I simply add “#” stitches to each front panel and “# x 2” to the back panel? I see great sweater patterns all the time, but for some reason, this one struck me as the one for me. Unfortunately, I’m more than 1XL.
I like it but wish it was a knitting pattern.
Yes, you can add stitches to the front and back panels to make them as wide as you’d like! Thanks for asking!
Lol!!
You can easily make the arms as wide as you need with this pattern because you decide how wide you want to leave the arm openings. So while I’ve given measurements, you can do what you’d like and follow the basic stitch pattern. You also can easily make each panel wider by adding more stitches. I hope this helps! I also really hope that I can find a way to make more sizes in the coming year. Thanks Robin!
I absolutely love this pattern!! So I tried to start it but my gauge was incorrect. The amount of stitches was correct but the amount of row was really wrong. I tried to to dc instead of hdc and it turned our correct. So I was just wondering if I could change all of the hdc into dc? Or would it turn out wrong?
Thanks,
Lydai
*Lydia
That’s what I did to make it a size bigger.
Hi-this is really cute. My question is what method do you use to wash/dry this piece?
Thank you for time in creating this and sharing it.
Hi Jessica! I am new to crochet – just started in January. This is the second of your patterns that I’ve tried. The Azul V-mesh poncho turned out beautifully! Thank you. On this pattern, I’m confused by the sleeves. Do I make the sleeves separately and then join them to the body of the sweater, or do I crochet them directly from the armholes in left in the seamed-together body? I’ve looked online for video tutorials but can’t find anything to help. Thanks for your help.
Hi Justine! Sorry for the delay! Crochet them directly onto the arm opening. 🙂 Hope this helps!
Wow that so good.useful work with the creative and amazing thoughts. I like it very much.
Wow, that so good.useful work with creative and amazing thoughts. I like it very much. thanks for the ideas.