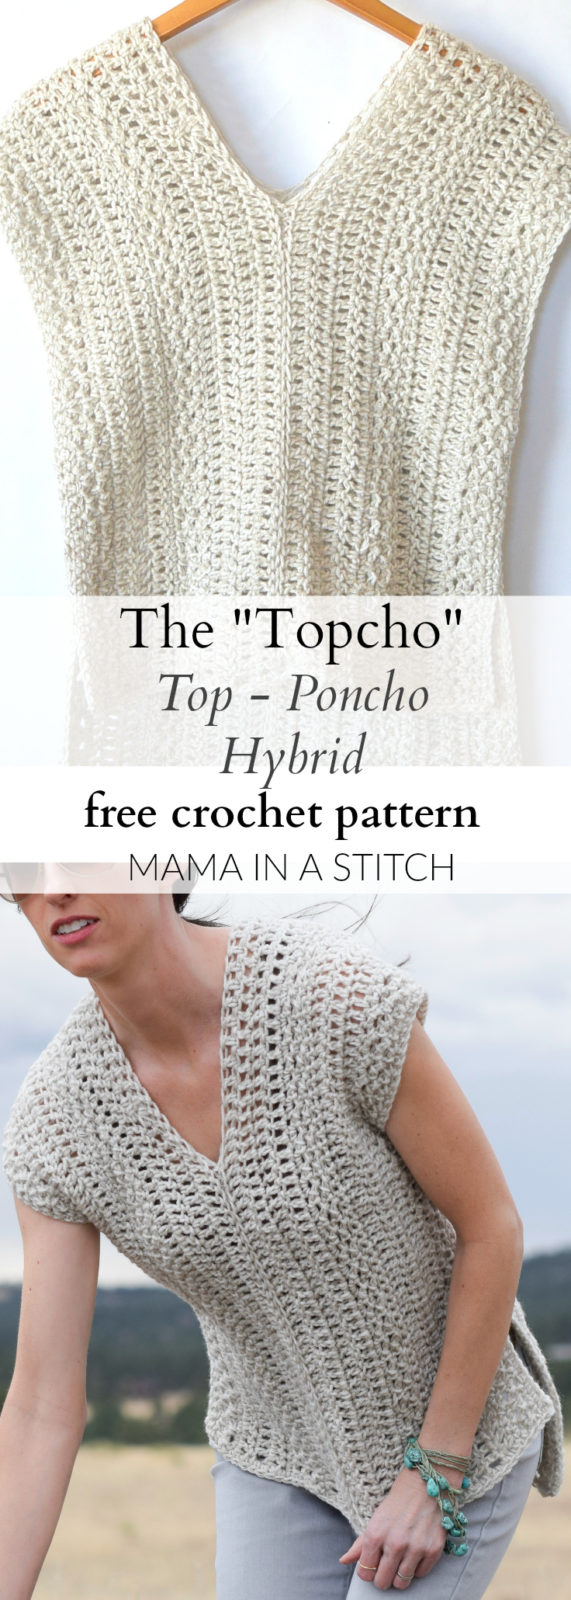
The “Topcho” Easy Crochet Shirt Pattern
Spring and summer crochet season is officially upon us, right? Of course, it’s still freezing in most of the country right now but we can dream. 😉
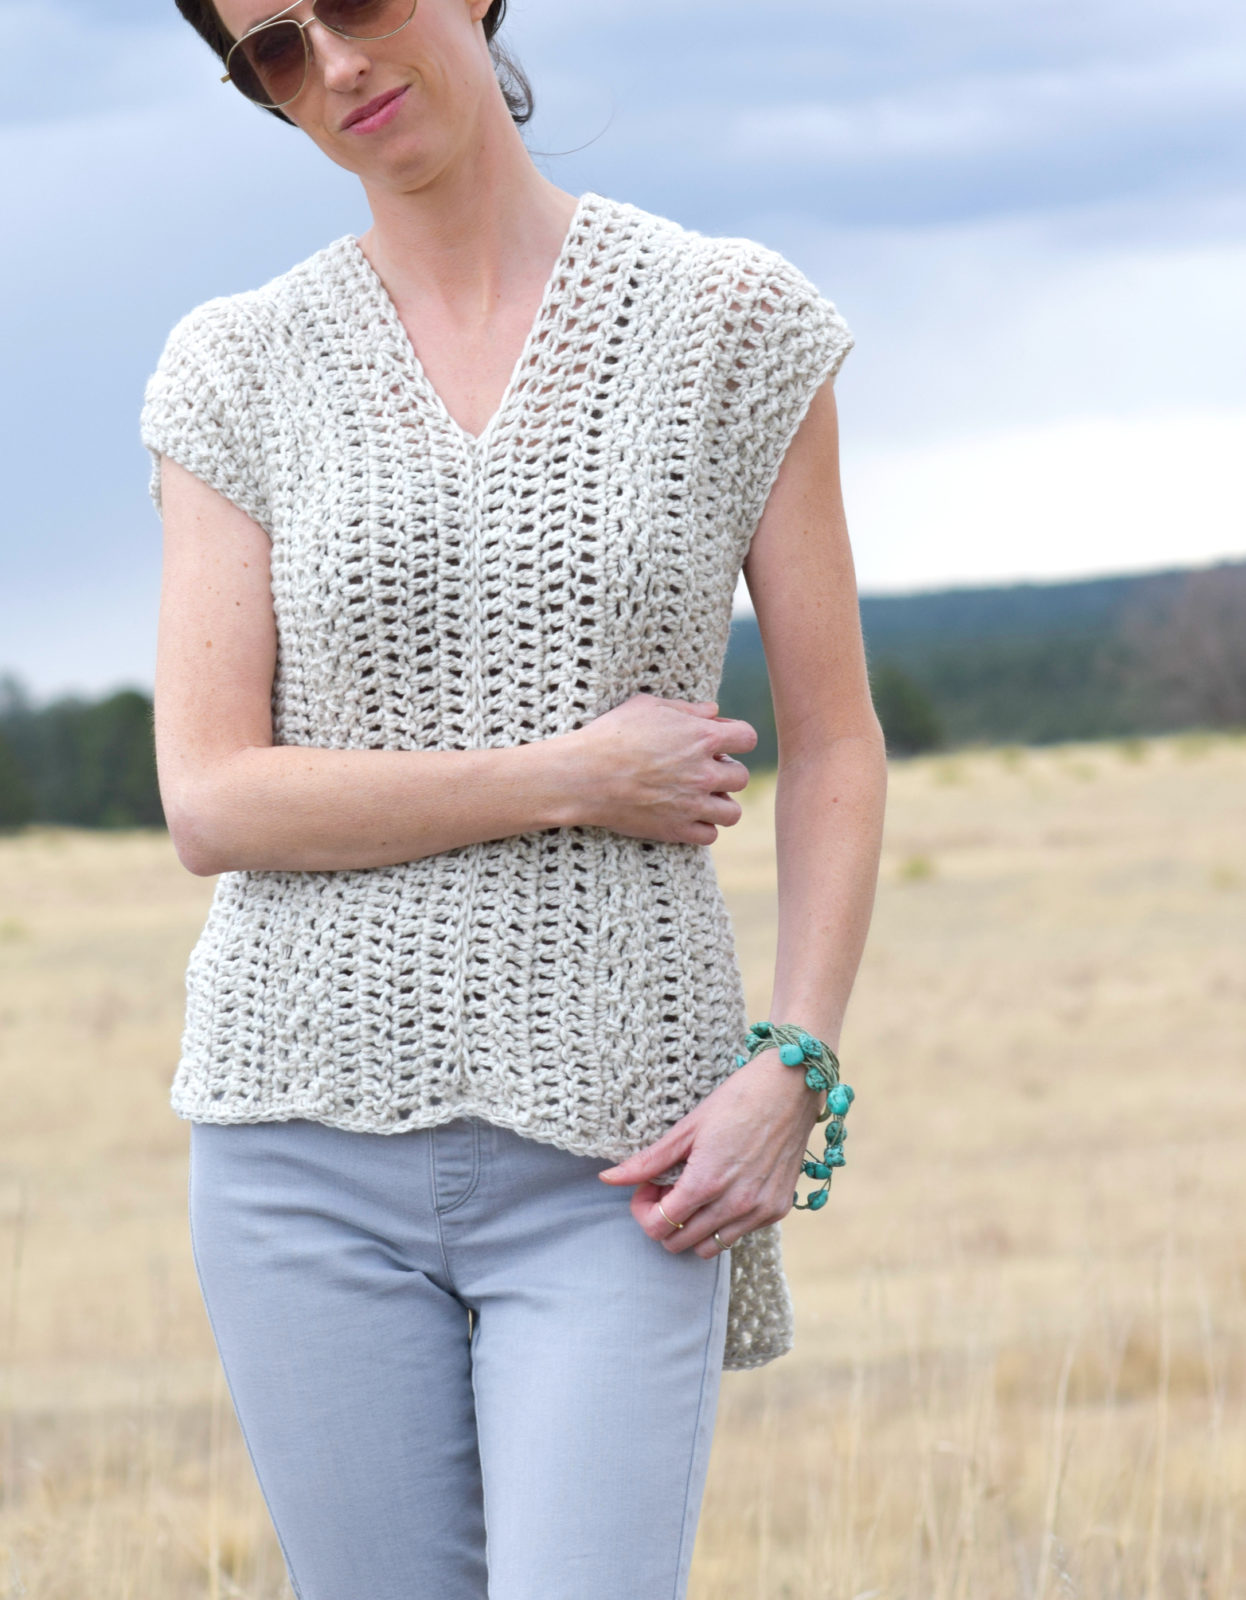
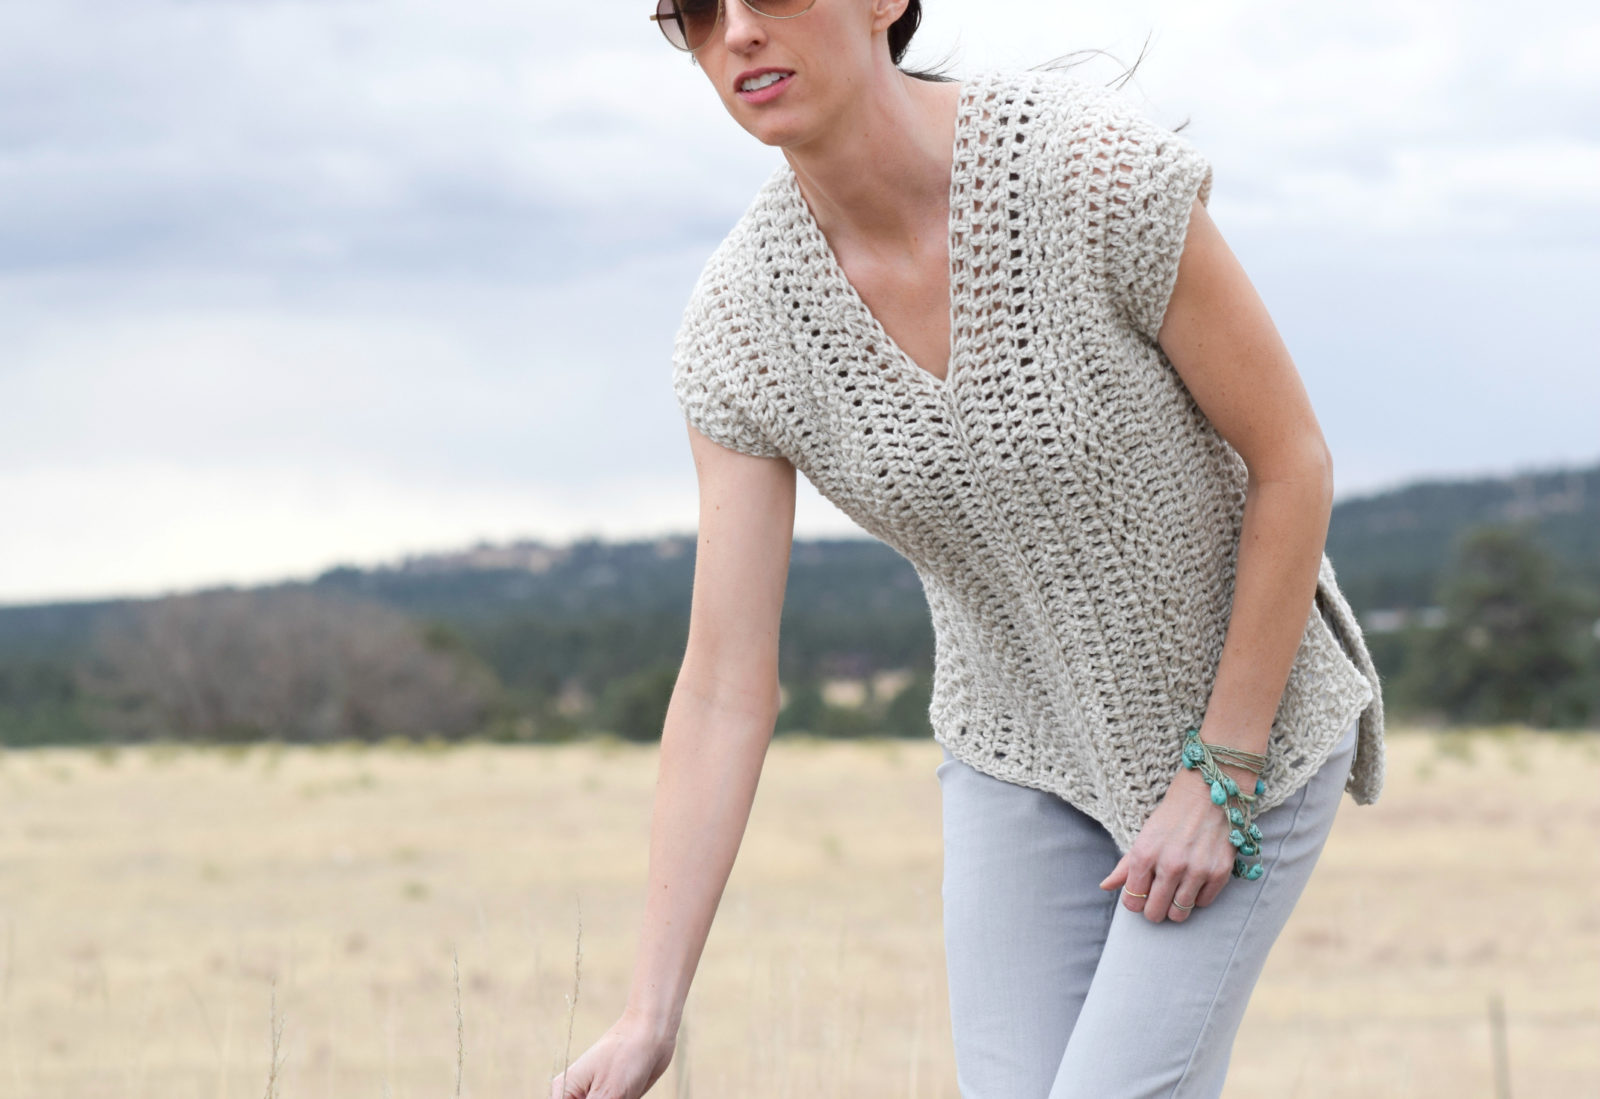
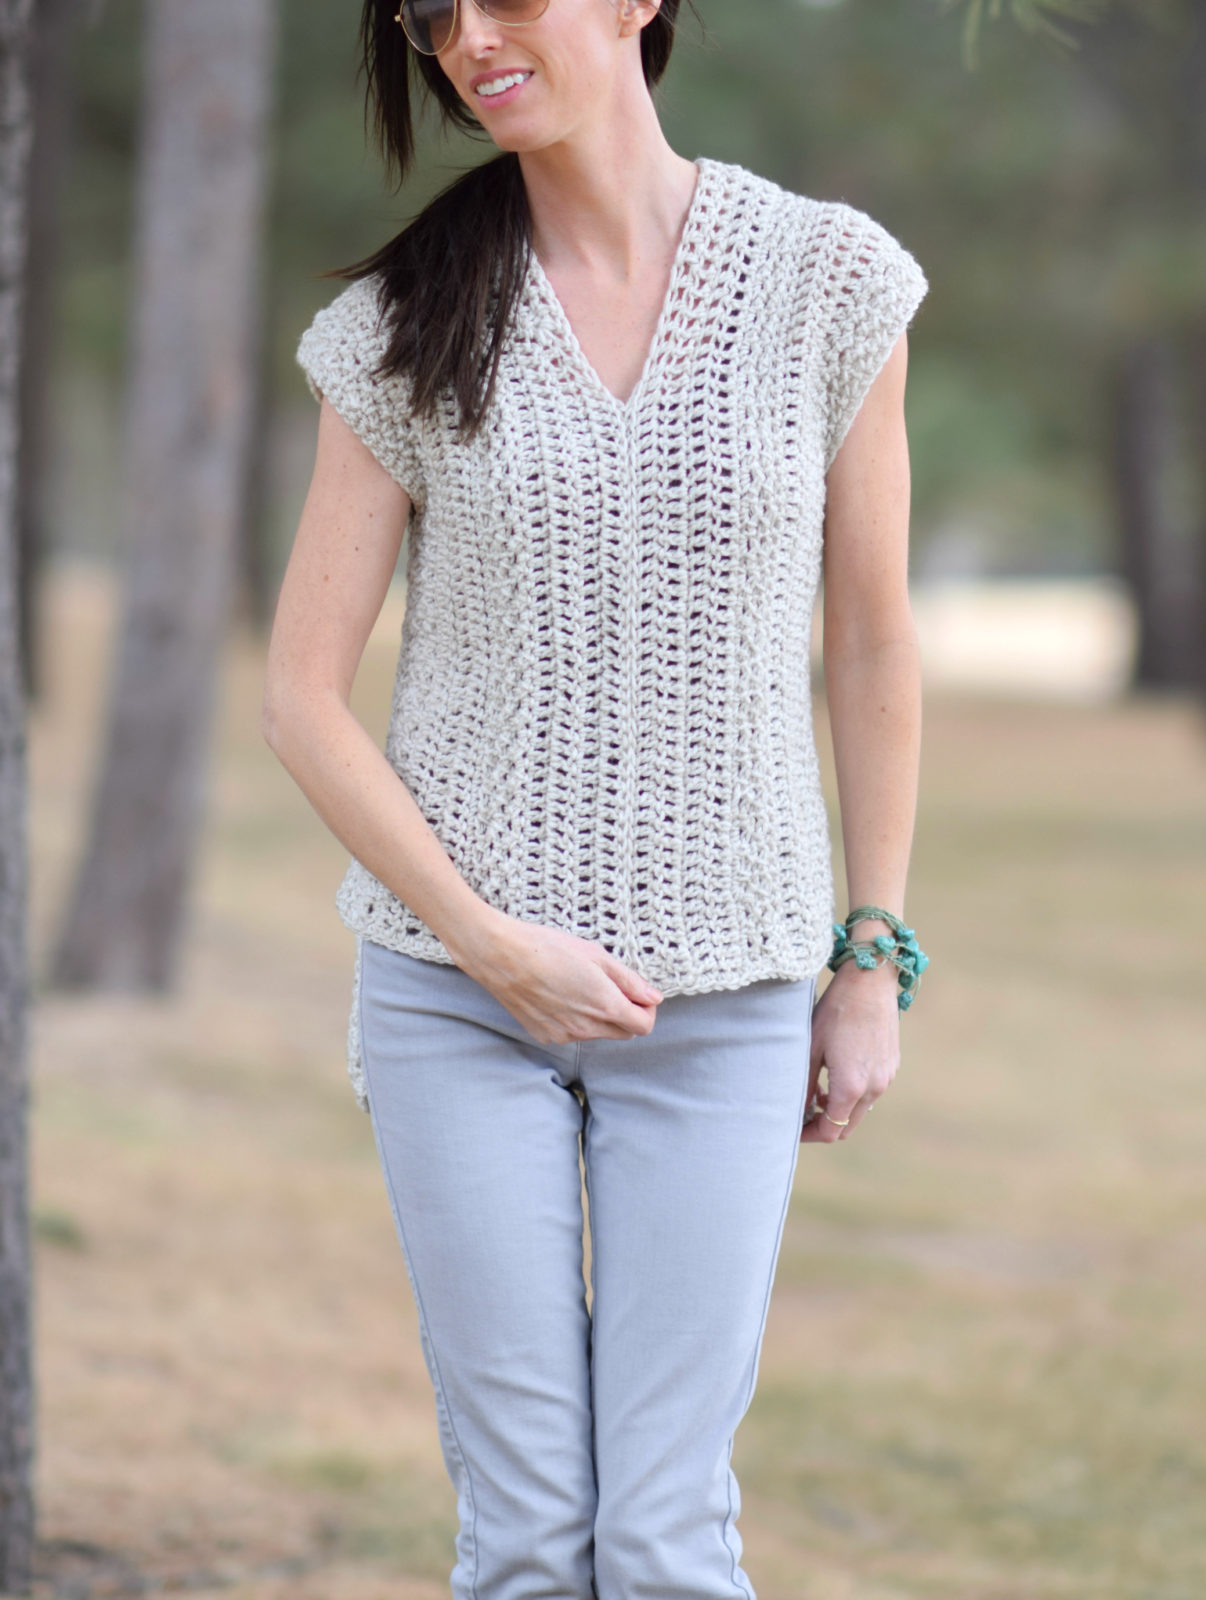
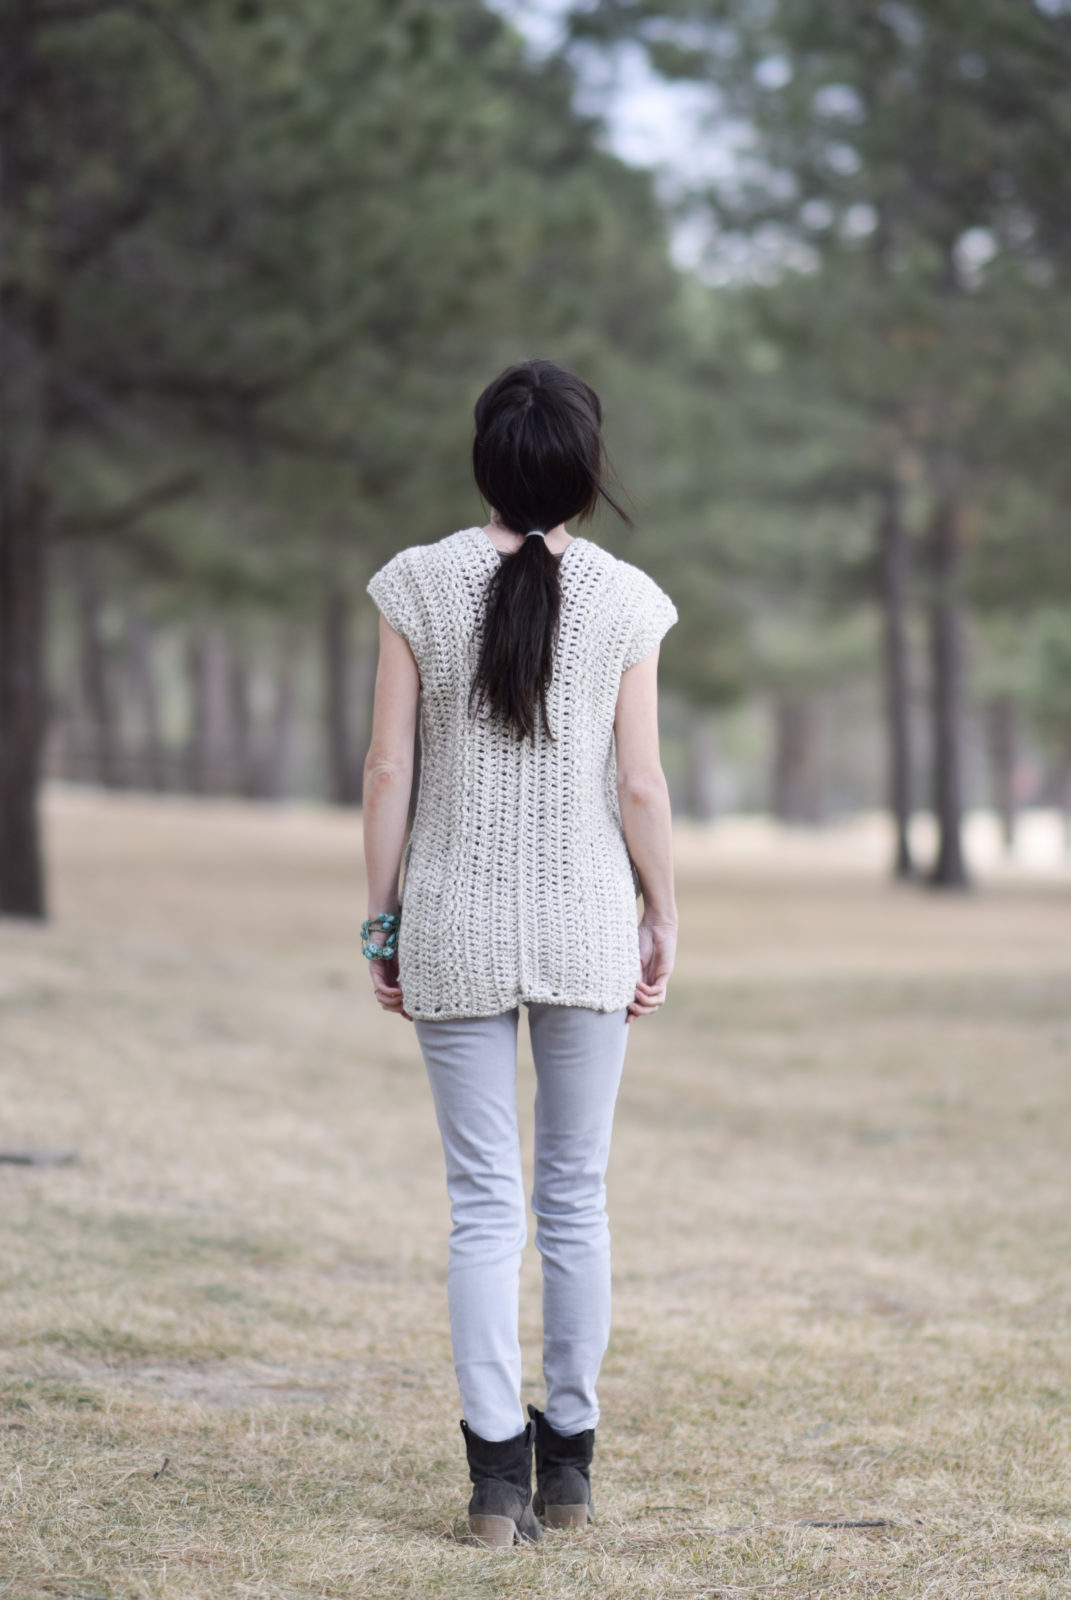
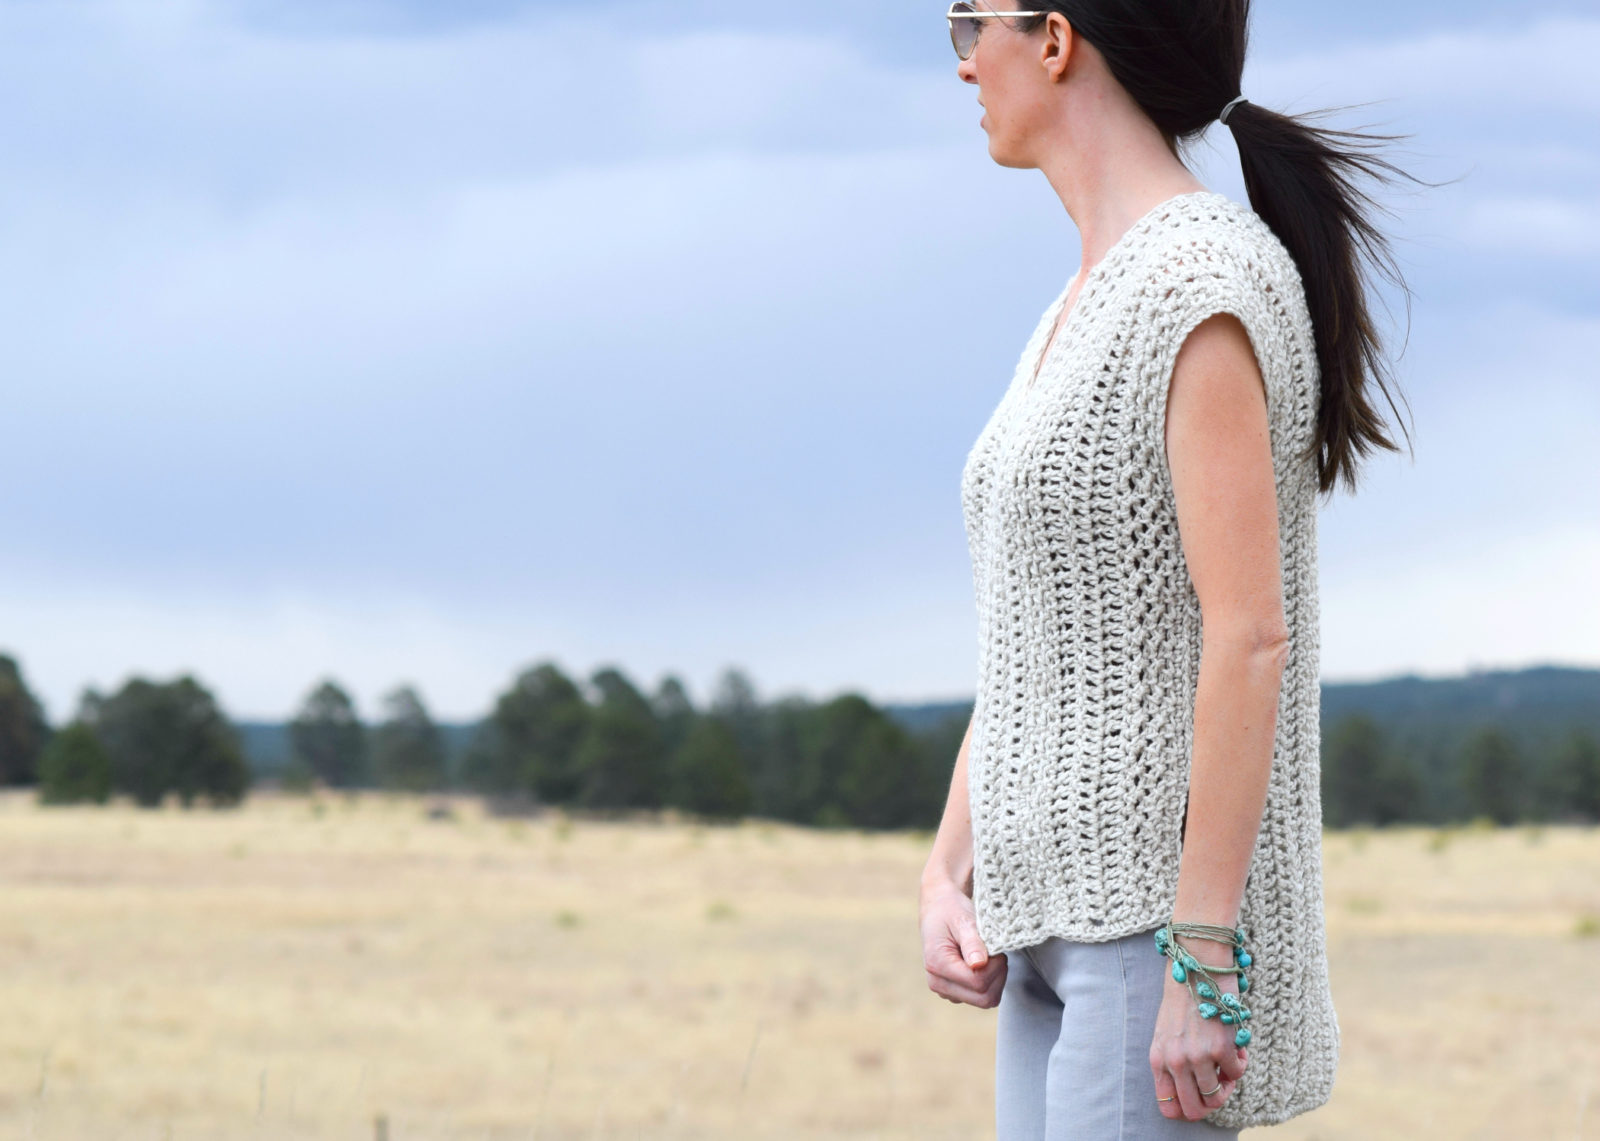
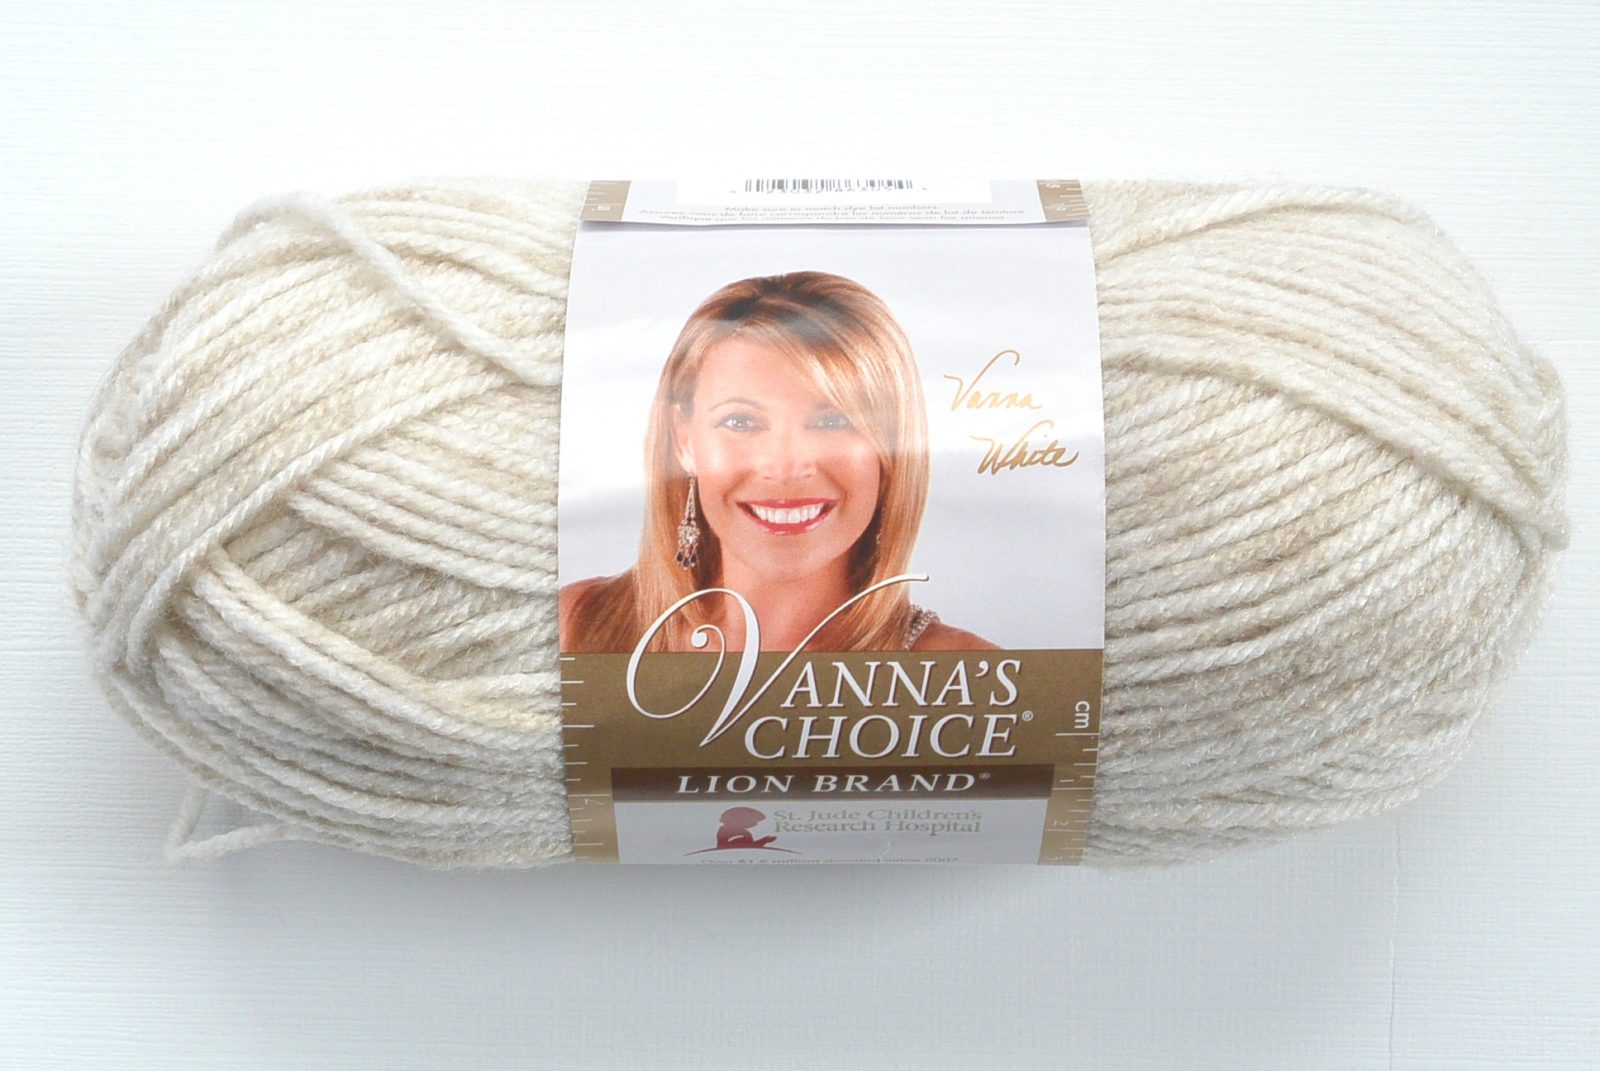
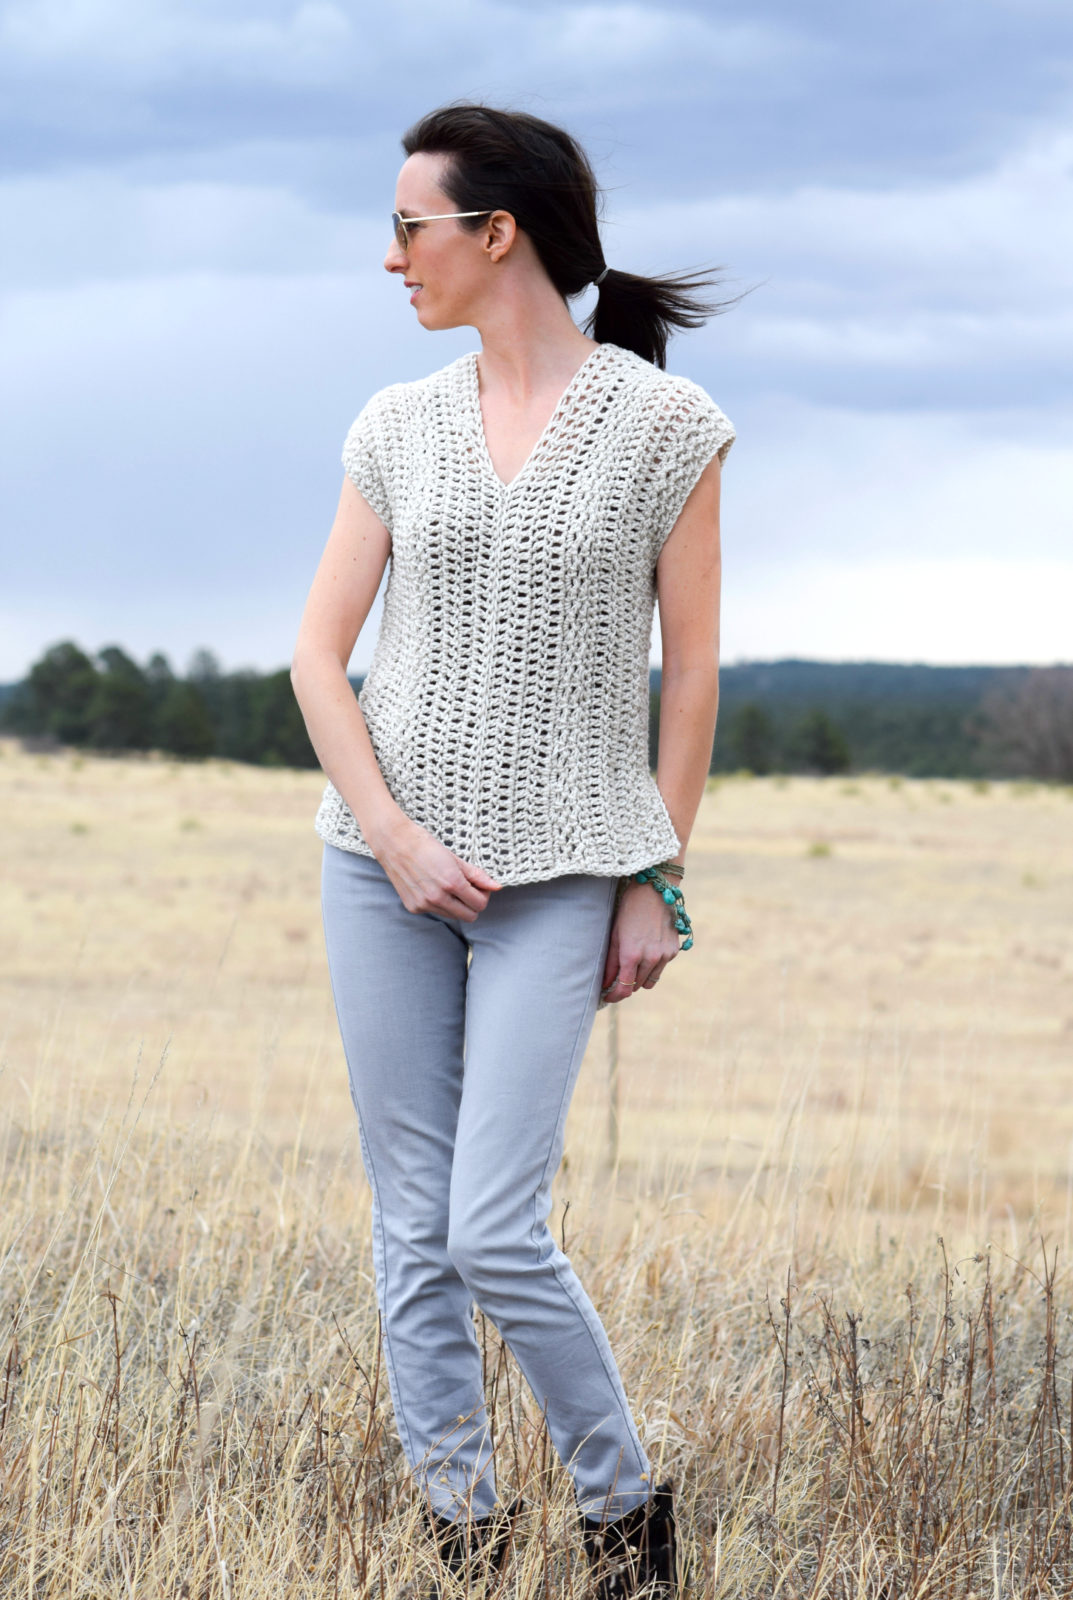
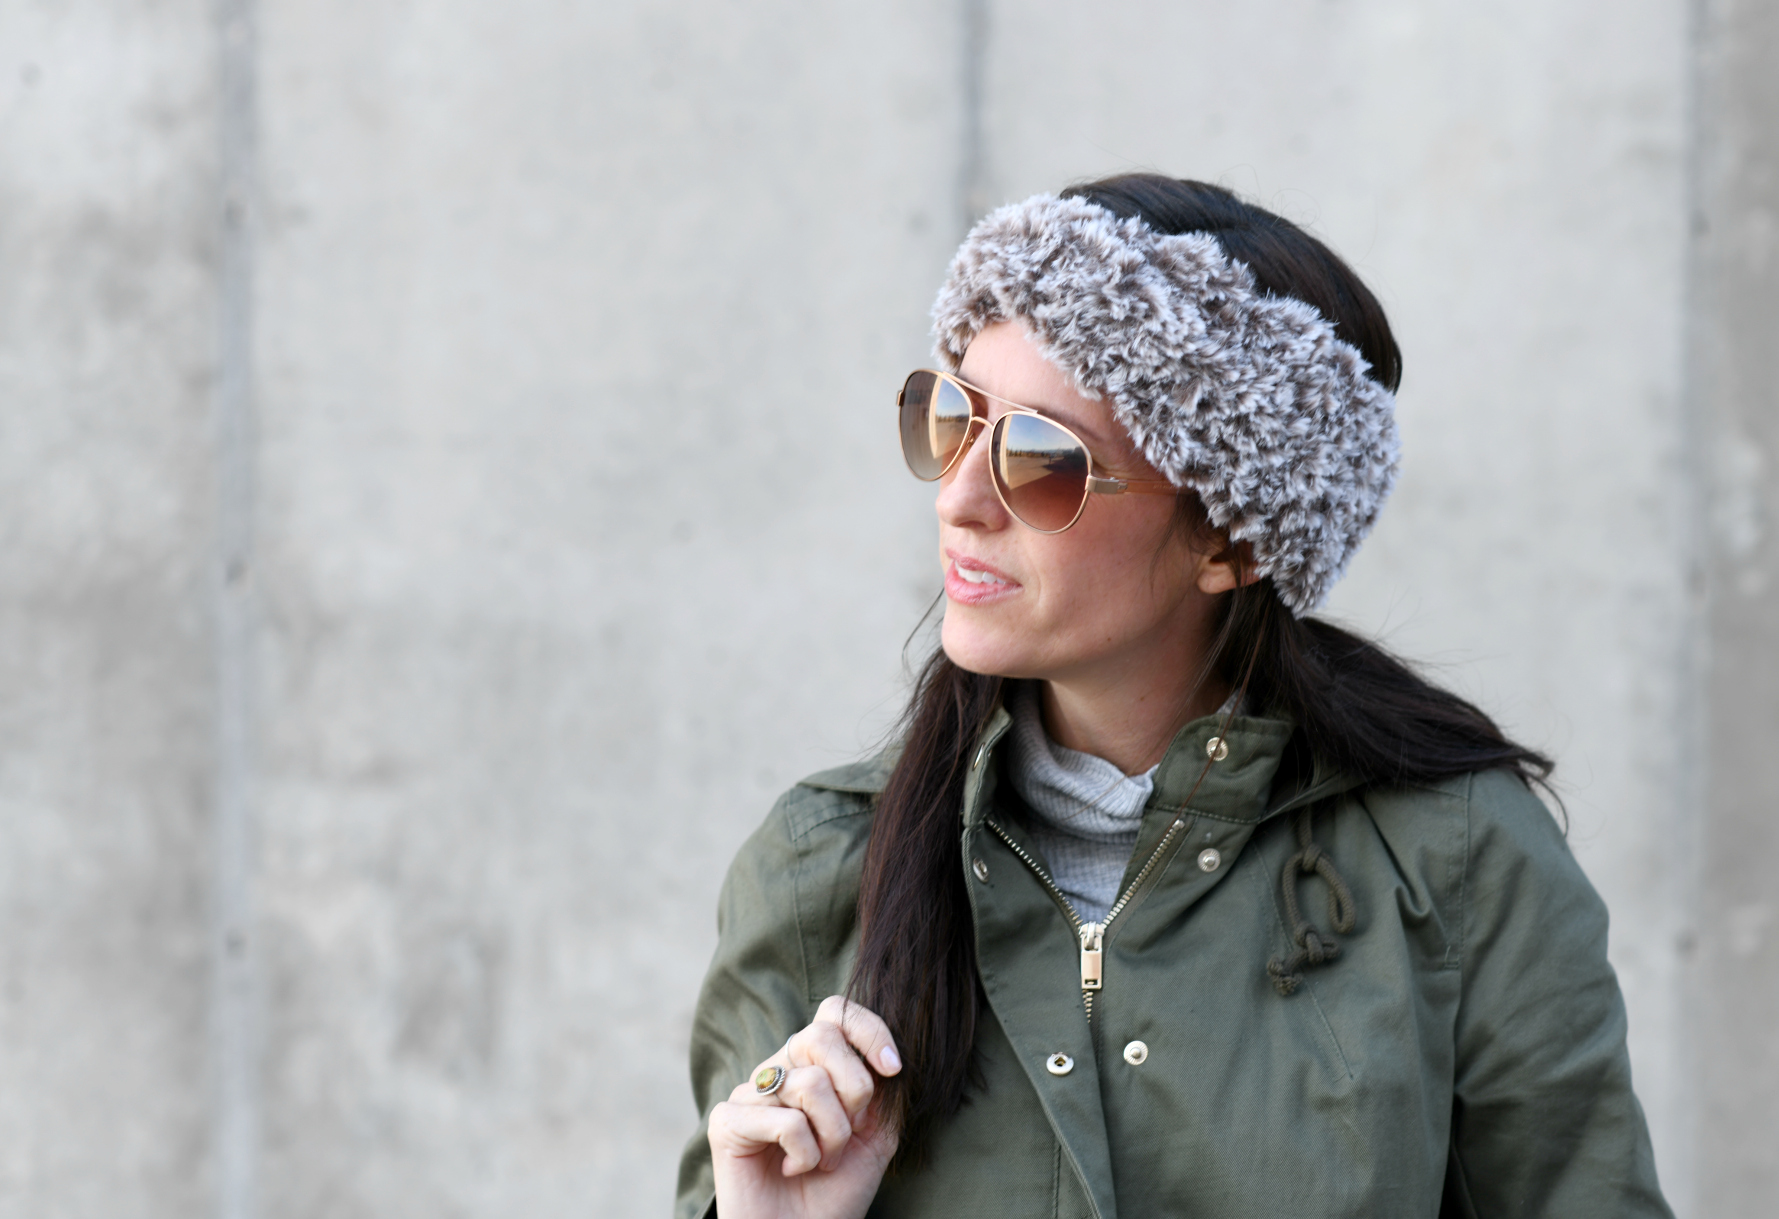
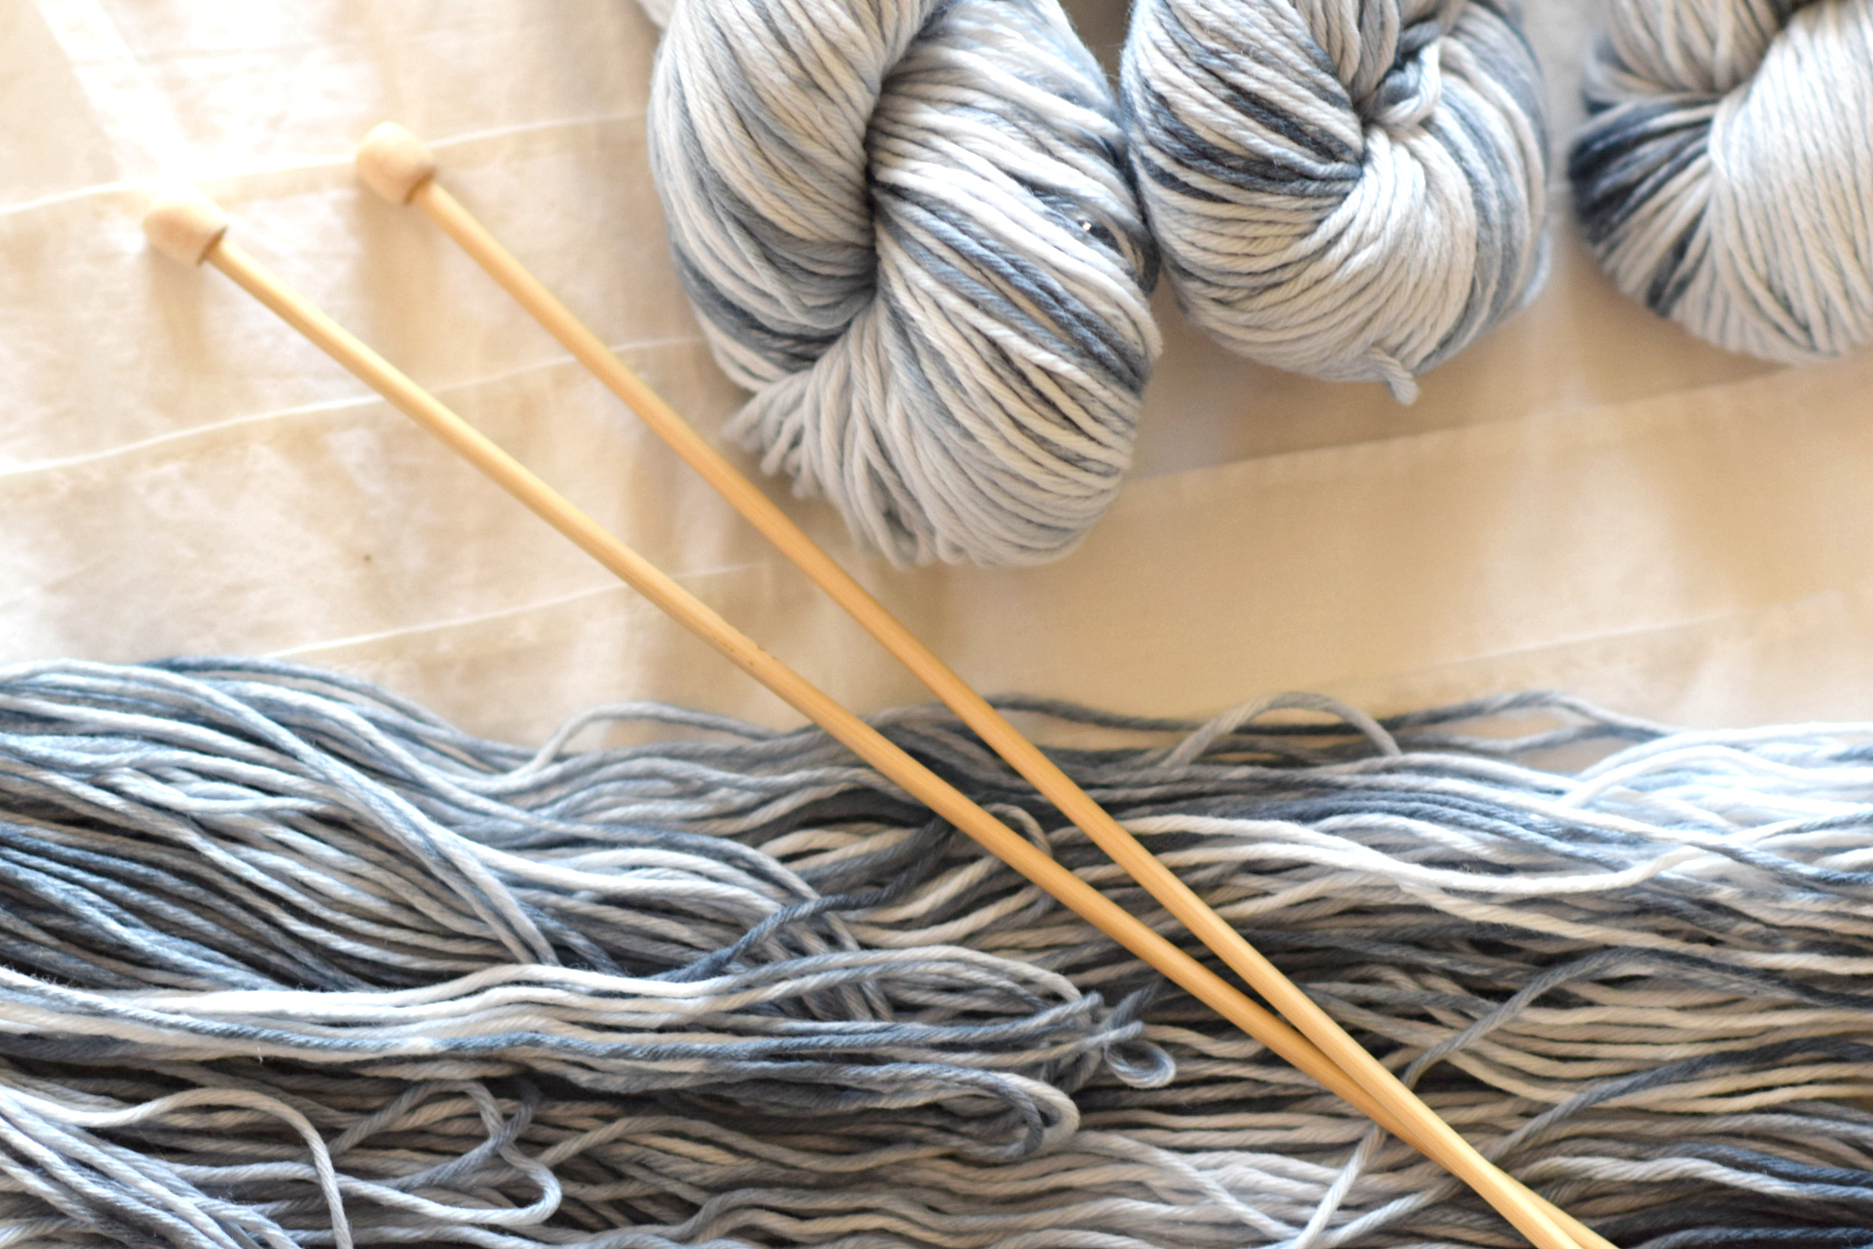
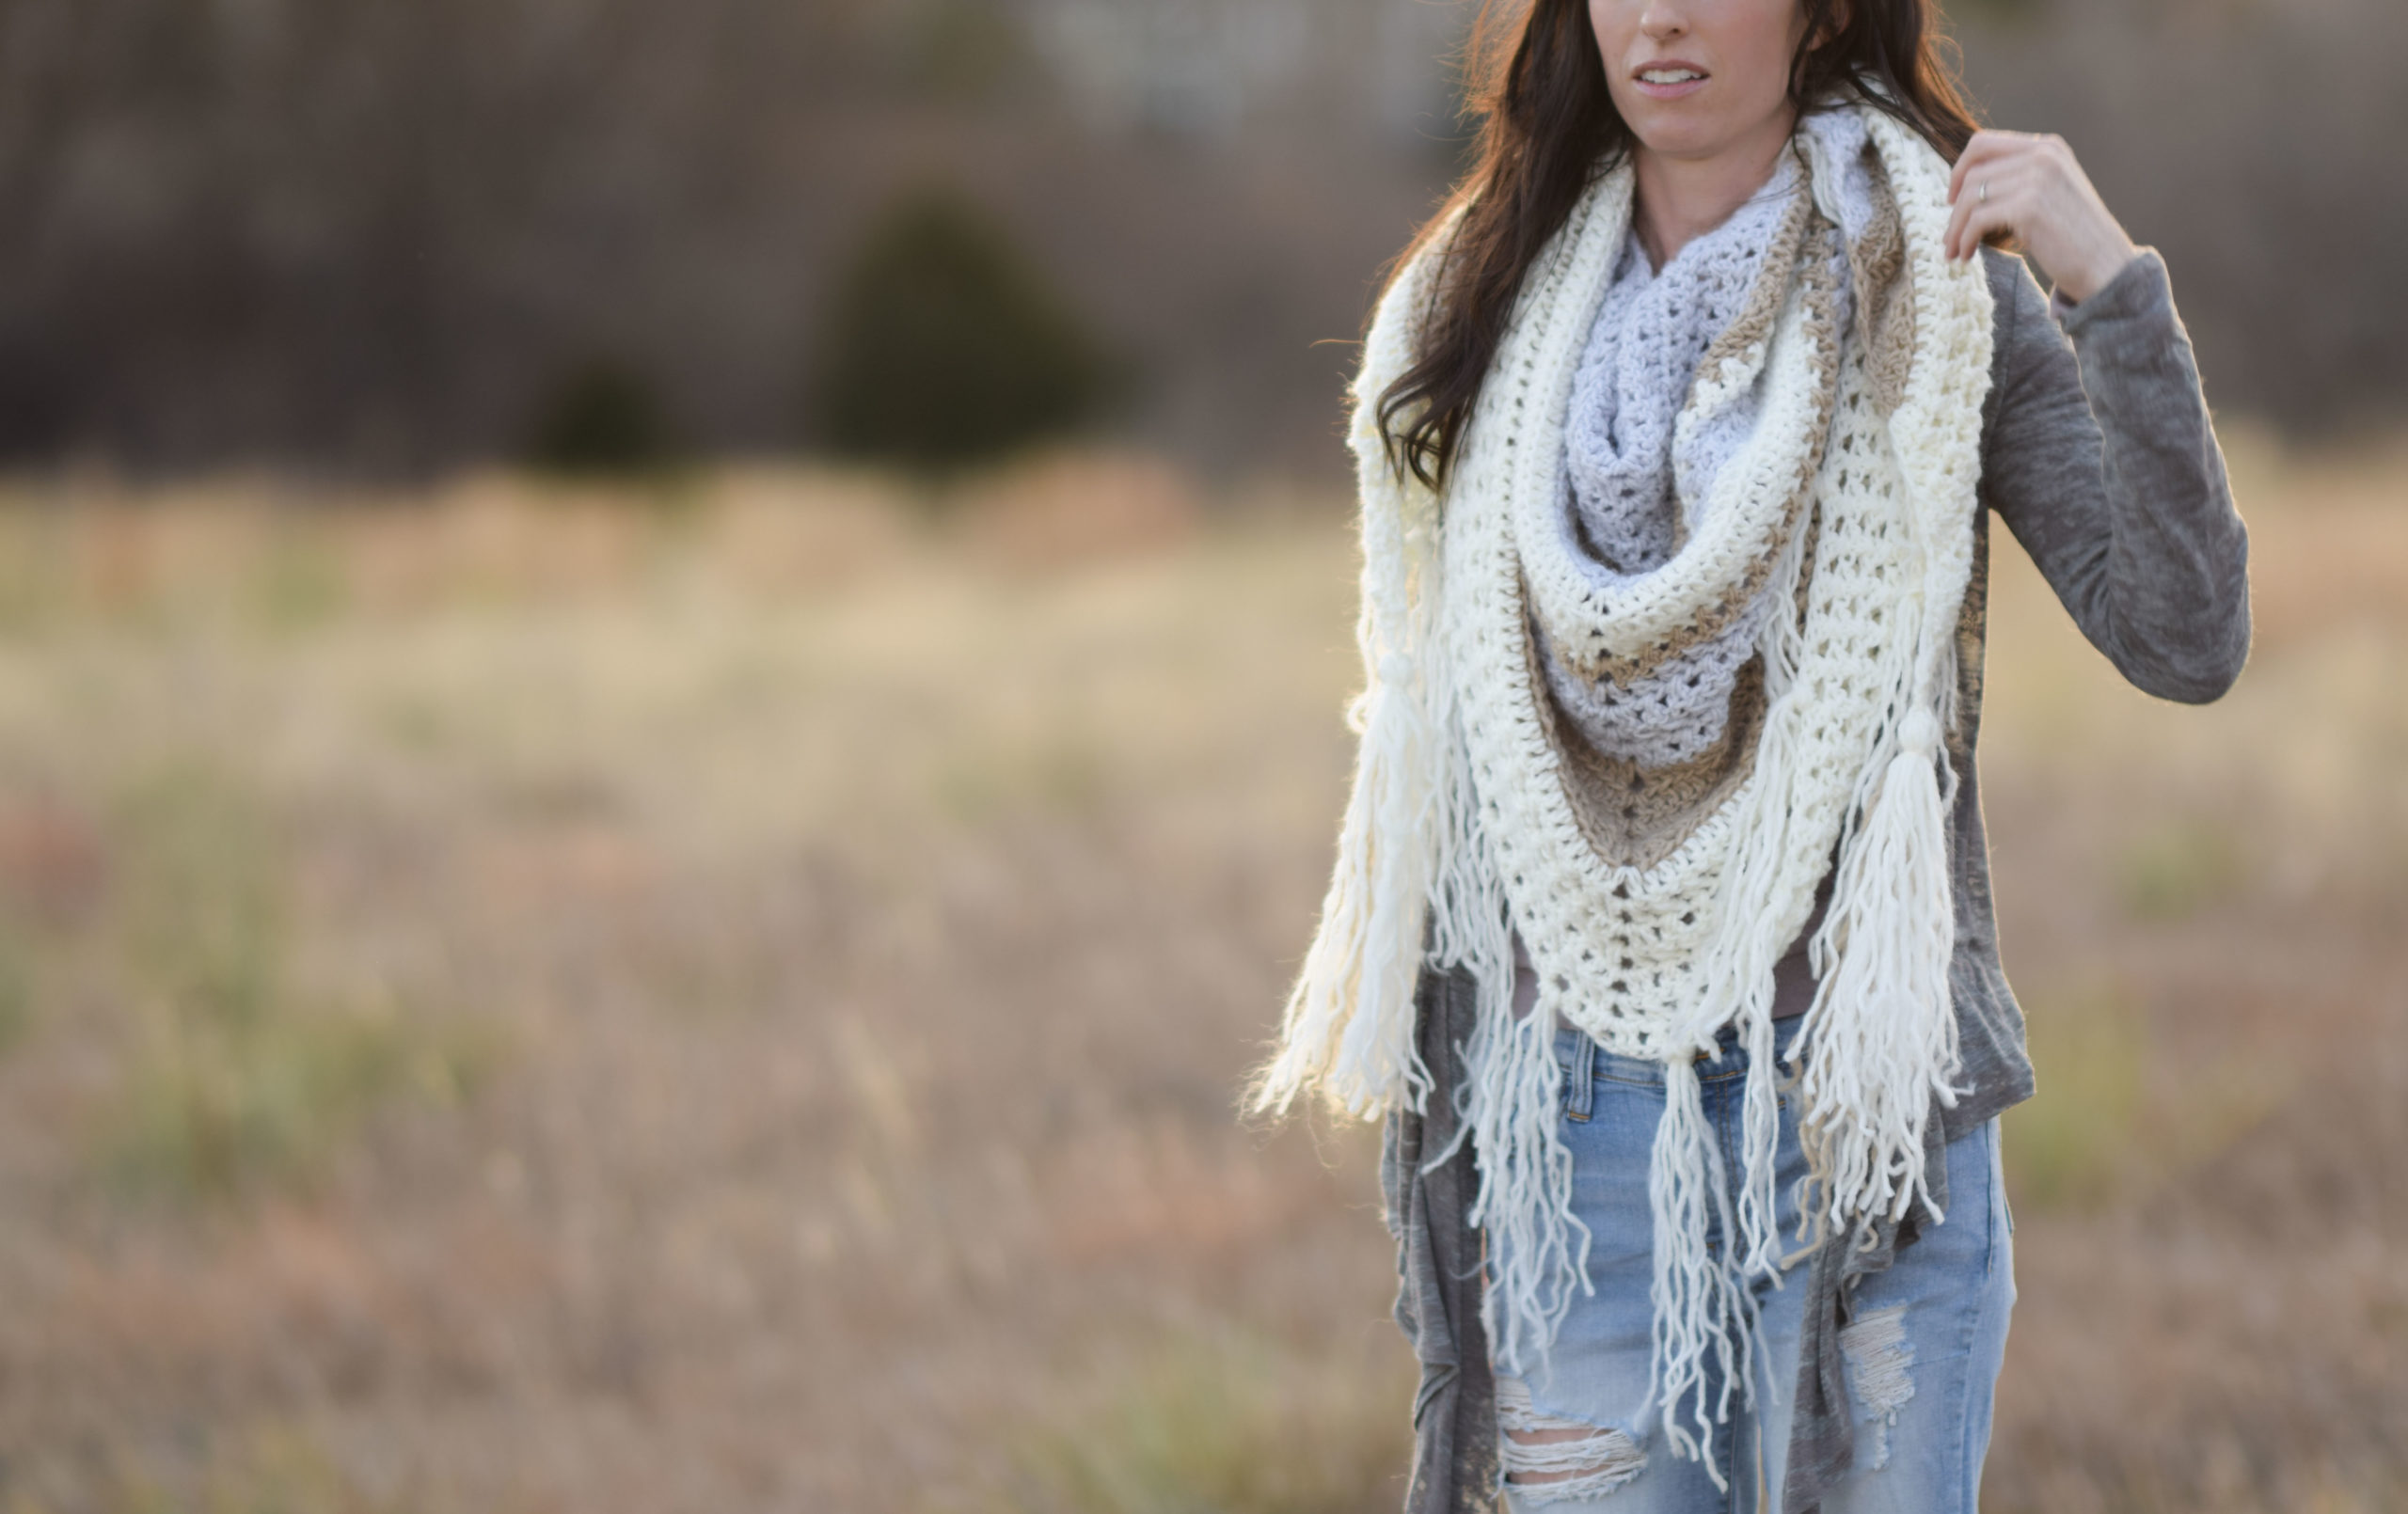
I had a lot of fun making this crocheted top and plan to get a lot of use out of it in the coming months. I named it a “Topcho” as it’s a top – poncho hybrid of sorts and it’s made by simply crocheting two rectangles and seaming them together. I’ve seen ponchos made in a similar manner, though typically I see them made without side seams (you will seam up the center and sides for this). Ponchos also seem to fit loosely, and while this top is roomy, the fit is a bit more snug. The Vanna’s Choice yarn that I chose for this project is called “Pearl Mist” and I chose it because of the light spring-like color with blends of grey/beige. It should match a range of pants, jeans, shorts and could even work as a cover-up. Yay for versatility!
As usual, you can find the entire pattern for free by scrolling down, or you can purchase the inexpensive, printable PDF version from my Etsy Shop HERE.
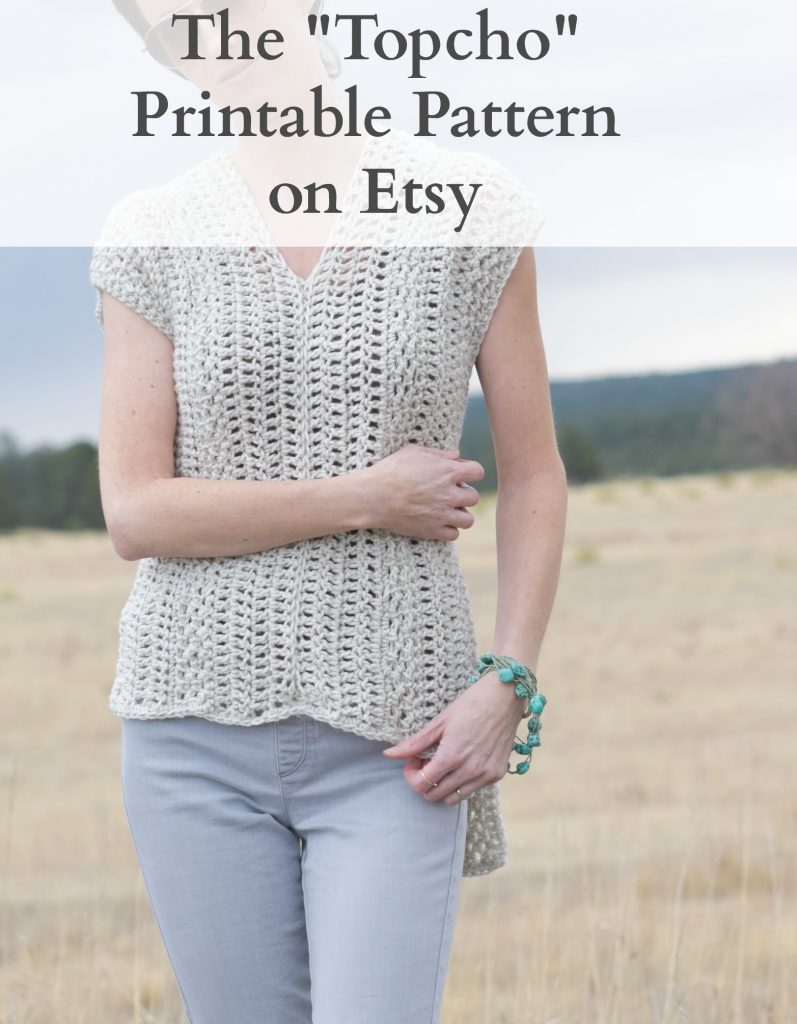
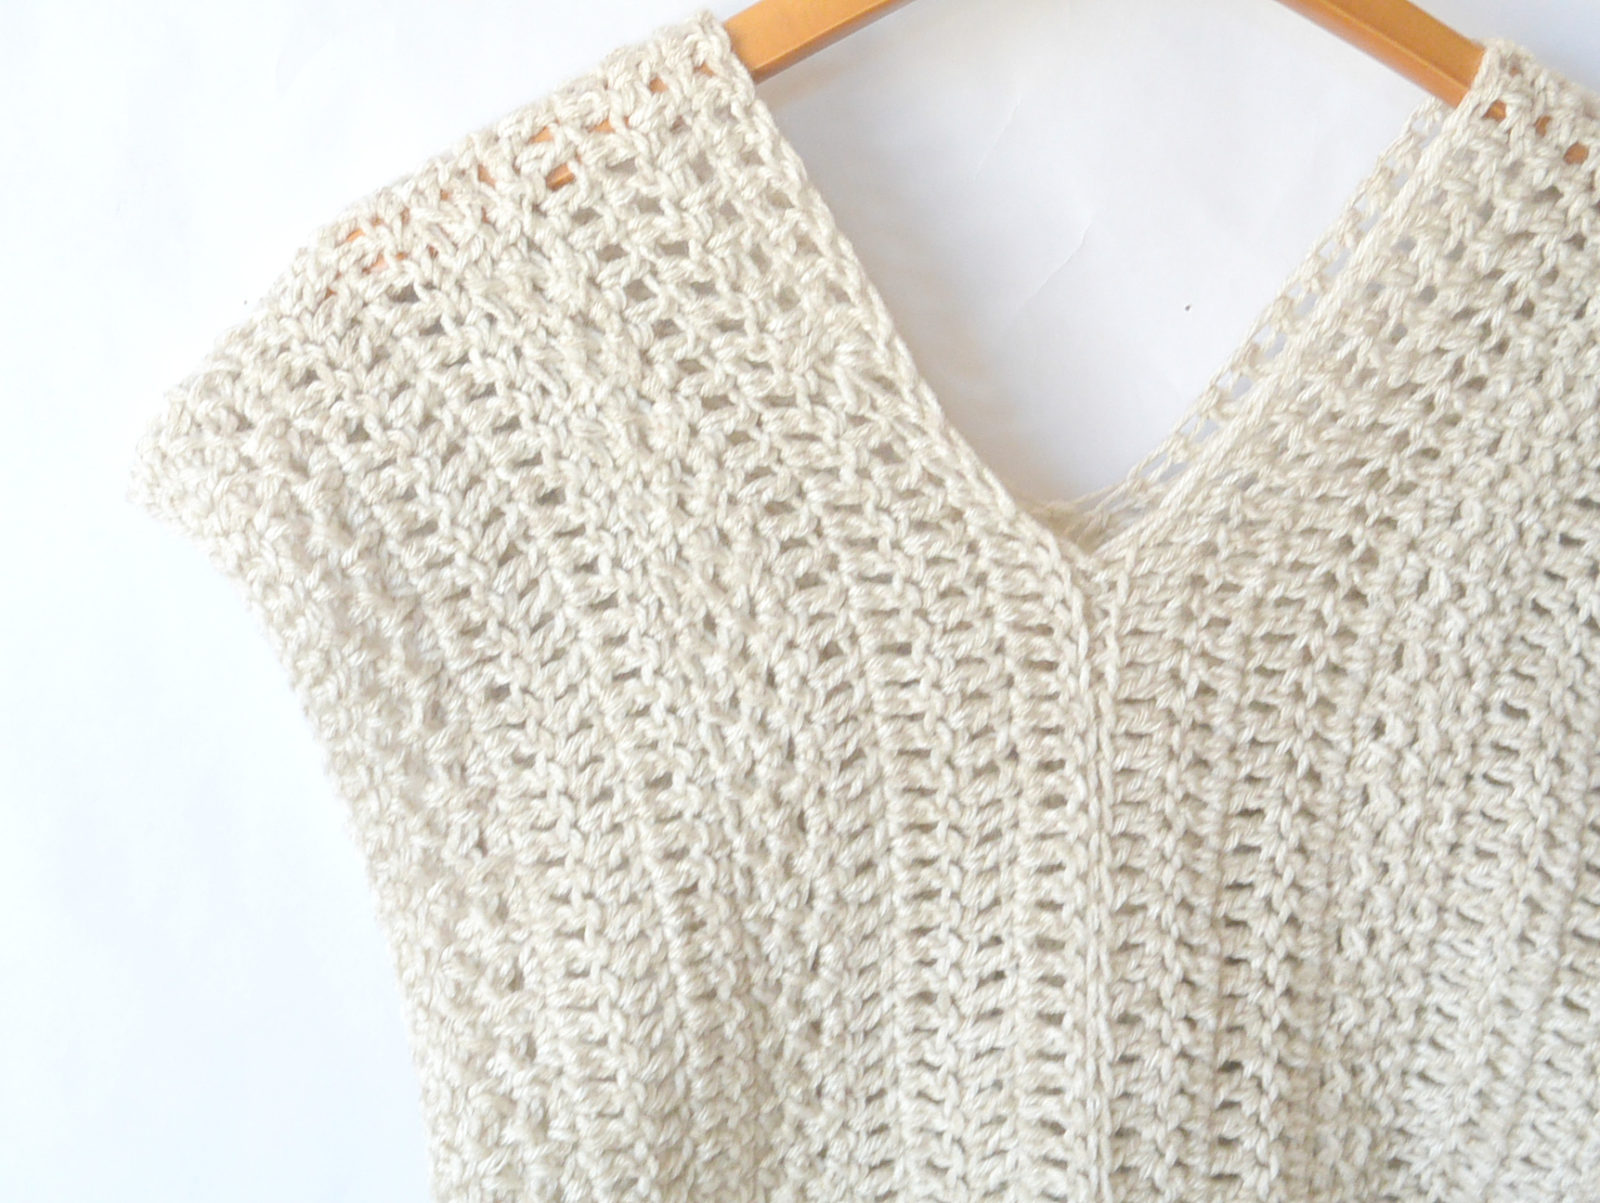
Here’s the little “official explanation”: This simple boho inspired top is sure to impress with the gorgeous yet understated stitch work. Not only is it a comfortable top, it can also work as a cover-up, extra layer or light poncho. The shirt appears complicated, but it is quite easy to crochet! The various textures stand out to create a unique and beautiful piece. The construction is simple since it’s made by crocheting two rectangles which are seamed together. This “Topcho” is perfect for an afternoon at the beach, a casual day out or an evening with friends. If you’re comfortable with basic stitches, chains and counting stitches, you should be all set to make this!
You will need:
Size K, 6.5 mm Crochet Hook
4 skeins (Small/Medium) 5 skeins (Large) Lion Brand Vanna’s Choice in Pearl Mist (85 g 145 yards/skein) (Small uses 272 g, Medium uses 314 g, Large uses 358 g)
Scissors
Tapestry Needle to weave in ends
‘
(Affiliate Links Above)
Skill Level:
Beginner +
Abbreviations/Skills needed:
sc – single crochet
dc – double crochet
ch – chain
sk – skip
st – stitch
sl st – slip stitch
Gauge:
Approximately 2.6 stitches per inch
Sizes Available:
Small (S) , Medium (M), Large (L)
Top Measurement Approximations:
Bust Circumference
Small: 34” inches
Medium: 38” inches
Large: 42” inches
Front Top of Shirt to Bottom Cuff
Small: 20” inches
Medium: 20.5” inches
Large: 21” inches
Center Back Top of Shirt to Bottom Cuff
Small: 24” inches
Medium: 25” inches
Large: 26” inches
(You may also make equal lengths for the front and back by simply adjusting the seam as instructed in the pattern)
Notes:
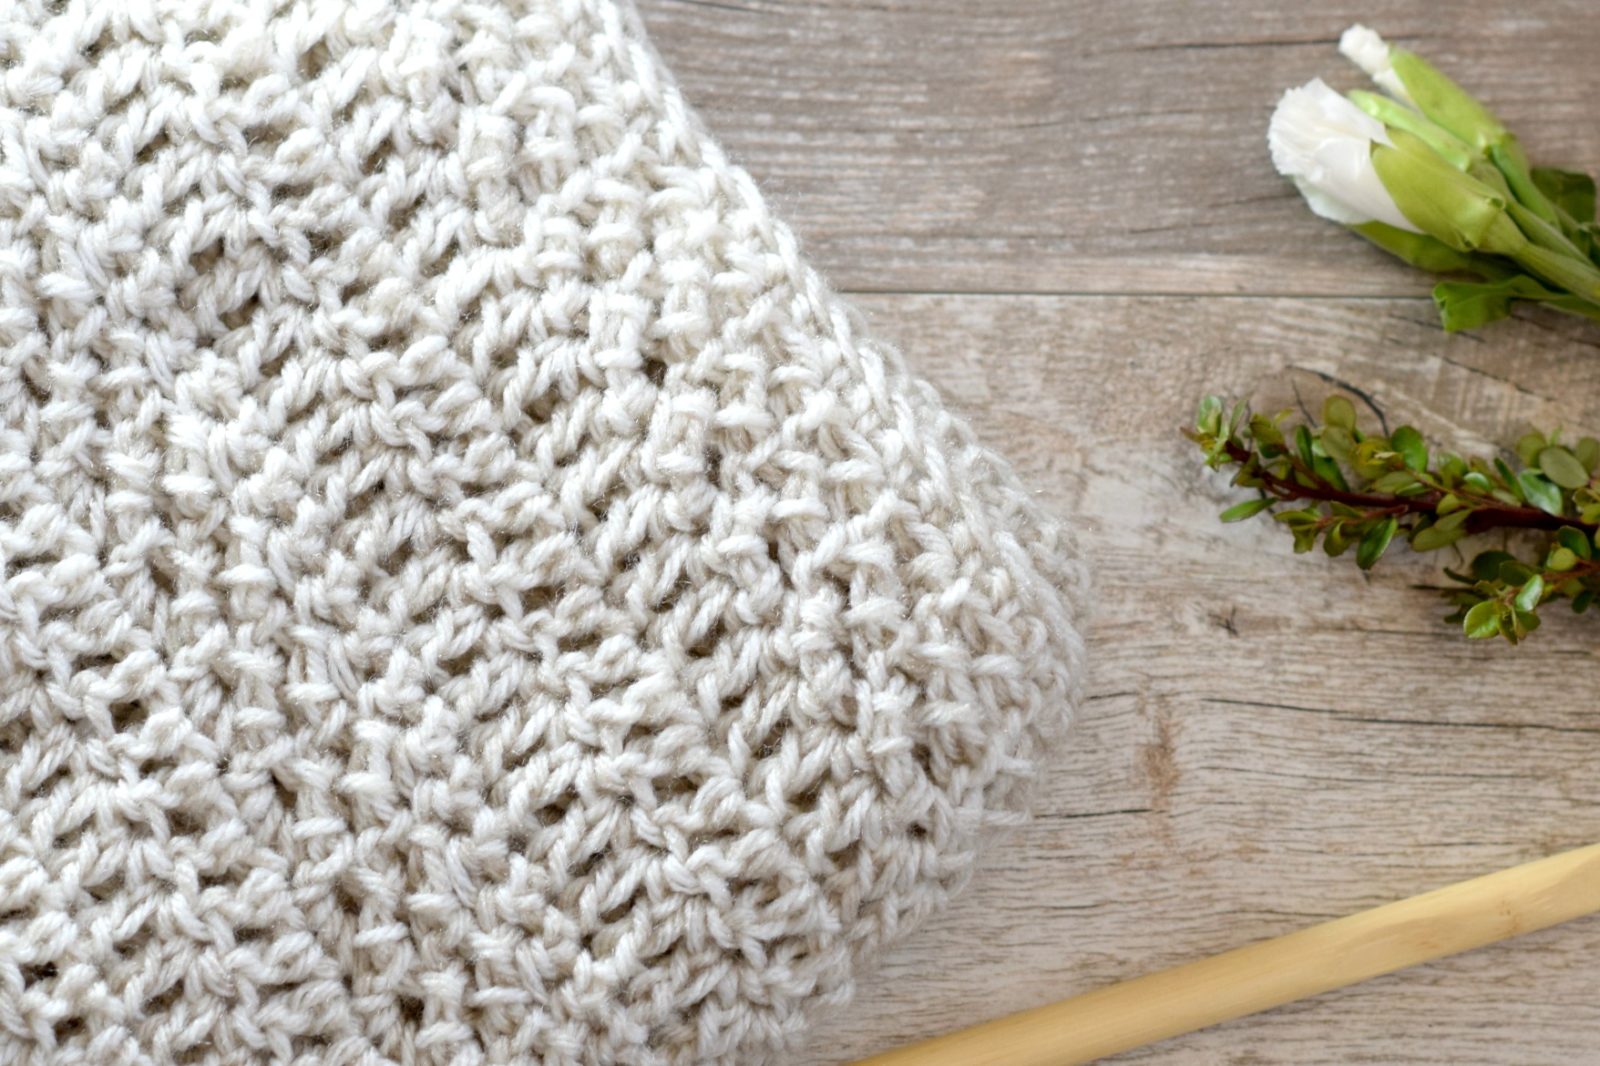
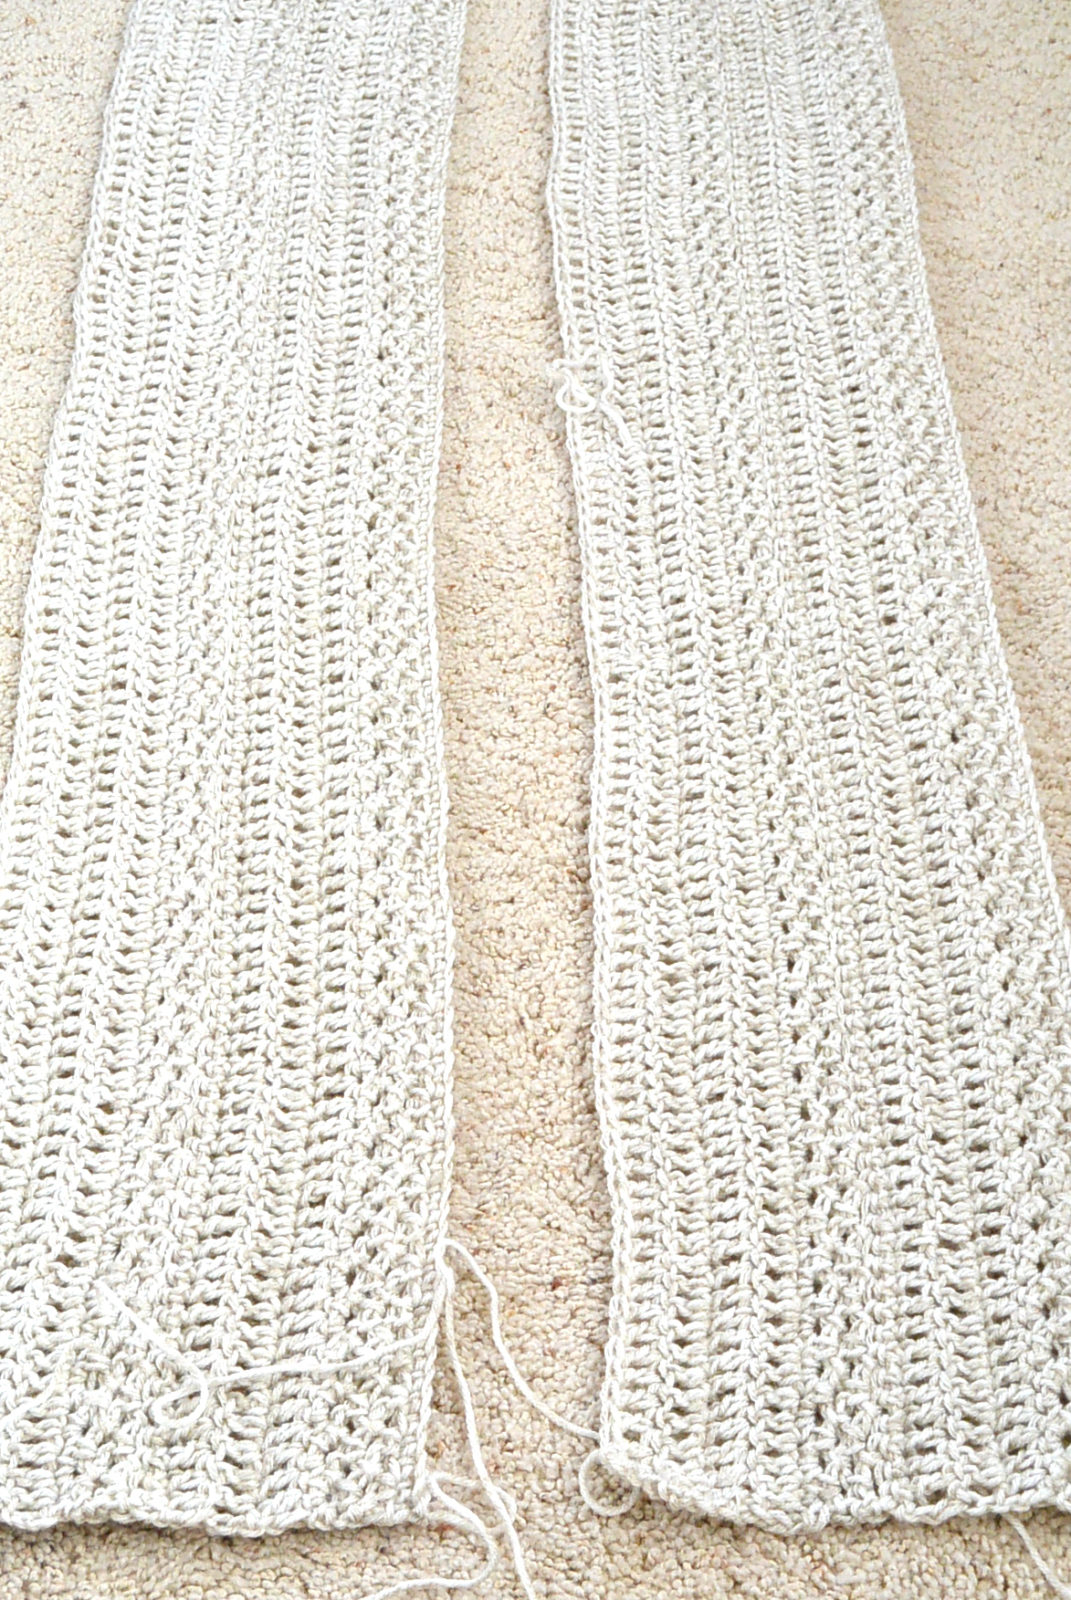
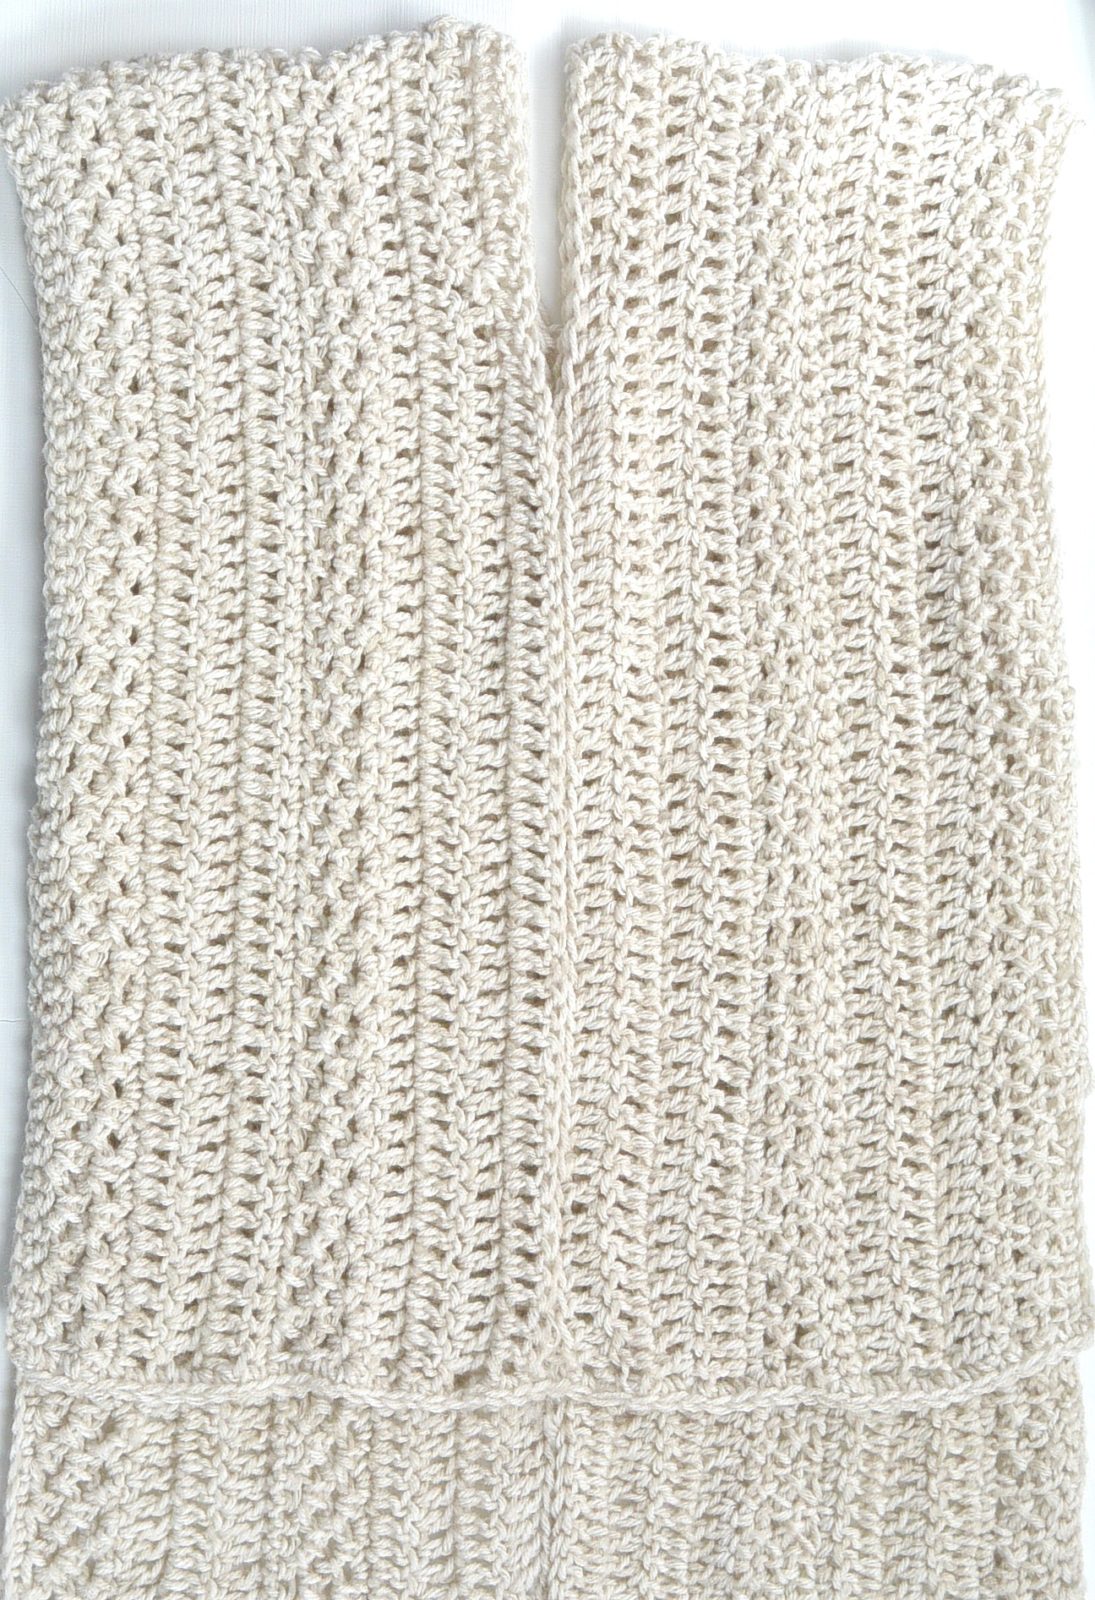
The “Topcho” is made by crocheting two rectangular pieces and seaming them together. Below you will find the approximate size of each rectangle if crocheted with the listed gauge. If you need to make width adjustments, simply add rows of double crochet at the end, or decrease the number of final double crochet rows to make it smaller.
Small Rectangles: Each rectangular piece measures approximately 8.25” x 44” inches
Medium Rectangles: Each rectangular piece measures approximately 9.25” x 45.5” inches
Large Rectangles: Each rectangular piece measures approximately 10.25” x 47” inches
As you work, if you find that your stitch count is off, simply add a stitch or decrease in a row to make corrections.
Pattern
Follow the key for your size: (S, M, L)
Chain (119, 123, 127) stitches
Row 1 Sc in 2nd st from hook, sc in each stitch across row (118, 122, 126 stitches), ch 2, turn
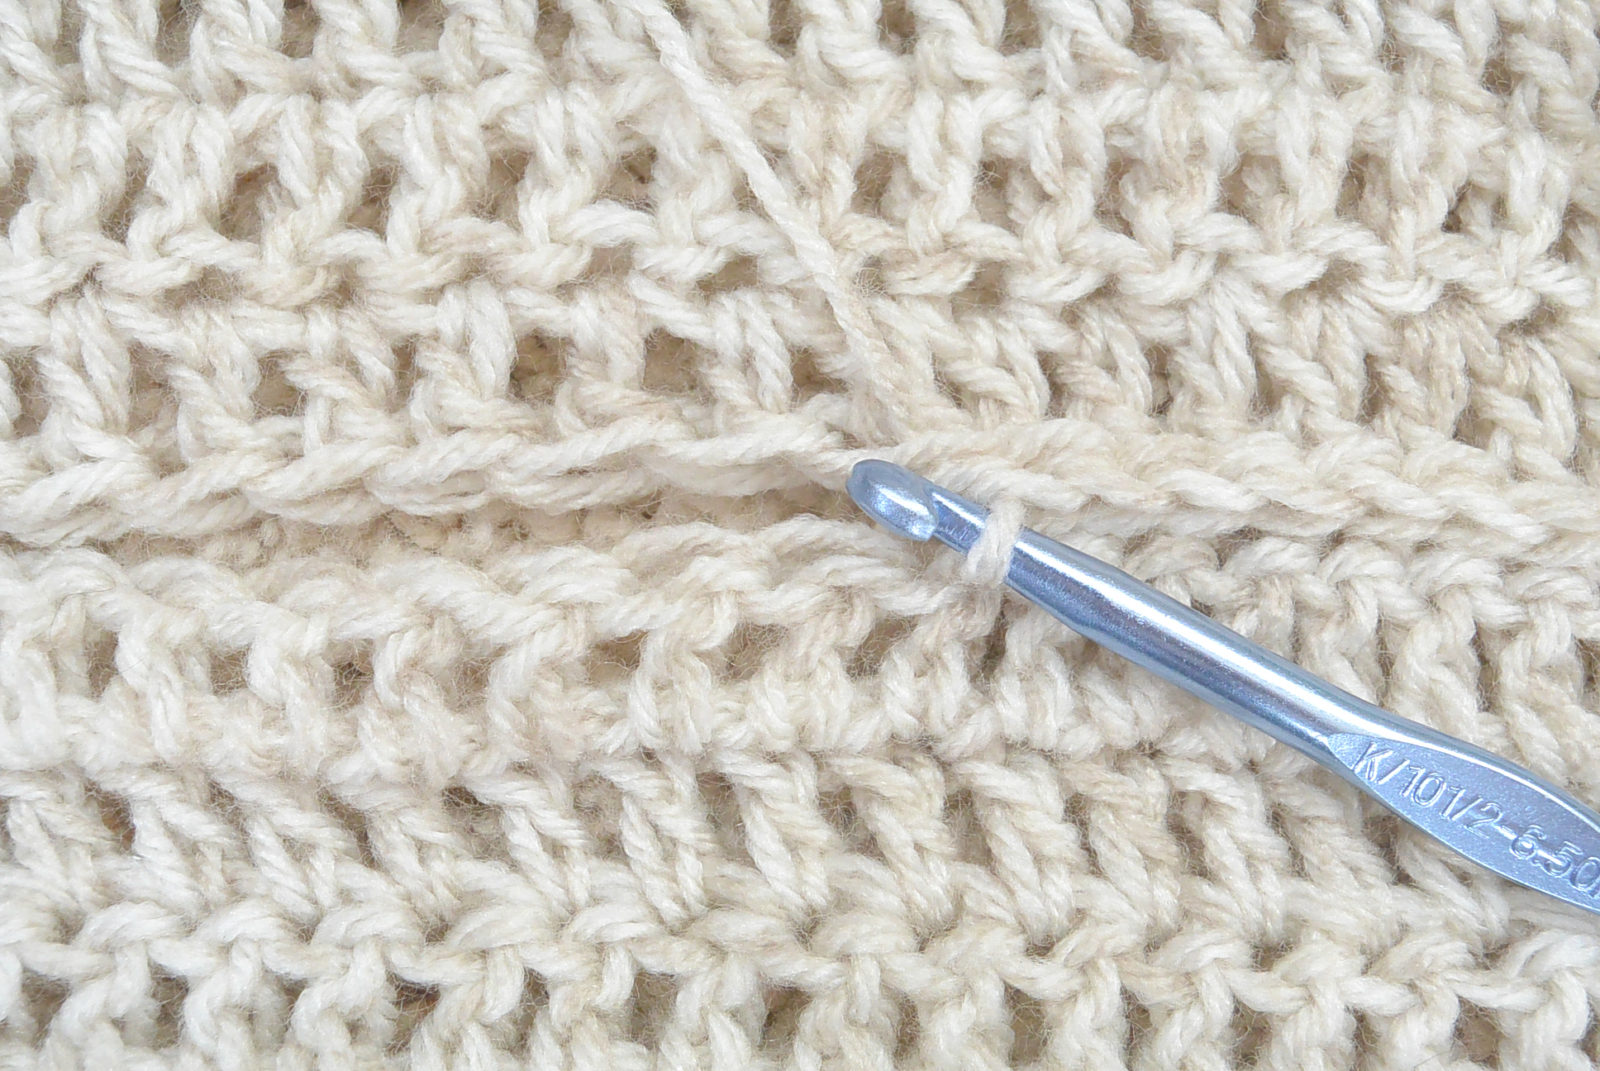
Row 2 Skip 1st sc st, sl st in next sc, *ch 2, sk st, sl st in next stitch. Repeat from * across the row. Ch 2 at end of row. Turn.
Row 3 Sl st into ch 2 space below, *ch 2, sl st into next ch 2 space. Repeat from * across the row. Ch 2, turn.
Row 4 Repeat row 3
Row 5 Sl st into ch 2 space below, *ch 2, sl st into next ch 2 space. Repeat from * across the row. Ch 1, turn.
Row 6 Make 2 sc in each ch 2 space across the row. Ch 3, turn. (118, 122, 126 stitches)
Row 7 Dc in 5th stitch from hook. Dc in each stitch across the row. Ch 3, turn. (118, 122, 126 stitches – note: turning chain from previous row counts as 1st stitch of row)
Row 8 Repeat row 7
Row 9 Dc in 5th stitch from hook, dc in each stitch across the row. Ch 1, turn.
Row 10 Sc across the row, ch 2, turn (118, 122, 126 stitches)
Row 11 Sk 1st stitch of row, sl st in next st, *ch 2, sk st, sl st in next st. Repeat from * across the row. Ch 2, turn.
Row 12 Sl st into ch 2 space below, *ch 2, sl st into next ch 2 space. Repeat from * across the row. Ch 2, turn.
Row 13 Sl st into ch 2 space below, *ch 2, sl st into next ch 2 space. Repeat from * across the row. Ch 2, turn.
Row 14 Sl st into ch 2 space below, *ch 2, sl st into next ch 2 space. Repeat from * across the row. Ch 1, turn.
Row 15 Make 2 sc in each group of ch 2 spaces across the row, ch 3, turn. (118, 122, 126 stitches)
Row 16-18 Repeat row 7.
Row 19 Dc in 5th stitch from hook. Dc in each stitch across the row, ch 3, turn. (Size Small – this is your final row. Do not chain 3 at end of row. Simply tie off and weave in ends)
Row 20 (M,L only) Repeat row 7 (Medium is complete after finishing row 20. For Medium, do not chain 3 at end of row 20, simply tie off and weave in ends)
Row 21 (L only) Repeat row 7 but ch 1 rather than 3 at end of row. Turn.
Row 22 (L only) Sc across row. Tie off and weave in ends.
Repeat this pattern two times in order to make matching rectangles. Then move on to the simple assembly!
(Lightly block if wanted)
Assembly (see photos below for additional help):
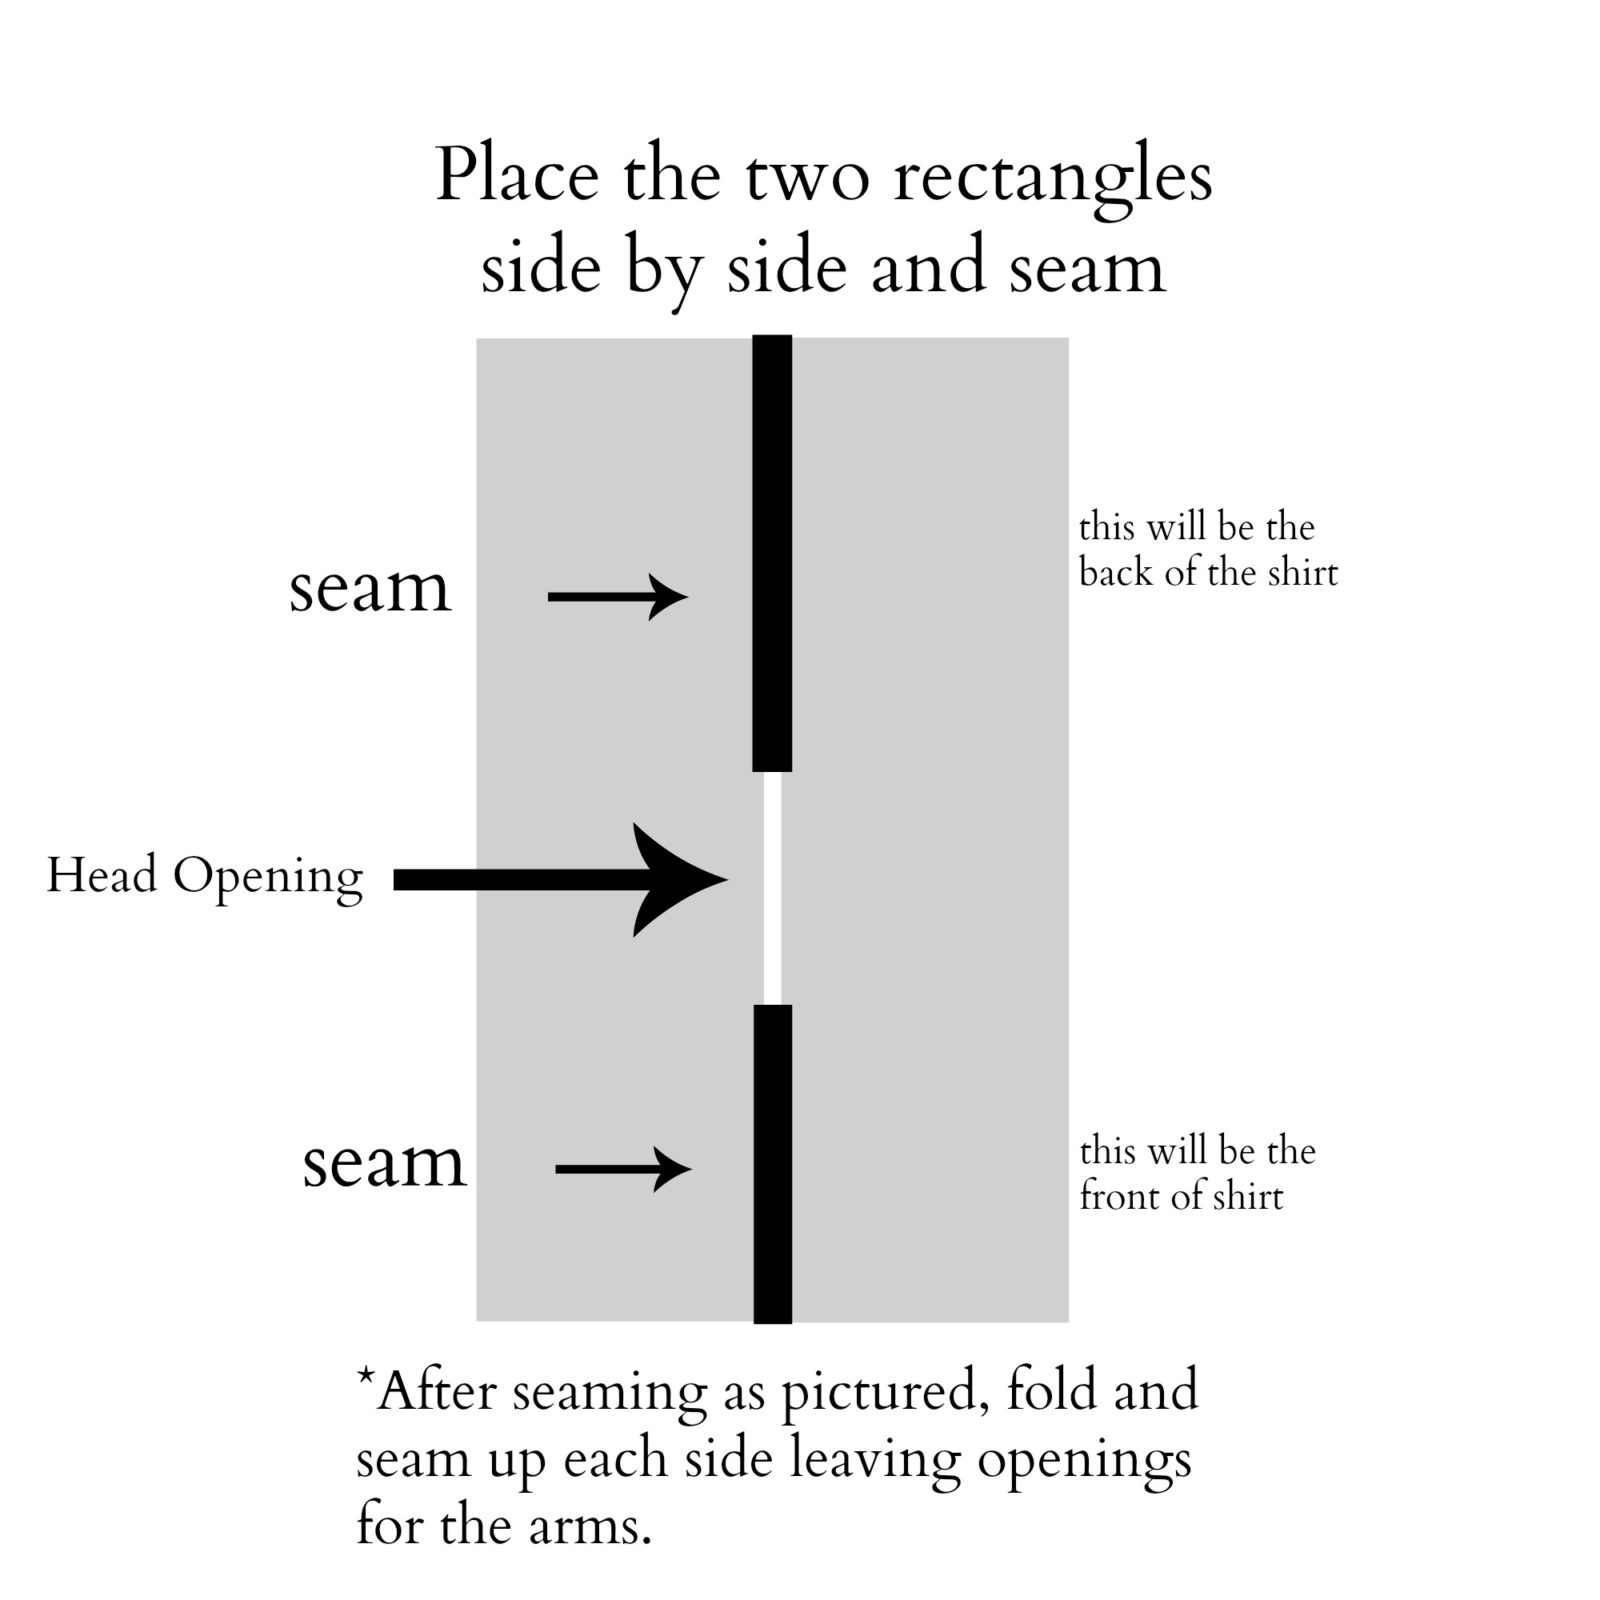
Center Seam:
Lay both rectangles side by side, with double crochet sections in the center (These were the final rows). With a whip stitch or slip stitch seam, sew together the center front panels, from the bottom up, approximately 14” inches. Tie off and weave in ends.
Leave approximately 11” inches of space from where you tied off, (this is the opening for your head and neck) and start a new seam, sewing the two panels together at the other end.
Side Seams:
Next, fold so the head and neck opening is halved. Seam up each side of the shirt with a whip stitch or slip stitch. You may start your seam 3 inches up from the bottom for the look pictured. Leave at least an 8.5” inch long opening on each upper end for the arm holes for a small (9.0” opening for medium and 9.5” opening for large)
Note: These seams may be adjusted to fit your personal taste. As written the front of the shirt is shorter than the back of the shirt. Simply make your center front and back seams equal in length in order to make the front and back sides the same.
Optional: Add a single crochet border to the bottom of the front and back.
And there you have it! An easy and pretty little top to wear as the weather warms up.
I’m definitely on a kick of making shirts and sweaters. It’s fun to start dreaming of what to make for the warmer months! What do you like to crochet during spring and summer?

Email
I think that I would make the front and back the same length – I like the front a bit
longer too so i would split the length into two even sides 🙂
Also I agree with the lady that said she was a seasoned knitter – I knit alot more than
crocheted but your patterns are amazing and easy to follow too !
Thanks Alot – and the pics are very very nice too !
Hi Erna – thanks for your sweet words about my pics. And I love that you’re thinking about how to make this your own by making the front a bit longer too!
Just love your patterns. You are soooooooooo talented.
Can’t wait to Crochet your “Topcho” shirt pattern.
I am an experienced knitter as well so I love the diversity of your patterns
Aww thanks Jill! That’s so sweet of you. This is a really fun one to make. I hope that you enjoy it as well. Have a great day and thank so much for taking the time to leave me a sweet comment!
Love your “Topcho” crochet shirt.
You are soooooooooo talented.
Love the diversity of your patterns as I also love knitting. Use to teach both at a High School as an Art Class for adults years ago.
Wishing you well.
Very cute!
Thanks Buffy!
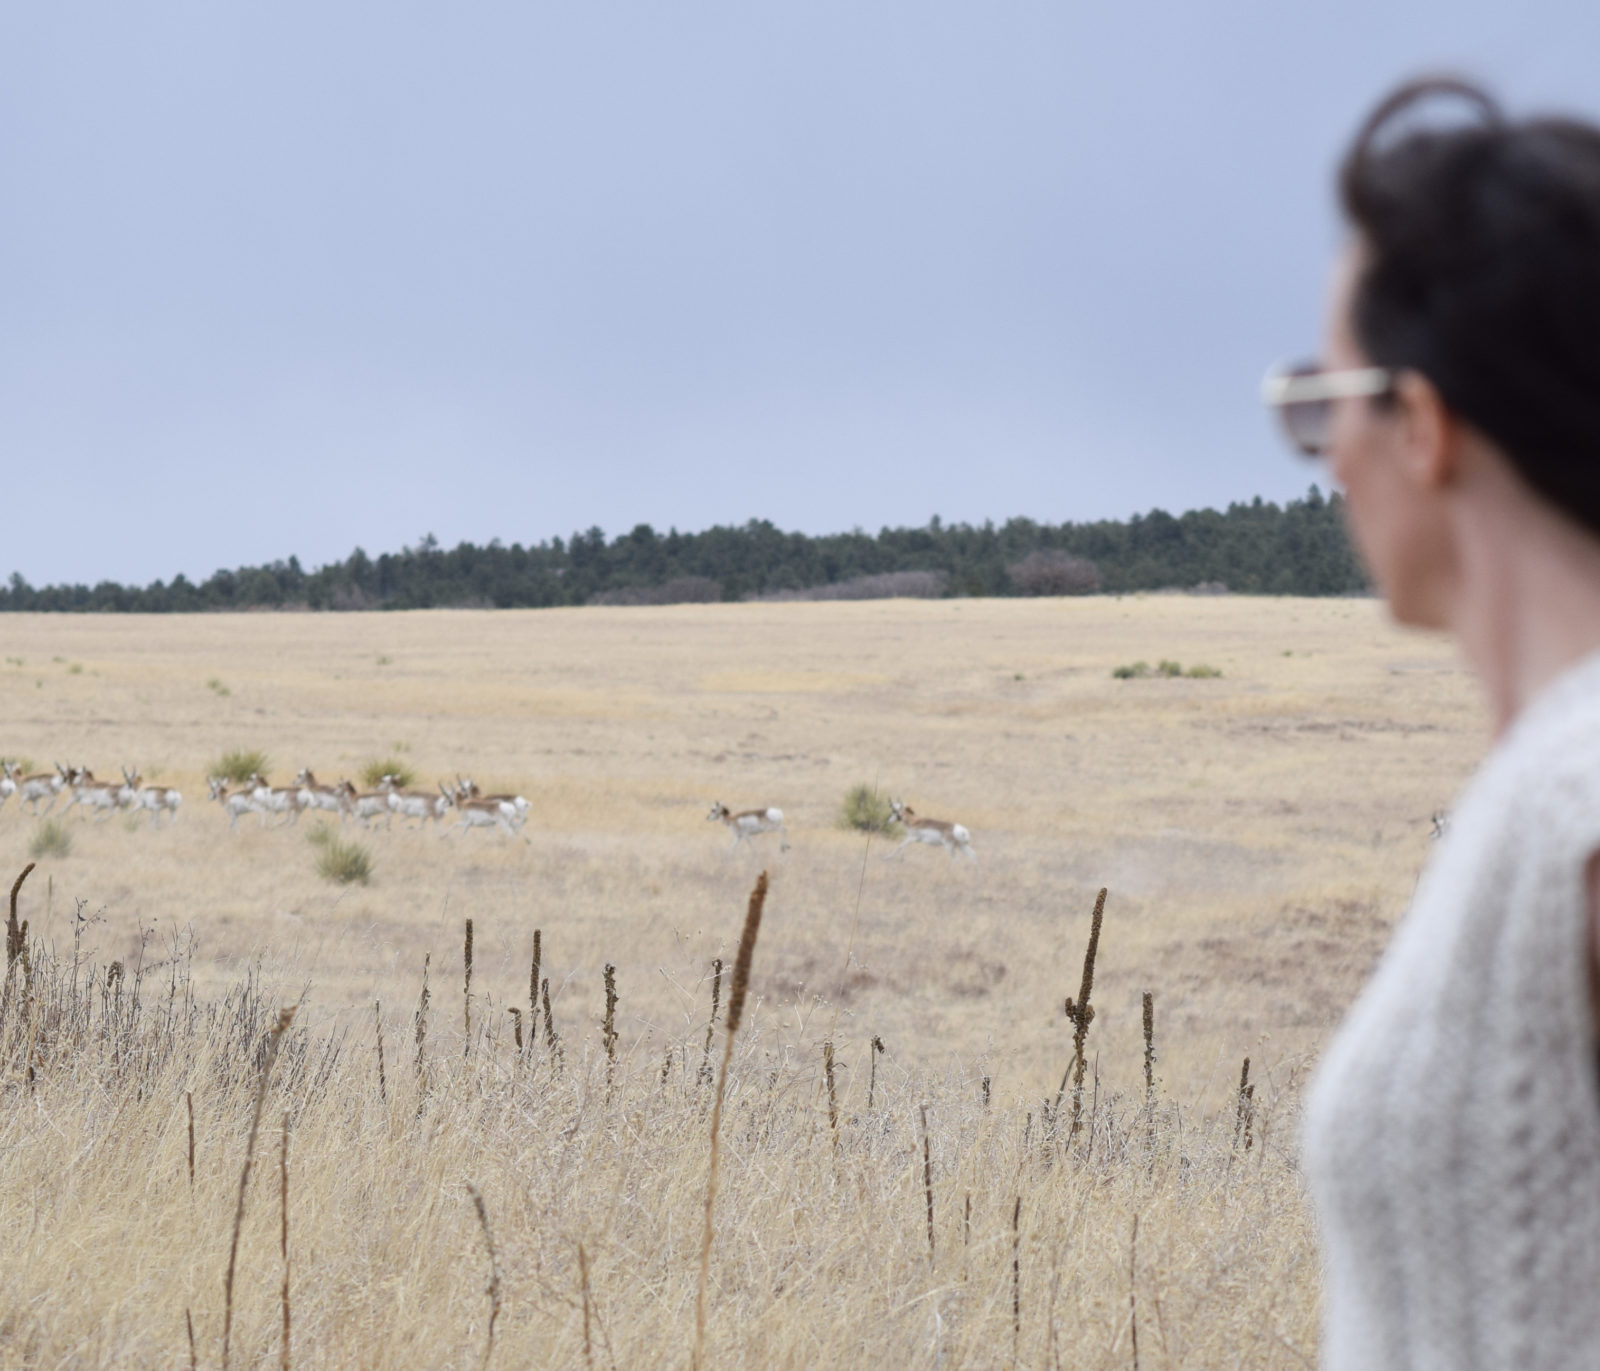
I love your Topcho!!! Thanks so much for the pattern and of course, the antelope are amazing!!!
Thanks Willow! And yes, it was so cool to have the antelope hanging out for sure!
Beeeeeuuuutiful spring top!
Knit version in the future???
Thanks Christine! Maybe a knit version – I’m not sure! Thanks for the suggestion. 🙂
I notice in all the pics of the topcho you seem to be holding it in front! Is there a reason for that?
Thanks for your response in advance.
Hi! There’s no reason. I just like to grab the shirt I guess! There is one photo near the bottom that I don’t believe I’m touching it.
Is it possible to do your Topcho seamless? I’m just being a curious crocheter, would love it if this was possible. Love it BTW.
It would be possible Sheila, but this is the simplest way to do it.
You could just continue the first rectangle, leaving a gap for the head opening, chaining the next row where the gap is to close the gap, and continue the rectangle for the other half. That makes sense in my head. I would have to try it out to see if it works. I had just made a similar idea for my granddaughter except I didn’t leave a straight neck gap, I shaped it to form a neck hole, with an off centred button tab, rejoining the yarn where necessary.
That is very lovely. Thank you for sharing.
You’re welcome!
Oh my goodness, this is beautiful! I can’t wait to make it. Just as soon as I finish the light frost cardigan for my daughter. Love your patterns and thank you for sharing them with us.
Hi Becky! I’m so glad that you like this one too. 🙂 You’re welcome. Have a great weekend!!! And enjoy making the cardigan.
Thank you for always inspiring me with your talent! I love your crochet patterns.
You’re welcome Laura! Thank YOU for taking the time to let me know that you like them!
I love this! Thanks for sharing your pattern and skills for free; very generous of you.
You’re so welcome! It’s so fun for me to share!
Thanks, the rectangle idea is endless for different stitches to use. Thanks so much. Love it
Very true! You’re welcome Kim!
This is beautiful! Next on list to make after your broomstick lace top! Thanks for sharing!
Hi, Jessica. Love this pattern, your lovely photos and your instructions. Just wondering if you think this would work up in cotton yarn…making it a little ore wearable in the warmer months. Thanks for your response.
JoAnn
Hi JoAnn,
This would be LOVELY in a cotton yarn….good idea! Thanks for the kind words about the pattern and photos!
Love, love this top. On my way to purchase yarn so I can start project today! Thank you for sharing!
I’m so happy that you like it! Hope you love making it. It’s always fun to buy new yarn. 🙂
What size are you wearing in the pictures? I am thinking of making this but with the front as long as the back…guessing I would make each row longer.
Lovely piece!
I’m wearing the small. 🙂 Make the panels exactly as I write in the pattern, simply adjust the seam so that they are even in front and back rather than offset.
It’s a beautiful top. I’m busy putting on my stitches but I would also like to know if it is possible to make the front the same length as the back. Do I just add more stitches to the from panels? Thank you for lovely patterns and sharing with us.
Hi Marinda – Yes, you can make them equal. Simply follow the same pattern until you seam. When you seam, make them equal lengths in front and back.
Starting this project today!
Girlfriend, I would recognize that landscape ANYWHERE I was!
Woo hoo! Go Betsy! I hope that you like the project! And yay for pretty Colorado landscapes, right? 😉
Could you do this in a fingerling yarn ? I just bought some and love this pattern thanks
You could, but you’d have to modify the pattern quite a bit, starting with a much longer chain. 🙂
Would love to see this in a knitted version. Thanks for sharing your patterns
Thanks for the suggestion Patricia! I’ll keep it in mind for the future!
I love this, it’s beautiful! And I especially love the vertical lines instead of the usual horizontal lines in other top patterns. I do have one question: in row 6 the stitch count is 126 (for large size), in row 7 it says to dc in the 5th stitch from the hook and the stitch count is 126. I can’t get that stitch count if I start in the 5th stitch. I’m probably reading the pattern wrong, please help.
Hi Mary,
I’m not totally sure what’s going on with the stitch count. That first chain counts as a stitch, and you need to be sure to make the final double crochet in that turning chain as well. Maybe that will help?
What a great way to make a V neck without all the complexity of increase and decrease.
I love the versatility of long in back and shorter in front.
The simple stich patterns look very rich and textured.
Topcho…..great pattern. Thanks so much.
You’re welcome Josey. Thanks for taking the time to let me know that you like the pattern. 🙂
I am Halfway done the first panel and I have a few questions
1) when you chain and D.C. In the 5th stitch you get a decent size hole . I don’t see this on your sample you are wearing
In row 14 it says to Sl below into the 2 chain below the it says to repeat and just says to slip stitch is it below or not?
Thank you in advance for your help
Hi Margaret – If you make that last DC into the turning chain (which counts as a DC) there shouldn’t be a hole. Simply repeat the stitch pattern and slip stitch into that ch 2 for row 14. Hope this helps!
I’ve had the same problem with this row also. The DC in 5th stitch from hook leaves a large hole?
When I refer to 5 stitches in that context, I’m including the ch stitches….so it’s not 5th stitch from hook if you’re counting that as one stitch. I hope this helps! That definitely would cause a hole.
Finally! A crochet top I can set myself wearing! I love it. Thank you, ShayShay!
I just wanted to say thank you for your wonderful patterns and easy to follow tutorials that go with them! I was able to easily adjust both the topcho and the mod mesh honey blanket sweater into my size (2x) and they turned out beautifully! (I did them both in Caron Cake too)
I appreciate your inspiration and look forward to your future projects!
I’d love to see this in more sizes.
Thanks for the thought and suggestion Liza!
Love this!! I have previously made a couple of your Blanket crocheted “cardigan” for two special girlies I know. 🙂
The long back /shorter front of this design is very cute, and I could also see the front looking amazing with a fringed look – similar to one of your other Blanket cardigan patterns!!
I always love the aesthetics of your designs – and your photos capture their beauty (and nature’s beauty) so well!
Thanks so much for all of the kind words about the photos and the patterns! Made my night!
Hi,
I love your pattern! I guess I’m going to have to brush up on my crocheting skills. Until I accomplish that, do you have any suggestions on what knitting stitches I could use or are you planning on creating a knit version of this pattern? Hint! Hint! 🙂
I’ve had many requests for a knit version, so I better get on that! I will do my best to come up with one…..but I don’t know when that will be. So many projects and so little time. 😉
So beautiful and so easy. Thank you for sharing.
You’re welcome! 🙂
Thanks for such a simple easy pattern I made it in blue and will be making another in yellow, great pattern and very easy to follow
Saw this on Moogly’s Hooking on Hump Day. Simple, versatile and stylish so thank you for the pattern! Definitely going to make this after finishing current project. This might look good in linen blend I just happen to have-just got to check the measurements.
I’m a beginning crocheter (have quite a lot of knitting experience) trying to understand/work this pattern. Is it worked horizontally or vertically, because at 123 stitches for the medium size, my rectangle is only about 36″ long. It would be too short as a top and much shorter than your finished piece (which I would love to recreate). And my stitch pattern doesn’t even remotely resemble the picture. Should I try it with a larger hook? My tension is about medium and stitch pattern fairly even, but I keep ripping it out because I’m doing something fundamentally wrong. I would love to know what… LOL! Any suggestions would be greatly appreciated – it’s such a cool garment and looks so easy. Thank you for posting it!
Hi Kim! It’s hard to know what’s going wrong, but after a few rows, you should measure and yes, it should be more like 45″ inches long. But if your stitch pattern isn’t coming out right, then there could be something else going on. You certainly can try it with a larger hook and see if that helps! I’ve heard from many people who have made it at this point but haven’t heard of this issue yet. Hopefully a larger hook will help!
Hey, this is great! Can’t wait to try it! Are the sides completely open? No seam? There’s no picture showing the underarm/side area. Sorry if I just missed it. ..
The sides are seamed. 🙂 It’s in the instructions but you’re right, you don’t see it in the pictures.
Hi, on row 7 and 19 says dbl crochet in 5th stitch. This looks like a typo, shouldn’t it be dbl crochet in the 2nd stitch? It leaves a hole if u do the 5th stitch. Looks like might be a typo.
Thanks
The 5th stitch from hook includes the 3 ch stitches you made as you turned. This means it the second stitch in the foundation row.
Hope this helps!
This helps tremendously. But I am still having issues with that row as it doesn’t end up laying flat when I DC into each stitch. What am I doing wrong?
I am a teacher of crocheting at : Artistic Expressions; ; in Mauston,WI.;53948! I would like to teach this to my class or give them this pattern if you do not mind my doing so. I like the simplicity of the pattern and believe it will be comfortable to wear.
Hi Willis! Thank you for asking! I’d be honored. I only ask that you not share it in any digital form unless it’s a link back to my blog, and no mass production or printing and distributing of the pattern. If it’s for a small class, that’s great!
Confused….how many panels? You say only 3? Also mine are only 6 inches wide not 8. I followed the pattern or so I thought. Please advise. Thanks
Hi Tamara!
It’s made with two panels. It might help to look at the photos as well…you can see the two panels are seamed along the center on either end. If your panels came out thinner than mine and you followed the pattern, you could have a tighter tension. Simply add more rows of double crochet to make them as wide as they are supposed to me. I hope this helps!
I was going to comment as I was confused too because you said to repeat the pattern twice. This to me means that after I made it once, I make it 2 more times, therefore making 3 panels.
I am almost done with my Topcho in a beautiful teal color… Loved making it. I’m going for the size large as I don’t like my clothes tight. But after I sew up the seams should I turn it inside out or does it matter? Also, for those mentioning the “holes” on the DC rows, I had them too. I think this pattern would be good for using the Alternate Turning Chain technique to eliminate that gap you can get with a chain 3 and gives a flatter edge. You can find a video on YouTube for how to work it.
Hi Toni!
Yes, you can certainly turn it inside out if you’d like. The teal sounds beautiful! And thank you for your thoughts on the double crochet gaps! I will have to check out that YouTube video.
Hi from Australia,
I would love to make this pattern with my 8 ply pure alpaca wool, would this pattern work with a 5mm crochet hook and the 8ply wool?
How would I add sleeves to your topcho blouse. Thank you
I’m stuck at row 7. It doesn’t make any sense to me. Dc in 5th chain from the hook??? First of all the hole is too big, and you won’t end up with the same stich amount as row 6. So what’s going on here????
Hi Ania,
The chain stitches count as stitches…please include those in your count and you should be all good!!
She mean
Skip 3 ch and 1 sc
And start in 2 sc
This is 5th st
I think that is very late
I have started this top numerous times, I love the look of it. One thing I don’t understand is, if I am making two alike rectangles, how does it come out longer in the back?
Hi Priscilla!
They are identical rectangles, however it is in the way that you seam them that it will be longer in the back. 🙂
Hi Jessica,
I LOVE this pattern!! I live in Utah so I love going camping, trail hiking and all the good things of living in the West. I made one of your ponchos and it is great for this kind of up and down temperatures. Now I am starting this shirt and another one! I’m not as good as you but you are my inspiration to be a great crochter. Thank you for all your great patterns and hard work to put it all together.
Ah hi Sonda! I love to hear from another fellow “western” girl! Thanks so much for your kind words and for taking the time to write to me! And you’re welcome of course – it’s so fun for me to share and meet people like you!
We are the Rocky Mountain crocheters!
Hi Jessica, I’m having difficulty figuring out how to do Rows 3 and 4. I just cannot understand what it means to sl st into the ch 2 space below for two rows. Is there a tutorial that shows this? Thanks for your help!
Love the look of this top. Do you have something similar for knitters? Believe it or not, I don’t know how to crochet.
So sorry Lisa, but I’ve only got a crochet version of this one. Thanks for asking!
Love the changing pattern across the rows. I’m no longer skinny, but this will make a great ruana if I just sew up the back center seam, and leave the front and sides open. I’ll probably make each rectangle a little wider, as I prefer something to cover my upper arms! For people who like the longer ruanas, it’s also easy to make it longer. There are ruana measurements online, or just use a fabric tape measure, and measure from where you want it to hit on the front of your body (your hipbone maybe), and then up and over your shoulder and back down to the point you want it to hit on the backside. If you want it to be knee length, just measure from your knees in the front, up over your shoulder and back down to the back of your knees! I feel the itch to make several of these, in several colors! Also, you live in paradise!
Love the changing pattern across the rows. I’m no longer skinny, but this will make a great ruana if I just sew up the back center seam, and leave the front and sides open. I’ll probably make each rectangle a little wider, as I prefer something to cover my upper arms! For people who like the longer ruanas, it’s also easy to make it longer. There are ruana measurements online, or just use a fabric tape measure, and measure from where you want it to hit on the front of your body (your hipbone maybe), and then up and over your shoulder and back down to the point you want it to hit on the backside. If you want it to be knee length, just measure from your knees in the front, up over your shoulder and back down to the back of your knees! I feel the itch to make several of these, in several colors! Also, you live in paradise! Thank you for sharing your talents.
Waaaaw
You give me many good idea
Thank you very very much
Hi Jessica
I love this pattern, but, regretfully, as another person said, I am no longer skinny. I have been thinking about resizing it to a 3x-4x sizing, by using my bust measurement and expanding the width of each rectangle. Do you think this can work? Do you know of any difficulties I could run into? I would welcome any input you would be willing to give. I am new at resizing and wouldn’t try this except I really love this pattern.
I was making a scarf with a pretty shell pattern and ombre yarn. I liked it so much I decided to turn it into a top. I remembered seeing this pattern, so I made two scarves and sewed them together using your directions for this top. Thanks for sharing your talents!
Hi Jessica! Love this pattern, and I’d like to make it in 4x-5x size. (It’s flattering too;)). Could you please provide the rectlangles’ measurements for this size? I will appreciate it very much!
Admire your talent, work and generosity!